Twix Trifles
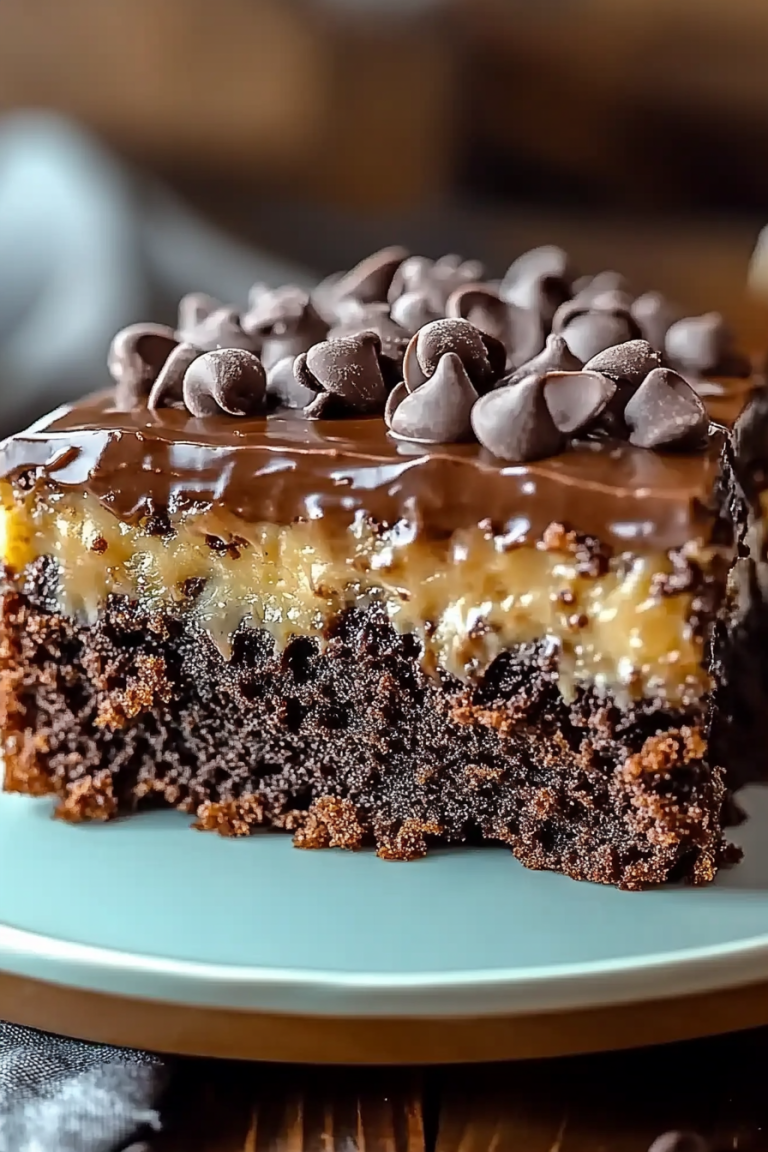
There’s something magical about dessert that feels fancy yet tastes familiar, and Twix Trifles hit that sweet spot for me every single time. I still remember the first time I served this at a casual family gathering—the way the layers revealed themselves in clear glass cups, the caramelly sheen of the glaze catching the light, and the way my kids begged for “just one more bite” before the plate vanished. Twix Trifles are essentially a playful take on a trifle: layers of tender vanilla sponge, creamy filling, chopped Twix bars for that unmistakable caramel-and-cookie crunch, and a glossy chocolate glaze on top. They’re incredibly forgiving, too. Make-Ahead friendly, crowd-pleasing, and portable—perfect for potlucks, potluck-style gatherings, or a cozy Friday night with friends. I always do this when I want something comforting but not heavy: assemble, chill, and let the magic do the rest. If you’re craving something that feels special without needing to bake a big cake, this is your go-to dessert.
What is Twix Trifles?
Twix Trifles are a celebration of texture and flavor in bite-sized portions. Think of it as a deconstructed candy bar in elegant layers: soft, vanilla-infused sponge or cake forms the base, then a whipped-cream–mascarpone (or cream-cheese) filling that’s light enough to keep things silky, and every spoonful includes chopped Twix bars for that caramel-chocolate crunch. The final veil is a glossy chocolate glaze that drapes over the top like a little edible bow. The name Twix Trifles comes from the star ingredient—the Twix bars—paired with the classic trifles approach to layering. It’s essentially a chocolate-happy, caramel-Dream Dessert that feels fancy enough for guests but still totally doable on a weeknight. If you’ve ever made a layered pudding and granola dessert, you know the thrill of seeing those distinct layers come together—only this time, you’ll get that familiar salted-caramel twist from Twix with every bite.
Why you’ll love this recipe?
What I love most about Twix Trifles is how forgiving they are. You don’t need to be a pastry pro to pull this off, and you can tailor every layer to what you have on hand. The flavor is bold—plenty of chocolate, a hit of caramel, and that sweet-and-salty mix from Twix—yet the texture stays light thanks to the fluffy sponge and whipped filling. The simple base makes it approachable for kids and adults alike, which is priceless on a busy weeknight when you want something charming without spending hours in the kitchen. It’s also a terrific budget-friendly dessert: a few bars of Twix scattered through generous layers stretch far, and you can reuse leftovers from pantry staples like a Pound Cake or a store-bought sponge. I’ve made this with almond milk in the filling and it actually made the creamier texture pop, which was a happy surprise. It’s versatile too—swap in dark chocolate for a deeper finish, or add a pinch of sea salt to the glaze for a “salted caramel” punch. This version quickly earned a place in our family rotation because it feels special but still feels like comfort in a glass.
How do you make Twix Trifles?
Quick Overview
Twix Trifles come together in three star steps: bake or prepare a light vanilla sponge (or use a shop-bought Sheet Cake) for the base, whip up a creamy filling that can hold a few crushed Twix pieces, and finish with a glossy chocolate glaze. Layer everything in transparent glasses or a wide trifle dish so the stripes of cream, sponge, and Twix show off. The real joy is in the small moments—smelling the vanilla as the sponge cools, hearing the crunch of Twix in the filling, watching the glaze shimmer as you drizzle it on. It’s a dessert that travels well to gatherings, tastes like you spent hours, and yet comes together quickly enough that you can still host without being chained to the stove.
Ingredients
For the main layer (Vanilla Sponge or Pound Cake):
- 1 cup all-purpose flour
- 1 1/2 teaspoons baking powder
- 1/4 teaspoon salt
- 3 large eggs
- 3/4 cup granulated sugar
- 1/2 cup milk (dairy or non-dairy, like almond milk, for a lighter crumb)
- 2 teaspoons vanilla extract
- Optional: 1 tablespoon melted butter or oil for extra moisture
For the Filling:
- 1 cup heavy cream, chilled
- 8 oz mascarpone or Cream Cheese, softened
- 1/3 cup powdered sugar (plus more to taste)
- 1 teaspoon vanilla extract
- 6–8 Twix bars, chopped into small bite-sized pieces (reserve a few for topping)
For the Glaze:
- 3/4 cup semisweet or dark chocolate chips
- 2 tablespoons heavy cream
- 1/4 teaspoon flaky sea salt (optional but excellent)
Optional assembling aids: you can skip the sponge completely and use store-bought pound cake or ladyfingers if you’re pressed for time. If you’re making this for kids, you can sprinkle a few more Twix pieces between layers for extra crunch. And yes, you can lighten the filling with whipped cream plus a touch of yogurt or cream cheese for tang; I’ve done it a few times, and the texture stays dreamy.
Step-by-Step Instructions
Step 1: Preheat & Prep Pan
Preheat the oven to 350°F (176°C) if you’re baking the sponge from scratch. Line a shallow 9×13-inch pan with parchment and lightly grease. If you’re using store-bought cake, skip this step and skip to Step 5. This part is the backbone of the dessert—the sponge needs to be light and even so the trifle layers stack nicely.
Step 2: Mix Dry Ingredients
In a small bowl, whisk together the flour, baking powder, and salt. This helps ensure an even crumb in the sponge and prevents lumps from sneaking in later. It’s one of those tiny steps that makes a big difference in texture—trust me on this.
Step 3: Mix Wet Ingredients
In a separate bowl, beat the eggs with the sugar until light and pale. The mixture should look like a glossy, pale finale to a dessert show. Stir in the milk and vanilla. If you’re using melted butter or oil, whisk that in too. The goal is a smooth, cohesive batter that’s ready to mingle with the dry ingredients.
Step 4: Combine
Pour the wet into the dry and whisk just until combined. Don’t overmix; a few small lumps are totally fine. Overmixing can lead to a tougher crumb. If you’re slicing into a thin sheet later, this is the moment you want the batter to feel pourable, not stiff.
Step 5: Prepare Filling
Chill the mixing bowl and beaters if you haven’t already. Whip the heavy cream to soft peaks, then set aside. In a separate bowl, beat the mascarpone or cream cheese with powdered sugar and vanilla until smooth and dreamy. Gently fold the whipped cream into the cheese mixture, aiming for a light, airy texture. Fold in roughly half of the chopped Twix pieces so you get pockets of caramel crunch in every bite. The rest can wait for assembly or be tucked into the layers on top for a little sparkle.
Step 6: Layer & Swirl
If you baked a sponge, cut it into thin rectangles or cube it into bite-sized pieces. Begin with a layer of cake at the bottom, then a generous spoonful of filling, followed by a scatter of Twix pieces. Repeat until your glasses or dish reach the top, finishing with a layer of filling and a dusting of Twix shards across the surface for that candy sheen.
Step 7: Bake
If you baked sponge, you’ll bake it first and allow it to cool completely before building the trifles. If you used store-bought cake, you can skip the baking entirely. In either case, the key is even, cooled layers so the texture stays soft yet structured in the parfait jars. There’s nothing worse than a wobbly, unlayered mess, so take your time with this step and savor the Simple Joy of assembly.
Step 8: Cool & Glaze
Drizzle the warm or room-temperature glaze over the top layer so it sets into a glossy cap. For the glaze, gently melt the chocolate with the cream until smooth, then pour or drizzle in a thin, even stream to cover the surface. A pinch of sea salt on top makes the chocolate pop and adds a whisper of saltiness that pairs beautifully with the caramel sweetness. If you’re serving soon, you can glaze right before serving; if you’re making ahead, consider glazing closer to serving to preserve the shine.
Step 9: Slice & Serve
Let the trifles chill for at least 2 hours (or longer) so the layers firm up and the flavors blend. When it’s time to serve, garnish with reserved Twix bits, a swirl of extra glaze, or a light dusting of cocoa powder. A little mint leaf on top can add a fresh contrast if you’re feeling fancy. These Twix Trifles are best enjoyed slightly chilled, with a hot cup of coffee or a bold espresso, allowing the caramel notes to kiss the palate with every bite.
What to Serve It With
Twix Trifles pair beautifully with a few thoughtful accompaniments, whether you’re serving them for breakfast, brunch, or as a dessert finale. Here are a few ideas that keep the vibe casual yet special:
For Breakfast: A light, medium roast coffee or a cocoa-rich latte. Serve the trifles in smaller glasses so guests can start the day with a touch of indulgence without feeling overwhelmed. A dollop of lightly sweetened whipped cream on top reads as a fancy café touch, and the hints of chocolate and caramel make mornings feel a little more festive.
For Brunch: Pair with a simple berry salad and sparkling water with citrus. The trifles’ richness is balanced by bright fruit and a little fizz from sparkling beverages—trust me, it’s a crowd-pleaser. You can even set up a “build-your-own trifle” station with mini glasses so guests craft their own layered cups.
As Dessert: Offer with a slightly bitter espresso or a full-bodied red wine like a garnet Malbec. The contrast between the cool, creamy layers and a glass of wine elevates the whole experience, and the chocolate glaze mirrors the tones in the wine beautifully.
For Cozy Snacks: Serve with warm milk or a cup of chai. If you’re chasing after kids who crave a late-night treat, these are perfect because they don’t require baking a big dessert—just assemble, chill, and share the happiness.
Family traditions often creep into the tiny details: I love to set the trifles in a row on the counter during a movie night, and my kids know that the spoons come loaded with more Twix texture than filling. It’s little rituals like these that turn a simple dessert into a story you’ll tell for years.
Top Tips for Perfecting Your Twix Trifles
Here’s where a few insider tricks make all the difference. I’ve learned these by doing and tasting and adjusting, so you don’t have to stumble through the same missteps I did.
Base Layer Prep: If you’re baking the sponge, let it cool completely before cubing. A warm edge will crumble and crush, and you’ll end up with a sloppy layer rather than neat cubes. If you’re using store-bought cake, choose a dense, tender variety that holds up to soaking and slicing. A light, airy sponge adds airiness to the trifles, but it can disintegrate if it’s too soft. Aim for a sturdy, bread-like crumb that still soaks up the cream without turning into mush.
Mixing Advice: When you fold the whipped cream into the mascarpone, do it gently and in portions. You want volume, not a heavy mixture. Overworking the filling will deflate the brightness and make the texture feel heavy. A few soft folds will keep the lightness intact while the Twix pieces add character.
Twix Layer Customization: This is where your personality shines. I love a good handful of Twix chunks in the middle for a crunch bomb, but you can reserve some for topping and keep the middle a little creamier. If you want a deeper chocolate vibe, swap in dark chocolate for some or all of the glaze. To balance sweetness, sprinkle a tiny pinch of sea salt into the glaze—it’s a game-changer.
Ingredient Swaps: Use almond milk or oat milk in the filling to lighten the texture and add a nutty note. Swap mascarpone for cream cheese if you prefer tang, then add a little more sugar to compensate. If you don’t have Twix bars, you can improvise with a mix of chopped shortbread cookies and caramel bits for a similar effect without exact candy alignment.
Baking Tips: If your oven runs hot, lower the temperature by 25°F and check a few minutes earlier than the earliest suggested time. This helps prevent the sponge from turning dry. When layering, aim for even distribution across glasses so every bite is balanced—no one should get a pile of filling while someone else gets mostly sponge.
Glaze Variations: For a glossier shine, add a tablespoon of corn syrup to the glaze. If you want a richer finish, use a mix of dark chocolate and a little bit of milk chocolate. You can also drizzle warm caramel over the top for a dramatic, extra-Chewy Twix moment.
Over the years, I’ve learned that patience during assembly pays off. Chill the trifles long enough to set the layers, but don’t over-chill to the point where the filling firms up too much. A gentle, cool set gives you clean slices and neat layers you’ll be proud to serve.
Storing and Reheating Tips
Twix Trifles store beautifully in the fridge for up to 2–3 days. They’re sturdy enough to be made ahead, which makes them especially practical for holiday hosting or a busy week.
Room Temperature: If you’re serving within a few hours, you can keep the assembled trifles at room temperature for up to 2 hours. If your climate is warm or your kitchen tends to get toasty, refrigerate sooner to prevent the filling from softening too much.
Refrigerator Storage: Store in airtight glasses or a covered trifle dish. Layered glassware shows off the pretty stripes and helps keep the filling from drying out. The Twix pieces can soften a bit after sitting, which is fine—just give the cups a gentle swirl before serving to rediscover the textures.
Freezer Instructions: These are best fresh, but you can freeze the sponge and filling separately for up to one month if you want to prep ahead. Thaw in the fridge overnight and reassemble with fresh glaze just before serving for a bright finish. Freezing may slightly alter the texture of the whipped cream filling, but it’s still delicious.
Glaze Timing Advice: If you’re freezing the trifles, wait to glaze until you’re ready to serve. The glaze can run when the dessert thaws, which to me defeats the purpose of a crisp top layer. If you’re refrigerating, you can glaze after chilling so the top remains glossy and appealing.
These tips have saved me more times than I can count. It’s the little things—the way the filling holds its shape, the glossy top, the way the Twix pieces stay crisp just enough—that make Twix Trifles feel truly special.
Frequently Asked Questions
Final Thoughts
Twix Trifles are proof that a dessert can feel special without being intimidating. They celebrate big, comforting flavors in a simple, flexible format that welcomes tweaks and personal touches. I love how easy they are to adapt—whether you’re feeding a crowd or just craving something a little extra after dinner. They pair beautifully with coffee, conversation, and the kind of laughter that only happens around a table full of friends and family. If you give this recipe a try, I’d love to hear about your twists—your favorite chocolate-to-caramel balance, whether you go more cookie-crunch or more fudge-like in the filling, and how you like to finish the top. Happy baking, and may your Twix Trifles be as joyful to eat as they are to make!

Twix Trifles
Ingredients
Main Ingredients
- 12 bars Twix candy bars chopped
- 3.4 oz instant vanilla pudding mix
- 3 cups milk
- 1 container whipped topping thawed
Instructions
Preparation Steps
- Crush the Twix bars into small pieces. You can do this by placing them in a zip-top bag and crushing them with a rolling pin or mallet.
- In a medium bowl, whisk together the instant vanilla pudding mix and milk until well combined and the pudding begins to thicken. Let it sit for a few minutes as per pudding package directions.
- Gently fold the thawed whipped topping into the prepared pudding until just combined. Be careful not to overmix.
- To assemble the trifles, layer the ingredients in individual serving glasses or a large trifle dish. Start with a layer of crushed Twix bars, followed by a layer of the pudding mixture, and then another layer of crushed Twix bars. Repeat the layers until the glasses are full, ending with a topping of crushed Twix.
- Chill the trifles in the refrigerator for at least 30 minutes before serving to allow the flavors to meld and the dessert to set.