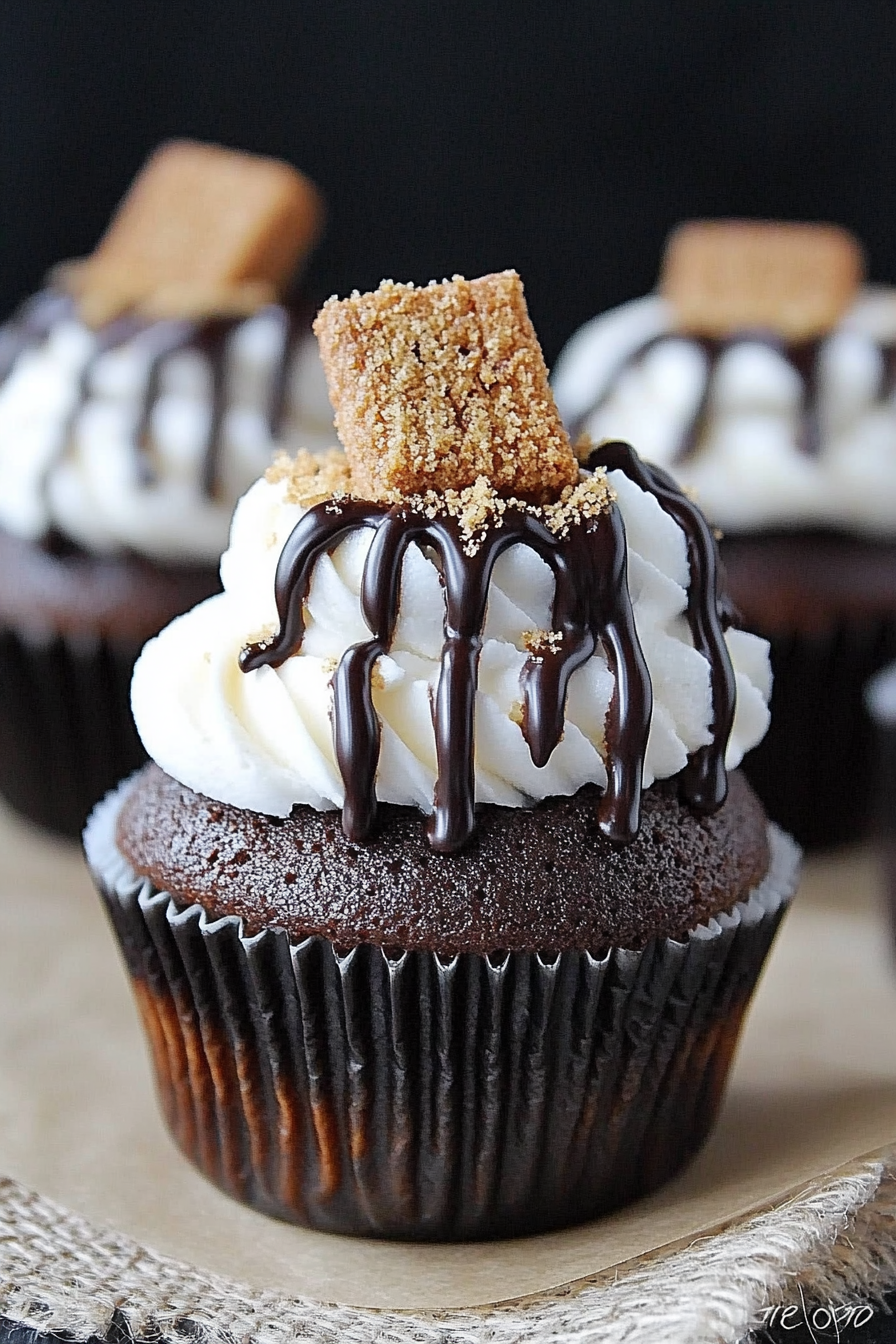
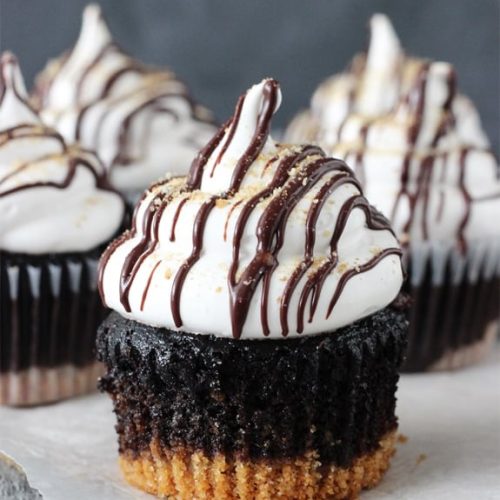
Smores Cupcakes
I still remember the smell of campfires, the crackle of burning wood, and those sticky marshmallow fingers from roasting s’mores as a kid. If your family is anything like mine, nothing quite beats the magic of that perfect sandwich: crunchy graham crackers, melted chocolate, and a toasted marshmallow that’s just the right amount of ooey-gooey. So, when I first dreamed up these Smores Cupcakes, it felt like capturing all that nostalgia and wrapping it into little handheld treats that everyone could enjoy without roaming the backyard with sticks. Honestly, they’re like a campfire in cupcake form, but way easier to make indoors. Every time I bake these, it’s like reliving those summer nights. If you’ve ever loved a classic cupcake, you’ll adore these even more because of that rich layering of flavors and textures—plus, they’re a total crowd-pleaser at family gatherings or last-minute dinner parties.
What is a smores cupcake?
Think of these as the perfect mashup between the classic American campfire treat—the s’more—and a moist, chocolatey cupcake. It’s essentially a cupcake that’s got all the good stuff you’d expect from a s’more: a chocolate base, a middle layer or topping of gooey marshmallow, and that crisp crunch of graham cracker crumbs somewhere in the mix. The idea’s simple but brilliant—each bite packs that familiar toasted sweetness, the bitter chocolate, and the satisfying crumbly crunch you want. It’s not just a cupcake with marshmallows dumped on top—this is a carefully layered dance of textures and flavors designed to remind you exactly why s’mores have been a summer staple for generations. You don’t need a campfire to enjoy this treat, just a cozy kitchen and a dash of sweet nostalgia.
Why you’ll love this recipe?
What I love most about these Smores Cupcakes is how they bring together so many textures and flavors you didn’t even realize could cozy up so perfectly in a cupcake. The chocolate cake is rich but never heavy, with the graham cracker crumbs adding just the right amount of crunch. Then there’s the marshmallow swirl, which melts into pockets of gooey sweetness that remind me of camping trips with my family. And the best part? It’s surprisingly simple to put together, which makes it my go-to when I have unexpected guests or the kids suddenly crave something sweet after school.
They’re also wallet-friendly. Most of the ingredients are staples you probably already have sitting in your pantry—flour, cocoa powder, sugar, marshmallows, and graham crackers. And with just a few easy substitutes, you can make this recipe work for whatever dietary tweaks your family needs. You can add a bit of instant coffee to the mix if you really want to deepen the chocolate flavor—trust me, it’s a game-changer. These cupcakes aren’t just dessert—they’re perfect for breakfast with your morning coffee, a sweet brunch centerpiece, or an easy afternoon snack that makes any day feel a little special.
How do I make smores cupcakes?
Quick Overview
Making these cupcakes is like a mini adventure, but nothing to stress about. You start with a simple chocolate batter mixed with crushed graham crackers for that lovely texture. After that, the marshmallow gets swirled in, creating a beautiful gooey ribbon inside each cupcake. Then a quick bake, a cool down, and a quick drizzle or frosting finish. I always do a little swirl with extra graham cracker crumbs or a toasted marshmallow on top to keep the campfire vibe alive. The whole process is straightforward enough that even if you’re juggling kids or a busy schedule, you can whip these up with no sweat. The perfect combination of quick and indulgent, without the mess of an actual campfire.
Ingredients
For the Main Batter:
- 1 ¾ cups all-purpose flour – I like using bleached flour for a lighter crumb.
- ½ cup cocoa powder – I use Dutch-processed for a richer, deeper chocolate flavor.
- 1 cup granulated sugar – balances the bitterness of cocoa.
- 1 tsp baking powder – to give just enough rise.
- ½ tsp baking soda – helps keep it tender.
- ½ tsp salt – enhances all the flavors.
- ½ cup unsalted butter, melted and slightly cooled – makes the cupcakes moist and tender.
- 1 cup whole milk (or almond milk if you want a dairy-free twist) – feel free to experiment here! Almond or oat milk actually makes the batter creamier.
- 2 large eggs – for structure and richness.
- 1 tsp vanilla extract – any good quality one works but I love the taste of pure Madagascar vanilla here.
- ¾ cup graham cracker crumbs – finely crushed for texture and subtle sweetness.
For the Filling:
- 1 ½ cups mini marshmallows – the gooey heart of these cupcakes.
- Optional: 2 tbsp heavy cream – if you want a marshmallow fluff style filling, mix with melted marshmallows.
For the Glaze:
- 1 cup powdered sugar – sifted to avoid lumps.
- 2–3 tbsp milk or cream – adjust for your preferred glaze thickness.
- ½ tsp vanilla extract – for extra warmth.
- Additional graham cracker crumbs for sprinkling on top.
- Optional: A few mini marshmallows to toast and place on top for decoration.
Step-by-Step Instructions
Step 1: Preheat & Prep Pan
Preheat your oven to 350°F (175°C). This is a sweet spot for baking cupcakes where your marshmallows won’t burn too quickly. Line a standard 12-cup muffin pan with paper liners or lightly grease them if you’re going bare. I always like the liners because these cupcakes get a bit sticky with the marshmallows inside.
Step 2: Mix Dry Ingredients
In a large bowl, whisk together the flour, cocoa powder, baking powder, baking soda, salt, and graham cracker crumbs until evenly combined. This is important to get the leavening agents evenly distributed and to avoid pockets of clumpy cocoa or crumbs later. The graham crumbs blend right in making the batter look a little sandy but don’t worry, that’s perfect.
Step 3: Mix Wet Ingredients
In another bowl, whisk the melted butter, sugar, eggs, milk, and vanilla extract together until smooth and slightly frothy. The eggs help lighten the batter, so beating them well with the sugar before adding the dry ingredients ensures fluffy cupcakes. Be sure not to use hot butter or it might cook the eggs prematurely.
Step 4: Combine
Pour the wet ingredients into the dry and gently fold together with a spatula until just combined. Don’t overmix here—keep that batter lumpy and thick. Overmixing can make your cupcakes dense and tough. The texture should be thick enough to scoop but not dry; if it feels too stiff add a splash of milk.
Step 5: Prepare Filling
For the filling, if you want the marshmallow fluff style, gently warm your marshmallows with cream in a small saucepan over low heat, stirring until soft and spreadable. If you prefer classic mini marshmallows just keep them as they are for pockets of melt-in-your-mouth bites in your cupcakes.
Step 6: Layer & Swirl
Fill each cupcake liner halfway with the chocolate batter, add 1 tablespoon of marshmallows (or marshmallow fluff), and then top with more batter until your liner is about ¾ full. Using a skewer or toothpick, gently swirl the marshmallow through the batter. This creates those gorgeous gooey marbled pockets that’ll ooze in every bite. Make sure to swirl lightly to keep that contrast clear — too much swirling and it all blends into one uniform flavor.
Step 7: Bake
Bake for 18-22 minutes, depending on your oven. Around 18 minutes, start checking by inserting a toothpick close to the edge (away from the marshmallow swirl) — it should come out with only a few moist crumbs. The marshmallow pockets might look slightly gooey but will set once cool. If you leave them too long, the marshmallows might become too browned or rubbery, so keep an eye on them.
Step 8: Cool & Glaze
Let cupcakes cool completely in the pan on a wire rack—this helps the marshmallow set a bit before you glaze. For the glaze, mix powdered sugar, vanilla, and milk until smooth and pourable but not runny. Drizzle generously over each cupcake. While the glaze is still wet, sprinkle graham cracker crumbs on top and add a mini marshmallow or two; you can even toast those with a kitchen torch for that extra campfire vibe!
Step 9: Slice & Serve
These are best served at room temperature so the marshmallow centers are perfectly melty without being too floppy. If you want to share slices, use a serrated knife and cut gently to keep those layers intact. Watching the gooey marshmallow peek out as you cut is honestly the best part. Grab a glass of milk or a cup of coffee, and enjoy that sweet nostalgic hit you’ve been craving.
What to Serve It With
For Breakfast: Smores cupcakes are surprisingly delightful with a cup of strong coffee or a chai latte. The warmth of your morning drink pairs beautifully with the rich chocolate and sweetness of the marshmallow swirl. Try serving them with a sprinkle of cinnamon on top to add a subtle spice that wakes up your senses.
For Brunch: Dress them up with dollops of whipped cream and fresh berries on the side. A creamy café au lait or a sparkling mimosa complements the sweetness, making it feel like a special occasion even on a lazy Sunday.
As Dessert: After dinner, stack a couple of cupcakes on a pretty plate and serve alongside a scoop of vanilla ice cream or a drizzle of caramel sauce. The cold creaminess highlights that melty marshmallow inside, while a cup of dark roast coffee or espresso cleanses the palate.
For Cozy Snacks: When you’re craving comfort food at random times, these cupcakes with a warm mug of hot cocoa take the edge off any stressful day. My kids ask for this all the time after school, and honestly, it’s become a little family tradition to bake a batch every fall or winter.
Top Tips for Perfecting Your Smores Cupcakes
Graham Cracker Prep: Crush your crackers finely but not into dust. A little bit of crunch in crumbs adds texture that you want to feel in every bite. If you can find the honey-flavored ones, they add a subtle sweetness that pairs nicely with chocolate.
Mixing Advice: Avoid the temptation to beat the batter too much! Overmixing can activate the gluten and make cupcakes tough. Fold gently, and stop once the flour is just incorporated. If you see streaks of flour, give it one last delicate fold.
Swirl Customization: The swirl is what makes these cupcakes visually fun and tasty. Use a fine toothpick or skewer and swirl just a few times for a classic marble effect. For some flair, drop little dollops of melted chocolate in the swirl for extra richness.
Ingredient Swaps: I’ve tested substituting butter with coconut oil or veggie oil—it works fine but changes the flavor and texture slightly. For a dairy-free option, almond or oat milk and dairy-free butter follow well. You can swap granulated sugar for coconut sugar if you want a deeper caramel note.
Baking Tips: Position your rack in the center of the oven so heat distributes evenly; cupcake tops bake beautifully this way. If your oven runs hot, drop the temperature by 10 degrees and add 2–3 minutes to bake time. Remember, marshmallows brown quickly, so don’t leave unattended toward the end.
Glaze Variations: I’ve played with chocolate ganache or a cream cheese frosting for glaze alternatives when I want richer, more decadent cupcakes. Toasted marshmallows on top make the presentation stand out and add that original campfire charm—just don’t toast so long that the marshmallow becomes bitter or hard.
I learned after a few generations that slightly underbaking them makes the marshmallow pockets extra gooey and irresistible. And a quick blast with a kitchen torch before serving? Total fan favorite. Trust me, this one’s a game-changer for the finishing touch!
Storing and Reheating Tips
Room Temperature: These cupcakes keep well at room temp for 1–2 days when covered lightly with a clean tea towel or in an airtight container. That keeps the marshmallow nice and soft without drying out the cupcake.
Refrigerator Storage: Store them in an airtight container for up to 5 days. They might firm up a bit, especially the marshmallow, but pop them out and let them warm to room temperature for best texture.
Freezer Instructions: You can freeze fully cooled cupcakes without glaze by wrapping them tightly in plastic wrap and placing them in a freezer-safe container or bag for up to 3 months. Thaw overnight in the fridge, then warm gently in the microwave for 15–20 seconds to revive that gooey goodness.
Glaze Timing Advice: For best results, add the glaze just before serving. If you’re prepping in advance, wait to glaze or the icing might soften or absorb moisture over time, dulling the shine and texture.
Personally, I find storing glazed cupcakes in the fridge shortens their best eating window, so I usually keep the glaze separate until ready to serve. But on busy days, this dish holds up surprisingly well and doesn’t lose its charm if you follow these tips.
Frequently Asked Questions
Final Thoughts
Every time I bake these Smores Cupcakes, the house fills with the warm, inviting scent of chocolate and toasted marshmallows, and I can’t help but sneak several bites before anyone else gets to them. They remind me of childhood summers, spontaneous family get-togethers, and that simple joy of sharing something sweet with loved ones. If you’re someone who’s ever smiled at the smell of a campfire or craved that perfect gooey bite, these cupcakes deliver all that in smaller packages — perfect anytime, anywhere.
Don’t be surprised if these become a new staple in your dessert rotation like they are in mine. Give them a whirl, play around with your favorite mix-ins, and most importantly, enjoy so much of the process and sharing. If you try them, I’d love to hear your thoughts or any delicious tweaks you make—drop a comment or share a photo! Happy baking and here’s to many more cozy, sticky, happy moments stirred up in your kitchen.
Campfire Treats Easy Smores Cupcakes
Ingredients
Main Ingredients
- 1.25 cup graham cracker crumbs
- 5 tbsp butter, melted
- 5 tbsp sugar
- 1 cup all purpose flour
- 1 cup granulated sugar
- 0.375 cup Hershey’s Special Dark Cocoa powder
- 1 tsp baking soda
- 0.5 tsp salt
- 1 each egg
- 0.5 cup buttermilk
- 0.5 cup vegetable oil
- 0.75 tsp vanilla extract
- 0.5 cup boiling water
- 4 egg white egg whites
- 1 cup granulated sugar
- 0.5 tsp cream of tartar
- 1 tsp vanilla extract
- to taste chocolate sauce (e.g. Hershey’s Hot Fudge Topping)
- to taste graham cracker crumbs
Instructions
Preparation Steps
- Preheat oven to 325°F and line cupcake pan with liners.
- In a small bowl, combine graham cracker crumbs, melted butter, and sugar. Mix well.
- Press about 1.5 tbsp of the graham cracker crust mixture into the bottom of each cupcake liner.
- Bake crusts for 7 minutes, then remove and set aside.
- In a large bowl, whisk together flour, sugar, cocoa powder, baking soda, and salt.
- Add egg, buttermilk, and vegetable oil to dry ingredients and mix until combined.
- Add vanilla to boiling water, then slowly stir into the batter. Mix well.
- Pour batter into cupcake liners, filling each a little more than halfway. Bake at 300°F for 17-19 minutes.
- Remove cupcakes from oven and let cool for 5 minutes in pan, then transfer to wire rack to cool completely.
- To make meringue frosting, combine egg whites, sugar, cream of tartar, and vanilla in a heatproof bowl.
- Place bowl over simmering water (double boiler) and whisk constantly until sugar dissolves and mixture is warm (120-140°F), about 4-6 minutes. Remove from heat.
- Using a mixer, beat on low then high speed until stiff, glossy peaks form, about 5-7 minutes.
- Pipe meringue frosting onto cupcakes, then top with chocolate sauce and graham cracker crumbs as desired.