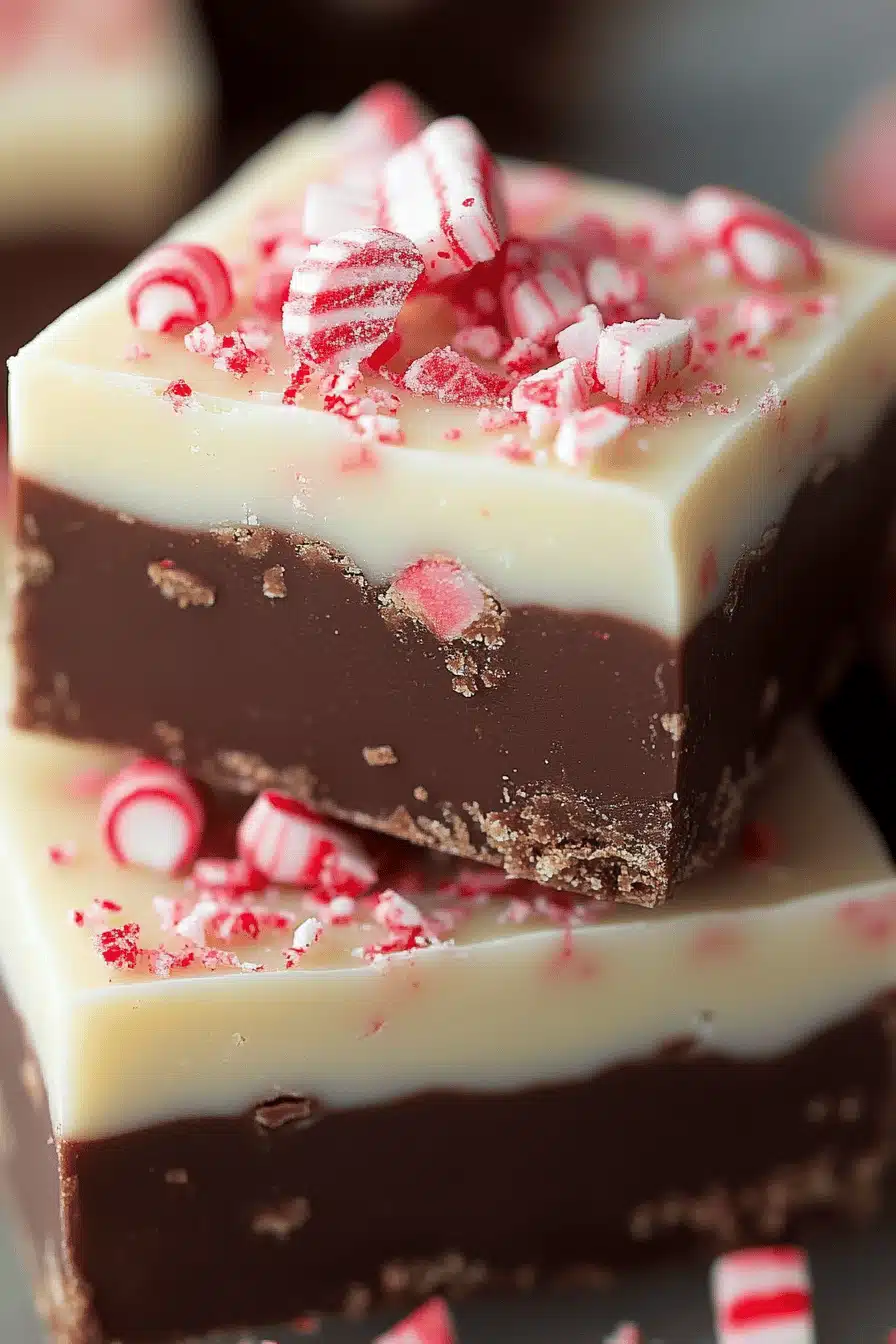
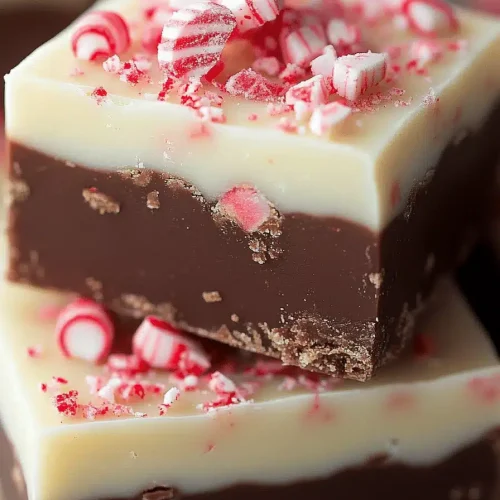
Perfect Fudge Recipe
Oh, fudge! If there’s one treat that instantly transports me back to my grandma’s kitchen, it’s a batch of perfectly smooth, rich, melt-in-your-mouth fudge. I remember the way the air would get thick with the scent of chocolate and sugar, and how I’d practically vibrate with anticipation waiting for it to set. It’s more than just candy; it’s a hug in dessert form. For years, I’ve been on a quest for that elusive *perfect Fudge Recipe*, the kind that’s unbelievably decadent but surprisingly simple to whip up. And you know what? I think I’ve finally cracked it. Forget those grainy, disappointing batches you might have tried making before. This one is a game-changer. It’s the perfect blend of indulgence and ease, making it ideal for holiday gifts, a special treat for the family, or honestly, just for when that late-night craving hits and you need something incredibly satisfying without turning on the oven for hours.
What is perfect fudge?
So, what makes this Fudge Recipe truly “perfect”? At its heart, fudge is a confection made primarily from sugar, butter, and milk or cream, cooked to a specific soft-ball stage and then cooled rapidly to prevent large crystal formation, which is key to that silky texture. Think of it as a concentrated burst of sweet, creamy goodness. This particular recipe elevates that basic concept by using high-quality ingredients and a straightforward method that yields incredible results every single time. It’s not overly complicated, but it requires a little attention to detail, which, in my experience, is where the magic happens. It’s the kind of fudge that makes people stop, close their eyes, and savor every bite. It’s that classic, nostalgic flavor we all know and love, but with a refined texture that truly stands out.
Why you’ll love this recipe?
Honestly, the reasons I keep coming back to this recipe are numerous, and I think you’ll find yourself in the same boat. First and foremost, the FLAVOR is out of this world. It’s intensely chocolatey, with a creamy richness that’s just divine. It’s not cloyingly sweet; it’s perfectly balanced, so you can truly appreciate the depth of the chocolate. Then there’s the SIMPLICITY. I know, I know, “fudge” can sound intimidating, conjuring images of candy thermometers and tricky temperatures. But this method bypasses a lot of that fuss. It’s surprisingly straightforward, and once you get the hang of it, you’ll be making batches on repeat. It’s also incredibly COST-EFFECTIVE. The ingredients are all pantry staples, meaning you don’t need to break the bank to create something truly special. Plus, the VERSATILITY is fantastic. While my classic chocolate version is unbeatable, you can easily add nuts, swirls of caramel, or even a hint of peppermint. It’s also incredibly giftable! This recipe always disappears in minutes at my house, and it’s become my go-to when I need a thoughtful, homemade present that’s guaranteed to impress. It’s one of those recipes that just makes me happy to bake, and even happier to share.
How do I make perfect fudge?
Quick Overview
Making this perfect Fudge Recipe is a straightforward process that involves melting, stirring, and a little bit of patient cooling. The key is using good ingredients and paying attention to the texture as it cooks. We’ll melt our base, incorporate the flavorings, and then let the magic of cooling do its thing to create that signature smooth texture. It’s designed to be relatively quick to prepare, with the main “work” happening on the stovetop. The rest is just waiting for it to set, which, trust me, is the hardest part!
Ingredients
For the Main Fudge Base:
You’ll need good quality unsalted butter – I always opt for European-style butter if I can find it, as it has a slightly higher fat content and a richer flavor. About 1 cup (2 sticks) is perfect. For the chocolatey goodness, we’re using a combination of granulated sugar and unsweetened cocoa powder. You’ll need about 3 cups of granulated sugar and 3/4 cup of unsweetened cocoa powder. Make sure your cocoa powder is truly unsweetened – Dutch-processed cocoa will give a darker, smoother chocolate flavor, but natural cocoa works just fine too! We also need milk or half-and-half; I prefer using half-and-half for extra richness, about 1 cup. A pinch of salt is essential to balance the sweetness, just about 1/2 teaspoon. And of course, the star of the show: chocolate! I use about 1 teaspoon of pure vanilla extract for that classic flavor boost. If you’re a chocolate lover like me, you’ll want to use good quality semi-sweet or Dark Chocolate chips (about 6 ounces) to really amp up the chocolate intensity.
For Added Texture (Optional but Recommended):
This is where you can really personalize your fudge! I often add about 1 cup of chopped walnuts or pecans for a delightful crunch. Other popular additions include mini chocolate chips for extra pockets of melted chocolate, or even a sprinkle of sea salt on top just before it sets.
Step-by-Step Instructions
Step 1: Preheat & Prep Pan
First things first, let’s get our pan ready. You’ll need an 8×8 inch square Baking Pan. I like to line mine with parchment paper, leaving an overhang on the sides. This makes it so much easier to lift the fudge out once it’s set. Lightly grease the parchment paper with a little butter or cooking spray. Set this aside.
Step 2: Mix Dry Ingredients
In a medium-sized saucepan (heavy-bottomed is best to prevent scorching), whisk together the granulated sugar, cocoa powder, and salt. Make sure there are no lumps of cocoa powder; whisking them out now will ensure a smoother fudge later. Give it a good whisk until everything is evenly combined.
Step 3: Mix Wet Ingredients
Add the butter and the milk (or half-and-half) to the saucepan with the dry ingredients. Place the saucepan over medium heat.
Step 4: Combine and Cook
Stir the mixture constantly until the butter is melted and the sugar is dissolved. Bring the mixture to a rolling boil. This is the crucial part: once it’s boiling, stop stirring and let it boil undisturbed for exactly 5 minutes. I use a timer for this! If you stir, you risk crystallizing the sugar, which can make your fudge grainy. While it’s boiling, you can gently stir in the chocolate chips if you’re using them, just to get them started melting. The goal here is to reach the soft-ball stage, which happens when the sugar syrup forms a soft, pliable ball when dropped into cold water.
Step 5: Reach the Soft-Ball Stage
After the 5 minutes of boiling, start checking the temperature if you have a candy thermometer. You’re looking for 235°F (113°C). If you don’t have a thermometer, you can do the “soft-ball test”: drop a small amount of the boiling syrup into a glass of very cold water. If it forms a soft, shapeable ball that flattens when you remove it from the water, you’re there! This stage is critical for that smooth, creamy texture. If it boils too long, it can become hard and brittle; if not long enough, it might not set properly. This is where a little patience really pays off.
Step 6: Add Flavor and Texture
Remove the saucepan from the heat. Stir in the vanilla extract and any optional add-ins like chopped nuts. Now, here’s a trick my grandma taught me: don’t overmix! Gently stir the mixture until it just starts to lose its sheen and begins to thicken slightly. You don’t want to whip a lot of air into it at this stage.
Step 7: Pour into Pan and Cool
Quickly but carefully, pour the fudge mixture into your prepared pan. Use a spatula to spread it evenly. At this point, you can sprinkle any extra toppings like more chocolate chips or sea salt over the top if you like. Let the fudge cool completely at room temperature. This can take anywhere from 2 to 4 hours, depending on how warm your kitchen is. Resist the urge to put it in the fridge to speed things up; this can actually lead to a duller finish and a less desirable texture. Patience is key here!
Step 8: Slice and Serve
Once the fudge is completely set and firm to the touch, use the parchment paper overhang to lift it out of the pan. Place it on a cutting board and use a sharp knife to cut it into squares. I usually aim for 1-inch squares, but you can make them as big or small as you like. If the fudge feels a little sticky while cutting, you can briefly dip your knife in hot water and wipe it dry between cuts.
What to Serve It With
This perfect fudge recipe is so wonderfully versatile, it’s not just for dessert. For BREAKFAST, I love cutting it into tiny, bite-sized pieces and sprinkling them over yogurt parfaits or even pancakes. It adds a little sweet surprise that makes the morning feel extra special. For BRUNCH, it’s elegant when served in small, jewel-like squares on a pretty platter alongside fresh berries and a dollop of whipped cream. It feels sophisticated without being fussy. As a decadent DESSERT, it’s divine served with a scoop of good quality vanilla bean ice cream or a rich cup of coffee. The slight bitterness of the coffee cuts through the sweetness beautifully. And for COZY SNACKS? This is where it truly shines. Enjoy a square with a glass of cold milk, or pair it with a warm mug of hot chocolate on a chilly evening. My family also loves having a piece with a nice cup of tea in the afternoon – it’s the perfect pick-me-up. Sometimes, I even add a little cinnamon or chili powder to the mixture for a grown-up twist, which is fantastic with a dark roast coffee.
Top Tips for Perfecting Your Fudge
Over the years, I’ve learned a few tricks that I think really elevate this fudge from good to truly spectacular. First, about the zucchini prep: while this recipe doesn’t use zucchini, I know many classic fudge recipes do! For those, always wring out as much moisture as possible. My favorite method for moisture removal involves grating the zucchini, then squeezing it thoroughly in a clean kitchen towel. For this recipe, the key is really about sugar and chocolate quality. Don’t skimp on the cocoa powder or chocolate chips! A good quality chocolate makes a world of difference. My MIXING ADVICE is crucial: when you’re stirring in the vanilla and add-ins after taking it off the heat, be gentle. You want to incorporate them without overworking the mixture, which can lead to a grainy texture. Think of it as folding them in rather than aggressively stirring. For ingredient SWAPS, I’ve experimented a lot. If you’re not a fan of nuts, omit them entirely – it’s still incredible. You can also try adding mini marshmallows or even a swirl of peanut butter when it’s slightly cooled. For BAKING TIPS, while this recipe doesn’t involve traditional baking in an oven, the “cooking” on the stovetop is your bake. Pay close attention to that 5-minute boiling time; it’s the most critical step. Using a heavy-bottomed saucepan helps distribute heat evenly and prevents scorching. And finally, for GLAZE VARIATIONS (though this recipe doesn’t use a glaze, if you wanted to add one later), consistency is everything. A good glaze should be pourable but not too thin. My favorite is a simple powdered sugar and milk mixture, but you could easily add cocoa powder for a chocolate glaze or even a touch of espresso powder.
Storing and Reheating Tips
Storing this perfect fudge is thankfully quite simple, and it keeps well, which is great for making ahead. At ROOM TEMPERATURE, I find it stays perfectly fresh for about 2 weeks if stored in an airtight container. Just make sure it’s completely cooled before covering. If your kitchen is particularly warm, you might want to keep it in a slightly cooler spot. For REFRIGERATOR STORAGE, it will last even longer, usually up to 3-4 weeks. However, I find that refrigeration can sometimes make fudge a little firmer and potentially less creamy. If you do refrigerate it, store it in an airtight container, and let it sit at room temperature for about 15-20 minutes before serving to soften up a bit. For FREEZER INSTRUCTIONS, this fudge freezes beautifully. Wrap individual squares or the entire slab tightly in plastic wrap, then place it in a freezer-safe bag or container. It can stay frozen for up to 3 months. To thaw, unwrap it and let it come to room temperature for a few hours. The GLACE TIMING ADVICE is simple: if you plan to glaze this (which this recipe doesn’t require, but if you were adding a decorative swirl or drizzle), do it once the fudge has cooled enough to be firm but is still slightly warm, or once it’s fully cooled. For storage, I’d recommend glazing only if you plan to eat it within a few days, as the glaze can sometimes affect the fudge’s texture over longer storage periods.
Frequently Asked Questions
Final Thoughts
There you have it – my absolute go-to, foolproof recipe for perfect fudge. It’s the kind of recipe that brings joy, whether you’re making it for a special occasion or just a Tuesday afternoon. I truly believe that food has a way of connecting us, and sharing this fudge, with its rich flavor and comforting texture, feels like sharing a little piece of happiness. I hope it becomes a cherished recipe in your kitchen too. If you try it, please let me know how it turns out! I’d love to hear about any variations you try or how your family enjoys it. Drop a comment below or share a picture – I can’t wait to see your creations! Happy fudge-making!
Perfect Fudge Recipe
Ingredients
Main Ingredients
- 3 cups semi-sweet chocolate chips or dark chocolate for richer taste
- 1 can sweetened condensed milk 14 oz can
- 0.25 cup unsalted butter
- 1 tablespoon vanilla extract
- 1 cup chopped walnuts optional
Instructions
Preparation Steps
- Line an 8x8 inch baking pan with parchment paper and lightly grease it with non-stick spray.
- In a medium saucepan over low heat, melt the chocolate chips, sweetened condensed milk, and butter together, stirring constantly until fully smooth.
- Remove from heat and stir in vanilla extract and chopped walnuts if using.
- Pour the mixture into the prepared pan and smooth the top with a spatula.
- Refrigerate for at least 2 hours or until firm.
- Lift fudge out using parchment paper and cut into 16 squares. Store in an airtight container.