olive tapenade
You know those days? The ones where you’re staring into the fridge, completely uninspired, and dinner feels like a monumental task? Yeah, I have those way more often than I’d like to admit! But when those moments hit, there’s one thing that always saves the day, and it’s this incredible olive tapenade. It’s funny, I used to think of tapenade as something fancy you’d only get at a restaurant, all sophisticated and maybe a little intimidating. But after my first attempt, I realized it’s actually one of the simplest, most rewarding things you can whip up in your own kitchen. It’s like bottling up a little bit of the Mediterranean sunshine and having it ready whenever you need a flavor boost. It’s a million miles away from those jarred olives you might have lurking in the back of the fridge, offering a depth of flavor that’s just… wow. If you’ve ever loved a really good bruschetta or a vibrant pasta sauce, you’re going to adore this olive tapenade. It’s a true kitchen MVP, and I can’t wait to share it with you!
What is olive tapenade?
So, what exactly *is* this magical olive tapenade? At its heart, it’s a simple paste or spread made primarily from finely chopped olives, capers, anchovies (don’t skip these if you can help it, they add an amazing umami depth!), garlic, and Olive Oil. Think of it as the concentrated essence of savory, salty, briny goodness. The name itself comes from the Provençal French word “tapeno,” meaning caper, which just goes to show how central those little salty buds are to the flavor profile. It’s not a complicated dish; there’s no cooking involved really, just a good chop and a mix. It’s that easy! It’s rustic, yet elegant, and packs a punch of flavor that can elevate the most humble piece of toast or the most elaborate appetizer platter. It’s the kind of thing that makes people go, “Wow, what is *that*?” It’s basically a flavor bomb waiting to happen, a little taste of the Mediterranean coast right in your kitchen.
Why you’ll love this recipe?
Honestly, I could talk your ear off about why this olive tapenade is a staple in my home, but let’s get to the good stuff. First off, the **flavor**. It’s intensely savory, with the olives providing a salty, slightly bitter base, while the capers and anchovies add layers of briny, umami richness. A hint of garlic and a good glug of quality Olive Oil just tie it all together beautifully. It’s complex without being complicated, and it tastes *so* much better than anything you’ll find pre-made. What I love most about this is its sheer **simplicity**. Seriously, if you can chop and stir, you can make this. It takes less than 10 minutes from start to finish, and the only “cooking” involved is the gentle emulsification of the olive oil. This means it’s a lifesaver on busy nights when you need a quick appetizer or a flavorful addition to a meal. It’s also incredibly **cost-efficient**. A few jars of good olives, some pantry staples like capers and garlic, and you’ve got a gourmet spread that costs a fraction of what you’d pay in a shop. And the **versatility**! Oh my goodness, the ways you can use this are endless. It’s fantastic on toasted baguette slices, of course, but it’s also amazing stirred into pasta, spread on grilled chicken or fish, dolloped onto scrambled eggs, or even as a dip for raw vegetables. It’s like a flavor magic wand for almost any dish. Compared to making a complex dip or a baked appetizer, this olive tapenade is a breath of fresh air. It’s the kind of recipe that makes you feel like a culinary whiz without breaking a sweat. It’s pure, unadulterated deliciousness in a bowl, and I’m convinced it will become a favorite in your kitchen too.
How do I make olive tapenade?
Quick Overview
This is all about bringing together simple, vibrant ingredients to create something truly spectacular. You’ll be roughly chopping your olives, garlic, and capers (or pulsing them in a food processor for an even quicker route!), then whisking it all together with a good dose of quality olive oil, perhaps a splash of lemon juice, and a pinch of Black Pepper. It’s a no-cook wonder, relying on the freshness and quality of your ingredients to shine. This method ensures maximum flavor with minimum effort, making it perfect for last-minute entertaining or just a weeknight treat for yourself.
Ingredients
For the Star of the Show (The Olives):
You’ll want about 1.5 cups of good quality pitted olives. My absolute favorite combination is Kalamata and Castelvetrano olives. The Kalamatas bring that deep, classic Mediterranean flavor, while the Castelvetranos add a buttery, milder note and a beautiful green contrast. If you can’t find both, don’t stress! Any good quality pitted black or green olives will work. Just avoid the really bland, watery ones that often come in large, economy jars if you can. Drain them well, and if they’re particularly salty, you might want to give them a quick rinse and pat them dry before chopping. That little step can make a big difference!
The Briny Boosters:
1/4 cup capers, drained (these are non-negotiable for that salty tang!)
2-3 anchovy fillets (packed in oil, these melt into the tapenade and add incredible depth without tasting fishy. If you’re really anti-anchovy, you can omit, but trust me, try it at least once!)
The Aromatics:
1-2 cloves garlic, minced (adjust to your garlic preference – I like it punchy!)
A good pinch of freshly ground Black Pepper
The Binder & Emulsifier:
1/3 to 1/2 cup extra virgin Olive Oil (use a good one, it really shines here! Start with 1/3 cup and add more until you reach your desired consistency)
Optional Zing:
1 teaspoon fresh lemon juice (adds brightness and cuts through the richness)
Step-by-Step Instructions
Step 1: Prep Your Olives
First things first, make sure your olives are drained really well. If you’re using very salty olives, give them a quick rinse under cool water and then pat them thoroughly dry with paper towels. This isn’t just about removing excess salt; it helps the tapenade achieve the right texture. Excess water will make it watery, and nobody wants watery tapenade!
Step 2: Chop Everything Up
This is where the magic starts. You can do this two ways: the rustic, chunky way or the smoother, quicker way. For the rustic version, finely chop the olives, capers, and anchovy fillets by hand. Aim for small, confetti-like pieces. The garlic can be minced very finely. For a smoother texture, you can pulse everything in a food processor. Be careful not to over-process into a paste; you still want a little bit of texture. Pulse the olives, capers, and anchovies a few times, then add the garlic and pulse a few more times. The key is to get it chopped, not pureed.
Step 3: Combine the Flavors
Transfer your chopped mixture to a medium bowl. Add the minced garlic, capers, and anchovy fillets to the chopped olives. If you’re using lemon juice, add that now too. Give everything a good stir to combine all those wonderful ingredients.
Step 4: Emulsify with Olive Oil
Now, it’s time for the olive oil. Start by drizzling in about 1/3 cup of the extra virgin olive oil. Stir it in really well. The oil will start to coat everything, binding the ingredients together and creating that beautiful tapenade texture. Add more olive oil, a tablespoon at a time, until you reach your desired consistency. Some people like it chunkier and less oily, while others prefer a smoother, more spreadable consistency. Taste as you go!
Step 5: Season and Taste
Give your tapenade a good taste. The olives, capers, and anchovies are already quite salty, so you probably won’t need extra salt. Add a generous pinch of freshly ground black pepper. If it tastes a little flat, that splash of lemon juice can really wake it up. Adjust the garlic or lemon to your liking. Remember, the flavors will meld and deepen as it sits.
Step 6: Let it Mingle
This is perhaps the hardest step – waiting! For the best flavor, cover the bowl and let the olive tapenade sit at room temperature for at least 30 minutes, or refrigerate it for an hour. This allows all those delicious flavors to meld together beautifully. It’s tough to wait, I know, but it’s so worth it!
Step 7: Serve and Enjoy!
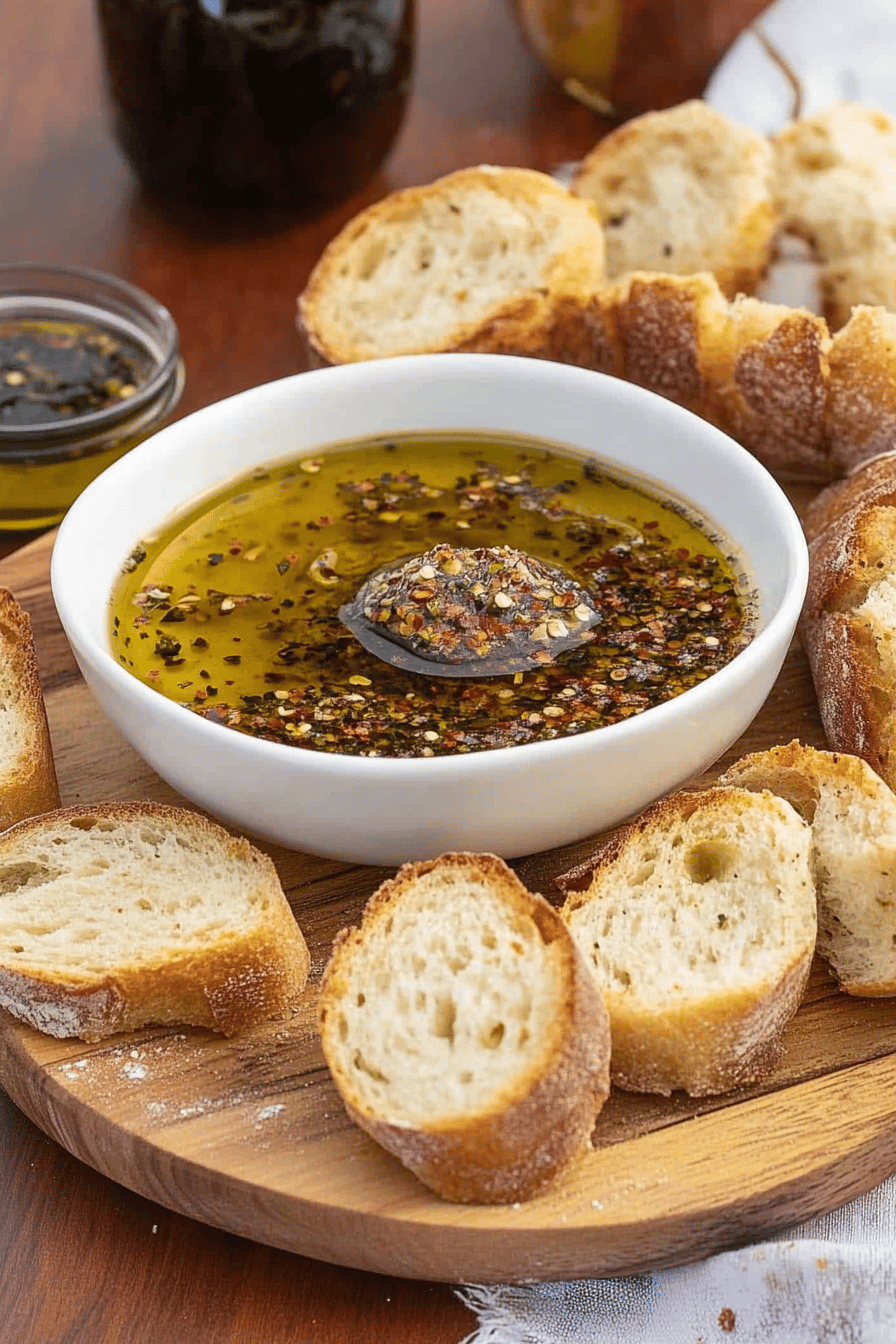
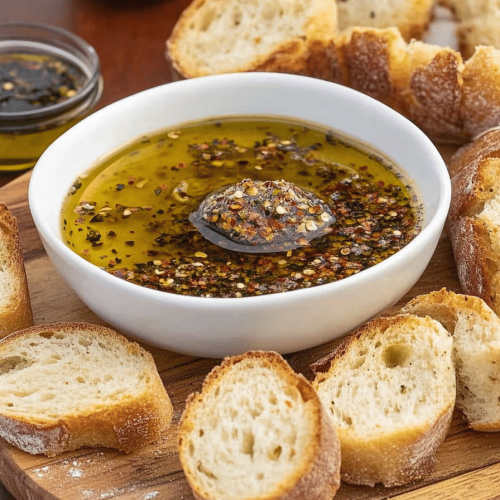
Your homemade olive tapenade is ready to shine! Serve it with your favorite crackers, bread, or as part of a larger appetizer spread. It’s best served at room temperature, so take it out of the fridge about 15-20 minutes before serving if you’ve chilled it.
What to Serve It With
Oh, the possibilities are almost endless! This olive tapenade is such a versatile little star. For a simple **breakfast** boost, I love a little smear on a toasted whole-wheat English muffin with a perfectly poached egg on top. It adds a savory kick that’s just divine. For a more elegant **brunch**, it’s a must-have on an antipasto platter alongside some good cheeses, cured meats, fresh fruit, and crusty bread. It’s also fantastic as a spread on mini quiches or tarts. If you’re looking for something a bit more substantial, dollop it onto grilled chicken breasts or flaky white fish just before serving – the heat melts it slightly and makes the flavors sing. As a **dessert** option? Now, this might sound a little unconventional, but a tiny bit can be surprisingly good with some sharp, aged cheddar cheese or even a drizzle over roasted figs. For **cozy snacks**, it’s my go-to for a quick appetizer when friends pop over. Spread it on some toasted baguette slices (maybe rub a clove of garlic on the toast first!), or serve it in a small bowl with a side of crunchy crudités like bell peppers, cucumber, and carrots. My family absolutely devours it with warm pita bread. Seriously, it makes even the most basic meal feel special. I even love adding a spoonful to my pasta sauce to give it an extra depth of flavor. It’s a true kitchen chameleon!
Top Tips for Perfecting Your Olive Tapenade
Over the years, I’ve learned a few tricks that really elevate this simple spread. Firstly, **olive quality is paramount**. I know I’ve mentioned it, but it bears repeating. If you use bland, watery olives, your tapenade will taste bland and watery. Aim for olives with character – Kalamata, Castelvetrano, Gaeta, or even a good mix. If you can, buy them from an olive bar if your grocery store has one; they often have a much better flavor. Secondly, don’t be afraid of the **anchovies**. I know they can sound daunting, but when they’re chopped up and blended with everything else, they don’t taste “fishy” at all. What they do provide is an incredible depth of savory flavor, that essential umami that makes people ask, “What’s your secret?” They essentially dissolve into the mix, adding a salty richness that’s hard to replicate. If you’re truly wary, start with just one fillet, but I beg you, give them a chance! For **texture**, I like a mix of hand-chopped and a quick pulse in the food processor. I find hand-chopping gives you more control for a rustic feel, but a few pulses in the processor can speed things up immensely. Just be mindful not to turn it into a smooth paste; you want some lovely little bits of olive and caper to bite into. When it comes to the **olive oil**, use your best extra virgin olive oil. The flavor really comes through, so a fruity, peppery oil will make a noticeable difference. Start with the lower amount of oil and add more gradually until you reach your preferred consistency – some like it thicker and chunkier, others prefer it more spreadable. And don’t forget the **acid**! That little splash of fresh lemon juice is a game-changer. It brightens everything up and cuts through the richness, balancing out the salty, briny flavors. You can also experiment with a tiny pinch of red pepper flakes if you like a little heat. For **storage**, it’s best kept in an airtight container in the fridge, and a thin layer of olive oil on top can help preserve it. Before serving, always let it come to room temperature; the flavors are so much more pronounced that way. I’ve found that the flavors actually improve after the first day, so making it ahead of time is a brilliant idea!
Storing and Reheating Tips
Okay, so you’ve made this glorious olive tapenade, and maybe you have a little bit left over (a rare occurrence in my house, but it happens!). Storing it properly is key to keeping that amazing flavor fresh. If you’ve got leftovers, transfer the tapenade to an airtight container. I usually use a small glass jar or a plastic container with a good seal. At **room temperature**, it’s best enjoyed within a few hours, especially if it’s warm. However, for the best flavor and safety, I always recommend **refrigerating** it. It will keep well in the fridge for about a week to 10 days. To help preserve it even longer and prevent it from drying out, I often pour a thin layer of olive oil over the top of the tapenade before sealing the container. This acts as a protective barrier. When you’re ready to use it, just scoop out what you need. The flavors will be a bit muted when it’s cold, so I always pull it out of the fridge about 15-20 minutes before serving to let it come back to room temperature. This really allows those complex, savory notes to shine. As for **freezer instructions**, while it *can* be frozen, I don’t often recommend it for tapenade. The texture can suffer a bit upon thawing, becoming a little more watery or separated. If you absolutely must freeze it, wrap it tightly in plastic wrap, then place it in a freezer-safe bag or container. It should last for about 2-3 months in the freezer. Thaw it slowly in the refrigerator overnight, and then drain off any excess liquid and give it a good stir. You might need to add a little extra fresh olive oil to bring it back to its former glory. For the **glaze** (if you decide to add one, though this recipe doesn’t have a specific glaze), it’s usually best to apply it fresh before serving, as it can sometimes make the tapenade too wet if stored together.
Frequently Asked Questions
Final Thoughts
So there you have it, my friends! My absolute favorite olive tapenade recipe. It’s one of those dishes that’s ridiculously easy to make but tastes incredibly sophisticated. It’s the perfect example of how a few simple, high-quality ingredients can come together to create something truly magical. I love it because it’s so adaptable – whether you’re hosting a party or just need a quick flavor boost for your lunch, this tapenade has got your back. It’s a testament to the power of simple, honest food. If you’re looking for other quick and flavorful Mediterranean-inspired dishes, you might also enjoy my sun-dried tomato pesto or my lemon-herb marinated olives. They share that same bright, fresh flavor profile. I truly hope you give this olive tapenade a try. It’s a recipe that’s brought so much joy to my kitchen, and I have a feeling it will do the same for yours. Can’t wait to hear how yours turns out in the comments below! Happy spreading!
Easy Olive Tapenade a Mediterranean Delight
Ingredients
Main Ingredients
- 0.33 cup Olive oil
- 2 tablespoons Fresh parsley, chopped
- 1 tablespoon Fresh oregano, chopped
- 0.75 cup Green olives, chopped
- 2 oz Feta cheese, crumbled
- 1 clove Garlic, minced
- 0.5 large Lemon, zested and juiced
- 2 teaspoons Honey
Instructions
Preparation Steps
- Combine all ingredients in a shallow dish. Add more olive oil if needed.
- Serve with crusty bread, crackers, or veggie sticks.