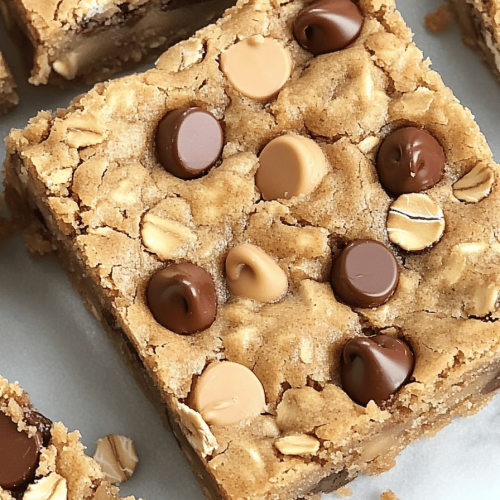
Oatmeal Chocolate Chip Bars
You know those days? The ones where you *desperately* need a treat, but the thought of pulling out all the stops for a full-blown cake or a batch of cookies feels like climbing Mount Everest in flip-flops? Yeah, I’ve been there more times than I can count. And usually, my go-to in those moments has always been something comforting, something familiar, something that just *hits the spot*. For years, that was a classic Chocolate Chip Cookie. But then, one afternoon, after a particularly chaotic morning with the kids and a looming deadline, I stumbled upon a recipe for oatmeal chocolate chip bars, and let me tell you, it was a revelation. It’s like the best parts of a chewy oatmeal cookie met the pure joy of a gooey chocolate chip bar, all wrapped up in an easy-to-handle square. These aren’t just any oatmeal chocolate chip bars, though. These are the ones that disappear from the pan like magic, the ones my family begs for, and the ones that have officially earned a permanent spot in my recipe box. If you’re looking for that perfect sweet something that’s surprisingly simple to whip up, you’ve found it.
What is Oatmeal Chocolate Chip Bar?
So, what exactly are these magical Oatmeal Chocolate Chip bars we’re talking about? Think of them as the ultimate crowd-pleaser, a hybrid dessert that takes all the comforting, wholesome goodness of oatmeal and marries it with the irresistible allure of melty chocolate chips, all baked into a convenient, chewy bar. It’s essentially a thick, tender oatmeal cookie dough, but instead of scooping individual cookies, we press it all into a pan, add a generous layer of chocolate chips (or chunks, your call!), and bake it into a glorious slab of deliciousness. The beauty of it is that it’s less fussy than cookies – no rolling, no perfectly spaced mounds on a baking sheet. You just press, bake, and slice. They’re wonderfully adaptable, too, which is probably why I love them so much. They’re hearty enough to feel a little bit virtuous (hello, oats!) but decadent enough to satisfy any sweet tooth. It’s a win-win situation, really.
Why you’ll love this recipe?
What are some of the reasons why this oatmeal chocolate chip bar recipe has become my absolute favorite?flavor is just out of this world. We’re talking a perfect balance of nutty oats, sweet brown sugar, a hint of cinnamon, and rivers of gooey, melted chocolate. Every bite is a symphony of textures and tastes. And the best part? The simplicity. Seriously, this recipe is a lifesaver on busy weeknights or when unexpected guests pop over. You can probably whip up the batter in about 10-15 minutes, and then it’s just a matter of baking. No complicated steps, no fancy techniques required. Plus, it’s incredibly cost-efficient. Oats, flour, sugar, butter, eggs, chocolate chips – these are pantry staples that most of us alreadyversatility! While I adore them plain, you can easily add nuts, dried fruit, or even swirl in some caramel or peanut butter for an extra special treat. I’ve even found that using a mix of semi-sweet and dark chocolate chips gives it an extra layer of flavor complexity that’s just divine. Compared to regular Chocolate Chip Cookies, these bars have a wonderful chewiness and a more substantial texture thanks to the oats, and they’re so much easier to slice and share. What I truly adore about these oatmeal chocolate chip bars is that they feel both nostalgic and completely satisfying, hitting that sweet spot between a wholesome snack and a decadent dessert. They’re perfect for packing in lunchboxes, for a quick afternoon pick-me-up, or for satisfying that late-night craving without the fuss of traditional baking.
How to Make Oatmeal Chocolate Chip Bars
Quick Overview
This recipe is designed for maximum flavor and minimal fuss. You’ll start by whisking together your dry ingredients, then mixing in your wet ingredients until just combined. The dough will be thick and wonderfully textured. Press half of this deliciousness into your prepared pan, generously scatter your chocolate chips, and then top with the remaining dough, gently pressing it down. A quick bake, a bit of cooling, and then you’ve got yourself the most amazing oatmeal Chocolate Chip bars ready to be sliced and devoured. It’s truly that straightforward, and the results are consistently fantastic.
Ingredients
For the Main Batter:
You’ll need 2 ½ cups of rolled oats (not instant, please! The old-fashioned kind gives the best texture). Make sure they’re good quality; it really does make a difference. We’ll also use 1 ½ cups of all-purpose flour, 1 teaspoon of baking soda, ½ teaspoon of salt, and a generous ½ teaspoon of ground cinnamon. The cinnamon isn’t strictly necessary, but it adds such a lovely warmth that I always include it. For the wet ingredients, we’ll use 1 cup (2 sticks) of unsalted butter, softened (make sure it’s not melted, just nicely softened so it creams properly), 1 cup of packed light Brown Sugar, and ½ cup of granulated sugar. The combination of brown and white sugar gives us that perfect chewy texture and caramel-like flavor. And of course, 2 large eggs, and 1 teaspoon of pure vanilla extract. Using real vanilla extract is a non-negotiable for me; it just elevates everything.
For the Filling:
This is where the magic happens! We’re going to use 2 cups of semi-sweet chocolate chips. I love using a mix of semi-sweet and dark chocolate for a richer flavor, but feel free to use whatever your heart desires. If you’re feeling adventurous, chocolate chunks are also fantastic here, providing bigger pockets of melted chocolate. Some people like to add ½ cup of chopped nuts like walnuts or pecans to the chocolate chips for a bit of crunch, which is a lovely addition if you’re a nut lover.
For the Glaze:
This part is optional, but highly recommended for that extra touch of decadence. You’ll need ½ cup of powdered sugar, 1 tablespoon of milk (or cream for extra richness!), and ½ teaspoon of vanilla extract. You can adjust the milk to get your desired consistency – a thinner glaze for drizzling or a thicker one for a more opaque finish. Some people like to add a pinch of salt to balance the sweetness, and I often do this too. It’s a simple glaze, but it really elevates the bars.
Step-by-Step Instructions
Step 1: Preheat & Prep Pan
First things first, preheat your oven to 350°F (175°C). This is a pretty standard baking temperature, so most ovens will do just fine. Next, grab an 8×8 inch or 9×9 inch baking pan. I prefer an 8×8 for thicker bars, but a 9×9 will give you slightly thinner, more cookie-like bars. Grease the pan well with butter or cooking spray, and then line it with parchment paper, leaving an overhang on two opposite sides. This parchment sling is your best friend for lifting the bars out of the pan later. Trust me, it makes life so much easier!
Step 2: Mix Dry Ingredients
In a large bowl, whisk together the rolled oats, all-purpose flour, baking soda, salt, and ground cinnamon. Whisking them together thoroughly before adding the wet ingredients ensures that everything is evenly distributed, especially the leavening agents like baking soda. This is a simple step, but it’s crucial for even baking and a consistent texture throughout your bars. You want to see a nice, uniform mixture with no pockets of flour or baking soda.
Step 3: Mix Wet Ingredients
In a separate, larger bowl (or the bowl of your stand mixer if you’re using one), cream together the softened butter, light brown sugar, and granulated sugar until light and fluffy. This usually takes about 2-3 minutes. Then, beat in the eggs, one at a time, until fully incorporated. Finally, stir in the vanilla extract. Make sure your butter is truly softened, not melted, as this creaming process incorporates air, which helps with the texture.
Step 4: Combine
Now, gradually add the dry ingredients to the wet ingredients, mixing on low speed or by hand until just combined. Be careful not to overmix here! Overmixing can develop the gluten in the flour too much, leading to tough bars. You want to mix until you no longer see streaks of dry flour. The dough will be thick and slightly sticky, which is exactly what we’re aiming for. It should smell wonderfully sweet and buttery already!
Step 5: Prepare Filling
If you’re adding nuts to your chocolate chips, give them a rough chop now. In a small bowl, combine your chocolate chips and any added nuts. This makes it easy to sprinkle them evenly over the base layer of the dough.
Step 6: Layer & Swirl
Take about half of the cookie dough and press it evenly into the bottom of your prepared baking pan. It can be a little sticky, so wetting your fingers or using a spatula helps. Then, evenly scatter the chocolate chip mixture over the dough layer. Now, take the remaining dough and gently crumble or dollop it over the chocolate chips. Carefully press this top layer down to cover the chocolate as much as possible, creating a nice, even surface. You don’t need to press too hard, just enough to seal it. If you’re feeling artistic, you can use a knife to create a few swirls or decorative patterns on top before baking, but it’s purely for looks!
Step 7: Bake
Bake in your preheated oven for 25-35 minutes. The exact time will depend on your oven and the size of your pan. You’re looking for the edges to be golden brown and set, and the center to look mostly set but still slightly soft. A toothpick inserted into the center should come out with moist crumbs attached, not wet batter. I usually start checking around the 25-minute mark. Overbaking will lead to dry, crumbly bars, so err on the side of slightly underbaked, as they’ll continue to cook as they cool.
Step 8: Cool & Glaze
This is perhaps the hardest part – waiting! Let the bars cool completely in the pan on a wire rack. I know, I know, it’s torture when they smell this good. Allowing them to cool fully is crucial for them to set properly, making them easier to cut. Once they’re completely cool, prepare the glaze. In a small bowl, whisk together the powdered sugar, milk, and vanilla extract until smooth. Add more milk a tiny splash at a time if needed to reach your desired drizzling consistency. Drizzle the glaze over the cooled bars. If you want a thicker glaze, let it sit for a few minutes before drizzling. For a thinner glaze, drizzle immediately.
Step 9: Slice & Serve
Once the glaze has set (or if you skipped the glaze), use the parchment paper overhang to carefully lift the entire slab out of the pan onto a cutting board. Now, the fun part! Slice into bars. I usually aim for 12-16 bars, depending on how generous I’m feeling. A sharp knife works best, and wiping it clean between cuts can help create neater slices. Enjoy them at room temperature for the best texture and flavor!
What to Serve It With
These oatmeal chocolate chip bars are wonderfully versatile, making them a perfect fit for so many occasions. For breakfast, they’re a step up from a plain muffin. I love pairing them with a hot cup of coffee – the coffee’s bitterness perfectly complements the sweetness of the bars. They’re also great with a glass of cold milk, especially for the kids. For a more leisurely brunch, serve them on a platter alongside fresh fruit and maybe some yogurt parfaits. The rustic charm of the oats makes them feel right at home in a brunch spread. As a sophisticated dessert, they’re fantastic served slightly warm, perhaps with a scoop of vanilla bean ice cream or a dollop of whipped cream. A drizzle of extra chocolate sauce wouldn’t hurt either! And for those simple, cozy snacks, they are absolutely perfect on their own with a cup of tea or hot chocolate on a chilly afternoon. My kids have a tradition of having one with their homework after school, and it always seems to provide that much-needed energy boost and sweet reward. I’ve also found that they pair surprisingly well with a glass of red wine, especially a fruity merlot, if you’re looking for something a bit more adult and unexpected for an evening treat.
Top Tips for Perfecting Your Oatmeal Chocolate Chip Bars
Over the years, I’ve learned a few tricks that make these oatmeal chocolate chip bars absolutely foolproof. For the oats, always use old-fashioned rolled oats; instant oats will turn into a gummy mush, and steel-cut oats won’t soften enough. I learned that the hard way! When it comes to mixing, remember: gentle is key. Overmixing the dough after adding the flour is the number one culprit for tough bars. Mix only until the dry ingredients are just incorporated. For that perfect swirl effect on top, don’t try to make it too uniform. A little bit of unevenness adds to the rustic charm. If you want a more intricate pattern, you can gently drag a knife through the top layer of dough before baking, but don’t overwork it. When it comes to ingredient swaps, I’ve experimented quite a bit. If you don’t have brown sugar, you can use all granulated sugar, but you’ll lose some of that wonderful chewiness and caramel flavor. For the chocolate chips, feel free to use milk chocolate, dark chocolate, white chocolate, or even a combination. Adding chopped nuts like walnuts or pecans is a classic addition that I highly recommend if you enjoy them. For baking, oven temperature variations are common. If your oven tends to run hot, you might need to reduce the temperature slightly or shorten the baking time. Always go by visual cues – golden brown edges and a set center – rather than just the clock. A toothpick test is your best friend here. Don’t be afraid to experiment with the glaze, either. A simple dusting of powdered sugar is lovely if you’re not a fan of glaze, or you can add a little cocoa powder to the glaze for a chocolatey finish. I’ve even tried swirling a bit of melted peanut butter into the chocolate chip layer for a double chocolate peanut butter bar, which was an absolute hit!
Storing and Reheating Tips
One of the best things about these oatmeal chocolate chip bars is how well they store. They’re pretty resilient! At room temperature, they’ll stay delicious for about 3-4 days when stored in an airtight container. I usually keep mine in a tin or a plastic container with a tight-fitting lid to keep them from drying out. If you’re living in a particularly warm climate or it’s very humid, you might want to pop them in the refrigerator sooner. For refrigerator storage, they’ll last even longer, typically up to a week. Keep them in an airtight container to prevent them from absorbing any odors from other foods. The texture might firm up slightly in the fridge, but they’re still wonderfully chewy. To bring them back to their best, you can warm them gently in the microwave for about 10-15 seconds, just enough to soften them and bring out that gooey chocolate chip goodness. If you need to store them for longer periods, freezer instructions are your friend. Wrap the cooled bars tightly in plastic wrap, then place them in a freezer-safe bag or container. They can stay frozen for up to 2-3 months. Thaw them at room temperature, or gently reheat them in the microwave or a low oven for a few minutes. For the glaze, I find it’s best to add it *after* the bars have completely cooled, and then let the glaze set before storing. If you plan to freeze them with glaze, be aware that the glaze might soften or slightly crack upon thawing. It’s usually better to add a fresh drizzle of glaze after thawing if you want it to look perfect.
Frequently Asked Questions
Final Thoughts
So there you have it – my go-to recipe for the most incredible oatmeal chocolate chip bars! I genuinely hope you give these a try. They’re more than just a dessert; they’re a little slice of comfort, a perfect solution for those sweet cravings, and a guaranteed hit with anyone who tries them. The combination of hearty oats, rich chocolate, and that perfect chewy texture is just pure magic. They’re simple enough for a beginner baker but delicious enough to impress even the most discerning dessert lover. If you find yourself loving this recipe as much as I do, you might also enjoy my Chewy Peanut Butter Cookies or my Ultimate Fudgy Brownies – they’re in a similar vein of comforting, crowd-pleasing treats! I can’t wait to hear how yours turn out, so please don’t hesitate to leave a comment below with your experience, any fun variations you tried, or just to say hello. Happy baking!
Oatmeal Chocolate Chip Bars
Ingredients
Main Ingredients
- 0.75 cup unsalted butter softened
- 0.75 cup packed brown sugar
- 0.5 cup granulated sugar
- 2 large eggs
- 1 teaspoon vanilla extract
- 1.5 cup all-purpose flour
- 1 teaspoon baking soda
- 0.5 teaspoon salt
- 3 cup rolled oats old-fashioned
- 1.5 cup semi-sweet chocolate chips
Instructions
Preparation Steps
- Preheat oven to 350°F (175°C). Grease and flour a 9x13 inch baking pan.
- In a large bowl, cream together the softened butter, brown sugar, and granulated sugar until light and fluffy.
- Beat in the eggs one at a time, then stir in the vanilla extract.
- In a separate medium bowl, whisk together the flour, baking soda, and salt.
- Gradually add the dry ingredients to the wet ingredients, mixing until just combined.
- Stir in the rolled oats and chocolate chips until evenly distributed.
- Press the dough evenly into the prepared baking pan.
- Bake for 20-25 minutes, or until the edges are golden brown and the center is set.
- Let cool in the pan for at least 30 minutes before cutting into bars.