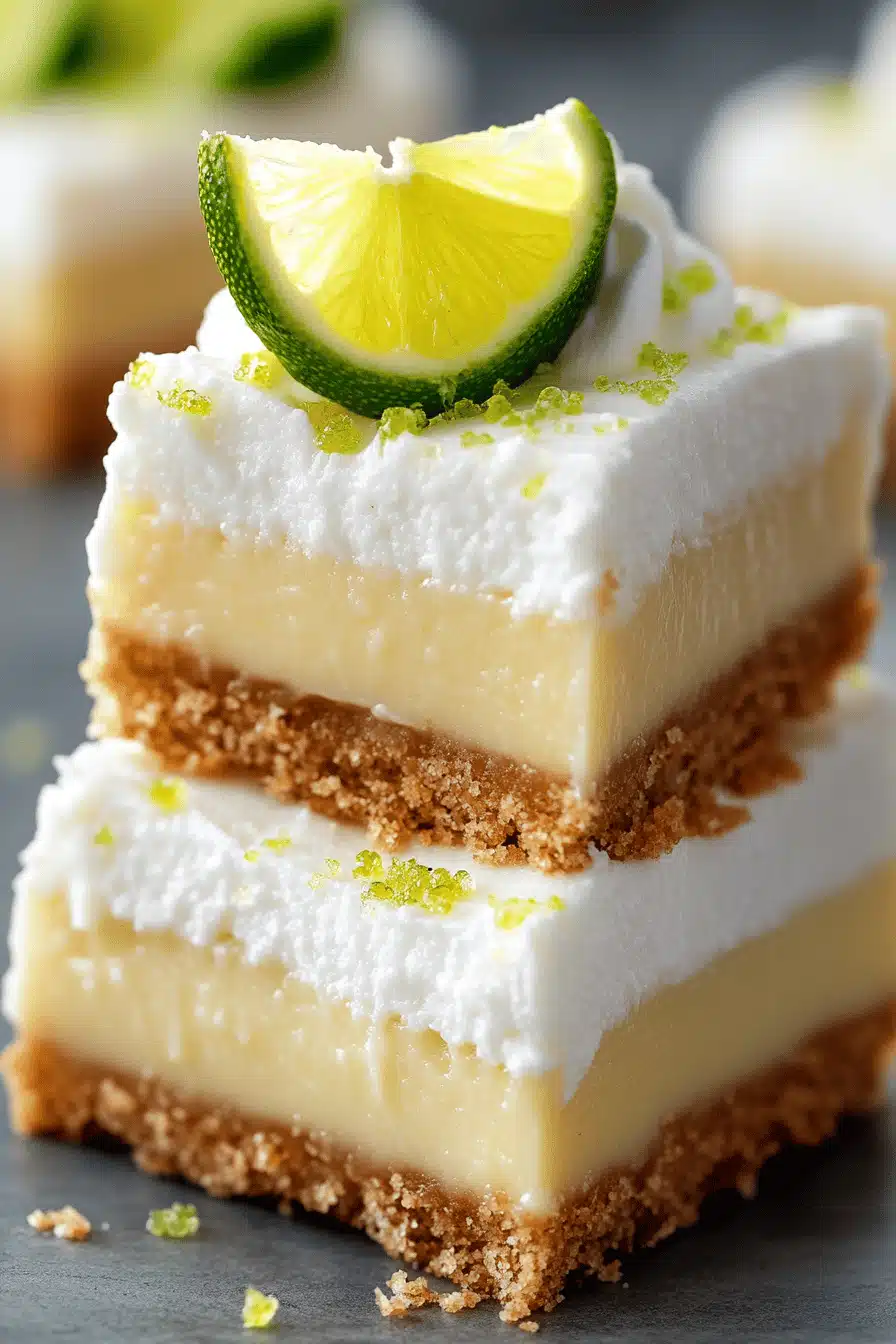
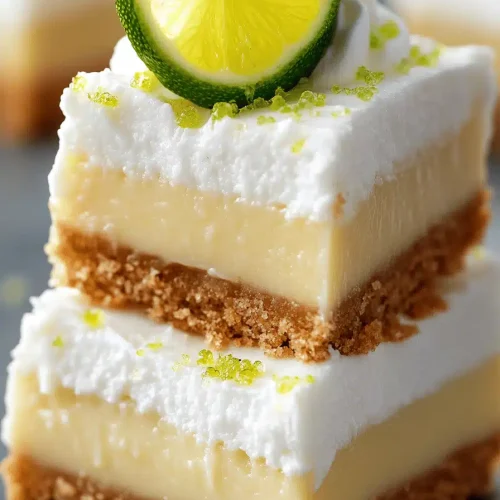
Key Lime Pie Bars
When I think of dessert that brings smiles in a single slice, Key Lime Pie Bars always pop to mind. I learned to love citrusy bite-sized treats from a sunny kitchen where my grandmother kept a bowl of bright limes on the counter and a cheerful towel thrown over her shoulder. These Key Lime Pie Bars are like a picnic in a bar: a buttery crust, a tangy-lime filling, and a kiss of sweetness that somehow tastes like summer in every bite. They’re not fussy or fussy to make—just honest, cozy baking that fits into weeknights and weekend gatherings alike. I’ve made them countless times, and this version never fails to disappear in minutes at my house. My kids actually ask for seconds, which is basically the best compliment a dessert can get. And yes, I’ve tweaked and tested this recipe until I’m certain I’ve found the simplest, most forgiving method—so you can feel confident even if you’re juggling a million things at once. The smell alone brings everyone to the kitchen, and I know you’ll love that moment as much as I do.

What is Key Lime Pie?
Think of Key Lime Pie Bars as the best of two worlds: the creamy, tangy dream of a key lime pie, compacted into a portable bar you can hold with one hand. They’re essentially a buttery crust (think graham cracker or shortbread), a bright lime curd-like filling that’s lightly baked to set, and a glossy glaze or optional topping that seals in shine and flavor. The name itself comes from the small, tart limes native to Florida’s Keys—dessert royalty in these parts. But you don’t need Florida heat to pull this off. It’s essentially a pantry-friendly dessert that tastes like a sunny afternoon even on a rainy day. I love that you can slice these into neat squares for a potluck, and they stay surprisingly well in the fridge for days, so they’re great for make-ahead treats. This version leans into a simple crust, a lime-forward filling, and a flexible glaze that you can customize depending on what you have in the pantry.
Why you’ll love this recipe?
What I love most about Key Lime Pie Bars is how forgiving they feel while still delivering that bright, zesty bite. The crust comes together like a dream, no chilling tantrums required, and it bakes up into a sturdy base that stays crisp even after a drizzle of glaze. The filling is tart and luscious without being puckery, and the lime zest adds perfume that makes the kitchen feel like a citrus grove. This isn’t just dessert; it’s a lifeline on busy nights when a quick, crowd-pleasing treat is exactly what you need. It’s also budget-friendly: you can lean on pantry staples like graham crackers, butter, and canned milk without breaking the bank. The versatility is key—swap in almond flour for a nuttier crust, use regular lime juice if you don’t have Key limes, or drizzle a white chocolate glaze if you’re craving something extra creamy. My sister prefers it without glaze, while I can’t resist a glossy lime finish that makes the bars glisten in the sunlight. It’s a recipe you’ll reach for again and again, whether you’re feeding a crowd or just craving a small, sweet pick-me-up after dinner.
How do I make Key Lime Pie Bars?
Quick Overview
In minutes, you’ll have a crust pressed into a pan, a tangy filling whisked together, and a glaze ready to pour. The beauty of this method is that you bake the crust first, then pour in the filling and bake it again until set. It’s straightforward and reliable—the kind of recipe that makes you feel like a kitchen genius even on a Tuesday. The result is a sturdy, slice-able bar with a buttery base, a silken lime center, and a touch of sweetness that keeps everything balanced. You’ll love how easy it is to cut clean edges and how the flavors deepen after a little chill time in the fridge. If you’re new to Dessert Bars, this is the perfect entry point: simple steps, big payoff, and no need for fancy equipment. Trust me on this one, you’ll be glad you tried it.
Ingredients
For the main battery (crust):
- 1 1/2 cups graham cracker crumbs (or finely crushed shortbread cookies for a richer crust)
- 1/4 cup granulated sugar
- 6 tablespoons unsalted butter, melted
- Pinch of salt
For the Filling:
- 4 large egg yolks
- 1 can (14 oz) sweetened condensed milk
- 3/4 cup freshly squeezed lime juice (Key lime if you can, otherwise Persian limes work well)
- 1 tablespoon lime zest (plus extra for finishing if you love it)
For the Glaze:
- Option A: 1 cup powdered sugar, 2–3 tablespoons lime juice, a splash of milk or water to loosen, optional zest
- Option B (optional white chocolate glaze): 4 oz white chocolate, 1–2 tablespoons heavy cream
Notes and sourcing tips: If you’re feeling fancy, use shortbread cookies for the crust and a pinch more salt to really make the crust savory-sweet. For the lime juice, Fresh is best—taste as you go and stop at that bright, not sour, verge. If you want to keep this dairy-light, you can experiment with a dairy-free Condensed Milk substitute, but I’ve found that traditional condensed milk yields the creamiest, most reliable filling for these bars.
Step-by-Step Instructions
Step 1: Preheat & Prep Pan
Preheat your oven to 350°F (175°C). Lightly grease a 9×9-inch square pan or line with parchment for easy removal. A clean edge after slicing is worth the extra minute of prep. I like to wipe the pan with a touch of butter first and then tap in a quick dusting of flour or spray with nonstick spray so the crust doesn’t cling when you lift the bars out for slicing.
Step 2: Mix Dry Ingredients
In a small bowl, whisk together the graham cracker crumbs, sugar, and salt. This is where you’ll start to smell that toasty butter and feel the crumb mixture come together. The texture should resemble wet sand—coarse, with some small clumps, but cohesive enough that when you press it, it holds its shape. If your crumbs feel too powdery, add another tablespoon of melted butter to help bind them.
Step 3: Mix Wet Ingredients
In a separate bowl, whisk the egg yolks until they’re smooth and pale. Then beat in the sweetened condensed milk until everything is perfectly blended. Add the lime juice and zest, giving it a few quick whisking passes to wake up that essential lime brightness. The mixture should look glossy and vibrant—thanks to the lime, you’ll get a little natural color as you whisk.
Step 4: Combine
Pour the wet filling into the dry crust base and stir just until combined. Don’t overmix; you want that slight crumb texture in the crust to hold up when you lift a bar. If you’ve got a few stubborn bits of crumb, press them into the pan with the back of a spoon so the surface is even before pressing the crust firmly into place.
Step 5: Prepare Filling
Press the crust mixture firmly into the pan to form an even layer. Bake the crust for about 10 minutes until the edges start to look golden. While it bakes, you’ll notice the scent of toasty crumbs wafting through the kitchen—this is the moment you know you’re doing something good. Remove the pan and pour in the lime filling. Gently tap the pan on the counter to dispel any large air bubbles; a few small bubbles are perfectly fine, but you don’t want big pockets forming in the center.
Step 6: Layer & Swirl
Return the pan to the oven and bake for another 15–18 minutes, or until the center just jiggles when you give the pan a small shake. If you want a pretty swirl effect, you can whisk a tiny amount of zest into a tablespoon of lime juice and drizzle it in a quick swirl before the filling fully sets. A toothpick inserted near the center should come out with a few moist crumbs (not raw batter). Let the bars cool on a rack for about 20 minutes before applying glaze.
Step 7: Bake
Let the bars bake until the filling is set but still faintly wobbly in the center—it will firm up as it cools. If your oven tends to run hot, check a few minutes early to prevent cracking in the surface. Baking times can vary by pan and oven, so a quick jiggle test is your best friend here.
Step 8: Cool & Glaze
Allow the bars to come to room temperature, then chill in the fridge for at least 2 hours, ideally overnight. Chilling makes slicing clean and neat. For the glaze, whisk together powdered sugar and lime juice until smooth. If you’re using the white chocolate glaze, melt the chocolate with the cream in 15-second bursts in the microwave, stirring between, until glossy and smooth. Drizzle the glaze over the cooled bars and let it set for about 15 minutes; the glaze will harden into a pretty, glassy finish that catches the light like a tiny citrus glaze. If you’re in a hurry, dust with a little extra zest and a pinch of flaky salt for a quick, sophisticated finish.
Step 9: Slice & Serve
Once the glaze is set, use a sharp, warm knife to cut neat bars. Wipe the blade between slices for clean edges. I like to wipe with a warm damp towel to keep the edges tidy. Serve chilled or at room temperature; both are delightful, and the lime aroma will fill the room as soon as you set them on a serving plate. A dollop of whipped cream or a scatter of lime zest makes them look almost too pretty to eat, which is exactly how I like them to be when I’m sharing with friends.
What to Serve It With
Key Lime Pie Bars are bright enough to pair with almost anything, but here are a few ideas that have worked beautifully in my house.
For Breakfast: A light touch of whipped cream and a fresh cup of coffee. They pair well with a sunny morning and a quiet moment before the day begins.
For Brunch: A platter with berries and a sprig of mint; a glass of sparkling water with lime makes the flavors sing.
As Dessert: A scoop of vanilla bean ice cream or a dollop of coconut whipped cream adds a creamy contrast to the tart lime. A thin lemon curd layered under the crust if you’re feeling fancy can be a showstopper.
For Cozy Snacks: Cut small rectangles, dust with a light dusting of cocoa powder or powdered sugar, and serve with hot tea or a mug of chai. This is the perfect treat when you want something sweet but not too heavy. These bars hold up beautifully in the fridge, so they’re a lifesaver on busy weeknights when you need a quick, cheerful bite after a long day.
Top Tips for Perfecting Your Key Lime Pie Bars
Here are a few tricks I’ve learned along the way to keep every batch consistent and delicious.
Crust Prep: If your crust seems crumbly, add a teaspoon of extra melted butter. The extra fat helps everything come together and stay put when you slice. If you want a crisper crust, bake a minute or two longer, but watch so it doesn’t brown too much.
Filling Flex: The lime juice can vary in brightness. If yours tastes a bit flat, add a teaspoon of zest and a tiny splash more condensed milk to round out the sweetness. You want tang that sings without sharp acidity.
Swirl Customization: For a marble look, drop in a few teaspoons of extra lime juice and drag a toothpick in slow circles through the filling just after you pour it in. The image should be a loose, sunburst pattern that looks pretty but shouldn’t disturb the setting filling.
Ingredient Swaps: Want gluten-free? Use gluten-free graham crackers or a mix of almond flour and a touch more butter in the crust. For a dairy-free version, try coconut cream condensed milk substitute—adjust sweetness to taste and keep an eye on texture since dairy-free fillings can set a bit differently.
Baking Tips: If your oven runs hot, start checking the crust a few minutes early. It’s better to pull slightly underdone than risk a crack down the center. Don’t overfill the pan; a shallow, even layer bakes more evenly and slices cleaner.
Glaze Variations: A lime glaze is a quick, zingy finish that glazes beautifully. If you want something a touch richer, a white chocolate glaze adds silkiness and a creamy sweetness that pairs perfectly with the lime. You can also skip the glaze altogether and finish with a dusting of lime zest and a pinch of flaky salt for a minimalist look.
Lessons learned: I’ve found that giving the crust a little extra press while hot ensures it holds its shape once cooled. I’ve also learned that the lime is not a friend to overcooking—the moment the center wobbles, you’re done. The residual heat finishes the set, and you won’t end up with a dry, crumbly middle. And yes, I’ve experimented with almond milk in place of regular dairy to see if it makes it creamier—spoiler alert: it does add a different texture, but the classic version remains my go-to for the bright, tangy finish I crave.
Storing and Reheating Tips
These bars actually get better as they sit, which is a gift when you’re feeding a crowd or planning ahead.
Room Temperature: Do not leave them out for more than two hours. For best texture, especially if you’re not glazing, wrap well and keep in a cool, dry place or in a covered container for up to 2 days. The filling will still be tender but occasionally the glaze may soften a bit, which is fine if you’re planning to eat them within a day or two.
Refrigerator Storage: Refrigerate in an airtight container for up to 5 days. If you’re carrying them to a gathering, cut and layer with parchment between layers to prevent sticking. The bars stay sliceable and bright for the full window, and you’ll notice flavors deepen with time.
Freezer Instructions: For longer storage, freeze individual bars wrapped tightly in plastic, then placed in a freezer-safe bag for up to 2–3 months. Thaw in the fridge overnight and bring to room temperature for the best texture and flavor. If you’re freezing with glaze on, expect the glaze to soften a bit once thawed; a quick re-glaze can fix that and add a glossy finish again.
Glaze Timing Advice: If you plan to freeze, you can skip glazing until serving day or apply glaze after thawing for a crisp finish. If you’re storing in the fridge without glaze, a light dusting of powdered sugar just before serving looks lovely and keeps things tidy.
Frequently Asked Questions
Final Thoughts
Key Lime Pie Bars feel like a warm hug in a neat, shareable square. They’re the kind of dessert you pull out when you want to show up with something reliably delicious and a little bit magical in a bite or two. The crust gives you that comforting crumb, the filling hits you with sunshine, and the glaze—well, that last extra flourish—adds a glossy finish that looks as good as it tastes. I’ve watched friends close their eyes as they take a bite, whispering “this is exactly what I needed,” and I’ll admit there are days I’ve reached for a square just for a little mood boost. If you’re ever in doubt, bake this for someone you love. You’ll see what I mean. And remember, I’d love to hear how yours turn out—leave a comment, tell me about your favorite glaze, or share a swap you tried. Happy baking!
Key Lime Pie Bars
Ingredients
Crust
- 1.5 cups graham cracker crumbs
- 0.375 cups granulated sugar
- 6 tablespoons unsalted butter, melted
Filling
- 14 ounces sweetened condensed milk
- 0.5 cup key lime juice freshly squeezed is best
- 3 large egg yolks
- 1 teaspoon lime zest
Toppings (Optional)
- whipped cream
- lime slices
Instructions
Preparation Steps
- Preheat your oven to 350°F (175°C). Grease and line a 9x13 inch baking pan with parchment paper, leaving an overhang on the sides for easy removal.
- In a medium bowl, combine the graham cracker crumbs and granulated sugar. Pour in the melted butter and stir until well combined and the crumbs are moistened.1.5 cups graham cracker crumbs
- Press the crumb mixture evenly into the bottom of the prepared baking pan to form the crust. Bake for 8-10 minutes, or until lightly golden. Remove from oven and let cool slightly.
- While the crust is cooling, prepare the filling. In a large bowl, whisk together the sweetened condensed milk, key lime juice, egg yolks, and lime zest until smooth and well combined.1.5 cups graham cracker crumbs
- Pour the lime filling over the cooled crust, spreading it evenly.
- Bake for 15-20 minutes, or until the filling is set around the edges but still slightly jiggly in the center. The center will continue to set as it cools.
- Let the bars cool completely in the pan on a wire rack. Once cooled, cover and refrigerate for at least 2 hours, or until firm.
- Once chilled, use the parchment paper overhang to lift the bars out of the pan. Cut into 16 bars. Serve with whipped cream and lime slices, if desired.