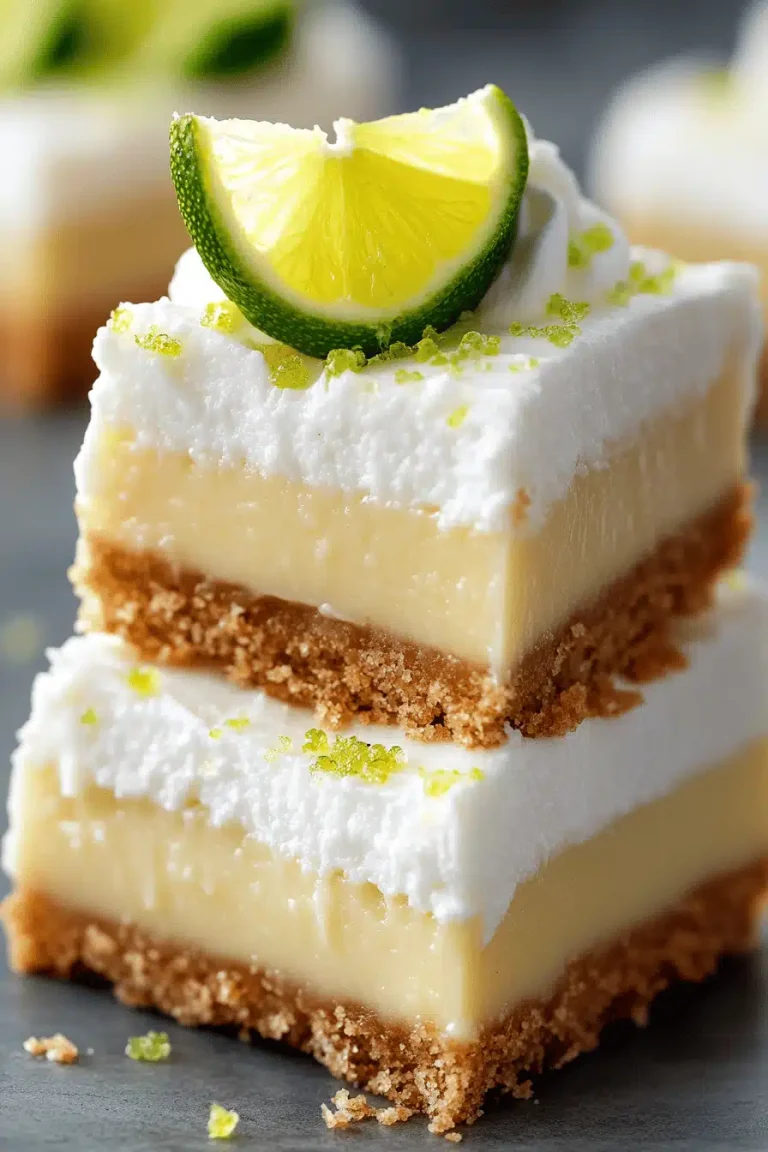
Key Lime Cake Recipe
Oh, where do I even begin with this Key Lime Cake? It’s the kind of cake that instantly transports me back to barefoot summers and the scent of citrus groves. You know, the ones that smell so intensely floral and bright, they almost make your eyes water in the best possible way? That’s what this cake is like. It’s sunshine in dessert form, a perfect little slice of tropical bliss that’s surprisingly easy to whip up, even on a weeknight. Forget those heavy, overly sweet cakes that leave you feeling… well, heavy. This Key Lime Cake is light, tangy, and utterly refreshing. Honestly, it’s my go-to when I need a serious mood booster, or when unexpected guests pop by and I want to impress them without breaking a sweat. It’s got this beautiful balance of sweet and tart that just sings. If you’ve ever loved a good Lemon Poppy Seed muffin, you’re going to adore this. It’s like its sophisticated, more exotic cousin who also happens to be incredibly friendly.
What is a Key Lime Cake?
So, what exactly is this magical Key Lime Cake? Think of it as a delightful hybrid of a tender, moist cake and the vibrant, unmistakable flavor of key limes. It’s essentially a wonderfully fluffy cake that’s infused with the zingy essence of key limes, often featuring a luscious lime-infused frosting or glaze. The ‘key’ in key lime is important here, because these little guys pack a punch that your regular Persian limes just can’t replicate – they’re more floral, more aromatic, and have a unique tartness that’s less acidic and more complex. We’re aiming for that perfect harmony where the sweetness of the cake tames the tartness of the lime just enough to create this incredibly balanced bite. It’s not a dense Pound Cake, nor is it a light sponge. It sits in this perfect middle ground – moist, tender, and bursting with bright citrus notes that wake up your taste buds. It’s like a hug for your senses, a little escape on a plate.
Why you’ll love this recipe?
Let me count the ways! First off, the flavor is just… out of this world. That tangy Key Lime, balanced with the sweetness of the cake? It’s utterly addictive. It’s not cloyingly sweet; instead, it’s bright, refreshing, and satisfyingly zesty. It’s the kind of flavor that lingers on your palate in the best way possible, making you crave just one more bite. Then there’s the simplicity. Seriously, I’ve made this cake when I’ve had only an hour to spare before needing to bring something to a potluck, and it pulled through beautifully. The ingredients are common, and the steps are straightforward, even for a beginner baker. It feels sophisticated, but it’s surprisingly fuss-free. And if you’re budget-conscious like me, you’ll appreciate that most of the ingredients are pantry staples, making this a real lifesaver when you want something special without a hefty price tag. What I truly adore about this key lime cake recipe is its versatility. Serve it as a light dessert after a big meal, pair a slice with your morning coffee, or make it the star of your next brunch spread. It’s just as happy being dressed up with a dollop of whipped cream as it is standing proudly on its own. It’s truly a crowd-pleaser that never fails to get rave reviews. Compared to other citrus cakes, this one has a unique complexity from the key limes that makes it truly stand out. It’s a winner, trust me on this one.
How do you make a Key Lime Cake?
Quick Overview
This Key Lime Cake is all about creating a wonderfully moist and tender crumb infused with bright key lime flavor, then topping it off with a simple, zesty glaze. You’ll mix your dry and wet ingredients separately, gently combine them, pour into a prepared pan, and bake until golden. The magic happens in the simplicity and the intense, natural flavor of the key limes. It’s a process that feels both rewarding and incredibly manageable, even if baking isn’t your everyday thing. The end result is a cake that’s both elegant and incredibly comforting, a true testament to how simple ingredients can create something extraordinary.
Ingredients
For the Main Batter:
2 ½ cups all-purpose flour (spooned and leveled)
1 ½ teaspoons baking powder
½ teaspoon baking soda
½ teaspoon salt
1 cup (2 sticks) unsalted butter, softened to room temperature
1 ¾ cups granulated sugar
3 large eggs, at room temperature
1 teaspoon vanilla extract
1 cup buttermilk, at room temperature (if you don’t have buttermilk, place 1 tablespoon of lemon juice or white vinegar in a measuring cup and fill to the 1-cup line with milk, let sit for 5 minutes)
For the Filling (or rather, the Lime Infusion!):
½ cup fresh Key Lime juice (from about 10-15 key limes – this is where the magic happens! Don’t skimp here; bottled just won’t do!)
2 tablespoons finely grated key lime zest (again, the zest is crucial for that aromatic punch)
For the Glaze:
1 ½ cups powdered sugar, sifted (sifting is key to a smooth glaze!)
2-3 tablespoons fresh key lime juice
1 tablespoon milk or heavy cream (optional, for a slightly richer glaze)
Step-by-Step Instructions
Step 1: Preheat & Prep Pan
First things first, let’s get your oven ready. Preheat it to 350 degrees F (175 degrees C). I like to grease and flour a 9×13 inch baking pan. Some people prefer using parchment paper on the bottom too, which is a great idea if you’re worried about sticking. Make sure to get into all the corners and edges so your beautiful cake releases perfectly. A well-prepared pan is your best friend in preventing any baking disasters!
Step 2: Mix Dry Ingredients
In a medium bowl, whisk together your all-purpose flour, baking powder, baking soda, and salt. Whisking them together ensures that your leavening agents are evenly distributed, which is super important for a consistent rise. You don’t want one bite to be flat and another to be a cake volcano! This step also helps to aerate the flour a bit, making for a lighter cake.
Step 3: Mix Wet Ingredients
In a large bowl, cream together the softened butter and granulated sugar. You want to beat this until it’s light and fluffy – think pale yellow and airy. This usually takes about 3-5 minutes with an electric mixer. Then, beat in the eggs, one at a time, making sure to incorporate each one fully before adding the next. Stir in the vanilla extract. Next, you’ll gradually add your room temperature buttermilk and then, the star of the show: the key lime juice and zest. Mix it all until just combined. Don’t overmix here; we just want everything to come together.
Step 4: Combine
Now it’s time to bring our wet and dry ingredients together. Gradually add the dry ingredients to the wet ingredients, mixing on low speed until just combined. It’s really important not to overmix here. Overmixing can develop the gluten in the flour too much, resulting in a tough cake. Stop mixing as soon as you no longer see streaks of dry flour. A few small lumps are totally fine!
Step 5: Prepare Filling
Actually, for this recipe, the “filling” is really just about infusing that intense key lime flavor directly into the batter. So, in Step 3, when you add the key lime juice and zest to the wet ingredients, that’s where the main flavor infusion happens. We’re not creating a separate filling to layer in, but rather making sure that glorious key lime essence is woven throughout every single bite of the cake itself. This makes for a more uniform, delicious flavor!
Step 6: Layer & Swirl
In this particular recipe, there’s no layering or swirling needed as we are infusing the lime directly into the cake batter itself. You’ll simply pour the batter into your prepared pan. You want to make sure the batter is spread evenly across the pan. Smooth the top with a spatula so you have a nice, flat surface for baking. It makes for a much more even bake and a prettier final presentation.
Step 7: Bake
Pour the batter into your prepared pan and spread it evenly. Bake for 30-35 minutes, or until a wooden skewer or toothpick inserted into the center comes out clean. Ovens can be finicky, so keep an eye on it! If the top starts to brown too quickly, you can loosely tent it with foil. The smell that fills your kitchen at this stage is pure happiness – that sweet and tangy citrus aroma is just divine.
Step 8: Cool & Glaze
Once baked, let the cake cool in the pan for about 10-15 minutes before inverting it onto a wire rack to cool completely. It’s crucial to let it cool completely before glazing, otherwise, the glaze will melt right off! For the glaze, whisk together the sifted powdered sugar and key lime juice until smooth and pourable. If it’s too thick, add a tiny bit more lime juice or milk; if it’s too thin, add more powdered sugar. Drizzle or spread the glaze over the cooled cake. The contrast between the tender cake and the slightly crisp glaze is heavenly.
Step 9: Slice & Serve
Once the glaze has set slightly (about 15-20 minutes), slice your beautiful Key Lime Cake and serve. I find it’s best served at room temperature, but a slight chill is also wonderful. A sharp knife will give you clean slices. You can also add a little extra lime zest on top for garnish if you’re feeling fancy! Enjoy the burst of sunshine with every bite.
What to Serve It With
This Key Lime Cake is so wonderfully versatile, it fits into almost any occasion. For a relaxed breakfast, a small slice pairs perfectly with a strong cup of coffee or a refreshing glass of iced green tea. The brightness of the cake cuts through the richness of the coffee beautifully. For a more elegant brunch spread, I love to serve it with a scattering of fresh berries like raspberries or blueberries. A dollop of lightly sweetened whipped cream or a small scoop of vanilla bean ice cream makes it feel extra special. As a sophisticated dessert, it’s divine on its own, but for those who love a little extra indulgence, a drizzle of raspberry coulis or a side of crème fraîche adds a lovely counterpoint to the tart lime. And for those cozy snacks when you just need a little pick-me-up? This cake is perfect. It’s simple, comforting, and always hits the spot. My family traditions often involve cutting extra-big slices after Sunday dinner, and the kids always ask for seconds, sometimes even thirds! We also love it with a light, airy meringue topping for an extra special treat.
Top Tips for Perfecting Your Key Lime Cake
Over the years, I’ve learned a few little tricks that make this Key Lime Cake absolutely perfect every single time. When it comes to the lime prep, fresh is non-negotiable. Seriously, the flavor from real key limes is miles beyond anything bottled. Roll them firmly on the counter before juicing to get the most juice out of each little fruit. And don’t be shy with the zest – it’s where a lot of that gorgeous aroma comes from! For mixing advice, remember what I said about not overmixing the batter. Once the flour is added, just mix until it’s *barely* combined. A few lumps are better than a tough cake. I always stop mixing and give it a final gentle fold with a spatula to make sure everything is incorporated without overworking it. When it comes to the ingredient swaps, if you absolutely can’t find key limes, you can use regular lime juice, but you might need a little more zest and perhaps a touch more sugar to balance the stronger, more acidic flavor. For a dairy-free version, I’ve had success using full-fat coconut milk (the kind in the can) mixed with a tablespoon of apple cider vinegar for the buttermilk substitute, and it actually makes the cake incredibly moist! Baking wise, always bake at the temperature the recipe states, but be mindful of your oven. If you know your oven runs hot, reduce the temperature by 10-15 degrees. Toothpick test is your best friend here; it should come out with just a few moist crumbs attached, not wet batter. For the glaze variations, if you prefer a thinner glaze, just add a touch more lime juice or milk. For a thicker, creamier glaze, use more powdered sugar. You can even add a tiny bit of green food coloring if you want that classic key lime pie look, but I usually prefer the natural, pale yellow hue. I’ve also found that letting the cake cool completely on a wire rack ensures even cooling and prevents a soggy bottom.
Storing and Reheating Tips
Storing this Key Lime Cake is pretty straightforward, but doing it right ensures it stays delicious. At room temperature, it’s best to keep it covered to prevent it from drying out. I usually use a cake dome or an overturned bowl. It should stay fresh and delicious for about 2-3 days. If you find yourself with a lot of leftovers (which is rare in my house!), or if your kitchen is particularly warm, refrigerator storage is a good option. Wrap the cake tightly in plastic wrap, or store it in an airtight container. It will keep well in the fridge for up to 5 days. When you want to serve it from the fridge, I always recommend letting it sit at room temperature for about 30 minutes to an hour to take the chill off and allow the flavors to bloom. For freezer instructions, this cake freezes surprisingly well! Wrap individual slices or the whole cake (if it’s fully cooled and glazed) tightly in a layer of plastic wrap, then a layer of aluminum foil. It can be frozen for up to 2 months. To thaw, simply unwrap it and let it come to room temperature on the counter. The glaze timing advice is important too: it’s best to glaze the cake *after* it has completely cooled. If you’re freezing it, you can either freeze it unglazed and glaze it once thawed, or freeze it with the glaze on (just make sure the glaze is fully set before wrapping). If storing unfrozen, glazing it just before serving or a few hours before is ideal for maximum freshness.
Frequently Asked Questions
Final Thoughts
So there you have it – my go-to Key Lime Cake recipe! It’s more than just a dessert; it’s a little ray of sunshine on a plate, a guaranteed mood-lifter that brings smiles all around. I truly believe this recipe is special because it captures that perfect balance of tangy, sweet, and incredibly refreshing. It’s simple enough for any baker and impressive enough for any occasion. If you loved this bright, zesty cake, you might also enjoy my Lemon Meringue Pie or my No-Bake Key Lime Pie bars for more of that glorious lime goodness! Give this Key Lime Cake a try, and I promise, you won’t regret it. I can’t wait to hear what you think, so please leave a comment below and let me know how yours turned out! And if you share a picture on social media, be sure to tag me!
Key Lime Cake Recipe
Ingredients
Cake Ingredients
- 2.5 cups all-purpose flour
- 1.5 teaspoons baking powder
- 0.5 teaspoons salt
- 1 cup unsalted butter, softened
- 2 cups granulated sugar
- 4 large eggs
- 0.5 cup buttermilk
- 0.33 cup key lime juice
- 1 teaspoon key lime zest
Cream Cheese Frosting
- 8 ounces cream cheese, softened
- 0.5 cup unsalted butter, softened
- 4 cups powdered sugar
- 2 tablespoons key lime juice
- 1 teaspoon key lime zest
Instructions
Preparation Steps
- Preheat oven to 350°F (175°C). Grease and flour two 9-inch round cake pans.
- In a medium bowl, whisk together flour, baking powder, and salt.
- In a large bowl, cream together butter and sugar until light and fluffy.
- Beat in eggs one at a time, then stir in buttermilk, key lime juice, and key lime zest.
- Gradually add the dry ingredients to the wet ingredients, mixing until just combined.
- Divide the batter evenly between the prepared pans.
- Bake for 30-35 minutes, or until a wooden skewer inserted into the center comes out clean.
- Let the cakes cool in the pans for 10 minutes before inverting them onto a wire rack to cool completely.
- While the cakes cool, prepare the frosting: In a large bowl, beat cream cheese and butter until smooth.
- Gradually beat in powdered sugar, then stir in key lime juice and zest until well combined.
- Once cakes are completely cool, frost the cake as desired.