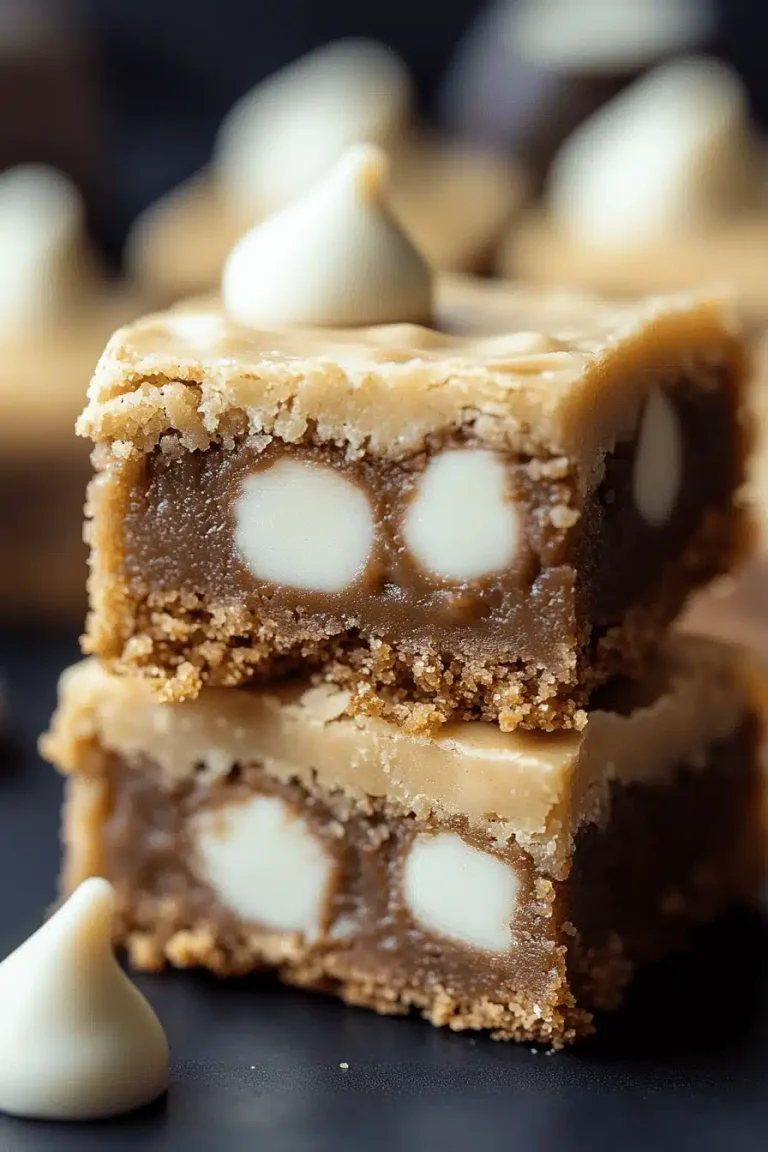
Homemade Rocky Road Fudge
Oh, where do I even begin with this Homemade Rocky Road Fudge? It’s more than just a sweet treat; it’s a direct portal back to my grandma’s kitchen, the scent of melting chocolate filling the air, and that giddy excitement when she’d let me “help” stir. You know those recipes that just hug you when you eat them? This is one of those. It’s rich, it’s decadent, it’s got that perfect crunch from the nuts and that delightful chew from the marshmallows, all swirled together in a way that’s just pure magic. Forget those fancy, complicated desserts that take hours. This rocky road fudge is the ultimate crowd-pleaser and, honestly, a lifesaver when that late-night sweet craving hits and you don’t want to fire up the oven for a whole cake. It’s my go-to for holidays, bake sales, or just because. I’ve made it so many times, it feels like a part of my family now, just like Grandma’s famous Apple Pie, but it’s so much quicker to whip up!
What is Rocky Road Fudge?
So, what exactly *is* this glorious concoction? Think of it as pure, unadulterated happiness in fudgy form. The “Rocky Road” part comes from all those wonderful, chunky bits you find swimming in the chocolatey depths – usually marshmallows and nuts. It’s essentially a no-bake fudge, which is music to my ears on a warm day or when I’m already juggling a million things. Instead of the intricate sugar-work and precise temperature control you might find in some traditional fudges, this one relies on melted chocolate and a few key binders to create its signature dense, melt-in-your-mouth texture. It’s that satisfyingly rich, chocolatey base, studded with those delightful rocky road surprises. It’s uncomplicated, forgiving, and tastes like a million bucks without costing a fortune or requiring advanced culinary degrees. It’s basically a warm hug from your childhood, packaged into a delicious, bite-sized treat.
Why you’ll love this recipe?
There are so many reasons I keep coming back to this Homemade Rocky Road Fudge, and I just know you’ll fall in love with it too. First off, the flavor explosion is just incredible. We’re talking deep, rich chocolate that’s perfectly balanced, not too sweet, not too bitter. Then you get those delightful textural contrasts – the soft, pillowy marshmallows that give a little chew, and the satisfying crunch from the toasted nuts. It’s a party in your mouth! But what truly makes it a winner in my book is its sheer simplicity. Seriously, if you can melt chocolate and stir, you can make this fudge. It’s perfect for beginner bakers, busy parents, or anyone who just wants a fantastic homemade treat without the fuss. It’s also surprisingly cost-effective. You probably have most of the ingredients in your pantry right now! And the versatility? Oh, the possibilities are endless. I’ve added dried cherries, swapped out nuts, even tried different kinds of chocolate. It’s a recipe that grows with you. What I love most, though, is that it always brings a smile to people’s faces. It’s pure comfort food, and that’s something truly special, isn’t it? It’s a delightful departure from a basic Chocolate Chip Cookie, offering something a bit more special without the baking stress.
How do you make Rocky Road Fudge?
Quick Overview
This fudge is all about minimal effort for maximum reward. We’re basically melting good quality chocolate, stirring in some Sweetened Condensed Milk and butter for that creamy, fudgy texture, and then folding in all the delicious rocky road goodies. It sets up beautifully in the fridge, no oven required! The whole process takes maybe 15-20 minutes of active time, then just a few hours of patient waiting for it to set. It’s honestly one of the easiest, most satisfying treats I know how to make, perfect for those moments you need something sweet, fast!
Ingredients
For the Main Fudge Base:
You’ll want to start with good quality chocolate. I usually go for a mix of semi-sweet and milk chocolate chips – this gives it a nice depth without being too dark. About 3 cups total of good quality chocolate chips (around 500g). If you’re feeling fancy, you can chop up a few good quality chocolate bars instead of chips; it melts beautifully. Don’t skimp on this part, as it’s the heart of your fudge! A block of good unsalted butter, about half a cup (113g), will add richness and help create that smooth texture. And for the magic binder, you’ll need one (14-ounce / 396g) can of sweetened condensed milk. Make sure it’s sweetened condensed milk, not evaporated milk – the sugar is crucial here!
For the Rocky Road Mix-ins:
Here’s where the fun begins! I always use about 1.5 cups of mini marshmallows. Mini ones distribute better and melt just a little bit, creating those lovely gooey pockets. For the crunch, about 1 cup of chopped nuts. Walnuts are classic, but pecans are divine, and even almonds work wonders. I like to lightly toast mine in a dry skillet for a few minutes until fragrant – it really amps up their flavor and crunch. Make sure they’re cooled before adding them so they don’t melt the chocolate prematurely!
For Optional Flavor Boosts:
This is where you can really personalize it. A teaspoon of vanilla extract is a must for me, as it enhances the chocolate flavor beautifully. If you like a hint of something extra, a pinch of salt can cut through the sweetness and make the chocolate pop even more. Some people love adding a tablespoon or two of peanut butter – it makes it extra decadent! I’ve even tried a swirl of caramel before chilling, and oh my, that’s a game-changer!
Step-by-Step Instructions
Step 1: Preheat & Prep Pan
This is a no-bake situation, so no oven preheating needed! What you *do* need is a pan. I usually grab an 8×8 inch square baking pan. Line it with parchment paper, leaving some overhang on the sides. This makes it super easy to lift the whole block of fudge out later. Make sure the parchment covers the bottom and comes up the sides – no sticky fudge sticking to my pan, thank you very much!
Step 2: Mix Dry Ingredients
Grab a medium-sized bowl and toss in your chopped nuts (if using toasted ones, make sure they’ve cooled down) and your mini marshmallows. Give them a quick stir to combine. Set this bowl aside. This is your rocky road crew, ready to be unleashed into the chocolatey goodness.
Step 3: Mix Wet Ingredients
In a heatproof bowl set over a saucepan of simmering water (a double boiler setup), combine your chocolate chips and the unsalted butter. Make sure the bottom of the bowl doesn’t touch the water; you just want to gently melt everything. Stir occasionally until the butter is melted and the chocolate is smooth and glossy. This usually takes about 5-8 minutes. Once smooth, remove the bowl from the heat.
Step 4: Combine
Pour the entire can of sweetened condensed milk into the melted chocolate and butter mixture. Add your vanilla extract and the pinch of salt, if you’re using them. Stir everything together until it’s completely smooth and beautifully combined. This is your rich, luscious fudge base. It should look thick and glossy, almost like a ganache.
Step 5: Prepare Filling
Now for the fun part! Gently fold the marshmallow and nut mixture into the warm chocolate base. Be careful not to overmix – you want distinct chunks of marshmallows and nuts, not a uniform mush. Just enough to get them evenly distributed throughout the fudge. It’s okay if some marshmallows start to melt a little; that’s part of the charm!
Step 6: Layer & Swirl
Pour the fudge mixture into your prepared pan. Use a spatula to spread it out evenly. If you’re adding any extra swirls like caramel or peanut butter, now’s the time to drizzle them over the top and use a toothpick or skewer to swirl them in gently. You want beautiful ribbons of flavor, not a muddy mess.
Step 7: Bake
Nope, no baking for this fudge! We just need it to set. Cover the pan tightly with plastic wrap or foil, and pop it into the refrigerator for at least 2-3 hours, or until it’s firm to the touch. The colder it is, the easier it will be to cut.
Step 8: Cool & Glaze
This fudge doesn’t need a glaze. The beauty is in its simple, fudgy finish, studded with all those delicious rocky road bits.
Step 9: Slice & Serve
Once the fudge is completely set, use the parchment paper overhang to lift the entire block out of the pan. Place it on a cutting board. For the cleanest cuts, use a sharp knife dipped in hot water and wiped dry between each cut. This prevents the fudge from sticking and makes for beautiful, neat squares. Cut into 1-inch squares, or whatever size makes your heart happy!
What to Serve It With
Honestly, this Homemade Rocky Road Fudge is so good, it stands entirely on its own. But if you’re looking to create a little something special, here are a few ideas that I absolutely adore.
For Breakfast: Okay, I know this sounds decadent, but hear me out! A tiny sliver of this fudge alongside a strong cup of coffee is my secret weapon for a tough morning. It’s like a little reward to start the day. Or, if you’re feeling particularly indulgent, a small piece alongside some fluffy pancakes or waffles adds an unexpected burst of chocolatey goodness.
For Brunch: This fudge is a showstopper on any brunch spread. I like to cut it into smaller, bite-sized pieces and arrange them on a pretty tiered stand. It pairs wonderfully with a mimosa or a fancy iced coffee. It’s always the first thing to disappear!
As Dessert: My absolute favorite way to serve this is after dinner, maybe with a scoop of good quality vanilla bean ice cream. The contrast of the warm, melting fudge with the cold ice cream is heavenly. Or, serve it alongside a rich espresso for a decadent after-dinner treat. It’s much more impressive than you’d think for something so simple!
For Cozy Snacks: This is the ultimate comfort food. I love having a piece with a warm mug of hot chocolate on a chilly evening. It’s pure bliss. It’s also perfect for movie nights – just have a plate of these ready, and everyone will be happy campers. My kids absolutely love these after school with a glass of cold milk; it’s their favorite “after school treat.”
My personal family tradition is to always have a batch ready during the holiday season. We cut them into festive shapes (sometimes using cookie cutters!) and gift them to neighbors and friends. It’s always met with such joy, and it feels so much more thoughtful than store-bought candy.
Top Tips for Perfecting Your Homemade Rocky Road Fudge
I’ve made this fudge more times than I can count, and through all those batches, I’ve picked up a few tricks that I think really make a difference. These are the little things that take it from good to absolutely phenomenal.
Chocolate Quality Matters: I know I mentioned this in the ingredients, but it’s worth repeating. Using a good quality chocolate is paramount. If you use waxy, lower-quality chips, your fudge might end up with a dull finish or a slightly greasy texture. Opt for chocolate that you enjoy eating on its own! Brands like Ghirardelli, Guittard, or even some of the higher-end store brands make a noticeable difference.
Don’t Overheat the Chocolate: When you’re melting the chocolate and butter, be patient. Gentle heat is key. If you overheat chocolate, it can seize up and become grainy or even burn. Use a double boiler setup and stir constantly until just melted and smooth. Remove it from the heat immediately after it’s smooth.
The Marshmallow Melt: While we want distinct marshmallows, a little bit of melting is good! It helps create those wonderfully gooey, chewy pockets that are characteristic of rocky road. Don’t worry if they look like they’re dissolving slightly; they’ll firm up again as the fudge chills. Just fold them in gently.
Toasting the Nuts: This is a game-changer! Toasting nuts brings out their natural oils and intensifies their flavor. It takes just a few minutes in a dry skillet over medium heat until they’re fragrant. Let them cool completely before adding them to the fudge, though, so they don’t melt the chocolate too early.
Sweetened Condensed Milk is Key: Make absolutely sure you’re using *sweetened condensed milk* and not evaporated milk. They look similar, but sweetened condensed milk has sugar added, which is essential for the fudge’s texture and sweetness. Evaporated milk will result in a much runnier, less sweet mixture.
Gentle Folding: When you add the marshmallows and nuts to the chocolate base, fold them in gently. You want to distribute them evenly, but you don’t want to break them down too much or overwork the mixture, which can make the fudge tough. Think of it as a delicate dance, not a vigorous stir.
Proper Pan Prep: Lining your pan with parchment paper is crucial. It prevents sticking and makes removing the fudge a breeze. Make sure the parchment paper comes up the sides of the pan so you have something to grip when lifting it out.
Cooling Time is Important: Resist the urge to cut into the fudge too soon! It needs adequate time in the refrigerator to set properly. At least 2-3 hours is usually enough, but if your kitchen is warm or you’ve added extra mix-ins, it might need a bit longer. A firm fudge cuts much more cleanly.
The Hot Knife Trick: For those perfectly clean edges, dipping your knife in hot water and drying it before each cut makes a world of difference. It helps slice through the fudge smoothly without dragging or crumbling.
Ingredient Swaps: Feel free to play around! If you’re not a fan of nuts, leave them out entirely. Want a different crunch? Try crispy rice cereal or even chopped pretzels for a salty-sweet kick. Different chocolate types (dark, white, caramel) can also be fun experiments!
Storing and Reheating Tips
One of the best things about this Homemade Rocky Road Fudge is how well it keeps. It’s a treat that’s designed to be made ahead, which is always a win in my book! Knowing how to store it properly ensures it stays delicious for days, or even weeks.
Room Temperature Storage: This is my preferred method for immediate enjoyment. Once the fudge is fully set and cut, you can store it in an airtight container at room temperature. I usually keep it in a container with a tight-fitting lid, perhaps with a piece of parchment paper between layers if you stack them. It will stay fresh and delicious for about 5-7 days. The texture might soften slightly as it sits, but the flavor remains fantastic.
Refrigerator Storage: If you prefer your fudge a bit firmer, or if your kitchen is particularly warm, refrigerating it is a great option. Store it in an airtight container, again, with parchment between layers if needed. It will keep well in the fridge for up to 2 weeks. When you take it out, I recommend letting it sit at room temperature for about 10-15 minutes before serving, so it’s not rock hard and the flavors can come through better.
Freezer Instructions: For longer storage, freezing is your best bet. Cut the fudge into individual pieces and wrap each piece tightly in plastic wrap, then place them in a freezer-safe bag or airtight container. Properly wrapped, homemade rocky road fudge can last in the freezer for up to 3 months. Thaw it by transferring the pieces to the refrigerator overnight, then let them come to room temperature for about 30 minutes before enjoying.
Glaze Timing Advice: Since this fudge doesn’t have a glaze, this isn’t a concern! The beauty of this recipe is its simplicity and its reliance on the inherent deliciousness of the chocolate and mix-ins.
I’ve found that the texture holds up remarkably well in all these storage methods. The key is always an airtight container to prevent it from drying out or absorbing other odors. If it does start to feel a little dry after a week or so, a quick zap in the microwave for about 5-10 seconds can help soften it up again, though it’s usually not necessary.
Frequently Asked Questions
Final Thoughts
So there you have it – my tried-and-true recipe for Homemade Rocky Road Fudge. It’s the kind of recipe that makes you feel like a kitchen wizard, even if you’re a total beginner. The combination of rich chocolate, chewy marshmallows, and crunchy nuts is just irresistible, and the fact that it’s no-bake makes it an absolute lifesaver. It’s brought so much joy to my family, and I truly hope it does the same for yours. Whether you’re making it for a special occasion, a holiday treat, or just because you deserve a little something sweet, this fudge is always a winner. If you love this, you might also enjoy my recipe for classic chocolate truffles or my easy no-bake peanut butter cookies – they have that same comforting, homemade vibe!
I can’t wait to hear what you think! Have you made this before? Do you have any special additions you like to include? Let me know in the comments below, and don’t forget to share your creations! Happy baking (or, in this case, happy no-baking)!

Homemade Rocky Road Fudge
Ingredients
Main Ingredients
- 0.5 cup unsalted butter
- 1 can sweetened condensed milk (14 ounce)
- 2 cups semisweet chocolate chips
- 1 cup mini marshmallows
- 1 cup chopped walnuts or pecans
Instructions
Preparation Steps
- Line an 8x8 inch baking pan with parchment paper, leaving an overhang on the sides.
- In a medium saucepan, melt butter over low heat.0.5 cup unsalted butter
- Add sweetened condensed milk and stir until well combined. Cook for 2-3 minutes, stirring constantly, until slightly thickened.0.5 cup unsalted butter
- Remove from heat and stir in the chocolate chips until completely melted and smooth.0.5 cup unsalted butter
- Fold in the marshmallows and chopped nuts until evenly distributed.0.5 cup unsalted butter
- Pour the mixture into the prepared pan and spread evenly.
- Refrigerate for at least 2 hours, or until firm.
- Lift the fudge out of the pan using the parchment paper overhang. Cut into squares and serve.