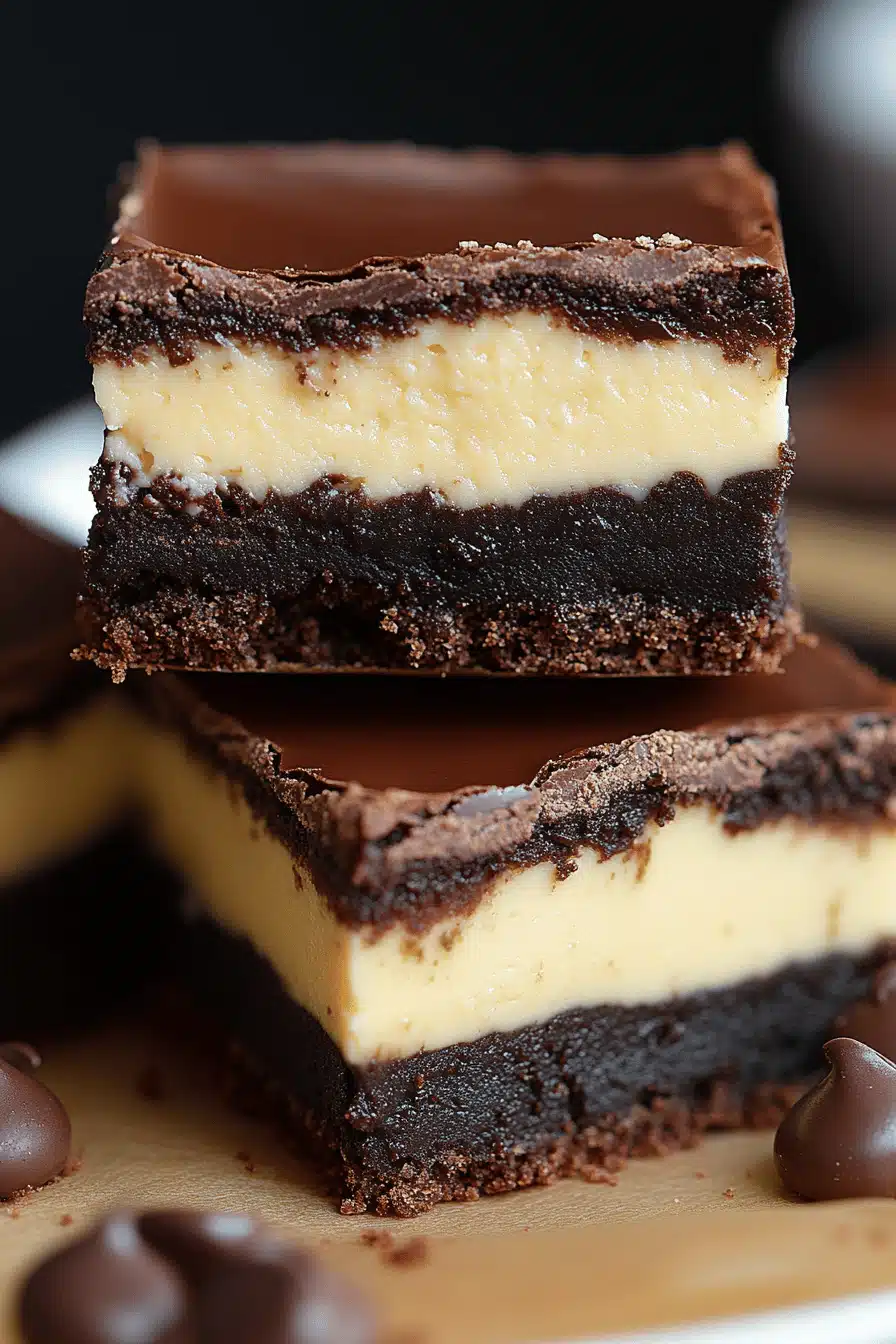
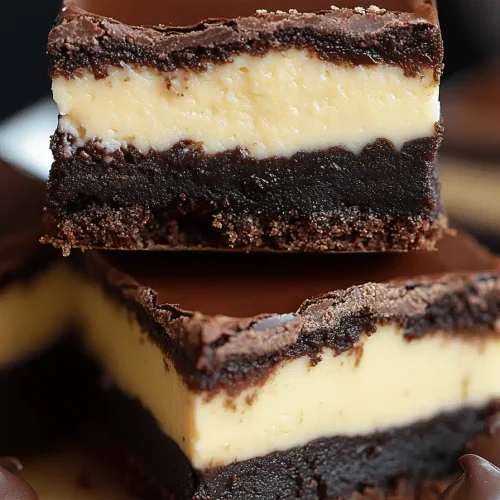
halloween cream cheese brownies
You know, there are some recipes that just *feel* like a holiday. For me, that’s always been the case with brownies. But when Halloween rolls around, I’ve got a special place in my heart, and my oven, for these Halloween Cream Cheese Brownies. They’re not just a treat; they’re a little bit of magic. I remember the first time I made them, years ago, when my little ones were tiny and obsessed with all things spooky. The swirls of cream cheese looked like little ghosts peeking out, and the rich, fudgy chocolate was just pure comfort. They’re so much more than just a dessert; they’re a memory-maker, and honestly, they’re ridiculously easy to whip up, even when the pre-Halloween chaos is in full swing. Forget those complicated cakes or fussy cookies; these brownies are the unsung heroes of any Halloween spread. They’re that perfect balance of decadent chocolate and tangy cream cheese that makes everyone ask, “What *is* this amazing thing?!” It’s my go-to when I want something that tastes like I spent hours in the kitchen, but in reality, I probably spent about 20 minutes prepping.
What are some good Halloween cream cheese brownies?
So, what exactly are these magical little squares? Think of them as your classic, ultra-fudgy brownie base, but with a dreamy, swirled layer of tangy Cream Cheese baked right into the top. It’s not just a topping; it’s integrated, creating these beautiful, almost marbled patterns that are just begging for a spooky topping. The name itself conjures up images of fun, right? Halloween cream cheese brownies are essentially a celebration in brownie form. The cream cheese layer adds this wonderful richness and a slight tang that cuts through the deep chocolate flavor beautifully. It’s like a cheesecake met a brownie and they decided to have the most delicious party ever. It’s that “wow” factor without the intimidation. It’s a brownie, but it’s elevated. It’s the kind of dessert that looks impressive but is surprisingly straightforward to assemble. It’s essentially a foolproof way to impress your friends and family, and it tastes utterly divine.
Why you’ll love this recipe?
Honestly, if I had to pick just *one* dessert to make for a fall get-together or even just a cozy night in, it would be these Halloween cream cheese brownies. There are so many reasons why they’ve become a staple in my kitchen, and I just know you’re going to fall in love with them too. First off, the flavor profile is just out of this world. You get that deep, intense chocolate richness from the brownie base, which is perfectly complemented by the smooth, slightly tart Cream Cheese Swirl. It’s that classic combination that just works, you know? It’s not overly sweet, which I really appreciate, and the texture is just incredible – fudgy, dense, and utterly satisfying. Then there’s the sheer simplicity of it all. I’m all about recipes that deliver maximum flavor with minimum fuss, and this one is a lifesaver on busy weeknights or when you’re hosting. You can honestly mix the batter and the cream cheese filling in under 20 minutes, and the rest is just hands-off baking time. No fancy equipment needed, just a bowl, a whisk, and a spatula. It’s also surprisingly cost-effective! Most of the ingredients are pantry staples, meaning you don’t need to break the bank to whip up something truly special. What I love most about these, beyond the taste and ease, is their versatility. They’re perfect for Halloween, obviously, but honestly, they’re delicious year-round. My kids ask for these all the time, not just when it’s spooky season! They’re fantastic for bake sales, potlucks, or when you’re just craving something incredibly decadent. Compared to a full-blown cheesecake or a multi-layered cake, these brownies offer that same “wow” factor without all the stress. They’re the perfect balance of elegance and comfort, and I can’t recommend them enough!
How do I make a pumpkin cream cheese brownie?
Quick Overview
This recipe is all about creating two distinct but harmonious layers: a rich, fudgy brownie base and a tangy, creamy swirl on top. You’ll mix up a simple brownie batter, prepare a quick Cream Cheese filling, layer them in a pan, swirl them together for that signature marbled effect, and then bake until perfectly set. It’s a straightforward process that yields incredibly impressive results, perfect for any occasion but especially for celebrating Halloween. The beauty is in the simplicity – minimal steps, maximum deliciousness.
Ingredients
For the Main Batter:
You’ll need 1 cup (2 sticks) unsalted butter, melted. Make sure it’s good quality butter; it really does make a difference in flavor. For the chocolatey goodness, we’re going to use 1 ½ cups granulated sugar. You can adjust this slightly if you prefer a less sweet brownie, but this amount is pretty perfect for the richness. Now for the chocolate itself: ¾ cup unsweetened cocoa powder. I always opt for a good Dutch-processed cocoa if I can find it – it gives the brownies a darker color and a deeper, smoother chocolate flavor. For binding and structure, we need 3 large eggs, and make sure they’re at room temperature; they incorporate much better. And of course, 1 teaspoon vanilla extract to enhance all those wonderful flavors. For the dry stuff, it’s 1 cup all-purpose flour, ½ teaspoon baking powder for just a little lift, and ½ teaspoon salt to balance the sweetness and bring out the chocolate. Oh, and for that extra fudgy texture, I always add ½ cup chocolate chips – semi-sweet or dark, your choice!
For the Filling:
This is where the magic happens! You’ll need 8 ounces Cream Cheese, softened. Make sure it’s truly softened, not just a little cool – this is key for a smooth, lump-free filling. I usually take it out of the fridge about an hour before I plan to start mixing. Then, ½ cup granulated sugar to sweeten it just a bit. For creaminess and binding, we need 1 large egg, also at room temperature. And finally, 1 teaspoon vanilla extract for a lovely hint of flavor that complements the cream cheese perfectly. Sometimes, if I’m feeling extra fancy, I’ll add a tiny pinch of salt here too, but it’s totally optional.
For the Glaze:
This is where you can really have some fun with the Halloween theme! For a basic glaze, you’ll need 1 cup powdered sugar, sifted if you want it extra smooth. Then, about 2-3 tablespoons milk (or even heavy cream for a richer glaze). A dash of vanilla extract is always a good idea. For the “Halloween” part, you can use food coloring – a few drops of orange or green can make it festive! Or, for a more natural color, a little bit of beet juice for pink/red or spinach juice for green works wonders, though it might slightly alter the flavor. You can also just dust them with powdered sugar for a spooky “cobweb” look.
Step-by-Step Instructions
Step 1: Preheat & Prep Pan
Alright, first things first, let’s get your oven ready. Preheat it to 350 degrees Fahrenheit (175 degrees Celsius). This is a pretty standard temperature for brownies, ensuring they bake evenly without getting too crispy on the edges before the center is cooked. Now, grab an 8×8 inch baking pan. I always like to line mine with parchment paper, leaving some overhang on the sides. This isn’t just about making cleanup easier (though it totally does!), it also helps you lift the finished brownies right out of the pan. If you’re not using parchment, make sure to generously grease and flour your pan. Trust me, no one wants brownies stuck to the bottom!
Step 2: Mix Dry Ingredients
In a medium bowl, whisk together your flour, baking powder, salt, and cocoa powder. The cocoa powder can sometimes clump up, so whisking it with the dry ingredients helps to break up any lumps and distribute it evenly. This step ensures that when you add the wet ingredients, you won’t have streaks of unmixed cocoa powder in your batter. It’s a small step, but it makes a big difference in the final texture and appearance of your brownies. Make sure to get all those dry bits well combined.
Step 3: Mix Wet Ingredients
Now, in a separate, larger bowl, combine your melted butter and granulated sugar. Give that a good whisk until it’s well combined. Then, add in your eggs one at a time, whisking after each addition. You’re not trying to whip air into this; you just want to ensure they’re fully incorporated into the butter and sugar mixture. Stir in the vanilla extract. This mixture should look smooth and glossy. It’s the base of our fudgy brownie goodness!
Step 4: Combine
Pour your dry ingredients into the wet ingredients. Now, here’s a little trick I learned: use a spatula or a wooden spoon, not a whisk, to combine them. Gently fold the dry ingredients into the wet until *just* combined. Overmixing is the enemy of tender brownies! You want to stop as soon as you no longer see streaks of dry flour. It’s okay if there are a few small lumps. Then, fold in those ½ cup of chocolate chips. They’ll melt a bit as they bake, creating extra pockets of chocolatey bliss.
Step 5: Prepare Filling
While your brownie batter is resting, let’s get the cream cheese filling ready. In a medium bowl, beat the softened cream cheese until it’s really smooth and creamy. You can use an electric mixer for this if you have one, but I often just use a whisk and some elbow grease. Add the granulated sugar and beat until well combined and no lumps remain. Then, beat in the egg and vanilla extract until everything is smooth and glossy. This filling should be thick but pourable.
Step 6: Layer & Swirl
Now for the fun part – assembling! Pour about half to two-thirds of your brownie batter into your prepared baking pan and spread it out evenly. Don’t worry if it’s not perfect; it’s going to get covered. Spoon dollops of the cream cheese filling over the brownie batter. Then, pour the remaining brownie batter over the cream cheese dollops. Now, take a knife or a skewer and gently swirl the batters together. You don’t want to over-swirl and mix them completely; aim for those beautiful marbled patterns that make these brownies so special. A few gentle figure-eights or zig-zags should do the trick!
Step 7: Bake
Pop that pan into your preheated oven. Bake for about 25-35 minutes. The exact time will depend on your oven, of course. You’ll know they’re done when the edges are set and slightly pulling away from the sides of the pan, and the center looks mostly set. You can insert a toothpick into the center – it should come out with a few moist crumbs attached, not wet batter. If it comes out completely clean, they might be a bit overbaked and could be dry. I usually err on the side of slightly underbaked for maximum fudginess.
Step 8: Cool & Glaze
This is a tough step, but you absolutely *must* let them cool completely in the pan on a wire rack before you even think about glazing or cutting. I know, I know, the smell is intoxicating, but cutting into them too soon will result in a gooey, messy disaster. Once they’re completely cool, you can make your glaze. Whisk together the powdered sugar, milk, and vanilla until smooth. Add a little more milk for a thinner glaze or more powdered sugar for a thicker one. If you’re using food coloring, add it now. Drizzle or spread the glaze over the cooled brownies. If you want to do a festive Halloween design, wait for the glaze to set a bit before adding details.
Step 9: Slice & Serve
Once the glaze is set, you can lift the brownies out of the pan using the parchment paper overhang. Place them on a cutting board and slice them into squares. I usually get about 16 brownies from an 8×8 pan. For the cleanest cuts, use a sharp knife and wipe it clean between each slice. Serve them at room temperature for the best fudgy texture. They’re absolutely delicious on their own, but a scoop of vanilla ice cream never hurt anyone!
What to Serve It With
These Halloween cream cheese brownies are so versatile, they honestly fit into almost any part of your day or any kind of gathering. For a relaxed breakfast or brunch, I love to pair them with a strong cup of coffee. The bitterness of the coffee really balances the richness of the brownie. I’ll often cut them into smaller squares for a little morning treat. For a more elegant brunch spread, I might dust them with a little extra powdered sugar for a snow-like effect or arrange them on a pretty platter with some fresh berries – raspberries are particularly lovely with chocolate. As a dessert, they’re already a star, but they play exceptionally well with others. A scoop of good quality vanilla bean ice cream is a classic for a reason, or perhaps a dollop of freshly whipped cream. For those cozy, autumnal evenings, when you just need something comforting, these are perfect. I often have them with a glass of cold milk, just like I did as a kid. Sometimes, if I’ve made a batch for a family movie night, we’ll even serve them warm with a drizzle of caramel sauce. It’s such a crowd-pleaser, and the swirl pattern makes them look extra special, even if you’re just serving them casually. They’re honestly good enough to stand on their own, but if you’re looking to create a fuller dessert experience, a fruit coulis or even a sprinkle of sea salt on top can elevate them even further.
Top Tips for Perfecting Your Halloween Cream Cheese Brownies
I’ve made these Halloween cream cheese brownies more times than I can count, and over the years, I’ve picked up a few tricks that I think really make a difference. So, let’s talk about how to get them just perfect. First off, **ingredient temperature is key**, especially for the cream cheese filling. Make sure your cream cheese and eggs are at room temperature for both the brownie batter and the filling. This ensures everything emulsifies beautifully and you get a smooth, lump-free mixture. Cold ingredients can lead to a streaky or lumpy batter, and nobody wants that! When it comes to **mixing the brownie batter**, remember my earlier tip: fold gently, and don’t overmix! Overmixing develops the gluten in the flour, which can lead to tough, cakey brownies instead of the dense, fudgy ones we’re going for. Stop mixing as soon as the dry ingredients are just incorporated. For the **swirls**, don’t go crazy! A few gentle passes with a knife or skewer are all you need to create those beautiful marbled patterns. If you over-swirl, you’ll just end up with a uniform brown color, and the visual appeal is a big part of what makes these special. You want distinct ribbons of chocolate and cream cheese. When it comes to **baking**, trust your senses and a toothpick. Ovens can vary, so don’t rely solely on the clock. Look for those set edges and that slightly firm center. A few moist crumbs on the toothpick are ideal for fudgy brownies; a completely clean toothpick often means they’re overbaked and will be dry. And a crucial step that’s often overlooked: **cooling completely**. I know it’s tempting to dive in, but letting them cool fully in the pan allows them to set properly. Cutting them while warm will result in a messy, gooey situation. If you want to **experiment with ingredient swaps**, I’ve had success using half whole wheat flour and half all-purpose flour for a slightly healthier twist, though they might be a bit denser. For the chocolate chips, feel free to mix in some white chocolate chips or even chopped nuts if you like. If you want to **adjust the sweetness**, you can slightly reduce the sugar in the brownie batter, but be mindful that sugar also contributes to texture and moisture. For the **glaze**, if it’s too thick, add milk a teaspoon at a time. If it’s too thin, add more powdered sugar a tablespoon at a time. And for those spooky Halloween colors, a little bit of natural food coloring like beet powder or turmeric can work wonders without affecting the taste too much!
Storing and Reheating Tips
Now, let’s talk about keeping these delicious Halloween cream cheese brownies fresh, because you’ll definitely want to savor them! For **room temperature storage**, I find they’re best eaten within the first 2-3 days. After baking and cooling completely, I store them in an airtight container. If you’ve already added the glaze, make sure it’s fully set before covering them. They maintain their fudgy texture really well at room temperature, and honestly, they’re just as good, if not better, on the second day as the flavors meld together. If you know you won’t get through them in a couple of days, **refrigerator storage** is your best bet. They’ll last quite a bit longer in the fridge, usually up to a week, stored in an airtight container. The texture might firm up a bit in the fridge, so if you prefer them softer, just let them sit at room temperature for about 15-20 minutes before serving. I sometimes find that the cream cheese layer can become extra delicious and firm in the fridge, almost like a mini cheesecake bite. For **freezer instructions**, these brownies freeze remarkably well, which is a lifesaver if you want to get ahead of the holiday baking! Once they’re completely cooled, and the glaze is set (or if you plan to glaze them after thawing), cut them into squares. Wrap each square tightly in plastic wrap, then place them in a freezer-safe bag or airtight container. They can stay frozen for up to 2-3 months. To thaw, simply transfer them from the freezer to the refrigerator overnight, or leave them on the counter for a few hours. If you plan to glaze them after thawing, wait until they’re completely thawed and at room temperature. Honestly, they’re so good, they never last long enough in my house to need freezing, but it’s a great option if you’re preparing for a big party or want to have them on hand!
Frequently Asked Questions
Final Thoughts
So there you have it – my absolute favorite Halloween cream cheese brownies. I truly believe this recipe is a winner because it strikes that perfect balance between being incredibly decadent and surprisingly easy to make. The rich, fudgy chocolate and the tangy cream cheese swirl create a flavor combination that’s just irresistible, and the beautiful marbled look makes them a showstopper, especially during spooky season. Whether you’re baking for a crowd, a family gathering, or just a personal treat, these brownies are guaranteed to be a hit. They’re the kind of dessert that brings smiles and happy sighs, and they remind me of all the best parts of home baking. If you love these, you might also enjoy my classic fudgy brownies or my pumpkin spice swirl bars for more seasonal deliciousness. I really hope you give these Halloween cream cheese brownies a try. I can’t wait to hear how yours turn out and what kind of fun decorations you come up with! Happy baking, everyone!
Loaded Halloween Cream Cheese Brownies
Ingredients
Main Ingredients
- 0.5 cup unsalted butter (1 stick)
- 6 ounces dark or bittersweet chocolate (chopped (I use 72%))
- 2 large eggs
- 0.75 cup granulated sugar
- 1 tablespoon McCormick Pure Vanilla Extract
- 1 tablespoon brewed coffee (leftover or cold coffee is okay, optional but recommended)
- 1 teaspoon instant espresso granules (optional but recommended)
- 0.75 cup all-purpose flour
- 0.5 teaspoon salt (or to taste)
- 8 ounces brick-style cream cheese (softened)
- 1 large egg
- 0.25 cup granulated sugar
- 10 drops Yellow McCormick Assorted Food Color (or as needed)
- 5 drops Red McCormick Assorted Food Color (or as needed)
- 12 sandwich cookies (such as Oreos, chopped (I chop each cookie in 6 to 9 pieces))
- 0.5 cup semi-sweet chocolate chips
Instructions
Preparation Steps
- Make the Brownies
- Preheat oven to 350F. Line an 8-inch square pan with aluminum foil leaving overhang and spray with cooking spray, or grease and flour the pan; set aside.
- To a large microwave-safe bowl, add the butter, chocolate, and heat on high power to melt, about 2 minutes. Stop to check and stir after 1 minute. Heat in 15-second increments until chocolate has melted and mixture can be stirred smooth. Allow mixture to cool momentarily before adding the eggs so they don’t scramble.
- Add the eggs, sugar, vanilla, optional coffee, optional espresso granules (neither make brownies taste like coffee and both enhance and round out the chocolate flavor), and whisk vigorously to combine.
- Add the flour, salt, and stir until smooth and combined without overmixing.
- Turn batter out into prepared pan, smoothing the top lightly with a spatula as necessary; set aside.
- Make the Cream Cheese Topping To a medium bowl, add the cream cheese, egg, sugar, and beat with a handheld electric mixer on high speed for about 2 minutes, or until mixture is smooth. Stop to scrape down the sides of the bowl as necessary.
- Add the Yellow Food Color, Red Food Color, and mix to incorporate. As needed, add additional drops of food color to achieve the desired shade of orange. Remember to add slowly because you can’t un-do it once you add it.
- Turn mixture out over the brownie layer in heaping tablespoon-sized dollops, leaving a bare 0.5-inch perimeter around the edges (the cream cheese is prone to burning if you add it right up to the edge so leave some space). Take your time and evenly smooth the dollops together to form an solid layer.
- Evenly sprinkles the sandwich cookies, chocolate chips, and bake for about 43 to 45 minutes, or until brownies are done. The toothpick test is tricky since you’ll hit melted chocolate chips and soft cream cheese, but test a few patches and when inserting the toothpick into the deepest brownie layer, it should feel ‘thick’ and set and not runny.
- Allow brownies to cool uncovered on a wire rack for about 2 hours.
- Cover with foil and refrigerate for at least 3 to 4 hours (I prefer overnight) before slicing and serving. The cream cheese needs to be chilled and set before slicing.