Cookie Bites Make Dessert Magic
Growing up, I watched my mom pull secrets from her old wooden recipe box the way you lean into a warm hug. The air would fill with vanilla and something chocolatey, and suddenly the whole kitchen felt like a little celebration. That’s exactly what this cookie bites dessert feels like tonight: a tiny, perfect bite that tastes like a memory. Imagine a chewy, butter-rich cookie pocket with a creamy center, finished with a glossy glaze that catches the light like caramel. It’s unbelievably versatile—you can tuck in a pinch of cinnamon, swap in Peanut Butter, or keep it simple and pure. What I love most is how this small treat travels so well on busy weeknights or lazy weekends. I’ll admit it, this one’s a lifesaver on quick dessert nights, and my kids actually ask for seconds every single time. The scent alone—brown sugar, vanilla, and that crisp edge—conjures family dinners and late-night chats. So grab a mug, because this cookie bites dessert is about to become your new favorite go-to indulgence.
What is a cookie bite?
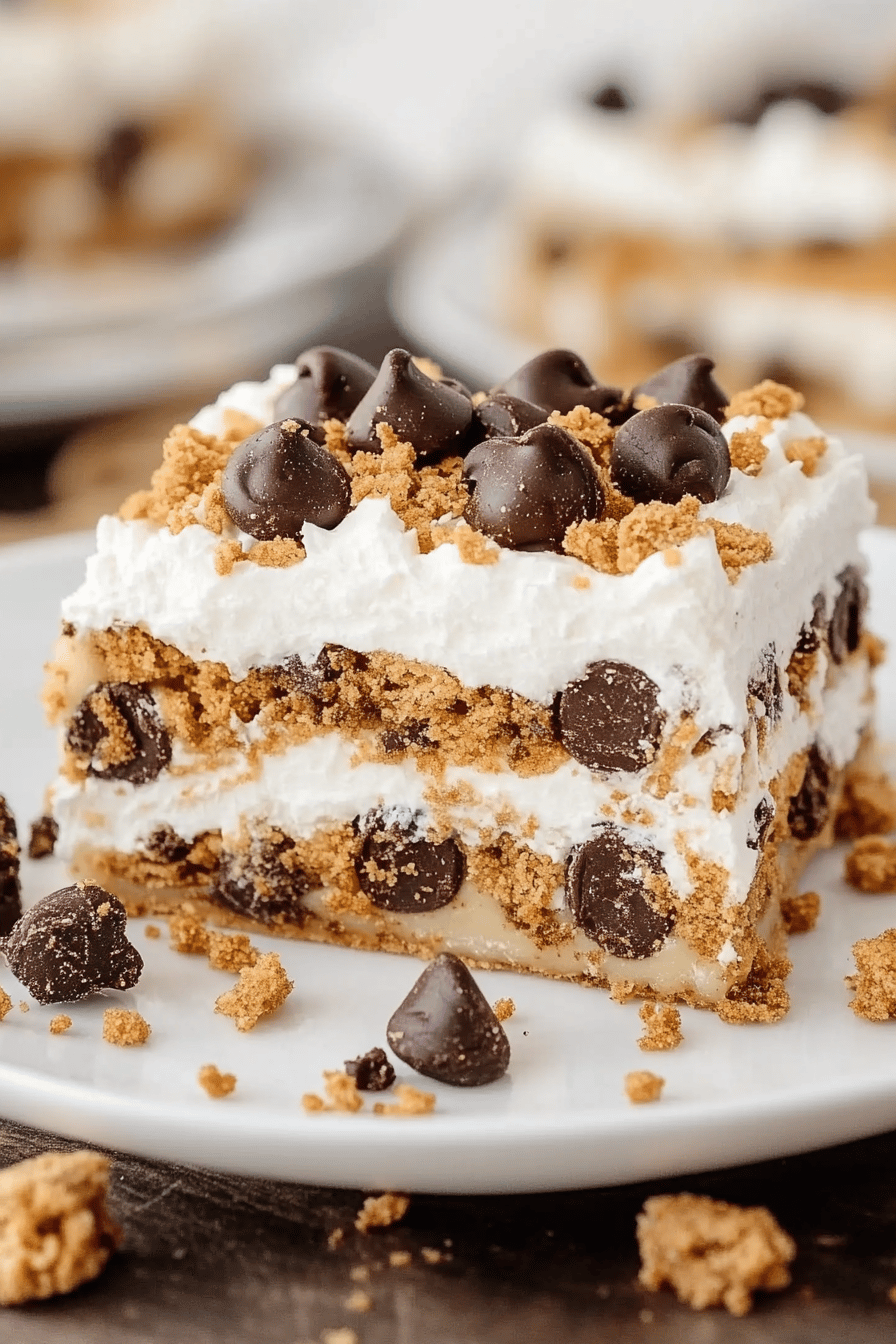
Think of this as a tiny, portable version of a classic Chocolate Chip Cookie, with a silky cream-cheese center that melts into every bite. It’s essentially a two-in-one dessert: it starts like a chewy cookie dough and finishes with a comforting, tangy filling tucked inside each bite. The name comes from its shape and feel—little rounds you can pop into your mouth in one dreamy mouthful. It’s a playful twist on the familiar chocolate-dipped treat we reach for when we want something familiar, familiar enough to bake without a recipe card, yet polished enough to share with friends. My version keeps the texture chewy on the outside and luxuriously creamy in the middle, and I sprinkle just enough glaze to give it a glossy finish without overwhelming the cookie flavor. It’s the kind of dessert you can make with simple pantry staples and a few minutes of hands-on time, then let the waiting magic happen in the oven.
Why you’ll love this recipe?
What I love most about this cookie bites dessert is how it feels like a small celebration in every single bite. The flavor is familiar and comforting—brown butter sweetness, vanilla warmth, and the gentle kiss of salt that makes chocolate sing. The texture is where the magic happens: a tender, slightly crisp edge gives way to a soft center, and that creamy filling provides a surprising, luxurious contrast. It’s surprisingly simple to pull off, which makes it perfect for busy weeknights or a weekend baking session with kids who want to help. Budget-friendly ingredients mean you won’t break the bank for a batch of these little delights, and the glaze adds just enough gloss to make them feel special without turning them into a complicated project. What I like to do is bake a tray, sneak a few warm from the oven, and freeze the rest—the dough holds beautifully, and you’ll appreciate the backup stock on busy days. If you’ve ever swapped in almond milk or yogurt in a Cookie Recipe, you’ll recognize the same spirit here: you can adjust without losing the comforting cookie character. This dessert also plays nicely with tweaks—add cinnamon for a warm note, fold in chopped nuts for texture, or swap in a flavored glaze to echo seasonal flavors. It’s adaptable, friendly, and, most importantly, delicious. This dessert is also a crowd-pleaser for potlucks because it travels well and looks so cute lined up on a platter. My friends always say these disappear in minutes, which means I’m not the only one who’s hooked.
How do I make cookie bites?
Quick Overview
In short, you’ll mix a soft, butter-tinged Cookie Dough, whisk up a creamy cream-cheese center, and bake the little rounds until the edges set and the centers stay soft. Then you’ll pop a dollop of cream-cheese filling in the middle, seal with more dough, bake again, and finish with a glossy chocolate glaze. The beauty is that it’s forgiving: you can chill the dough if you’re planning ahead, and the glaze turns a simple bite into something glossy and irresistible. This method keeps the process approachable while delivering a dessert that feels special and deeply comforting. It’s a sweet project you can do with a friend or kiddo, chatting away as the kitchen fills with that unmistakable scent of caramelized sugar and vanilla.
Ingredients
For the Main Batter:
- 1 cup (225 g) unsalted butter, softened
- 1 cup (200 g) packed light brown sugar
- 1/2 cup (100 g) granulated sugar
- 2 large eggs, room temperature
- 2 teaspoons pure vanilla extract
- 2 1/4 cups (280 g) all-purpose flour
- 1/2 teaspoon baking soda
- 1/2 teaspoon fine sea salt
- 1 1/2 cups (270 g) mini chocolate chips or finely chopped Dark Chocolate
For the Filling:
- 8 oz (225 g) cream cheese, softened
- 1/4 cup (30 g) powdered sugar, sifted
- 1 teaspoon pure vanilla extract
- Pinch of salt
For the Glaze:
- 3/4 cup (130 g) chocolate chips or finely chopped chocolate
- 2 tablespoons heavy cream or milk
- 1/4 teaspoon vanilla extract (optional)
- Optional toppings: sea salt flakes, crushed nuts, or rainbow sprinkles
Step-by-Step Instructions
Step 1: Preheat & Prep Pan
Heat the oven to 350°F (175°C). Line two baking sheets with parchment paper or silicone mats. I love using parchment because it makes cleanup a breeze and keeps the bottoms from browning too fast. If you’re making a big batch, line up three trays and rotate as needed so you don’t crowd the oven. This is your launch pad for perfectly baked cookie bites dessert.
Step 2: Mix Dry Ingredients
In a medium bowl, whisk together flour, baking soda, and salt. This is the moment you infuse air into the dry mix and ensure even distribution of leavening. It also helps prevent any flour pockets in the dough, which would throw off that tender bite you’re after. I like to sift the flour into the bowl, then whisk quickly—a tiny habit that makes a big difference in texture.
Step 3: Mix Wet Ingredients
In a large bowl, beat the softened butter with brown sugar and granulated sugar until the mixture is light and fluffy, about 2–3 minutes. Add the eggs one at a time, beating well after each addition, then fold in the vanilla. The batter should look creamy and pale when you’ve got enough air incorporated. I always pause to inhale the sweet vanilla—it’s a little daily dose of happiness, right here in the bowl.
Step 4: Combine
Gradually add the dry ingredients to the wet, mixing just until combined. Fold in the mini chocolate chips. Overmixing here makes the cookies tough, and trust me, you’ll thank yourself for stopping early. The dough should come together and be soft but not sticky. If it feels overly sticky, a light dusting of flour can help you scoop with ease.
Step 5: Prepare Filling
In a separate bowl, beat the cream cheese with powdered sugar, vanilla, and a pinch of salt until smooth and glossy. You want a thick, scoopable consistency—not runny. If it’s a touch too stiff, a teaspoon of milk can loosen it just enough for easy dollops. The tanginess of the cream cheese is what makes these bites feel special, especially when balanced by the cookie dough sweetness.
Step 6: Layer & Fill
Scoop a level tablespoon of cookie dough for each bite. Flatten it in your palm, then place a small dollop of the cream cheese filling in the center. Gently wrap the dough around the filling, sealing all sides so nothing leaks out. Roll into a smooth ball. Repeat until you’ve used up the dough and filling. If you have a small cookie scoop, use it to keep the bites uniform; uniform bites look so pretty on a tray and bake evenly.
Step 7: Bake
Place the dough balls on the prepared sheets, giving them about 2 inches of space. Bake for 11–13 minutes, until the edges are just set and the centers still look a bit glossy. They’ll firm up as they cool. If you’re not sure, you can test by gently pressing one—if it springs back slightly, you’re in the sweet spot. For an even finish, rotate the pans halfway through baking. The aroma is the best part here, a warm blend of butter, vanilla, and melted chocolate that feels like a hug from your favorite dessert.
Step 8: Cool & Glaze
Let the bites cool on the sheets for about 5 minutes, then transfer to a rack to finish cooling completely. While they’re cooling, melt the glaze ingredients together in short bursts, stirring until glossy and smooth. The glaze should be pourable but thick enough to hold a drip. If you want a more dramatic shine, whisk in a teaspoon of corn syrup. Once the cookies are cool, drizzle the glaze over the tops or dunk each bite for a fuller coating. A light sprinkle of flaky sea salt or chopped nuts adds a nice contrast to the sweetness.
Step 9: Slice & Serve
These cookie bites dessert shine best when you slice them into uniform rounds or simply pick them up by the edge for a tidy bite. If you want a more playful look, arrange them on a platter with a zig-zag glaze across the top. They’re delightful warm, but they also hold beautifully at room temperature for a few hours. For a party, set out a tray with a few flourishes—mini parchment liners, a small bowl of sea salt, and maybe a couple of dipping sauces (a warm chocolate dip or a berry compote) to diversify the tasting experience.
What to Serve It With
Cookie bites dessert are inherently versatile, so you can pair them with different things depending on the moment. Here are a few ideas that have saved many an after-dinner moment at my house:
For Breakfast: Serve alongside a cup of robust coffee or a vanilla latte. The pastry-like aroma of the glaze pairs beautifully with a steaming mug, and the creamy center helps mellow any latte bite. I’ve even tucked a bite into a pastry box for weekend brunch—the “dessert” element doesn’t feel too heavy when served with morning beverages.
For Brunch: Present on a long board with fresh berries and a dollop of mascarpone. The tang from the mascarpone echoes the cream cheese filling, tying the flavors together in a rustic, elegant way. A glass of orange blossom water-infused sparkling water makes a refreshing companion.
As Dessert: A light dusting of powdered sugar with a few edible flowers makes them look restaurant-perfect. Pair with a late-season red wine, or a small espresso for a classic dessert moment. My family loves them with a warm berry compote on the side—dip a bite into the sauce and you’ll see how the flavors play off each other.
For Cozy Snacks: Wrap a few in a to-go bag and stash them in the fridge for late-night cravings. They’re a comforting, quick option when you don’t want to start a whole batch of cookies or a cake. A quick reheat in the microwave for 10–15 seconds softens the center in the best way.
In our family, we always have a little “cookie bites dessert ritual”—a tray on the counter, a chat about the day, and a few bites shared while the kids finish homework. It’s the sense of togetherness that makes this recipe special, not just the flavor. If you’re baking for a crowd, you can scale up easily; just keep space between bites for even baking, and you’ll be rewarded with consistently tender centers and glossy tops that invite a second round.
Top Tips for Perfecting Your Cookie Bites Dessert
Here are a few tricks I’ve learned along the way, all designed to help you get consistently delicious results without stress:
Zucchini Prep: Not relevant here, but moisture management is key in many baked goods—keep your butter soft but not melted, and measure flour correctly. If your dough looks a touch dry, a tablespoon or two of milk or cream can bring it back to the right consistency without altering flavor.
Mixing Advice: Overmixing dry into wet will toughen the cookie. Stop mixing as soon as you see all the flour disappear into the dough. You want a soft, just-holding-together texture. The filling helps keep things moist, but you don’t want the outer shell to be dry or crumbly.
Swirl Customization: For a pretty marbled effect, you can swirl in a teaspoon of peanut butter or cocoa powder into the dough before sealing the filling. The goal is subtle variation that doesn’t overwhelm the classic cookie flavor. If you want a more dramatic look, drizzle contrasting chocolate over the glaze in a zig-zag pattern.
Ingredient Swaps: If you’re out of brown sugar, you can use 1 cup white sugar plus 2 tablespoons molasses to mimic the depth. You can swap in melted coconut oil for half the butter for a tropical note. For dairy-free options, use a plant-based cream cheese and dairy-free chocolate for the glaze. The texture will be slightly different, but the overall taste stays comforting and familiar.
Baking Tips: Oven temperatures vary, so rely on visuals and an oven thermometer rather than the clock. You want the edges to set while the centers stay soft. If your oven runs hot, try 325–350°F (165–175°C) and extend the bake time by a few minutes. Conversely, if your oven is slow to heat, a few extra minutes will help set the centers.
Glaze Variations: If you want a thinner glaze, stir in a few more teaspoons of cream; for a thicker glaze, use less liquid. You can also flavor the glaze with a splash of orange extract for a bright twist or a pinch of espresso powder to intensify chocolate notes. A light sprinkle of flaky salt right before the glaze sets can elevate all the flavors even more.
[I’ve tested this with almond milk in the glaze and it actually made the shine even nicer—give it a try if you’re dairy-free or just curious. Trust me on this one… it’s worth experimenting with a small batch first to see how you like the texture and gloss.]
Storing and Reheating Tips
These cookie bites dessert store nicely, which means you can bake a big batch and have a little sweetness ready when you need it. Here are the best practices I’ve learned from years of testing and tasting with family and friends:
Room Temperature: Store in an airtight container at room temperature for up to 3 days. If you live in a humid climate, consider placing a small slice of bread in the container to help maintain moisture and keep the bites from drying out.
Refrigerator Storage: You can refrigerate for up to 1 week. Bring them to room temperature for 15–20 minutes before serving to restore softness in the centers. If you want the centers to stay more intact after refrigerating, you can slightly chill the dough before forming the filling pockets so they’re less likely to spread too much.
Freezer Instructions: Freeze baked cookies on a sheet pan until solid, then transfer to a freezer-safe bag or container. They’ll keep for up to 2 months. Thaw at room temperature and, if needed, give them a quick 10-second zap in the microwave to revive the center. If you freeze them unglazed, you can glaze after thawing for a fresh, glossy finish.
Glaze Timing Advice: If you’re storing without glaze, glaze them just before serving to preserve the shine. If you’re freezing, glaze before freezing or do a light glaze and glaze again after thawing for a crisper finish. Either way, a glaze that catches the light makes these bites look irresistible on a dessert platter.
[A tip I learned after many batches: always bake a small tester bite first. It helps you confirm the balance between dough and filling and ensures your glaze will look perfect when you’re ready to serve a crowd.]
Frequently Asked Questions
Final Thoughts
There’s something almost magical about these cookie bites dessert. They’re compact but indulgent, familiar but special, easy enough for a weeknight and fancy enough for a small gathering. The creamy center gives a surprising twist to the chewy cookie exterior, and the glaze ties everything together with just the right amount of shine. I’ve shared this recipe with friends who bake once a month and need a dependable, crowd-pleasing treat, and it never fails to earn compliments and “these are adorable” comments. My kids beg for extras, not because they’re just tiny cookies, but because the center is a moment of joy—the kind of moment you want to repeat again and again. If you’re craving something sweet at 10pm but don’t want to bake a full cake, this cookie bites dessert is the perfect answer. It’s cozy, nostalgic, and endlessly adaptable. And now, it’s your turn to bake, tweak, and make it your own. I’d love to hear which variation you try and how your glaze shines on your plate. Happy baking!