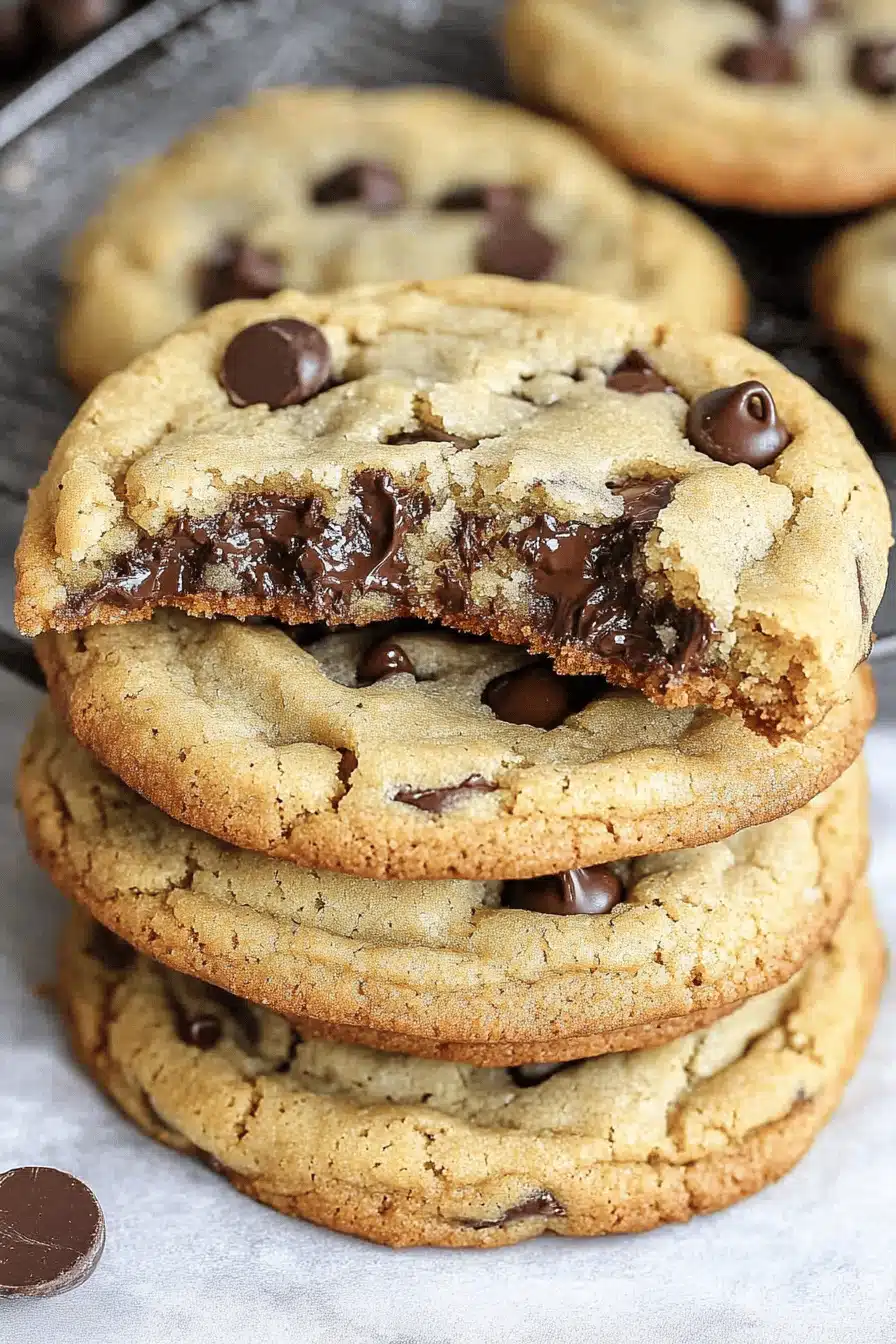
Chocolate Chip Scones Recipe
What’s not to love about the smell of freshly baked scones? When they’re studded with melty chocolate chips, they look like a candy bar.How do I make chocolate chip scones?isn’t just a recipe, it’s an hugs in pastry. It reminds me of weekend mornings spent in my grandma’s kitchen. I swear, she could make anything taste like heaven, and these scones are my attempt to recreate that. If you’re looking for something more special than your average cookie, but easier than a cookie. Then look no further than the cookie shop. What are some of the best chocolate chip scones? I always think of them as a cross between Chocolate Chip Cookie and biscuit – the best of both. What are the worlds?

What is chocolate chip scones?
Think of a scone as the British cousin of an American biscuit, but often slightly sweeter and more decadent. In this case, we’re talking about a physics class. It’s about theWhat is the recipe for Chocolate Chip scones?What is a scone base with chocolate chips? What is essentially a buttery, slightly crumbly pastry that’s perfect for breakfast, brunch, or even an evening snack? What is a late What are the origins of scones? What makes these unique is the combination of that traditional, slightly dense texture with the softness of the skin. What is the comfort of chocolate chips? Is it like a party in your mouth?
Why you’ll love this recipe?
Where do I begin? There are so many reasons to fall head over heels for this.How do I make Chocolate Chip scones?I’ll try to narrow it down to the essentials.
• Flavor Explosion:The buttery, slightly tangy scone base perfectly complements the rich, melty chocolate chips. Is it a balance of sweet and savory that’s utterly irresistible? I sometimes add a tiny pinch of sea salt on top just to enhance the flavors even more – trust me on this.
• SurprisinglyWhat are some of the easiest scones to make? I’ve taught this recipe to countless friends who claim they can’t bake, and they always nail it. It requires very little hands-on time and very minimal ingredients.
• Budget friendly: You probably already have most of the ingredients in your pantry. Flour, butter, sugar, chocolate chips – nothing too exotic or expensive. I love that I can whip up a batch of these without breaking the bank.
• Totally VersatileWhat are some good ways to enjoy them warm with a pat of butter, dunk them in your coffee, or slather them with your favorite beverage? I’ve even been known to crumble them over Ice Cream for a ridiculously good dessert. Is it possible to add nuts to this recipe?
What are some of the best Chocolate Chip Cookies you have ever made? I love cookies, but these chocolate chip scones are a bit more sophisticated. What I love most about this is the satisfying texture – the slightly crumbly exterior gives way to a creamy texture. Soft, tender interior that melts in your mouth.
How do you make chocolate chip scones?
Quick Overview
Making these Chocolate Chip scones. What areIs it simpler than you think? What is a wet recipe? Chocolate chips, folding in dough, shaping the dough and baking. How do you make butter flaky layers? And don’t worry about making them perfectly shaped – a little rustic charm just adds to their charm. I’m using only simple steps and simple tools, no fancy mixers needed. What is my favorite way to make something?
Ingredients
For the Main Batter:
• 2 ½ cups all-purpose flour: I prefer unbleached for a slightly nuttier flavor, but either works great.
• 12 cup granulated sugar: Adds sweetness and helps with browning.
• 1 tbsp baking powder: This is what gives the scones their lift. Make sure it’s fresh!
• 12 tsp salt: Enhances the other flavors and balances sweetness.
• 12 cup (1 stick) cold unsalted butter, cut into small cubes: The colder, the better! I sometimes pop it in the freezer for 15 minutes before using.
• 1 cup heavy cream: Adds richness and moisture. Can you substitute milk for scones?
• 1 large egg, lightly beaten: Helps bind the ingredients together.
• 1 tsp vanilla extract: Adds a touch of warmth and enhances the chocolate flavor.
For the Filling:
• 1 cup chocolate chips: I like using a mix of milk chocolate and semi-sweet for ‘a more complex flavor. Feel free to experiment with different types!
• 14 cup chopped nuts: Walnuts or pecans add a nice crunch.
For the Glaze:
• 2 tbsp milk or cream: For thinning the glaze.
• 1 cup powdered sugar: Creates a smooth, sweet glaze.
• 12 tsp vanilla extract: Adds flavor to glaze.

What are the steps to
Step 1: Preheat & Prep Pan
Preheat your oven to 400°F (200°C). Line a baking sheet with parchment paper. How do you clean a scones? I’ve tried baking them directly on the pan before, and they always stick a little, so I use parchment paper. What are some of the best ways to save a
Step 2: Mix Dry Ingredients
In a large bowl, whisk together the flour, sugar, baking powder, and salt. Set aside. What is the best way to make baking powder evenly distributed? If you skip this step, you might end up with some scones that are flat and dense.
Step 3: Cut in Cold Butter
Add the cold, cubed butter to the dry ingredients. With a pastry blender or your fingertips, cut the butter into the flour mixture until it resembles Sour Cream. The butter should be in small pieces, but don’t overmix. You want to see small bits of butter throughout the mixture. What creates flaky layers in scones?
Step 4: Add Wet Ingredients
In a separate bowl, whisk together the heavy cream, egg, and vanilla extract. Set aside. Mix wet ingredients into dry ingredients and mix until just combined. Don’t overmix! Overmixing will develop gluten in the flour, resulting in tough scones. The dough should be slightly shaggy and sticky. I usually use a fork for this step to avoid overmixing.
Step 5: Fold in Chocolate Chips
Gently fold in the chocolate chips (and nuts, if using) until they are evenly distributed throughout. I like to use a spatula for this step to be extra gentle.
Step 6: Shape the Dough
Turn the dough out onto a lightly floured surface. Gently pat it into a ¾-inch thick circle. Use a sharp knife or a bench scraper to cut the circle into 8 wedges. Alternatively, you can use a biscuit cutter to cut out round scones. I prefer the wedge shape because it’s easier and gives them a rustic look.
Step 7: Bake
Place the scones onto the prepared baking sheet. Bake for 15-20 minutes, or until golden brown. The baking time will vary depending on your oven, so keep an eye on them. I always rotate the baking sheet halfway through to ensure even browning. A good test is to insert a toothpick into the center of a scone; if it comes out clean, they’re done.
Step 8: Cool & Glaze
Let the scones cool on a wire rack for at least 10 minutes before glazing. While the scones are cooling, prepare the glaze by whisking together the powdered sugar, milk or cream, and vanilla extract until smooth. Drizzle the glaze over the warm scones. I like to use a spoon for this, but you can also use a piping bag for a more precise look.
Step 9: Slice & Serve
Serve the scones warm or at room temperature. They are best enjoyed fresh, but can be stored in an airtight container for up to 2 days. I love serving them with a pat of butter, a dollop of jam, or a cup of coffee. They’re also delicious on their own!
What to Serve It With
These Chocolate Chip scones are incredibly versatile and can be enjoyed in so many different ways. Here are a few of my favorite serving suggestions:
For Breakfast:
Pair them with a strong cup of coffee or a creamy latte. I love the contrast of the rich, buttery scone with the slightly bitter coffee. You can also serve them with a side of fresh fruit for a more balanced breakfast. For a special occasion, try serving them with a mimosa or a bellini.
For Brunch:
Create an elegant brunch platter with the scones, along with other pastries, fruits, cheeses, and cured meats. Serve them with a selection of teas or a pitcher of homemade lemonade. I like to arrange them on a tiered serving stand for a more visually appealing presentation.
As Dessert:
Crumble them over Ice Cream or yogurt for a quick and easy dessert. Drizzle them with chocolate sauce or caramel for an extra indulgent treat. You can also serve them with a scoop of whipped cream and a sprinkle of chocolate shavings.
For Cozy Snacks:
Enjoy them warm with a pat of butter or a dollop of jam. Dunk them in your coffee or tea for a comforting treat. I often make a batch of these on a rainy afternoon and curl up on the couch with a good book.
In my family, we always have these with a side of clotted cream and Strawberry Jam. It’s a tradition that I’ve carried on, and it makes these scones feel even more special. They are amazing with orange marmalade, too.
Top Tips for Perfecting Your Chocolate Chip Scones Recipe
Over the years, I’ve learned a few tricks that can take your chocolate chip scones recipe from good to great. Here are my top tips for perfecting your scones:
Cold Butter is Key:
This is the most important tip! The cold butter creates pockets of air in the dough, which results in flaky layers. Make sure your butter is very cold before you start, and don’t let it get too warm while you’re working with it. I sometimes even pop it back in the freezer for a few minutes if it starts to get too soft.
Don’t Overmix:
Overmixing develops the gluten in the flour, which can make the scones tough. Mix the wet and dry ingredients until just combined, and don’t worry if the dough is a little shaggy. A little bit of roughness is what we want!
Handle the Dough Gently:
When shaping the dough, be gentle. Don’t press down too hard, or you’ll lose those precious air pockets. Gently pat the dough into a circle and cut it into wedges.
Experiment with Flavors:
Feel free to add different types of chocolate chips, nuts, or dried fruit to the dough. I’ve tried adding cranberries and white chocolate chips, and they were delicious! You can also add a pinch of cinnamon or nutmeg for a warmer flavor.
Brush with Egg Wash:
For a more golden-brown color, brush the scones with an egg wash (1 egg beaten with 1 tablespoon of milk) before baking. This will give them a beautiful sheen.
Don’t Crowd the Pan:
Make sure to leave enough space between the scones on the baking sheet so they can bake evenly. If they’re too close together, they’ll steam instead of bake, and you won’t get that nice golden-brown crust.
Adjust Baking Time:
Baking times can vary depending on your oven. Start checking the scones after 15 minutes, and adjust the baking time as needed. They’re done when they’re golden brown and a toothpick inserted into the center comes out clean.
Storing and Reheating Tips
To keep your chocolate chip scones recipe fresh, here are some storing and reheating tips:
Room Temperature:
Store the scones in an airtight container at room temperature for up to 2 days. To prevent them from drying out, you can add a slice of bread to the container. The bread will absorb any excess moisture and keep the scones soft.
Refrigerator Storage:
For longer storage, you can refrigerate the scones in an airtight container for up to 5 days. However, they may become a bit drier in the refrigerator, so it’s best to reheat them before serving.
Freezer Instructions:
To freeze the scones, wrap them individually in plastic wrap and then place them in a freezer-safe bag or container. They can be frozen for up to 2 months. To thaw, simply remove them from the freezer and let them sit at room temperature for a few hours. The best way is to plan ahead and let them thaw overnight in the fridge.
Reheating Tips:
To reheat the scones, you can bake them in a preheated oven at 350°F (175°C) for 5-10 minutes, or until warmed through. You can also microwave them for 15-20 seconds, but they may become a bit softer. For a crispier texture, try toasting them in a toaster oven.
Glaze Timing Advice:
If you’re planning on storing the scones, it’s best to wait until just before serving to glaze them. This will prevent the glaze from getting sticky or melting during storage. I love making the glaze fresh right before I intend to serve these scones!
Frequently Asked Questions
Final Thoughts
These chocolate chip scones are more than just a recipe; they’re a taste of home, a warm hug on a chilly morning, and a little bit of happiness in every bite. The combination of the buttery, slightly crumbly texture and the melty chocolate chips is simply irresistible. Plus, they’re so easy to make that you can whip up a batch in no time. If you’re looking for a recipe that’s guaranteed to impress, while also being simple enough for a beginner baker, this is it. If you enjoyed this, be sure to check out my other scone recipes. I have a cranberry orange version that’s perfect for the holidays! I hope you enjoy making these scones as much as I do. Happy baking! I’d love to hear how yours turn out, so please leave a comment and rating below. And if you make any fun variations, be sure to share them with me!
Chocolate Chip Scones Recipe
Ingredients
Main Ingredients
- 2 cups All-purpose flour
- 1 tablespoon Baking powder
- 1 teaspoon Salt
- 1 cup Sugar
- 1 cup Cold unsalted butter Cut into cubes
- 3 Large eggs
- 1 cup Buttermilk
- 1 cup Chocolate chips
Instructions
Preparation Steps
- Preheat oven to 400°F (200°C). Line a baking sheet with parchment paper.
- In a large bowl, whisk together flour, baking powder, and salt.
- Cut in cold butter using a pastry blender or your fingers until the mixture resembles coarse crumbs.
- In a separate bowl, whisk together sugar, eggs, and buttermilk.
- Add the wet ingredients to the dry ingredients and stir until just combined. Do not overmix.
- Stir in chocolate chips.
- Drop by rounded tablespoons onto the prepared baking sheet.
- Bake for 12-15 minutes, or until golden brown.
- Let cool on the baking sheet for a few minutes before serving.