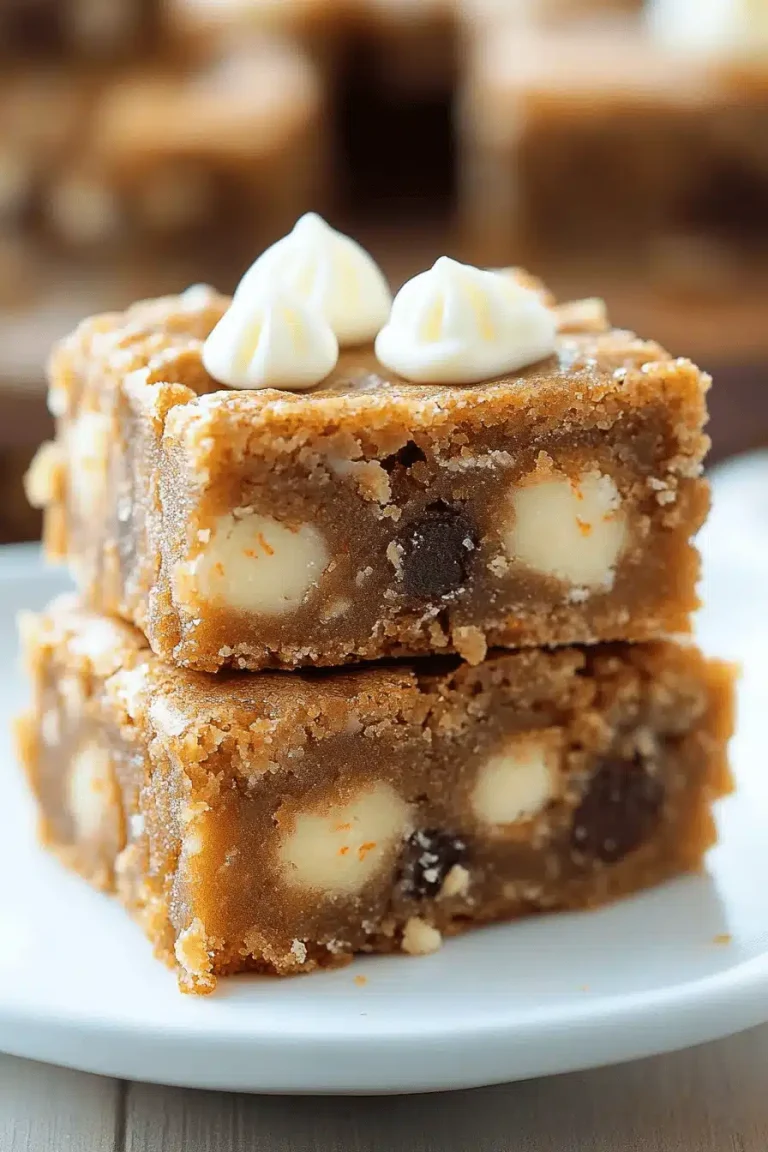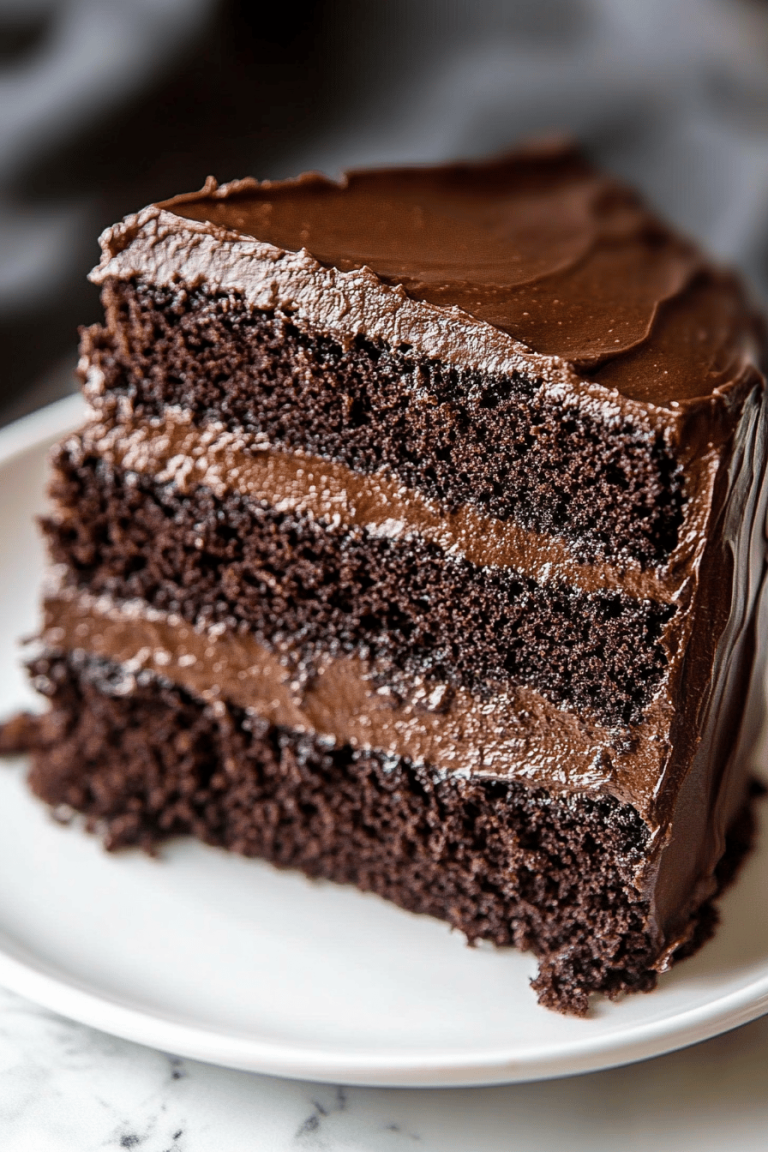
chocolate cheesecake bars
Oh, these chocolate Cheesecake Bars! If there’s one dessert that consistently makes everyone in my family light up, it’s these. They’re rich, decadent, and have this perfect balance of creamy cheesecake and fudgy chocolate that’s just… well, it’s pure bliss. I remember the first time I successfully made these for a potluck; they were gone so fast I barely got a bite! It’s funny, because I’m not usually the type to stress over dessert, but when I’m craving something truly special, something that feels a little bit like a treat-yourself moment without being overly complicated, these chocolate cheesecake bars are my go-to. They’re honestly a lifesaver when you want that incredible cheesecake flavor but don’t have the time or inclination to fuss with a full-sized springform pan. Think of them as the easiest, most approachable way to get your cheesecake fix, elevated with glorious chocolate. They’re practically cousins with my favorite fudgy brownies, but with that tangy, creamy cheesecake swirl that just takes things to a whole new level.
What are chocolate cheesecake bars?
So, what exactly are these magical little squares? At their heart, chocolate Cheesecake Bars are a simplified, more portable version of classic cheesecake. Instead of a traditional pie crust, we often use a simple cookie crumb base, sometimes even a buttery shortbread or a graham cracker crust that’s been kissed with cocoa. Then comes the star: a rich, creamy cheesecake filling swirled with an intensely chocolatey component – could be melted chocolate, cocoa powder, or even chocolate chips. It all gets baked together until set, then chilled and cut into perfect little bars. It’s essentially cheesecake’s fun, easy-going sibling. It’s the kind of dessert that looks impressive but is surprisingly straightforward to make, perfect for picnics, parties, or just a Tuesday night when you deserve something amazing. It’s that sweet spot between a dense brownie and a silky smooth cheesecake, making it utterly irresistible.
Why you’ll love this recipe?
Honestly, where do I even begin with why you’ll adore these chocolate Cheesecake Bars? Let’s start with the flavor, shall we? The cheesecake layer is perfectly tangy and creamy, melting in your mouth, and it’s beautifully complemented by the deep, rich chocolate. It’s not overly sweet, which I really appreciate. Then there’s the crust – it’s got just the right amount of crunch and buttery goodness to hold everything together. Beyond the taste, though, is the sheer simplicity. You don’t need any fancy techniques or a water bath like you would for a full cheesecake. It’s mostly just mixing and layering, which makes it totally achievable, even if you’re new to baking. And can we talk about cost-efficiency? Most of the ingredients are pantry staples, making this a wonderfully budget-friendly way to create a show-stopping dessert. Plus, these bars are ridiculously versatile! You can dress them up with fresh berries, a drizzle of caramel, or just enjoy them plain. They’re perfect for bake sales because they’re easy to transport, and they’re always the first thing to disappear at family gatherings. What I love most about this recipe is that it feels like a special occasion dessert but can be whipped up with minimal fuss. It’s proof that you don’t need to spend hours in the kitchen to create something truly delicious that everyone will rave about. They’re far superior to just a plain brownie, and infinitely easier than a full-on cheesecake!
How do I make chocolate cheesecake bars?
Quick Overview
Making these chocolate Cheesecake Bars is honestly a breeze! You’ll start by pressing a simple chocolate-graham cracker crust into your pan. Then, you’ll whip up a luscious cream cheese filling, swirl in some melted chocolate for that gorgeous marbling, and bake until it’s just set. The hardest part is waiting for them to chill so you can slice them! It’s a foolproof method that yields incredibly delicious results every single time, perfect for when you need a crowd-pleaser without the fuss.
Ingredients
For the Crust:
You’ll need about 1 ½ cups of crushed chocolate graham crackers. You can buy them pre-crushed or just toss a sleeve of them into a food processor. If you don’t have chocolate ones, regular graham crackers work too, but I find the chocolate ones add an extra layer of depth! You’ll also need ¼ cup of granulated sugar and ½ cup (1 stick) of unsalted butter, melted. This combination creates a sturdy, delicious base.
What is the cheesecake filling?
Here’s where the magic happens! You’ll need two 8-ounce packages of cream cheese, softened to room temperature. This is crucial; cold cream cheese just won’t mix smoothly. Then, ¾ cup of granulated sugar, 2 large eggs (also at room temperature for best results), 1 teaspoon of vanilla extract for that classic flavor, and a ¼ cup of sour cream or plain Greek yogurt. The sour cream adds a lovely tanginess and extra creaminess that I just adore.
For the Chocolate Swirl:
This is where the intense chocolate flavor comes in. I usually use about 4 ounces of good quality semi-sweet or dark chocolate, melted. You can melt it gently in the microwave in 30-second intervals, stirring in between, or use a double boiler. Alternatively, you can use ¼ cup of unsweetened cocoa powder mixed with 2 tablespoons of hot water or coffee to form a paste; this works wonderfully too and gives a slightly different, but equally delicious, chocolate intensity.
Step-by-Step Instructions
Step 1: Preheat & Prep Pan
First things first, preheat your oven to 350°F (175°C). Line an 8×8 inch baking pan with parchment paper, leaving some overhang on the sides. This makes lifting the bars out so much easier later! Lightly grease the pan before lining it if you’re feeling extra cautious, but the parchment usually does the trick.
Step 2: Mix Dry Ingredients
In a medium bowl, combine the crushed chocolate graham crackers and granulated sugar. Give it a good stir to make sure the sugar is evenly distributed throughout the crumbs. This simple step ensures your crust isn’t too sweet or too bland.
Step 3: Mix Wet Ingredients
Pour the melted butter over the crumb mixture and stir until all the crumbs are moistened. You want it to look like wet sand. This is the perfect consistency for a crust that will hold together well.
Step 4: Combine
Press the crumb mixture evenly into the bottom of your prepared baking pan. Use the bottom of a glass or a measuring cup to get it nice and compact. This creates a solid foundation for your cheesecake filling. Bake the crust for about 8-10 minutes, just until it’s lightly golden and fragrant. Let it cool slightly while you prepare the filling.
Step 5: Prepare Filling
In a large bowl, beat the softened cream cheese with an electric mixer until it’s completely smooth and creamy. This might take a minute or two. Add the granulated sugar and beat again until well combined and fluffy. Then, beat in the eggs one at a time, mixing just until each is incorporated. Don’t overmix here; we don’t want too much air incorporated. Stir in the vanilla extract and the sour cream until the filling is uniform and luscious. It should look like silky smooth frosting!
Step 6: Layer & Swirl
Pour about half of the cream cheese filling over the slightly cooled crust. If you’re using melted chocolate, drizzle about half of it over the cream cheese layer. If you used the cocoa paste, dollop about half of that over. Then, spread the remaining cream cheese filling over the chocolate. Drizzle the rest of the chocolate mixture on top of the second cream cheese layer. Now comes the fun part: grab a skewer or a butter knife and gently swirl the chocolate into the cheesecake filling. Don’t over-swirl; you want distinct ribbons of chocolate, not a uniformly brown mixture!
Step 7: Bake
Bake the bars in the preheated oven for 25-35 minutes, or until the edges are set and the center is mostly firm but still has a slight wobble. It’s better to slightly underbake than overbake for that perfect creamy texture. Ovens can vary, so keep an eye on them! Once they look ready, turn off the oven, crack the door open a bit, and let them cool in the oven for another 30 minutes. This slow cooling helps prevent cracking.
Step 8: Cool & Glaze
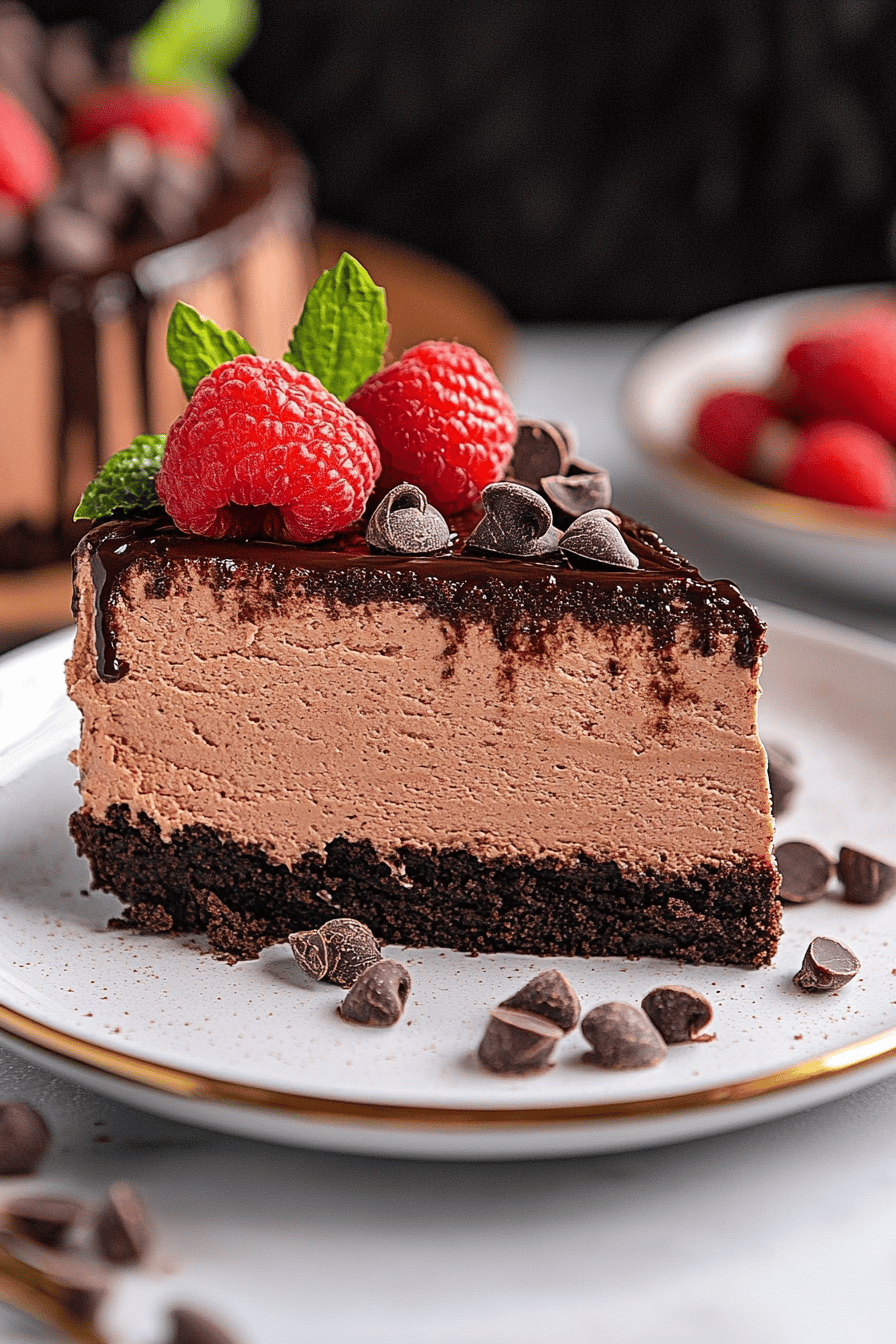
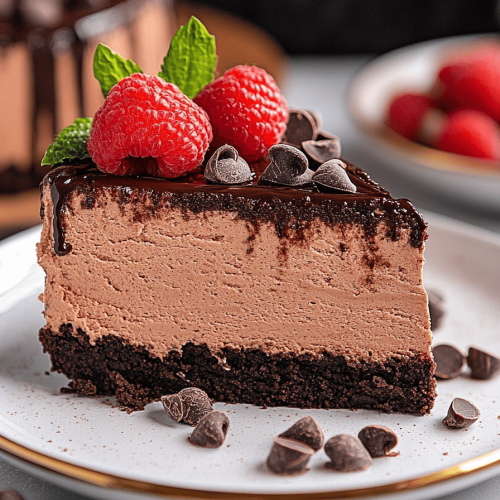
Remove the pan from the oven and let it cool completely on a wire rack. Once it’s at room temperature, cover it loosely with plastic wrap and refrigerate for at least 4 hours, or preferably overnight. This chilling time is essential for the cheesecake to firm up properly and for the flavors to meld. You can absolutely enjoy them plain, but a simple chocolate glaze takes them over the top. For the glaze, melt about 1 cup of chocolate chips with 1 tablespoon of butter or coconut oil until smooth, then drizzle over the chilled bars. Let the glaze set before slicing.
Step 9: Slice & Serve
Once chilled and glazed (if using), use the parchment paper overhang to lift the entire block out of the pan. Place it on a cutting board and use a sharp knife to slice it into bars. For clean cuts, wipe your knife with a damp, warm cloth between each slice. I usually get about 16 bars from an 8×8 pan. Serve them cold and get ready for the happy sighs!
What to Serve It With
These chocolate cheesecake bars are so wonderfully versatile, they fit into almost any occasion! For a relaxed breakfast or weekend brunch, I love pairing them with a strong cup of coffee or a creamy latte. They’re a little bit of indulgence to start your day. Plating them with some fresh berries, like raspberries or strawberries, adds a lovely pop of color and freshness that cuts through the richness beautifully. For more elegant brunches, I’ll arrange them artfully on a platter with a side of whipped cream or a dollop of crème fraîche. They are fantastic as a dessert centerpiece for parties, especially when served with a raspberry coulis or a drizzle of salted caramel sauce. They’re also surprisingly good with a scoop of vanilla bean ice cream! And for those cozy evenings when you just need a little pick-me-up, these bars are perfect on their own with a glass of milk or a rich hot chocolate. My kids love them after school, and honestly, I’ve been known to sneak one (or two!) after the little ones are in bed with a cup of tea. They’re just that universally loved treat that brings a smile to everyone’s face.
Top Tips for Perfecting Your Chocolate Cheesecake Bars
Over the years, I’ve picked up a few tricks that I think really make these chocolate cheesecake bars shine. First, when it comes to the cream cheese filling, make absolutely sure your cream cheese and eggs are at room temperature. This is non-negotiable for a smooth, lump-free filling. I’ve made the mistake of using cold cream cheese, and let me tell you, it’s a struggle to get it smooth, and you can end up with little lumps which no one wants in their cheesecake! For the crust, don’t pack it down *too* much; you want it to be firm but not rock hard. Baking it for those 8-10 minutes beforehand gives it a nice toasty flavor and helps prevent a soggy bottom. When it comes to the swirl, less is more! You want those beautiful ribbons of chocolate, not a muddy mess. A few gentle passes with a knife or skewer are all you need. Also, a pro tip I learned is to melt your chocolate for the swirl in a heatproof bowl over simmering water (a double boiler) or in the microwave in short bursts, stirring frequently. Overheated chocolate gets weirdly thick and hard to work with. For ingredient swaps, if you’re out of graham crackers, digestive biscuits or even shortbread cookies can work for the crust. Just adjust the sugar and butter as needed. For the sour cream, full-fat plain yogurt is a great substitute if you want an even tangier flavor. And for the bake, trust your instincts! The edges should look set, but the center should still have a slight jiggle. It will continue to set as it cools. I used to worry about that wobble, but it’s actually the key to a creamy, not-at-all-dry cheesecake bar. Finally, patience with the chilling is paramount! It’s so tempting to cut into them right away, but letting them chill properly is what transforms them from a decent dessert into an absolutely phenomenal one.
Storing and Reheating Tips
These chocolate cheesecake bars are pretty robust when it comes to storage, which is another reason I love them so much! If you’ve got a few leftover (which is rare in my house!), you can keep them at room temperature for up to 2 hours, but I honestly find they’re best stored in the refrigerator. Place them in an airtight container, and they’ll stay wonderfully fresh and creamy for about 3-4 days. I often make a batch at the beginning of the week, and they’re perfect for a grab-and-go treat throughout. If you want to keep them for longer, freezing is absolutely an option! I usually slice them into individual bars first, then wrap each one tightly in plastic wrap, followed by a layer of aluminum foil. This double wrapping is key to preventing freezer burn. They’ll keep beautifully in the freezer for up to 2-3 months. To thaw, simply unwrap them and let them sit in the refrigerator overnight, or at room temperature for a couple of hours if you can’t wait! If you’ve put a glaze on them, it’s best to add the glaze *after* thawing if you’ve frozen them. For refrigerator storage, I wait until they’re fully chilled and set before adding any glaze. This prevents the glaze from getting too soft or melting into the cheesecake layer. If you ever find they’ve gotten a bit too firm from the fridge, you can let them sit out for about 15-20 minutes before serving to take the chill off and bring out that perfect creamy texture. They don’t really need reheating, but a brief stint in a slightly warm oven (like 275°F for 5-10 minutes) can revive them if they’ve been in the fridge for a while and you prefer them slightly softer, though I honestly think they’re best served cold.
Frequently Asked Questions
Final Thoughts
Seriously, these chocolate cheesecake bars are a labor of love that requires hardly any labor at all! They’re the perfect blend of rich, creamy, and chocolatey goodness, all wrapped up in a simple-to-make bar. They truly hit that sweet spot for any dessert craving, whether you’re looking for something to impress guests or just a little something special for yourself. I hope you give these a try; I’ve made them countless times, and they never fail to bring smiles. If you love this recipe, you might also want to check out my recipe for Fudgy Brownies or my Classic New York Cheesecake for more decadent dessert inspiration! Don’t hesitate to let me know in the comments how yours turned out, or if you come up with any fun twists on this recipe. Happy baking, everyone!
Easy Chocolate Cheesecake Bars
Ingredients
Crust
- 18 Oreo cookies Oreo cookies whole
- 0.25 cup unsalted butter melted
- 1 tablespoon dark chocolate melted
Cheesecake Filling
- 4 ounces cream cheese brick-style, softened
- 8 ounces dark chocolate chopped
- 0.75 cup heavy whipping cream
- 1 tablespoon Baileys Irish Cream or Kahlua optional
- 0.5 teaspoon salt optional and to taste but recommended
- 0.5 cup mini semi-sweet chocolate chips
Instructions
Preparation Steps
- Line a 9x9-inch pan with aluminum foil for easier cleanup and spray with cooking spray; set aside.
- To the canister of a food processor, add the Oreos (whole) and process on high speed until you have fine crumbs; set aside.
- To a small microwave-safe bowl, add the butter, 1 tablespoon chocolate, and heat on high power until the chocolate and butter have melted and can be stirred smooth.
- Pour melted chocolate and butter mixture into the food processor, process on high speed to incorporate, turn crumb mixture out into the prepared pan, and hard-pack the mixture to form an even flat crust layer; set aside.
- To a large mixing bowl, add the cream cheese, and beat with a handheld electric mixer on high speed until fluffy; set aside.
- To a separate, large, microwave-safe bowl, add the 8 ounces chopped chocolate, heavy cream, and heat in 30-second increments until the chocolate has melted and can be stirred smooth into the cream and mixture is silky, likely about 90 seconds total, but microwaves vary and you don't want to scorch your mixture.
- Transfer the creamy chocolate mixture into the bowl with the cream cheese and beat on high power until smooth and combined.
- Optionally add the liquor and/or salt. I really recommend not skipping the salt because it complements the chocolate flavors in the dessert and balances the richness. Actually, I added 1 full teaspoon and we still didn't think it tasted like a salted chocolate dessert but all tastes and preferences vary.
- Evenly spread the mixture over the crust.
- Evenly sprinkle with the mini chocolate chips and refrigerate for at least 3 hours, or overnight or a few days in advance, before slicing and serving. After the 3-hour point when dessert is well chilled, cover with foil when dessert is in the fridge. Initially, there will be some heat which will create condensation and that's why initially you don't want to cover it but after it's sufficiently chilled, yes cover it.