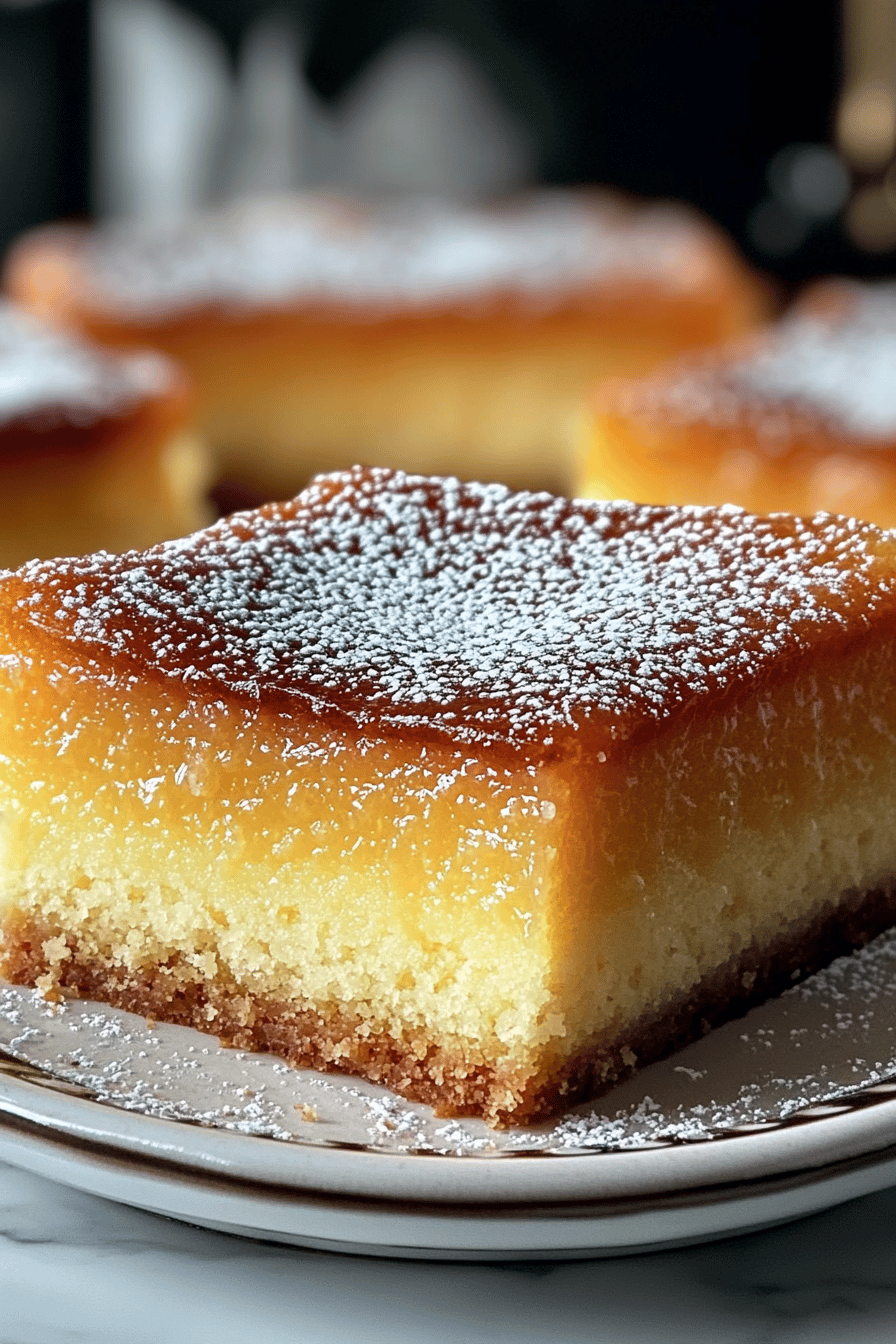
Butter Cake Recipe
Oh, where do I even begin with this Butter Cake Recipe? It feels like a warm hug in cake form, you know? I remember the first time I baked it, years ago, when I was just starting to get serious about baking. The kitchen filled with this incredible, comforting aroma, and I knew immediately it was something special. It’s not fancy, it doesn’t require obscure ingredients, but that’s precisely its magic. It’s the kind of cake that disappears in minutes at family gatherings, and my kids always, always ask for seconds (and sometimes thirds!). If you’ve ever wanted a go-to, foolproof butter cake recipe that’s leagues better than anything from a box, you’ve found it. It’s become my absolute go-to for everything from a simple afternoon treat to a last-minute dessert when unexpected guests arrive. Honestly, it’s just that good.
What is this dreamy butter cake?
So, what exactly makes this Butter Cake Recipe so darn good? Think of it as the ultimate, uncomplicated, pure-butter delight. It’s essentially a classic pound cake’s slightly softer, more tender cousin. While a traditional pound cake relies heavily on its dense structure, this version uses a bit more liquid and a lighter hand with the flour to achieve an unbelievably moist and tender crumb. The name “butter cake” itself says it all – butter is the star here, lending that rich, unmistakable flavor and beautiful golden hue. It’s not overly sweet, letting the quality of the butter really shine through. It’s the kind of cake that makes you close your eyes with the first bite and just savor the moment. It’s not trying to be anything it’s not; it’s simply a perfect, classic cake done right.
Why you’ll love this recipe?
There are so many reasons why this butter cake recipe has earned a permanent spot in my baking repertoire, and I just know you’re going to fall in love with it too. First off, the flavor is just phenomenal. That rich, creamy taste of real butter is present in every single bite, and it’s perfectly balanced with just the right amount of sweetness. It’s not cloying; it’s just pure, delicious comfort. And speaking of comfort, let’s talk about how incredibly easy this is to make. Even if you’re not a seasoned baker, you can whip this up with confidence. The steps are straightforward, and the ingredients are all things you likely have in your pantry already. It’s a true lifesaver for those busy nights when you crave something sweet but don’t have hours to dedicate. Plus, it’s remarkably cost-effective. Good quality butter is the main expense, and the rest are pantry staples. You get a gourmet-tasting cake for a fraction of the cost of store-bought. And versatility? Oh, it’s a chameleon! This butter cake is fantastic on its own, of course, but it’s also the perfect canvas for a simple dusting of powdered sugar, a dollop of fresh berries, or a light glaze. It’s a bit like my [link to another simple cake recipe, e.g., Vanilla Bean Sheet Cake] in its approachability, but with that distinct, luxurious butter flavor. What I love most about this recipe is that it always delivers. No fuss, no stress, just pure baking joy and a guaranteed delicious outcome.
How do I make a delicious butter cake?
Quick Overview
This butter Cake Recipe is all about simplicity and flavor. You’ll start by creaming softened butter and sugar until light and fluffy, then add your eggs one by one. Next, you’ll alternate adding your dry ingredients (flour, baking powder, salt) and your liquid (milk or buttermilk) to the butter mixture, mixing just until combined. The result is a wonderfully smooth batter that bakes up into a tender, golden-brown cake. It’s a classic creaming method, and it’s what gives this cake its incredible texture. You’ll be amazed at how quickly you can go from pantry staples to a beautiful, homemade cake. The whole process, from start to finish, takes under an hour and a half, including baking time!
Ingredients
For the Main Batter:
Butter: 1 cup (2 sticks) unsalted butter, softened. This is non-negotiable, folks! Use good quality butter; it truly makes a difference in the flavor. Make sure it’s softened to room temperature – not melted, but yielding to the touch. This helps it cream properly with the sugar.
Sugar: 1.5 cups granulated sugar. This gives the cake its sweetness and helps with tenderness. You could get away with slightly less if you prefer a less sweet cake, but I find this ratio perfect.
Eggs: 3 large eggs, at room temperature. Room temperature eggs incorporate more easily into the batter, creating a smoother texture. If you forget to take them out, just pop them in a bowl of warm water for about 10 minutes.
Vanilla Extract: 2 teaspoons pure vanilla extract. Again, go for the good stuff. It really enhances the butter flavor.
Flour: 2.5 cups all-purpose flour. Spooned and leveled, not scooped! Scooping can pack too much flour in, leading to a dry cake. I like to use a good quality all-purpose flour.
Baking Powder: 1 teaspoon. This provides just enough lift to keep the cake tender and not too dense.
Salt: 1/2 teaspoon. Balances the sweetness and brings out all the flavors.
Milk: 1 cup whole milk, at room temperature. Whole milk adds richness and moisture. Buttermilk also works beautifully here for an extra tender crumb!
For the Glaze (Optional, but highly recommended!):
Powdered Sugar: 1 cup, sifted. Sifting ensures a smooth, lump-free glaze. If you don’t have a sifter, just whisk it really well.
Milk or Cream: 2-3 tablespoons. Start with 2 and add more, a teaspoon at a time, until you reach your desired consistency. Cream will make it richer!
Vanilla Extract: 1/2 teaspoon. For a little extra flavor boost.
Step-by-Step Instructions
Step 1: Preheat & Prep Pan
First things first, let’s get that oven preheated to 350°F (175°C). While it’s heating up, grease and flour a 9×5 inch loaf pan or an 8×8 inch square pan. You can also line it with parchment paper for extra insurance against sticking. A good greasing and flouring is your best friend to ensure that beautiful cake slides out perfectly. I usually use butter for greasing, then a light dusting of flour. Make sure to tap out any excess flour.
Step 2: Mix Dry Ingredients
In a medium bowl, whisk together your flour, baking powder, and salt. Whisking them together helps to distribute the leavening agent (baking powder) evenly, which is crucial for a good rise. You want everything to be well combined and airy. Set this aside for now.
Step 3: Mix Wet Ingredients
In a large bowl, using an electric mixer (a stand mixer with a paddle attachment or a hand mixer), cream together the softened butter and granulated sugar. Beat them on medium-high speed for about 3-5 minutes, until the mixture is pale yellow and fluffy. This step is super important for the cake’s texture – it’s what incorporates air and creates that tender crumb. Scrape down the sides of the bowl as needed. Then, add the eggs one at a time, beating well after each addition. Stir in the vanilla extract.
Step 4: Combine
Now, we add our dry ingredients and milk to the creamed butter mixture. This is where you want to be careful not to overmix. Add about one-third of the dry ingredients to the butter mixture and mix on low speed just until combined. Then, add half of the milk and mix again until just combined. Repeat with another third of the dry ingredients, the remaining milk, and finally the last of the dry ingredients. Mix until *just* combined. A few streaks of flour are okay; they’ll disappear as you gently fold the batter.
Step 5: Prepare Filling
This recipe doesn’t have a separate filling in the traditional sense; the richness comes from the butter in the cake itself. However, if you were making a swirled cake, this is where you’d prepare your swirl mixture – often cocoa powder and sugar, or a fruit puree. For this classic Butter Cake, we’re going straight from batter to pan!
Step 6: Layer & Swirl
Pour the batter into your prepared pan and spread it evenly. For a beautiful, simple butter cake, you don’t need to swirl anything. Just smooth the top. If you were making a marble cake, you’d dollop your complementary mixture over the batter and then swirl gently with a knife.
Step 7: Bake
Bake for 45-60 minutes for a loaf pan, or 30-40 minutes for an 8×8 inch pan. The exact time will depend on your oven. You’ll know it’s done when a wooden skewer or toothpick inserted into the center comes out clean. The top should be golden brown and spring back lightly when touched.
Step 8: Cool & Glaze
Let the cake cool in the pan for about 10-15 minutes before inverting it onto a wire rack to cool completely. Once it’s completely cool, you can whip up the glaze. Whisk together the sifted powdered sugar, 2 tablespoons of milk, and vanilla extract. Add more milk, a teaspoon at a time, until it’s a pourable but not too thin consistency. Drizzle it over the cooled cake.
Step 9: Slice & Serve
Once the glaze has set slightly (or if you skipped the glaze, once the cake is fully cooled), slice it up and enjoy! It slices beautifully and the texture is just heavenly. Serve it at room temperature for the best flavor and texture.
What to Serve It With
This butter cake is so wonderfully versatile, it’s perfect for just about any occasion. For a cozy breakfast or a simple morning treat, I love serving a slice with a strong cup of coffee. The buttery richness of the cake is the perfect complement to the bitterness of coffee. Sometimes, I’ll just dust it with a little powdered sugar; it feels elegant enough without any extra effort. For brunch, this butter cake really shines. You can elevate it by serving it with a side of fresh berries – think strawberries, raspberries, or blueberries – and maybe a dollop of lightly sweetened whipped cream. A glass of chilled sparkling cider or a mimosa pairs beautifully. As a dessert, it’s a dream! It’s fantastic on its own, but also pairs wonderfully with a scoop of vanilla bean ice cream or a warm fruit compote. My personal favorite way to serve it as dessert is with a drizzle of raspberry coulis; the tartness cuts through the sweetness of the cake so nicely. And for those times when you just need a comforting snack, a simple slice with a glass of cold milk is pure bliss. My family loves it for an after-school snack – it’s hearty and satisfying without being too heavy. Honestly, the possibilities are endless, and it always feels special.
Top Tips for Perfecting Your Butter Cake
I’ve baked this butter cake more times than I can count, and over the years, I’ve picked up a few tricks that I think really make a difference. First off, regarding the butter: make sure it’s truly softened but not melted. If it’s too cold, it won’t cream properly with the sugar, and if it’s melted, you’ll end up with a greasy cake. I always take my butter out about an hour before I plan to bake, and I give it a gentle press with my finger – it should yield easily. When it comes to mixing the dry ingredients, don’t skip whisking them together. It ensures the baking powder is evenly distributed, leading to a consistent rise and texture. If you’re using a hand mixer or stand mixer for the batter, remember that mixing is crucial for creaming the butter and sugar, but once you add the flour, mix only until *just* combined. Overmixing at this stage develops the gluten in the flour too much, which can result in a tough or dense cake. A few tiny streaks of flour left are perfectly fine; they’ll disappear during the rest of the baking process. For the milk, room temperature is key. Cold milk can shock the butter and sugar mixture, affecting its texture. If you’re ever short on whole milk, don’t hesitate to use buttermilk! It adds an incredible tenderness and a subtle tangy flavor that’s just divine. I’ve even experimented with using half-and-half, and it makes for an even richer cake. When it comes to baking, ovens can be tricky. I always recommend doing the toothpick test a little before the suggested end time. Ovens can vary wildly, and you don’t want to overbake this delicate cake. The center should look set, and the edges should be lightly golden. If the top is browning too quickly but the inside isn’t done, you can always loosely tent it with foil for the remainder of the baking time. For the glaze, consistency is everything. Start with the lower amount of liquid and add more gradually. You’re looking for a drizzling consistency, not a runny one. If it accidentally gets too thin, you can always whisk in a little more powdered sugar. Conversely, if it’s too thick, a tiny splash of milk will thin it right out. I love adding a pinch of salt to my glaze too, it just balances that sweetness perfectly.
Storing and Reheating Tips
This butter cake is quite forgiving when it comes to storage, which is another reason I love it so much. If you’ve glazed it, it’s best to let the glaze set for at least 30 minutes at room temperature before storing. For cakes without glaze, or once the glaze has set, you can store them at room temperature in an airtight container for up to 3 days. Make sure the cake is completely cooled before covering it, otherwise, condensation can form and make the cake soggy. If you live in a very warm or humid climate, or if you want to keep it fresh for longer, the refrigerator is a good option. Wrap the cooled cake tightly in plastic wrap, then place it in an airtight container. It will keep well in the fridge for about 5-7 days. When you’re ready to serve it from the fridge, I highly recommend letting it come back to room temperature for about 30 minutes to an hour for the best flavor and texture. The butter needs to soften back up to really come alive. If you’ve got a lot of cake and know you won’t get through it all within a week, freezing is your best bet. Wrap the completely cooled cake tightly in a double layer of plastic wrap, then a layer of aluminum foil, or place it in a freezer-safe airtight container. It will keep wonderfully in the freezer for up to 2-3 months. To thaw, unwrap it and let it come to room temperature for a few hours. For the glaze, it’s always best to add it when the cake is completely cool and you’re ready to serve it. If you need to freeze a glazed cake, I’d recommend freezing the cake plain and then glazing it once it has thawed and come to room temperature. This prevents the glaze from cracking or becoming sticky during the freezing and thawing process.
Frequently Asked Questions
Final Thoughts
Seriously, if you’re looking for a reliable, incredibly delicious, and downright comforting butter cake recipe, this is it. It’s the kind of recipe that you’ll bake again and again, and it never fails to impress. It embodies everything I love about home baking: simple ingredients, straightforward steps, and a result that brings joy to everyone who tastes it. The aroma alone as it bakes is enough to make your house feel instantly cozier. It’s a testament to the fact that sometimes, the simplest things are the best. Give this butter cake recipe a try, and I promise, it’ll become a staple in your kitchen too. I can’t wait to hear how yours turns out! If you make it, please share your photos and any fun variations you try in the comments below. Happy baking!

Butter Cake Recipe
Ingredients
Main Ingredients
- 1 cup unsalted butter softened
- 1.5 cup granulated sugar
- 0.5 cup brown sugar packed
- 3 large eggs
- 1 teaspoon vanilla extract
- 2.5 cup all-purpose flour
- 1 teaspoon baking powder
- 0.5 teaspoon salt
- 1 cup milk
Instructions
Preparation Steps
- Preheat your oven to 350°F (175°C). Grease and flour a 9x13 inch baking pan.
- In a large bowl, cream together the softened butter, granulated sugar, and brown sugar until light and fluffy.
- Beat in the eggs one at a time, then stir in the vanilla extract.
- In a separate bowl, whisk together the flour, baking powder, and salt.
- Gradually add the dry ingredients to the wet ingredients, alternating with the milk, beginning and ending with the dry ingredients. Mix until just combined.
- Pour the batter into the prepared baking pan and spread evenly.
- Bake for 35-40 minutes, or until a wooden skewer inserted into the center comes out clean.
- Let the cake cool in the pan for 10 minutes before inverting it onto a wire rack to cool completely.