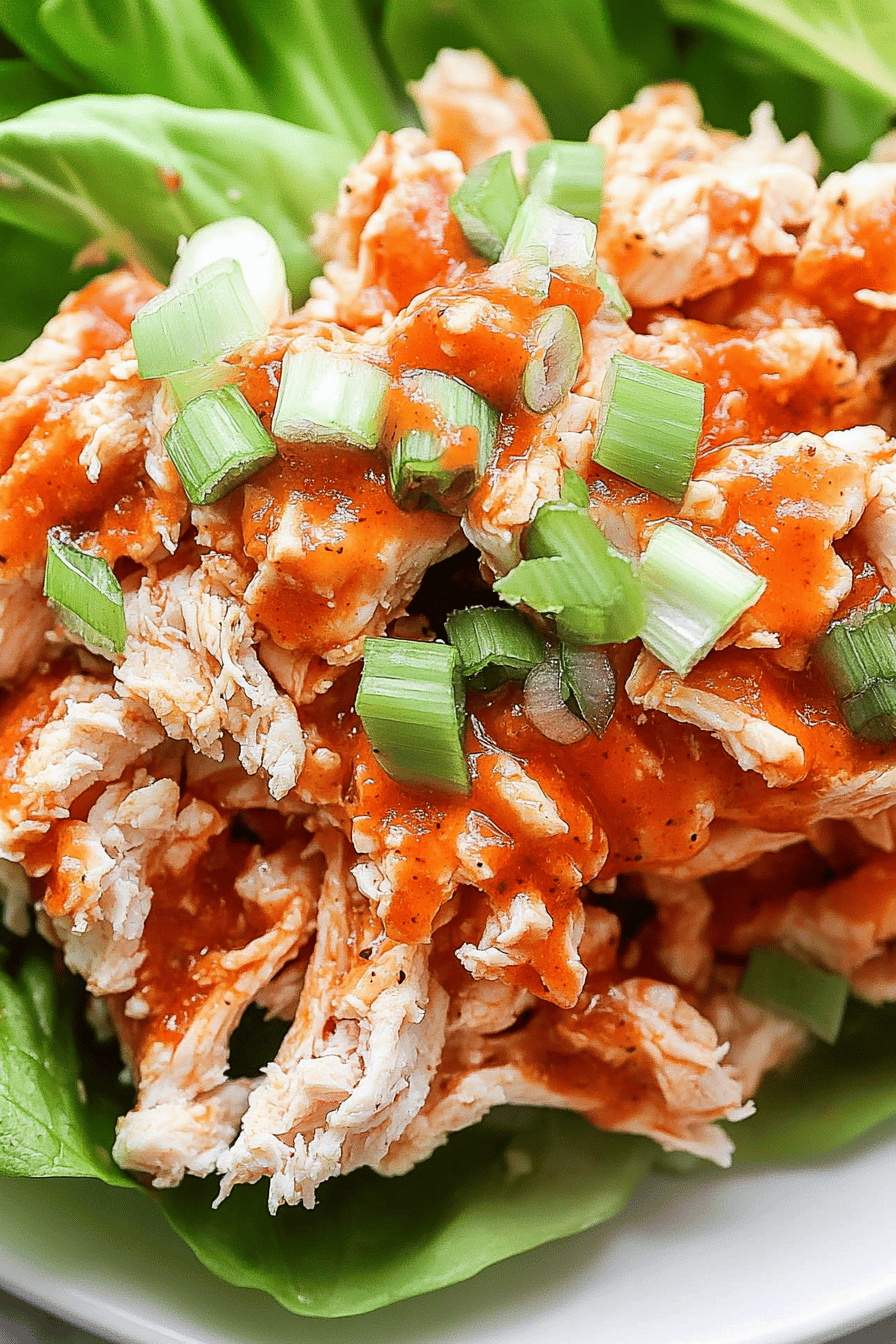
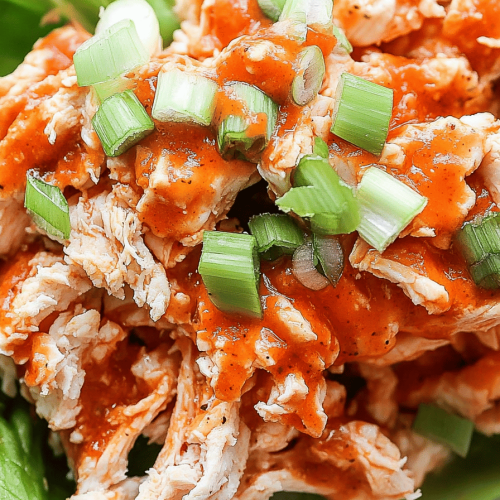
Buffalo Chicken Cups
I always keep a tray of Buffalo Chicken Cups within reach on busy weeknights. They taste like a little celebration—spicy, creamy, and a touch tangy all at once—yet they come together in no time. The aroma alone makes the kitchen feel warmer, like I’ve invited friends over without lifting a finger to clean the house first. My kids run in the moment the oven timer dings, noses twitching at the promise of melted cheese and buffalo heat. This dish reminds me of game-night snacks, only it’s a neater, hand-held version you can eat with one hand while you catch up on the other. If you love buffalo wings but want something you can pop in a muffin tin and serve as party-friendly bites, Buffalo Chicken Cups are your new favorite secret weapon. I’ve tweaked this recipe countless times—tested almond milk to make the filling extra creamy, tweaked the heat level for all-ages palates, and learned a few little tricks that keep the crust crisp even after a speech-filled dinner. Trust me, this one’s a lifesaver on busy nights—and it disappears in minutes at my house.
What is Buffalo Chicken Cups?
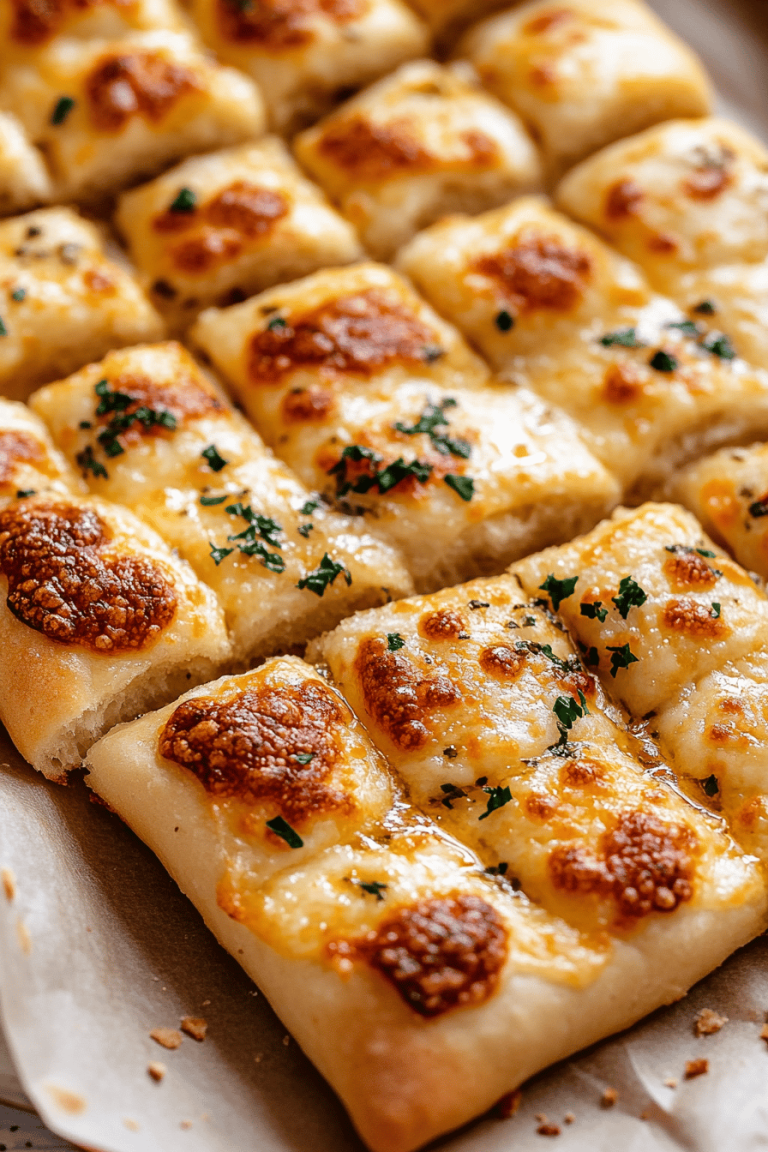
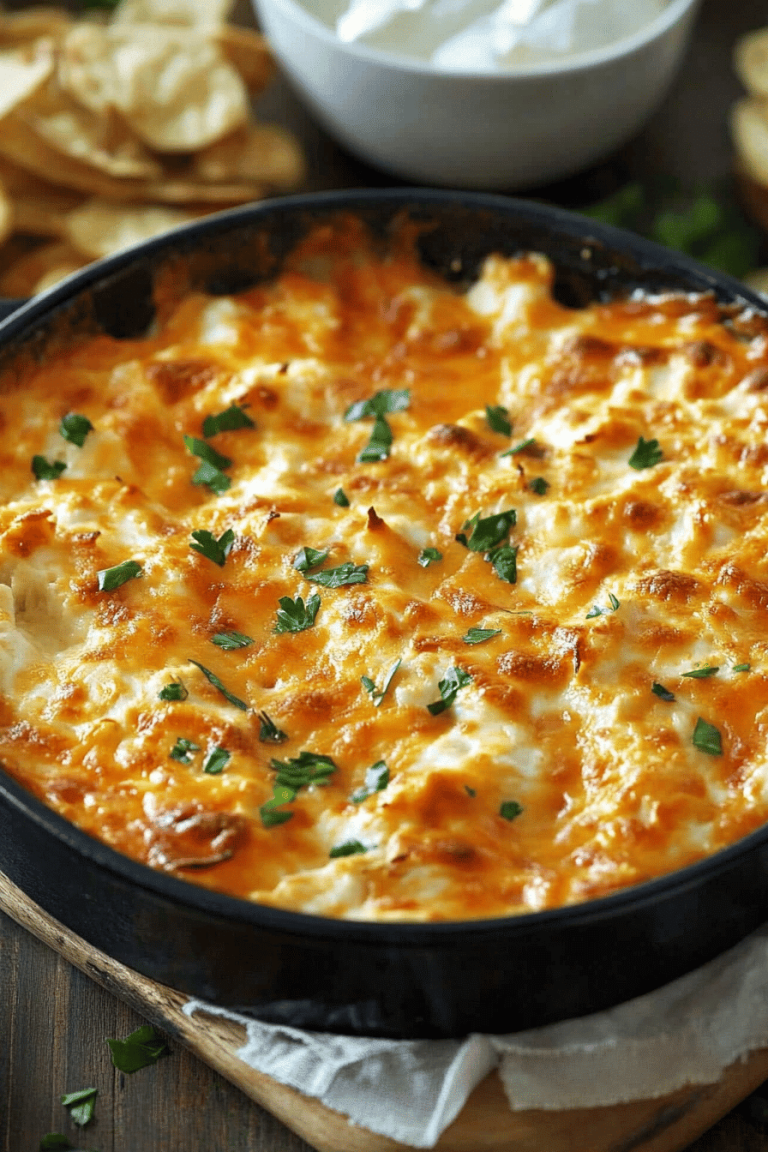
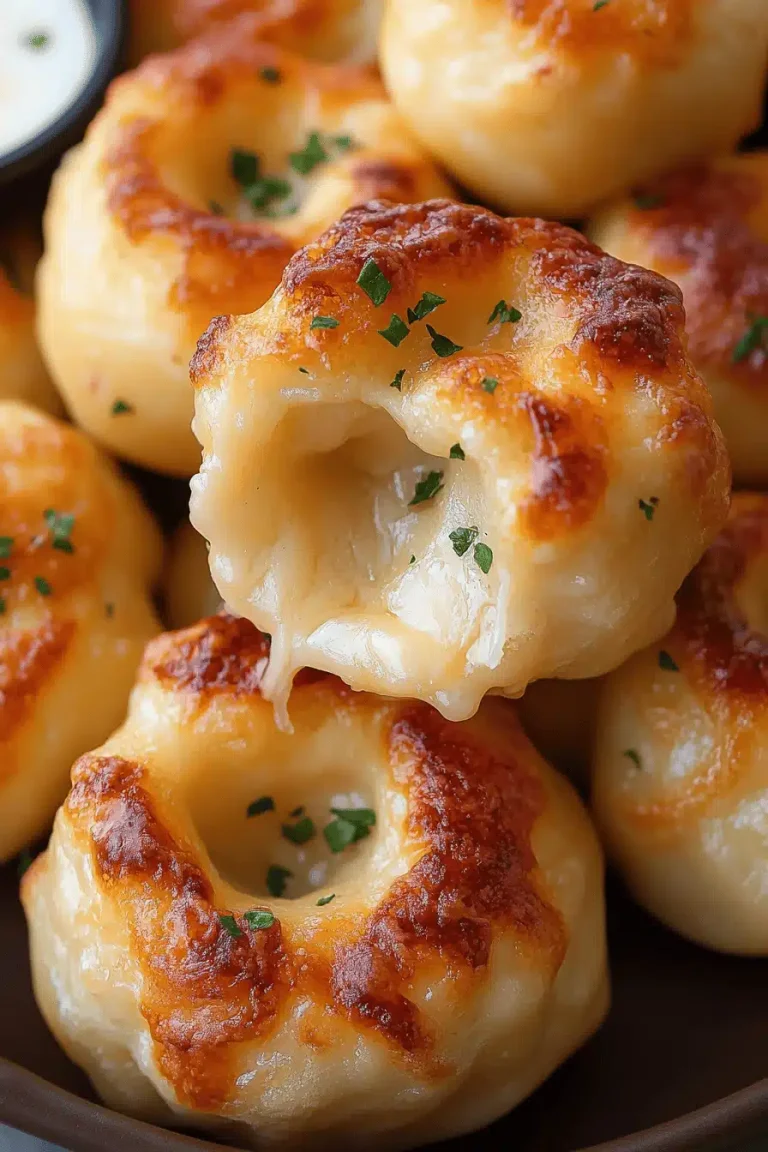
Buffalo Chicken Cups are bite-sized, crowd-pleasing bites that capture all the thrill of buffalo chicken in a compact, portable form. Think of them as a mash-up between buffalo chicken dip and a cheesy muffin: a creamy, spicy filling tucked into a crisp, easy crust, then finished with a glossy glaze that echoes the tangy sauce on your favorite wings. The name says it all—these cups are little, saucy cups of flavor that you can bake in a standard muffin tin. They’re essentially a cheese-lueled batter base that cradles a zippy buffalo chicken filling, finished with a quick glaze for that glossy, finger-licking finish. It’s a playful, family-friendly dish that still feels special enough for weekend entertaining, and the dipping sauce on the side makes them perfect for dipping, drizzling, or just nibbling straight from a warm muffin cup.
Why you’ll love this recipe?
What I love most about Buffalo Chicken Cups is how versatile they are in practice. They look fancy enough for a party platter, yet they’re easy enough to throw together on a weeknight. The flavor hits in layers—the tang of buffalo, the creaminess of cheese and Cream Cheese, and a crisp bite from the crust. It’s not just taste; it’s texture, too. The cups stay tender in the middle and crisp on the edges, which is exactly how I like my comfort food to behave. These cups are budget-friendly, using pantry staples and a few leftovers you might already have in the fridge. They freeze wonderfully, which makes them a lifesaver when you want to stock up for busy weeks. And because they’re hand-held, they’re always a hit at kids’ gatherings, game nights, or casual brunches with friends. If you’ve ever wished buffalo flavor could come in a neater, easier-to-serve package, you’ll be hooked after the first bite. What I love most about this recipe is how forgiving it is—you can dial up or dial down the heat, swap in different cheeses, or add celery for crunch, and the cups still sing.
How do you make Buffalo Chicken Cups?
Quick Overview
Here’s the quick picture before we dive deep: whip up a creamy main batter to form the crust, fold in a tangy Buffalo Chicken filling, bake until the crust is lightly golden and the filling is hot and bubbly, then finish with a glossy glaze. It’s a one-pan, hands-on process that feels fancy but is actually friendly for beginners. The best part is that you can assemble these ahead of time and bake them just before guests arrive, so you’re never scrambling the moment the doorbell rings. Buffalo Chicken Cups are ideal for a game day spread, a casual dinner, or a make-ahead snack that tastes like a party in your mouth.
Ingredients
For the Main Batter:
– 2 cups shredded mozzarella (or a mix of mozzarella and cheddar)
– 8 oz cream cheese, softened
– 2 large eggs
– 1/4 cup sour cream (or plain yogurt)
– 1/4 cup grated Parmesan
– 1/2 teaspoon garlic powder
– 1/4 teaspoon onion powder
– Pinch of salt and Black Pepper
– Optional: 1 tablespoon finely chopped chives for color
For the Filling:
– 2 cups cooked, shredded chicken (rotisserie chicken works great)
– 1/3 to 1/2 cup buffalo sauce (adjust to your heat preference)
– 1/2 cup blue cheese crumbles (optional) or shredded cheddar for a milder bite
– 1/4 cup finely diced celery for crunch
– 2 tablespoons cream cheese (to bind)
– A splash of ranch or blue-cheese dressing, if you like
For the Glaze:
– 1/4 cup buffalo sauce, heated with 1 tablespoon honey or maple syrup for a touch of sweetness
– 2 tablespoons butter, melted
– Optional: a squeeze of lemon juice or a dash of smoked paprika for depth
Step-by-Step Instructions
Step 1: Preheat & Prep Pan
Heat your oven to 375°F (190°C). Lightly grease a 12-cup muffin tin or line with parchment cups. The goal is a crust that won’t stick and a filling that won’t spill, so don’t skip this step—pampering your muffin cups pays off in the end. If you’re using wonton wrappers as a crust, brush the edges with a tiny bit of oil so they crisp beautifully.
Step 2: Mix Dry Ingredients
In a bowl, whisk the dry portion of the batter: mozzarella, Parmesan, garlic powder, onion powder, salt, and pepper. This dry mix is the flavor foundation, giving you that savory bite you expect from buffalo flavors. It helps the filling cling to the crust and keeps the texture cohesive.
Step 3: Mix Wet Ingredients
In another bowl, beat the cream cheese until smooth, then whisk in the eggs and sour cream. The mixture should be uniform and silky, like a little bowl of creamy clouds. If you test with a spatula and pull it through, you should see a little trail—the sign that everything is emulsified and ready to bake.
Step 4: Combine
Fold the wet mixture into the dry ingredients just until combined. Don’t overmix; you want a tender crumb, not a dense pancake. If the batter seems a touch thick, a splash of milk or water can help, but go slow so you don’t loosen the structure.
Step 5: Prepare Filling
In a separate bowl, mix the shredded chicken with buffalo sauce, cream cheese, celery, and blue cheese or cheddar. If you like extra heat, add a few more drops of hot sauce. Taste as you go—this is where you decide how punchy you want the filling to be. The filling should feel indulgent, but not so wet that it leaks through the crust.
Step 6: Layer & Swirl
Spoon a small amount of the main batter into each muffin cup to form the crust layer. Then dollop a generous spoonful of filling in the center. Top with another spoonful of batter to seal the filling inside. If you’re feeling fancy, swirl a little of the glaze into the top layer for a marbled effect that looks as good as it tastes.
Step 7: Bake
Bake for 18–22 minutes, until the crust is lightly golden and the filling is set at the center. If your oven runs hot, check at 15 minutes to prevent over-browning. A toothpick should come out clean or with a few moist crumbs; you don’t want mushy centers. Let the cups rest on a rack for 5 minutes before glazing.
Step 8: Cool & Glaze
For the glaze, whisk buffalo sauce with honey and melted butter until glossy. Drizzle or brush a light coat over the tops of the warm cups. The glaze adds shine and a final flash of heat—it’s the little kiss of flavor that makes the dish feel complete. If you’re making ahead, glaze just before serving to keep that mirror-like finish.
Step 9: Slice & Serve
These cups are best served warm, with a side of celery sticks and a small bowl of ranch or blue cheese dressing for dipping. Use a sharp knife or a small offset spatula to lift each cup cleanly from the tin, squeezing a little fresh parsley over the top for color if you like. My family loves the little cheese pull when you bite in—the presentation alone makes everyone hungry.
What to Serve It With
Buffalo Chicken Cups work beautifully as a stand-alone snack, but they also shine when paired with a few tasty sides. Here are ideas that I actually rotate through at gatherings and quiet weeknights alike.
For Breakfast: Serve a couple of cups with a bright tomato and avocado breakfast bowl, plus a cup of strong coffee. The heat in the cups wakes up the morning, and the cheese melts into a comforting, savory bite that pairs nicely with a light juice or a creamy latte.
For Brunch: Plate them with a cucumber-ranch salad and a sparkling citrus spritz. The cool crunch of the cucumber contrasts the warmth of the cups, making the whole plate feel like a celebration.
As Dessert: Okay, not typical, but a tiny bite with a dollop of cool ranch and a slice of celery can be a fun post-brunch contrast—still spicy, still delicious, and oddly refreshing after all that cheese.
For Cozy Snacks: Imagine a movie night, a blanket on your lap, and these cups paired with crunchy kettle chips and a glass of iced tea or cold beer. They’re the kind of snack that shows up at the door with a smile, no fuss required.
Top Tips for Perfecting Your Buffalo Chicken Cups
These little tricks have saved me more than once when I’m rushing or trying to impress guests without much notice.
Crust & Texture: Make sure the batter is not too runny; you want it to cling to the sides of the muffin cups. If it’s too loose, you’ll get a flat, crumbly crust. I usually add an extra tablespoon of cheese to tighten the mixture and help it crisp up nicely.
Mixing Advice: Stir until just combined. Overmixing makes the batter dense, which dulls the light, airy texture you’re after. If you notice lumps, don’t panic—ridges in the batter are normal and will bake out as the cups set.
Swirl Customization: For a showier bake, swirl a line of extra buffalo glaze through the tops after you glaze. This creates a marbled, glossy finish that’s as pretty as it is tasty.
Ingredient Swaps: Want lighter? Swap half the mozzarella for a sharper cheddar, and use Greek yogurt instead of sour cream for a tangy kick with a bit more protein. If you’re sticking with dairy-free, try a coconut yogurt and a dairy-free cheese blend—the result is still delicious with the right amount of heat.
Baking Tips: If your oven tends to burn edges, place the muffin tin on a lower rack and tent with a sheet of foil for the last 5 minutes. You want the centers corralled and the tops golden, not burnt. If you’re baking in a hotter oven, lower the temperature to 350°F (175°C) and extend the time by a few minutes.
Glaze Variations: Experiment with honey-sriracha for a sweeter heat, or a maple chipotle for a smoky finish. Keep the glaze glossy but not runny—thick enough to stay on top of the cups rather than running off the sides.
Lessons learned: I once underseasoned the crust and the cups tasted flat no matter how much filling I added. Now I taste the batter before filling and tweak with a pinch more salt or a splash of hot sauce. It makes all the difference. These buffalo bites respond to love and a little experimenting, so don’t be afraid to tailor them to your crowd.
Storing and Reheating Tips
These cups freeze surprisingly well and reheat like a dream, which makes them ideal for make-ahead meals or party prep days.
Room Temperature: Best enjoyed within 2 hours of baking. If you’re keeping them out longer, cover loosely to prevent the crust from getting soggy from humidity.
Refrigerator Storage: Store in an airtight container for up to 3 days. Reheat in a 350°F (175°C) oven for 8–10 minutes, or until heated through. If you’re using the glaze, add it after reheating to preserve shine.
Freezer Instructions: Freeze baked cups fully cooled, wrapped tightly, for up to 2 months. Thaw overnight in the fridge, then rewarm in the oven at 350°F (175°C) for 12–15 minutes. You may want to glaze them after reheating to refresh that glossy finish.
Glaze Timing Advice: If you’re serving from the freezer, glaze after reheating to keep the surface fresh. For fresh-baked cups, glaze while they’re still warm to help the glaze set into a lacquered top.
Frequently Asked Questions
Final Thoughts
If you’ve been hunting for a way to bottle that “party snack in a bite” feeling, Buffalo Chicken Cups are the answer. They’re cozy, fun, and just a little indulgent, with enough heat to wake up your palate and enough creaminess to soothe it back down. I love how adaptable they are—swap in mild or sharp cheeses, alter the buffalo heat, or swirl in a bit of ranch dressing for a different finish. They pair beautifully with a simple green salad or a bright cucumber-dill slaw, turning a casual weeknight into something you’d happily serve to guests. I can’t wait to hear how yours turn out—what heat level did you land on, and did you glaze or go glaze-free? Happy baking, friends, and may your kitchen always smell like warm cheese and spicy butter. And hey, if you try a twist, drop a comment below and share your variations. It’s my favorite part of this little cooking club we’ve got going here.
Buffalo Chicken Cups
Ingredients
Main Ingredients
- 2 cups cooked shredded chicken
- 0.5 cup buffalo wing sauce
- 0.25 cup cream cheese, softened
- 0.25 cup ranch dressing
- 1 cup shredded cheddar cheese
- 0.5 cup chopped fresh parsley
- 12 mini phyllo shells, thawed if frozen
Instructions
Preparation Steps
- Preheat oven to 350 degrees F (175 degrees C).
- In a medium bowl, combine the shredded chicken, buffalo wing sauce, softened cream cheese, and ranch dressing. Mix well until evenly coated.
- Stir in the shredded cheddar cheese and chopped parsley.
- Place the mini phyllo shells on a baking sheet.
- Spoon the chicken mixture evenly into each phyllo shell.
- Bake for 15-20 minutes, or until the filling is heated through and the cheese is melted and lightly golden.
- Garnish with extra parsley if desired. Serve warm.