cherry cheesecake
There’s something about cherry cheesecake that instantly takes me back to cozy Sunday afternoons at my grandma’s kitchen. The smell of sweet cherries mingling with that rich, creamy cheesecake filling always drew me right to the table. This cherry cheesecake recipe isn’t just any dessert—it’s kind of like the lovechild of smooth New York-style cheesecake and a vibrant cherry pie, rolled into one glorious bite. It’s the kind of treat that gets you excited for dessert without feeling overwhelmed by complicated instructions or endless ingredients. Honestly, I swear this recipe is a crowd-pleaser at every family gathering, and I’ve lost track of the number of times I’ve made it on a whim, especially when I needed something quick but special. If you like a good, classic cheesecake but want that joyful pop of cherry, this one’s got your name on it.
What is a cherry cheesecake?
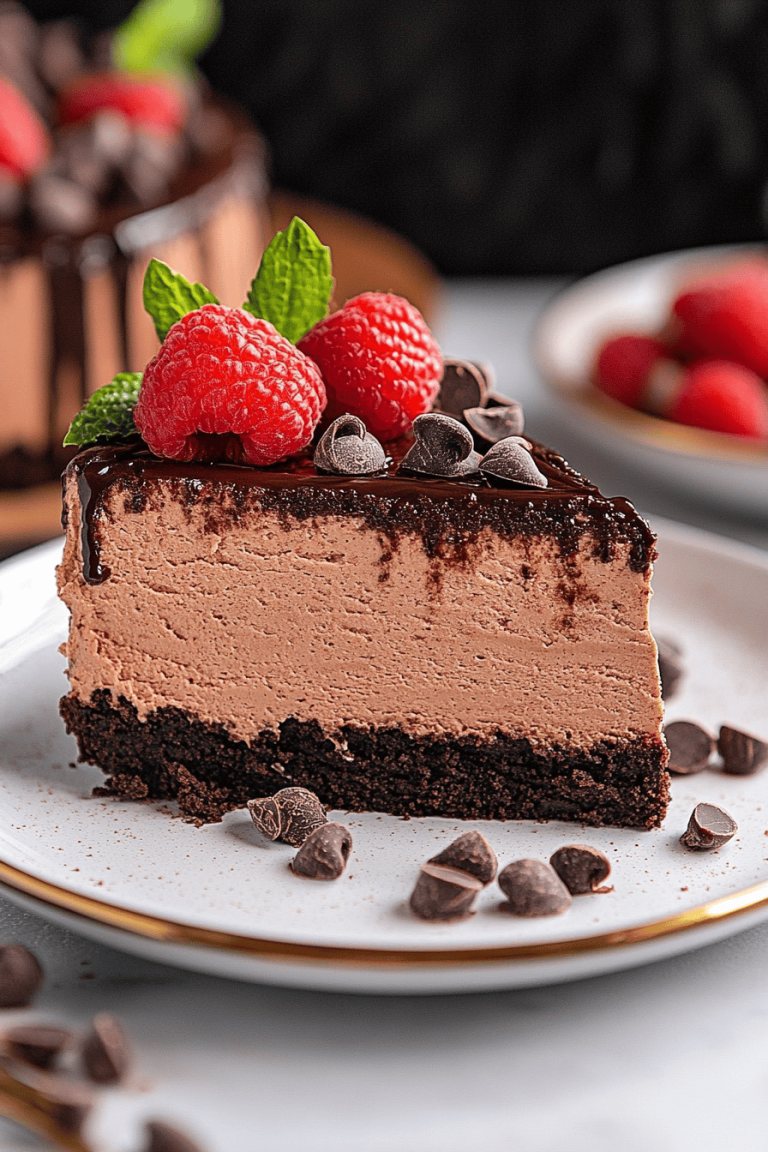
Think of cherry cheesecake as a luscious dessert that brings together the best of two worlds: creamy, tangy cheesecake and sweet, slightly tart cherry topping. It’s essentially a smooth cream cheese-based cake resting on a crumbly crust, usually graham cracker or biscuit, and topped generously with bright, glossy cherries. The cherries add a fresh burst of flavor and a beautiful pop of color that makes it irresistible. The name is straightforward, but the way it tastes? That’s where the magic happens. Over time, this dessert has become a classic staple in American bakeries and dinner tables alike, but honestly, its origins stretch back through various cheesecake and cherry pie traditions, each adding a little something special. If you’ve ever had a slice at a diner or a holiday dinner, you already know how comforting it feels — and it’s surprisingly easy to make at home.
Why you’ll love this recipe?
What I love most about this cherry cheesecake recipe is how it hits that sweet spot between rich indulgence and surprisingly simple prep. First off, the flavor is everything. The creamy, almost velvety cheesecake filling has just the right amount of tang from the cream cheese balanced by the sweetness, and the cherry topping? It’s like the grand finale every bite needs—bright, juicy, and a little bit tart to cut through the richness. I’ve brought this to potlucks more times than I can count, and it disappears in minutes.
Secondly, it’s not one of those desserts that makes you feel like you need a professional degree to tackle. The ingredients are super budget-friendly: cream cheese, eggs, sugar, and cherries—easy to find and easy on the wallet. I always make sure to pick fresh or even frozen cherries when out of season, and sometimes I even swap in almond milk for some creaminess in the filling—it turned out surprisingly well! This makes it perfect for last-minute guests or when you want something homey on a weeknight.
Another thing I swear by is its versatility. At my house, I’ve served this cheesecake as a breakfast treat with coffee, a fancy brunch highlight, a casual snack with friends, and the star dessert at dinner parties. It’s got that perfect texture balance—smooth but with a slight bite, and you can switch up the topping too if you want a different spin (hello, blueberry or mixed berry!). If you love my carrot cake or classic raspberry tarts, you’ll feel right at home with this cherry cheesecake—it just has that same heartwarming vibe.
How do I make a Cherry Cheesecake?
Quick Overview
Here’s the deal: you start by preparing a crumbly crust that gives a buttery base to your cheesecake. Then you whip up a silky cream cheese batter that’s smooth and tangy, pour it over the crust, and top it off with a luscious cherry glaze—sweet with a little zip. The real beauty is in the layering and swirling of the cherry topping into the batter, which creates a stunning marbled effect that people always ask about. This recipe is straightforward and doesn’t require fancy tools, so even if you’re new to cheesecake, you won’t feel overwhelmed. The baking and cooling steps are key, but I’ll guide you through all of those to get that perfect set without cracks. Honestly, the hardest part is waiting for it to chill enough to dive in!
Ingredients
For the Crust:
- 1 12 cups graham cracker crumbs (freshly crushed or store-bought, but fresh makes a better texture)
- 5 tablespoons unsalted butter, melted (helps bind the crust and adds richness)
- 2 tablespoons granulated sugar (balances the buttery flavor)
For the Cheesecake Filling:
- 24 ounces (3 blocks) cream cheese, softened to room temperature (trust me, no lumps here!)
- ¾ cup granulated sugar (adjustable, depending on how sweet you want it)
- 3 large eggs, at room temperature (helps with smoothness)
- 1 teaspoon vanilla extract (the soul of the filling)
- ½ cup sour cream or Greek yogurt (adds tang and creaminess)
- Optional: 2 tablespoons almond milk (if you want it creamier, like I sometimes do)
For the Cherry Glaze/Topping:
- 1 ½ cups pitted cherries (fresh or frozen and thawed; frozen work great when fresh aren’t available)
- ½ cup granulated sugar
- 1 tablespoon lemon juice (brightens the cherry flavor)
- 1 tablespoon cornstarch mixed with 2 tablespoons cold water (for thickening)
- Optional: a splash of almond liqueur or cherry brandy for a fancy twist
Step-by-Step Instructions
Step 1: Preheat & Prep Pan
Start by heating your oven to 325°F (160°C). I like using a 9-inch springform pan because it makes removing the cheesecake effortless. Lightly grease the pan with butter or nonstick spray, and then press the graham cracker crust mixture evenly on the bottom and a bit up the sides. I always squeeze the crumbs tightly so you get a firm base that holds together well. Pop it in the fridge to chill while you mix the filling—this little trick helps the crust stay crisp.
Step 2: Mix Dry Ingredients
Though the crust has most dry elements, the cheesecake filling doesn’t really involve extra dry ingredients besides the sugar. It’s best to sift your sugar a little for even distribution, but no worries if you skip this. For the glaze, keep your cornstarch and sugar ready, but mix the starch with cold water before adding—it avoids lumps.
Step 3: Mix Wet Ingredients
Grab a large bowl and beat that softened cream cheese until it’s totally smooth. I use my stand mixer for this part, but a handheld mixer works fine too. Then, gradually add sugar and vanilla, beating until silky. Add eggs one by one, mixing gently but thoroughly—this prevents air bubbles, which cause cracks later. Finally, blend in the sour cream and almond milk if using. You’ll know it’s ready when the batter is smooth, thick, and creamy without any lumps.
Step 4: Combine
At this point, the batter is ready to go into the crust-lined pan. Pour about two-thirds of the batter in first. This layering makes swirling the cherry topping way easier and more dramatic in effect.
Step 5: Prepare Filling
For the cherry topping, combine cherries, sugar, and lemon juice in a saucepan over medium heat. Let it simmer gently until the cherries release their juices (about 5–7 minutes). Stir in the cornstarch slurry and cook until thickened. The glaze should be glossy and coat the back of a spoon—if it’s too runny, cook a bit longer. Let it cool slightly before swirling.
Step 6: Layer & Swirl
Drop spoonfuls of the cherry glaze over the cheesecake batter, then pour the remaining batter on top. Now use a butter knife or skewer to gently swirl the cherries into the batter, creating marbled ribbons. Don’t overdo it; you want beautiful streaks, not a full mix.
Step 7: Bake
Bake uncovered for about 50–60 minutes, or until the edges are set but the center still jiggles slightly—it will firm up as it cools. If you notice the cheesecake browning too fast, tent loosely with aluminum foil. Oven temperatures vary, so keep an eye on it after the 45-minute mark. My husband swears by a water bath, but after years, I find this method just as foolproof with less mess.
Step 8: Cool & Glaze
Once baked, cool the cheesecake on a wire rack for about an hour, then chill it in the fridge for at least 4 hours or overnight. This step is crucial—it makes slicing neat and keeps everything firm. If you want an extra cherry glaze coat on top, now’s the time to gently spread any leftover cherry sauce for shine.
Step 9: Slice & Serve
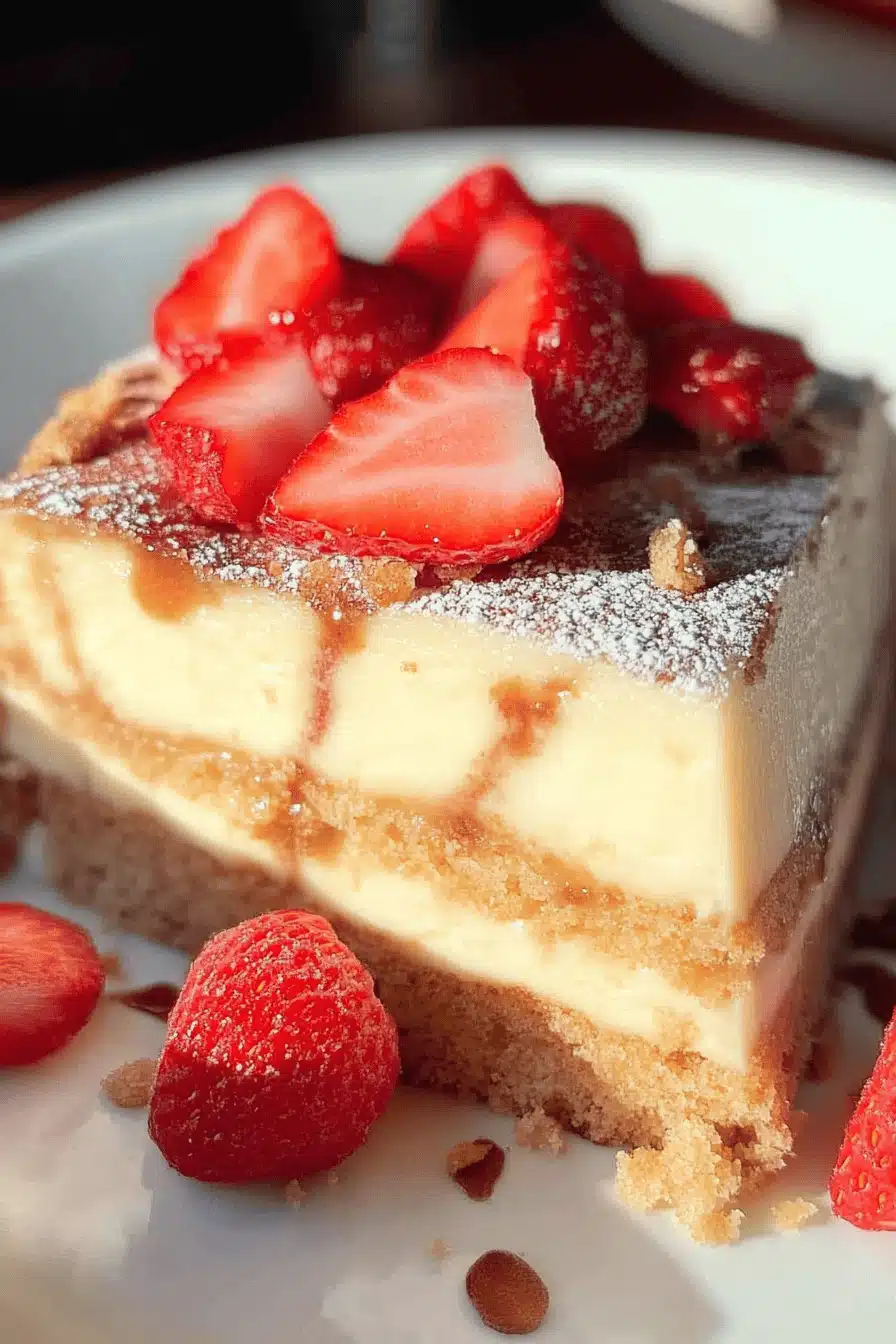
For that perfect slice, dip a sharp knife in hot water, wipe it dry, and then cut—it slices through like butter without tearing. Serve chilled, maybe with a dollop of whipped cream or a few extra cherries on top. The contrast of creamy filling with sweet-tart cherries is absolutely dreamy.
What to Serve It With
For Breakfast: I love to pair a slice with my morning coffee or a latte. The cheesecake almost feels indulgent enough for a brunch treat but mellow enough that it doesn’t overpower your morning vibes. Sometimes I add a sprinkle of cinnamon or nutmeg on top to warm it up.
For Brunch: Dress it up with fresh mint sprigs and a side of mixed berries. It pairs beautifully with sparkling water, orange juice, or even a mimosa if it’s a special weekend. Guests always comment that it doesn’t feel too heavy, so it’s the perfect balance.
As Dessert: After dinner, serve with vanilla bean ice cream or a drizzle of dark chocolate sauce. If you’re feeling fancy, a splash of cherry liqueur on the side makes it extra special. It’s a classic end to holiday meals, and the aroma when you bring it out is a total showstopper.
For Cozy Snacks: When craving a little something sweet in the afternoon, this cheesecake with a cup of chai or herbal tea hits the spot. It’s rich enough to satisfy sugar cravings but still comforting and homey. My kids absolutely adore it this way and often ask for seconds before dinner!
Top Tips for Perfecting Your Cherry Cheesecake
Cheesecake Texture: I learned early on that room temperature cream cheese makes all the difference—no lumps, just creamy magic. Beat it well but avoid overwhipping to keep it smooth instead of airy, which causes cracking.
Crust Prep: Press the graham cracker crumbs firmly but gently into the pan—tap the pan on the counter a few times to pack it evenly. This keeps it from crumbling when cutting.
Cherry Topping: Make sure to simmer the cherry glaze gently and don’t rush the cornstarch activation. If your topping is too thick, ease it with a splash of water or lemon juice. You can swap cherries with blueberries or a mix of berries if you want a different flavor.
Swirl Swag: When swirling your cherry topping into the batter, go slow with a thin skewer to get elegant, natural marbling without turning your cake pink all over.
Baking Tricks: I skip the water bath now and just tent the cheesecake with foil if browning too fast. Also, pulling it out when it still jiggles slightly in the middle really helps avoid that dry “cheesecake crack” look.
Glaze Variations: You can skip the cherry glaze entirely and fresh cherries on top work wonders as well. Or try a simple powdered sugar dusting or a raspberry coulis if you want a different finish. Just keep it cool before serving for the best look.
One mistake I’ve made more than once? Not letting the cheesecake chill long enough, which results in messy slices and a less firm texture. Patience here truly rewards you with perfect slices and flavor. This little tip has saved so many of my baking days!
Storing and Reheating Tips
Room Temperature: You can leave cherry cheesecake out on the counter for up to 2 hours if it’s cool in your kitchen, just covered loosely with foil or a cake dome. Past that, it’s best to refrigerate to keep it fresh.
Refrigerator Storage: Store leftover cheesecake in an airtight container or cover with plastic wrap to avoid fridge odors invading. It stays fresh and creamy for up to 5 days. I often slice it before storing for easy grab-and-go.
Freezer Instructions: Cheesecake freezes beautifully! Wrap tightly in plastic wrap and then in foil or a zip-top freezer bag. It keeps well for up to 3 months. When ready to eat, thaw overnight in the fridge and apply any glaze or toppings fresh afterward.
Glaze Timing Advice: If freezing, I recommend adding the cherry glaze right before serving—freezing can change its texture a bit, and fresh glaze always looks nicer and tastes fresher. For fridge storage, glaze can go on before chilling with no problem.
Frequently Asked Questions
Final Thoughts
This cherry cheesecake has been a comforting classic in my kitchen for years, and every time I make it, I think about those special moments with family and friends gathered around the table. Its creamy texture, beautiful marbled cherries, and simple, heartfelt ingredients make it a symbol of home. If you’re someone who loves desserts that feel like an embrace—rich, sweet, and a little bit nostalgic—this recipe will fit right into your collection. Don’t hesitate to play around with the cherry topping or try different crusts; each tweak makes it your own. I’d love to hear how yours turns out and any fun variations you try—drop a comment, share a picture, or rate it if you’re feeling generous! Happy baking, and remember: the best desserts are the ones made with love (and a little patience). Can’t wait to see your cherry cheesecake moments!
Easy Cherry Dessert Recipe You'll Love
Ingredients
Main Ingredients
- 2 cups graham cracker crumbs
- 0.5 cup salted butter melted
- 0.5 cup brown sugar
- 2 packages cream cheese 8oz package, softened
- 1 package instant vanilla pudding 3.4oz package
- 0.75 cup powdered sugar
- 1 can cherry pie filling 540ml can
Instructions
Preparation Steps
- In a large bowl, stir together graham cracker crumbs, melted butter, and brown sugar. Press mixture firmly into the bottom of an 8x8 inch square baking pan.
- Prepare instant vanilla pudding according to package instructions.
- In a mixing bowl, combine prepared pudding, powdered sugar, and softened cream cheese. Mix on low speed with an electric mixer until smooth and well combined. Spread cheesecake mixture evenly over the graham cracker crust.
- Spread cherry pie filling evenly on top of the cheesecake layer. Refrigerate the dessert for at least 2 hours before serving to allow it to set.