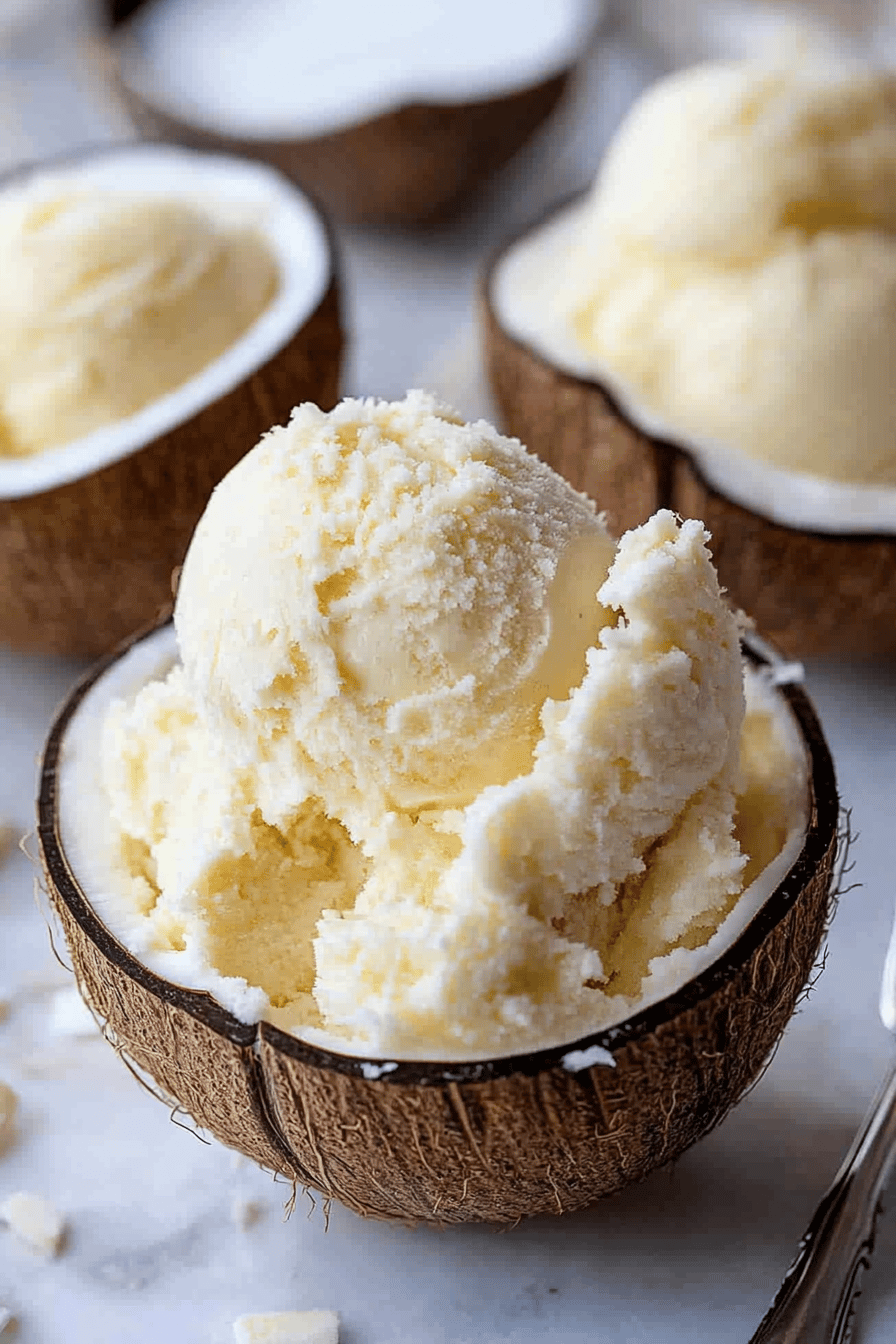
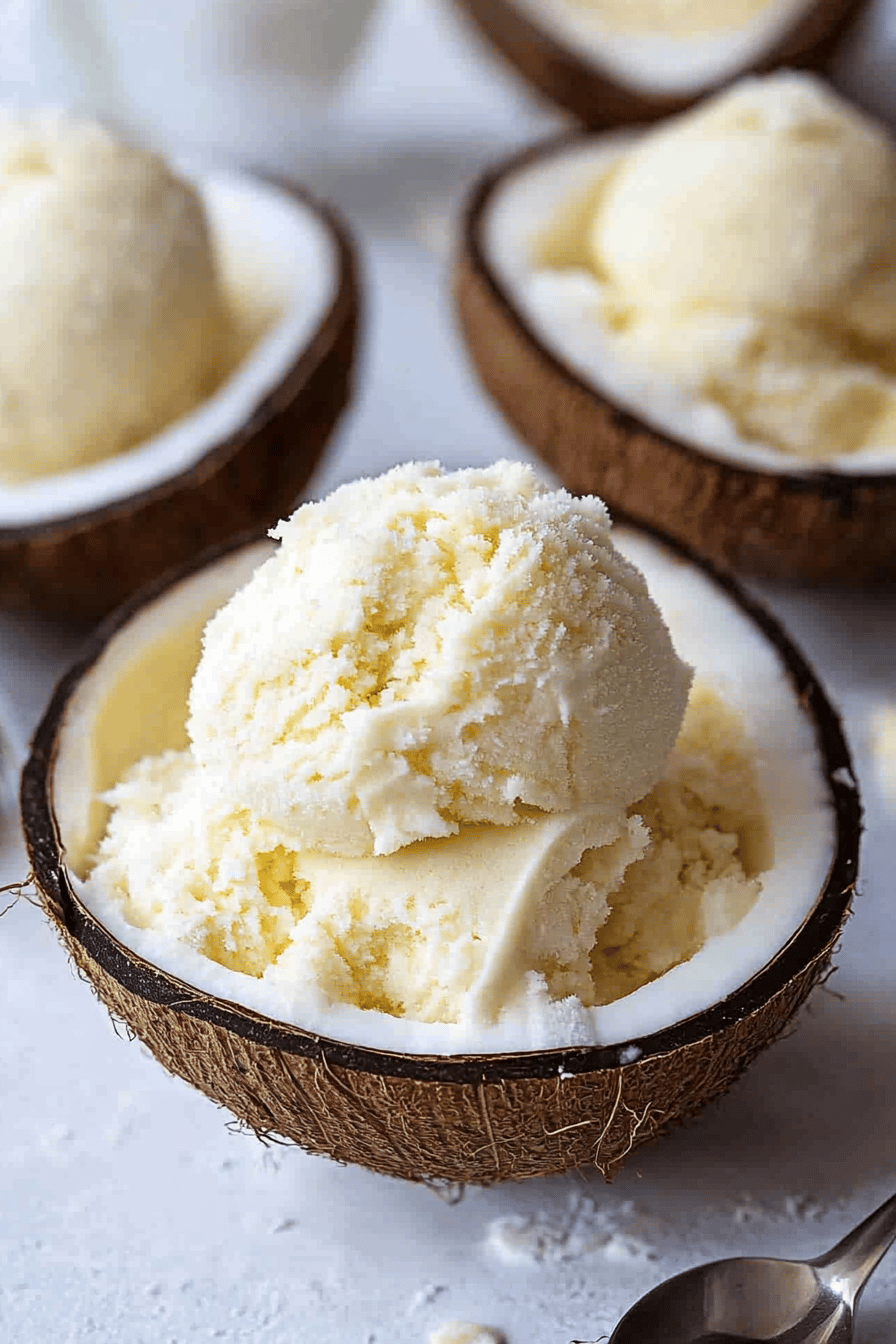
Coconut Ice Cream
Oh, where do I even begin with this Coconut Ice Cream? It’s like a warm hug on a chilly evening and a burst of sunshine on a sweltering afternoon, all rolled into one perfect scoop. You know those days when you’re just craving something sweet, something decadent, but you really don’t want to spend hours in the kitchen wrestling with complicated ingredients or a fussy oven? This is it. This is your answer. It’s so ridiculously easy, I sometimes feel like I’m cheating! My kids, bless their hearts, ask for this literally all the time, and honestly, I don’t blame them. It’s got that perfect balance of creamy, sweet, and just a hint of tropical magic. Forget those store-bought tubs that taste… well, like chemicals. This is the real deal, and it tastes like sunshine bottled up. It’s funny, I used to think making ice cream at home was this huge undertaking, something for people with fancy machines and endless patience. But this coconut Ice Cream Recipe changed everything for me. It’s the kind of dessert that makes people say, “Wow, you made this?” and I just smile and say, “Yep!” It’s that good, and that surprisingly simple.
What is coconut ice cream?
So, what exactly is this glorious creation I’m raving about? At its heart, coconut Ice Cream is a luscious, dairy-free frozen dessert where the star ingredient is, you guessed it, coconut! Instead of using traditional dairy like milk or cream, we rely on the rich, fatty goodness of full-fat coconut milk or cream to give it that unbelievably smooth, almost silken texture. Think of it as a tropical twist on your favorite frozen treat, but with a whole lot more depth and a naturally sweet, slightly nutty flavor that’s just divine. It’s essentially the same concept as classic ice cream – you’re chilling a sweet, flavored base until it freezes – but the foundation is entirely plant-based. This makes it a dream for anyone who’s lactose intolerant, vegan, or just looking for a lighter, yet still incredibly satisfying, dessert option. It’s less about a complex process and more about celebrating the beautiful, natural flavor of coconut.
Why you’ll love this recipe?
There are so many reasons why this coconut Ice Cream has become a staple in my kitchen, and I just know you’re going to fall head over heels for it too. First off, the flavor. Oh, the flavor! It’s this wonderful dance between the creamy, rich coconut and just the right amount of sweetness. It’s tropical without being overpowering, and it has a depth that’s hard to describe but utterly delicious. Then there’s the simplicity. Honestly, this is a lifesaver on busy nights. You don’t need an ice cream maker, no complicated churning, just a few simple steps and you’ve got a gourmet-tasting dessert. It’s also surprisingly budget-friendly. Cans of coconut milk are generally quite affordable, making this a much more economical choice than some fancy artisanal ice creams. And the versatility? It’s incredible! You can enjoy it plain, swirl in some fruit puree, add chocolate chips, or even sprinkle on some toasted coconut flakes for extra crunch. I’ve found that it pairs beautifully with just about anything, which makes it a go-to for any occasion. What I love most about this coconut ice cream, though, is how it feels like a little luxury without the guilt or the fuss. It’s a crowd-pleaser that’s always a hit, and it never fails to impress, even my pickiest eaters. It’s also a fantastic alternative if you’re looking for something a bit different from the usual vanilla or chocolate. It’s unique, it’s delicious, and it’s incredibly satisfying.
How do you make coconut ice cream?
Quick Overview
This coconut Ice Cream recipe is all about simplicity and maximum flavor. We’re talking about whisking together a few pantry staples, freezing the mixture until firm, and voilà – instant tropical bliss. The magic really happens in the quality of the coconut milk, which provides all the creaminess you need. It’s a no-churn wonder that requires minimal effort but delivers maximum reward. You’ll be amazed at how something so simple can taste so incredibly good and feel so luxurious.
Ingredients
For the Main Batter:
2 cans (13.5 oz each) full-fat coconut milk (this is key for creaminess, don’t skimp here! Look for brands with minimal additives.)
1/2 cup granulated sugar (you can adjust this to your sweetness preference)
1 teaspoon vanilla extract
Pinch of salt (enhances all the flavors!)
For Optional Swirls/Add-ins:
1/4 cup fruit puree (like mango, passionfruit, or raspberry)
1/4 cup melted dark chocolate
1/4 cup toasted shredded coconut (for texture!)
For the Topping (optional but recommended!):
Whipped cream
Fresh Berries
Extra toasted coconut flakes
Step-by-Step Instructions
Step 1: Preheat & Prep Pan
This step is super simple for this recipe as we’re not baking anything. The only prep needed is to make sure you have a freezer-safe container ready. A loaf pan works perfectly, or any similar shallow, freezer-safe dish. For an even smoother texture, you can pop your container in the freezer for about 30 minutes beforehand; this helps the ice cream set up faster and more evenly.
Step 2: Mix Dry Ingredients
In a medium bowl, whisk together the granulated sugar, salt, and vanilla extract. This helps to evenly distribute the sugar and ensures there are no pockets of sweetness. It also starts to dissolve the sugar slightly, which is helpful.
Step 3: Mix Wet Ingredients
Open your cans of full-fat coconut milk. You’ll want to give them a really good stir or even a quick whisk to combine any separated cream and liquid. Pour both cans into a larger bowl. Now, add the sugar-vanilla mixture from Step 2 into the coconut milk. Whisk everything together until the sugar is completely dissolved and the mixture is smooth and uniform. You’re looking for a creamy, homogenous liquid – no grainy bits of sugar!
Step 4: Combine
This step is more about ensuring everything is well-mixed. Pour your well-combined coconut milk and sugar mixture into your prepped freezer-safe container. If you’re adding any mix-ins like melted chocolate or fruit puree at this stage, you can gently swirl them in now with a knife or spoon, but don’t overmix – you want distinct ribbons!
Step 5: Prepare Filling
If you’re planning on adding swirls of fruit puree or melted chocolate, now’s the time to get them ready. Ensure your fruit puree is smooth and not too watery. For melted chocolate, let it cool slightly so it doesn’t melt the coconut base too much. Having these ready makes the swirling process much easier and faster.
Step 6: Layer & Swirl
Pour your coconut base into the freezer-safe container. If you’re adding swirls, dollop spoonfuls of your fruit puree or drizzle your melted chocolate over the top of the base. Then, take a butter knife or a skewer and gently swirl the additions through the base. Don’t go crazy here; you want beautiful marbling, not a uniform color. A few passes are usually enough. If you’re adding toasted coconut, you can stir some in now or sprinkle it on top just before freezing.
Step 7: Bake
We’re not baking this! This step is actually about freezing. Cover your container tightly with a lid or plastic wrap (making sure the wrap touches the surface to prevent ice crystals) and place it in the freezer. Freeze for at least 6-8 hours, or preferably overnight, until it’s completely firm and scoopable.
Step 8: Cool & Glaze
Once the ice cream is fully frozen, take it out of the freezer. If you’re adding a glaze, now is the time to prepare it. For example, a simple glaze of powdered sugar and a little coconut milk. Let the ice cream sit at room temperature for about 5-10 minutes to soften slightly, making it easier to scoop. If you’re glazing, you can do it just before serving or drizzle it over a scoop. It’s best applied right before serving to maintain its texture.
Step 9: Slice & Serve
Scoop your glorious coconut ice cream into bowls. Garnish with whipped cream, fresh berries, or extra toasted coconut flakes for a delightful crunch. The texture should be wonderfully creamy and refreshing. Enjoy every single bite!
What to Serve It With
This coconut ice cream is so versatile, it truly shines no matter when you serve it. For a delightful breakfast treat, I love serving a small scoop alongside some fresh tropical fruit like mango or pineapple. A drizzle of honey or a sprinkle of granola takes it to the next level, making it feel indulgent yet totally appropriate for the morning. At brunch, it’s an absolute showstopper. Imagine a beautiful presentation with a slice of your favorite brunch cake or even just served alongside some fluffy pancakes or waffles. A mint sprig makes it look extra fancy! As a dessert, it’s pure perfection. It’s the ideal palate cleanser after a rich meal, or a fantastic base for other toppings. I often serve it with a warm berry compote, some chocolate shavings, or even a shot of espresso for an affogato-style treat. And for those cozy snack attacks in the evening, it’s my go-to. A simple bowl on its own is incredibly satisfying, but a sprinkle of toasted almonds or a few chocolate chips makes it feel like a special occasion, even if it’s just a Tuesday. My family’s favorite is when I swirl in some raspberry puree – it adds a lovely tartness that cuts through the richness beautifully. It’s just a recipe that brings joy, no matter how you serve it.
Top Tips for Perfecting Your Coconut Ice Cream
I’ve tinkered with this coconut ice cream recipe more times than I can count, and through trial and error (and a few not-so-perfect batches!), I’ve picked up a few tricks that I think you’ll find super helpful. First, about the coconut milk: you absolutely need to use *full-fat* coconut milk. The kind in the can, not the carton you drink. The fat content is what gives this ice cream its incredible creaminess without any dairy. If you use light coconut milk or beverage-style coconut milk, your ice cream will likely be icy and disappointing. Trust me on this one! When you open the cans, don’t be alarmed if the cream has separated from the liquid; that’s totally normal. Just give it a really good whisk or stir to recombine everything before you use it. Another thing I learned is about the sugar. While 1/2 cup is a good starting point, taste your coconut milk mixture before you freeze it. If you prefer it sweeter, add a tablespoon or two more. Conversely, if you want it less sweet, you can always reduce it slightly, especially if you’re adding sweet fruit purees. For swirling, remember that less is often more. You want lovely ribbons of flavor and color, not a muddy mess. Gentle swirls are key! If you’re worried about ice crystals forming, make sure your container is well-sealed. Pressing a piece of parchment paper or plastic wrap directly onto the surface of the ice cream before putting the lid on is a game-changer. It creates a barrier and really helps keep it smooth. When it comes to freezing time, overnight is usually best. It needs that much time to fully firm up. If you try to scoop it too soon, it will be soft and melty. Patience is rewarded here! For ingredient swaps, I’ve found that using a small amount of a neutral-flavored oil like refined coconut oil (about 1-2 tablespoons) can sometimes boost creaminess if your coconut milk isn’t super rich. And if you want a richer flavor, a tablespoon of pure almond extract alongside the vanilla can be lovely, but use it sparingly! Don’t be afraid to experiment with adding a little bit of lime zest to the base for a citrusy kick – it’s surprisingly delicious and pairs wonderfully with coconut. Finally, for the best scoopable texture, let the ice cream sit out for about 5-10 minutes before you try to scoop it. It softens just enough to be perfect. I learned this after one too many frozen knuckles trying to dig into a rock-solid block!
Storing and Reheating Tips
So, you’ve made this amazing coconut ice cream, and you have leftovers (which, let’s be honest, is rare in my house!). Storing it properly is key to keeping it delicious. For storing at room temperature, it’s really best to enjoy it right away or within a few hours. It will melt fairly quickly due to its lower freezing point compared to dairy ice creams. If you need to store it in the refrigerator, it’s not really designed to be stored there once frozen, as it will just melt. The freezer is your best friend for this recipe! When freezing, make sure your container is truly airtight. I always use a freezer-safe container with a tight-fitting lid. If you don’t have a lid, heavy-duty plastic wrap pressed directly onto the surface of the ice cream, followed by aluminum foil, works wonders. This helps prevent freezer burn and those dreaded ice crystals. When stored this way, your coconut ice cream should stay good for about 2-3 weeks. After that, the texture might start to change, becoming a bit more icy. For the best quality, try to consume it within that timeframe. When you’re ready to enjoy it again, just let it sit on the counter for about 5-10 minutes to soften up. This makes it much easier to scoop and brings back that wonderful creamy texture. I generally don’t reheat ice cream, as that’s not really its purpose, but if you’ve made a batch with a fruit swirl, you might notice the fruit layer can get a little icier than the coconut base. That’s totally normal and doesn’t affect the taste. Just give it a good stir with your spoon when you scoop it!
Frequently Asked Questions
Final Thoughts
Honestly, if you’re looking for a simple, incredibly satisfying dessert that tastes like a tropical vacation in a bowl, this coconut ice cream is it. It’s proof that you don’t need a fancy ice cream maker or a long list of complicated ingredients to create something truly magical. It’s that comforting, familiar sweetness with a delightful hint of the tropics that just makes you happy. I hope you give this a try, especially if you’ve never made homemade ice cream before – this is the perfect starter recipe. And if you love this, you might also enjoy my recipes for Mango Sorbet or my No-Bake Chocolate Avocado Mousse; they offer similar fruity and creamy vibes! I’m so excited for you to experience this yourself. Please, if you make this coconut ice cream, come back and leave a comment below to tell me how it turned out! I absolutely love hearing about your kitchen adventures and seeing your creations. Happy scooping!
Coconut Ice Cream
Ingredients
Main Ingredients
- 13.5 oz Full-Fat Coconut Milk
- 0.75 cup Granulated Sugar
- 0.5 tsp Vanilla Extract
- 0.25 tsp Salt
Instructions
Preparation Steps
- In a saucepan, combine coconut milk, sugar, and salt. Heat over medium heat, stirring until sugar dissolves.
- Remove from heat and stir in vanilla extract.
- Pour mixture into a bowl and refrigerate for at least 4 hours, or until completely chilled.
- Churn in an ice cream maker according to the manufacturer's instructions.
- Transfer ice cream to an airtight container and freeze for at least 2 hours before serving.