4th of July Pie
There are some recipes that just *feel* like a holiday, and for me, that’s exactly what this 4th of July Pie does. It’s the kind of dessert that instantly transports me back to backyard barbecues, the smell of charcoal in the air, and fireflies blinking in the twilight. I remember making this for the first time years ago, trying to find something that screamed “celebration” but wasn’t overly fussy. I wanted something bright, something crowd-pleasing, and boy, did this deliver! It’s become our go-to summer pie, and honestly, it’s so good I’ve found myself making it for birthdays and even just random Tuesday evenings when we need a little something sweet. It’s sort of like a decadent, incredibly moist cake but in pie form, with a delightful tang that cuts through the sweetness. Forget complicated layered cakes; this 4th of July Pie is your shortcut to pure joy.
What is this 4th of July pie?
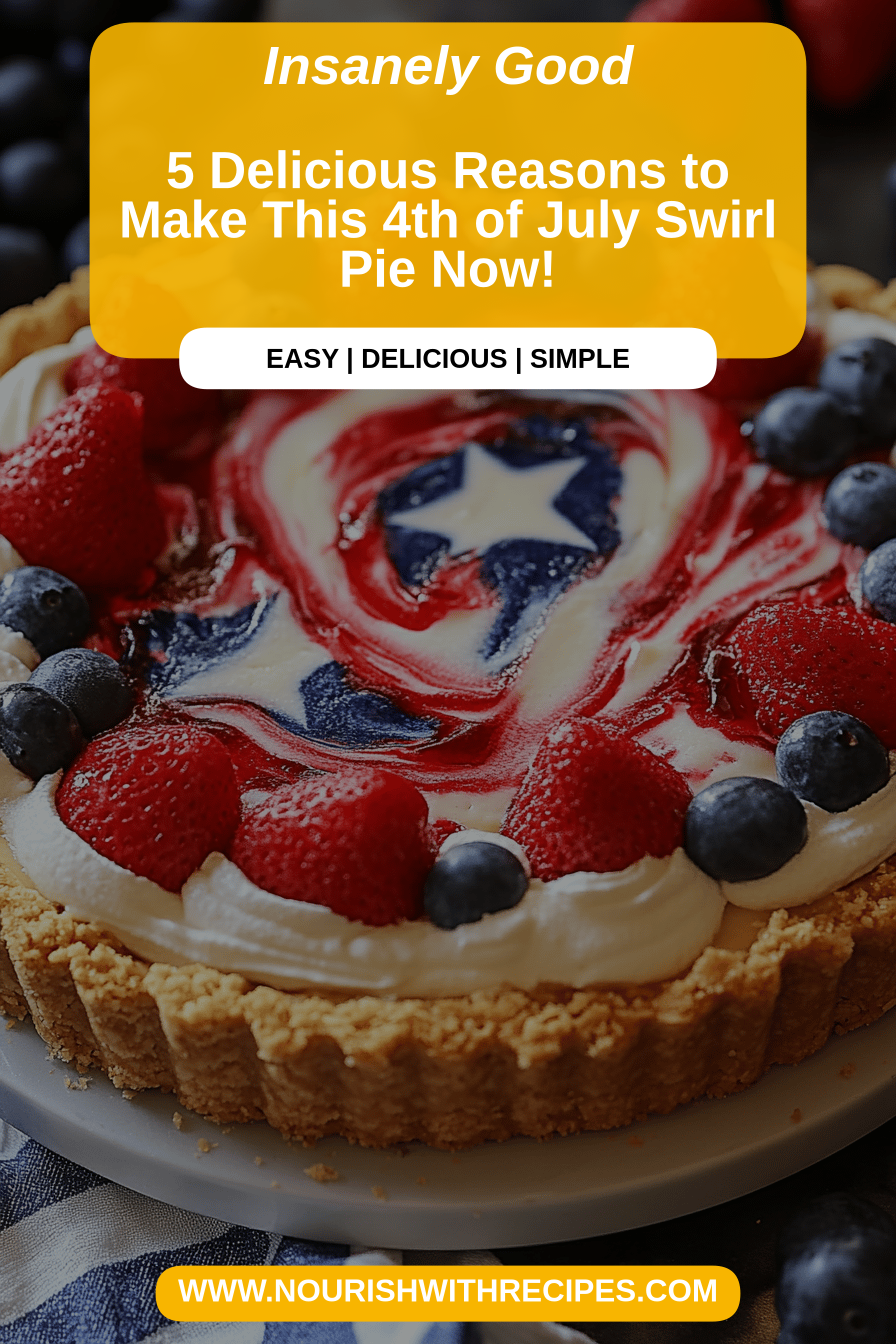
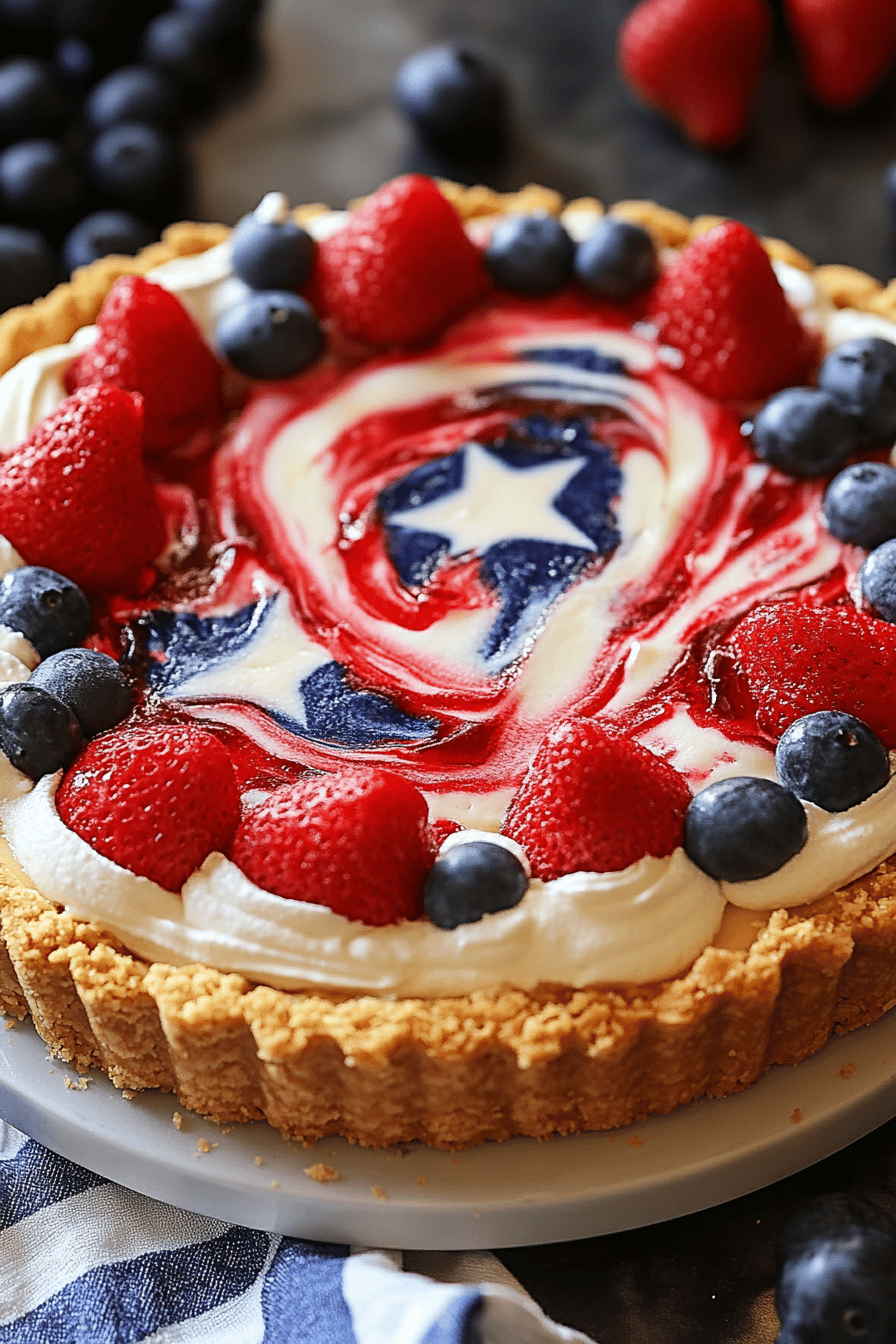
So, what exactly *is* this magical 4th of July Pie? Think of it as a wonderfully moist, slightly tangy, incredibly flavorful cake baked in a pie crust, topped with a sweet, luscious glaze. It’s not your traditional fruit pie, and it’s definitely not a cheesecake. It’s something entirely its own! The name itself is a bit of a playful nod to its vibrant colors and its perfect place at any summer gathering, especially around Independence Day. It’s got this lovely, almost creamy texture that comes from a few key ingredients, and a subtle citrusy note that just makes it sing. It’s basically sunshine in edible form, designed to be shared and loved by everyone at the table. It’s the kind of dessert that makes people ask, “Wow, what *is* this?” and then ask for the recipe!
Why you’ll love this recipe?
Honestly, where do I even begin with why this 4th of July Pie is an absolute winner? First off, the flavor is just out of this world. It’s sweet, yes, but it has this bright, almost zesty undertone that keeps it from being *too* sweet. It’s wonderfully balanced. The texture is another big win – it’s unbelievably moist and tender, almost like a rich, dense cake but lighter. And the glaze on top? Pure magic. It adds another layer of sweetness and that pop of color that just screams summer celebration.
But beyond the incredible taste, it’s also surprisingly simple to make. I know, I know, “pie” can sometimes sound intimidating, but this one is incredibly forgiving. You don’t need any fancy techniques. If you can stir ingredients together, you can make this pie. It’s a lifesaver when you’re planning a big get-together and need a dessert that’s going to impress without taking up your entire day. Plus, the ingredients are all super budget-friendly. You likely have most of them in your pantry right now! What I love most about this recipe, though, is its versatility. It’s fantastic on its own, but it’s also amazing served with a dollop of whipped cream or a scoop of vanilla Ice Cream. It’s just one of those dependable recipes that always turns out perfectly, no matter what. It’s definitely a step up from your average weeknight dessert, but it’s also way less stressful than those elaborate holiday pies that require perfect latticework.
How do I make a 4th of July pie?
Quick Overview
Making this pie is really a straightforward process. You’ll start by mixing up your wet and dry ingredients separately, then combine them to create a luscious batter. Next, you’ll prepare a simple, vibrant filling that gets swirled right into the batter before it bakes. The whole thing goes into a pre-made pie crust (because who has time for homemade crusts on a holiday weekend?!). Once baked to golden perfection, a quick, sweet glaze finishes it off. It’s honestly hard to mess this one up, and the result is a stunning, delicious pie that looks like you spent hours on it.
Ingredients
For the Main Batter:
- 2 cups all-purpose flour
- 1.5 cups granulated sugar
- 1 teaspoon baking soda
- 1/2 teaspoon salt
- 1 cup unsalted butter, softened
- 2 large eggs, at room temperature
- 1 teaspoon pure vanilla extract
- 1 cup buttermilk (or milk + 1 tbsp lemon juice, let sit for 5 mins)
When I’m grabbing my flour, I always go for a good all-purpose brand. For the sugar, regular granulated sugar is perfect here. The baking soda and salt are crucial for leavening and balancing flavors. Make sure your butter is truly softened – this makes a huge difference in how easily everything comes together. Room temperature eggs also emulsify better into the batter. Buttermilk is key for that tender crumb, but don’t worry if you don’t have any on hand; a quick substitute works just as well.
For the Filling:
- 1 cup fresh strawberries, hulled and chopped
- 1 cup fresh blueberries
- 1/4 cup granulated sugar
- 1 tablespoon cornstarch
- 1 tablespoon lemon juice
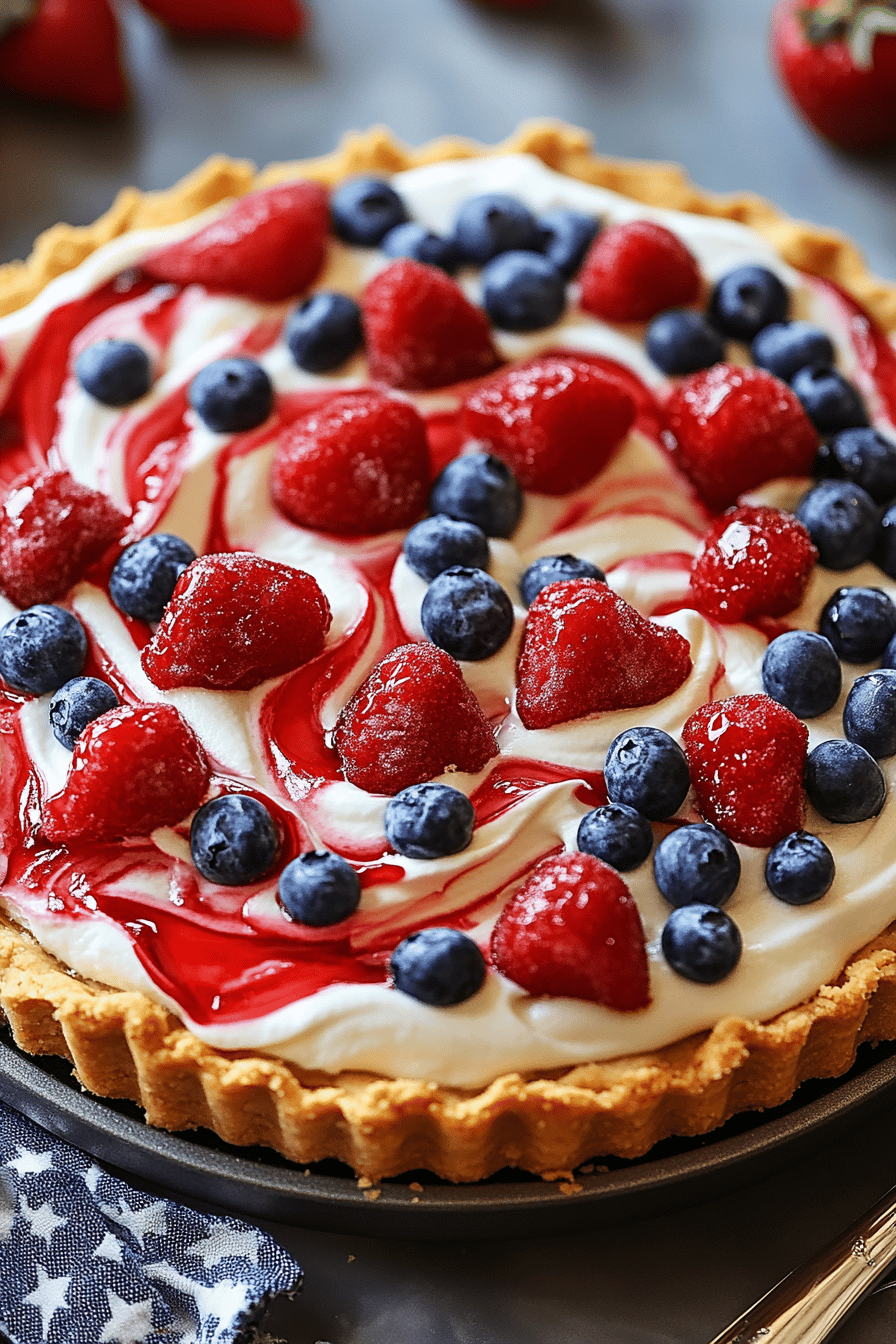
For the filling, Fresh Berries are best! I love using a mix of strawberries and blueberries for that classic red, white, and blue vibe. If you can’t find fresh, frozen berries work too, just be sure to thaw them and drain off any excess liquid before using. The cornstarch helps thicken the filling so it doesn’t make the pie too soggy. Lemon juice adds a nice brightness.
For the Glaze:
- 1 cup powdered sugar
- 2-3 tablespoons milk (or water)
- 1/4 teaspoon almond extract (optional, but highly recommended!)
- Red and blue food coloring
This glaze is what really makes it pop visually. Powdered sugar is the base, and you can use milk or even just water to get it to the right consistency. Almond extract adds a subtle, lovely flavor, but you can skip it if you’re not a fan. And of course, food coloring to get those festive colors!
Step-by-Step Instructions
Step 1: Preheat & Prep Pan
First things first, get your oven preheating to 375°F (190°C). You’ll need a standard 9-inch pie plate. I usually grab a store-bought crust because, honestly, life’s too short to stress about pie crusts on a busy holiday! Just unroll one and press it into your pie plate. Don’t worry if it’s not perfect; the filling will hide any little imperfections.
Step 2: Mix Dry Ingredients
In a large bowl, whisk together your flour, sugar, baking soda, and salt. Give it a good mix to make sure everything is evenly distributed. This ensures your leavening agents are spread throughout, which means a nicely risen and evenly baked pie.
Step 3: Mix Wet Ingredients
In a separate medium bowl, cream together the softened butter and eggs until light and fluffy. Then, stir in the vanilla extract and the buttermilk. It might look a little separated at this point, but don’t worry, it’ll all come together.
Step 4: Combine
Now, gradually add the wet ingredients to the dry ingredients, mixing on low speed (or by hand with a spatula) until just combined. Be careful not to overmix! Overmixing can lead to a tough pie, and nobody wants that. We’re just looking for a smooth batter with no dry spots.
Step 5: Prepare Filling
In a small bowl, gently toss together the chopped strawberries, blueberries, sugar, cornstarch, and lemon juice. Stir just enough to coat the berries. This will form your delicious, fruity swirl.
Step 6: Layer & Swirl
Pour about half of the batter into your prepared pie crust. Spoon dollops of the berry filling evenly over the batter. Then, pour the remaining batter over the filling. Now for the fun part: take a knife or a skewer and gently swirl the filling through the batter to create beautiful patterns. Don’t overdo it; we want distinct swirls, not a muddy mess!
Step 7: Bake
Bake for 45-55 minutes, or until a toothpick inserted into the center comes out clean. The top should be golden brown and set. If the crust edges start to brown too quickly, you can always loosely tent them with foil.
Step 8: Cool & Glaze
Let the pie cool completely on a wire rack. This is crucial! You want it to set up properly. Once it’s fully cooled, it’s time for the glaze. In a small bowl, whisk together the powdered sugar, 2 tablespoons of milk, and the almond extract. Add more milk, a teaspoon at a time, if needed, to reach a drizzly consistency. Divide the glaze into two small bowls and tint one red and one blue with food coloring. Drizzle the red and blue glazes over the pie in stripes or a fun pattern. Let the glaze set for about 30 minutes before slicing.
Step 9: Slice & Serve
Once the glaze has set, slice into your gorgeous 4th of July Pie and enjoy! It’s best served at room temperature or slightly chilled.
What to Serve It With
This 4th of July Pie is so versatile, it truly works for any occasion! For breakfast, I love a warm slice with a good cup of coffee. The sweetness is just right to start the day, and it feels like such a treat. For brunch, it’s absolutely stunning. You can serve it with a dollop of freshly whipped cream and maybe some fresh berries on the side to really make it pop. The visual appeal is fantastic for entertaining!
As a dessert, well, it’s the star of the show! It’s delicious on its own, but if you want to go all out, a scoop of good quality vanilla bean Ice Cream or even a tangy raspberry sorbet is perfection. The contrast in temperatures and flavors is divine. And for those cozy snack moments, when you just need a little something sweet after dinner or even for an afternoon treat, this pie is ideal. It’s comforting and utterly delicious. My family absolutely devours it, and I often find myself making a second one before the first one is even gone!
Top Tips for Perfecting Your 4th of July Pie
Over the years, I’ve learned a few tricks that really make this pie shine. First, for the filling, if you’re using frozen berries, make absolutely sure you thaw them and drain off *all* the excess liquid. Soggy filling is a no-go! A little extra cornstarch can help if your berries seem particularly juicy.
When it comes to mixing the batter, resist the urge to go overboard. Overmixing develops the gluten in the flour, which can make your pie tough. Mix until just combined, and don’t be afraid of a few tiny lumps – they’ll cook out. For that beautiful swirl effect, don’t try to overcomplicate it. Just a few passes with a knife or skewer will create lovely patterns without making the colors bleed too much.
For baking, ovens can be so finicky, right? My best advice is to watch the pie, not just the clock. Start checking around the 45-minute mark. If the crust is browning too fast, a simple piece of foil draped loosely over the edges is your best friend. It protects the crust while allowing the center to bake through.
I’ve experimented with ingredient swaps, too! For a dairy-free version, you can use a plant-based milk and a vegan butter substitute; it turns out wonderfully moist. If you don’t have buttermilk, the milk and lemon juice substitute works like a charm every time. And for the glaze, if almond extract isn’t your thing, a little bit of lemon zest can add a lovely brightness instead. Just remember, the consistency of the glaze is key for pretty drizzling. Too thin and it’ll run everywhere; too thick and it’ll be hard to work with. Aim for something that slowly drips off a spoon.
Storing and Reheating Tips
This 4th of July Pie is fantastic for making ahead, which is a lifesaver for holidays! Once it’s completely cooled, you can store it at room temperature, loosely covered, for up to two days. This is perfect if you want to bake it the day before your gathering. If you need to store it for longer, pop it into an airtight container in the refrigerator. It will keep well in the fridge for about 4-5 days.
Freezing is also an option, though I usually prefer to eat it fresh! If you want to freeze it, I’d recommend freezing it *without* the glaze. Wrap it tightly in plastic wrap, then in a layer of foil. It should keep well in the freezer for about 2-3 months. To thaw, simply remove it from the freezer and let it come to room temperature. You can also gently reheat individual slices in a low oven (around 300°F or 150°C) for about 10-15 minutes until warmed through.
Regarding the glaze, I always find it’s best to add it just before serving, especially if you’re storing the pie. If you’ve stored it in the fridge, the glaze can sometimes get a bit sticky or start to absorb into the pie. So, if you’ve stored it, you might want to whip up a fresh batch of glaze or just dust with a little powdered sugar for a simpler finish.
Frequently Asked Questions
Final Thoughts
This 4th of July Pie truly is a celebration in every bite. It’s the perfect blend of comfort and festivity, and it’s so incredibly satisfying to make and share. It embodies everything I love about summer baking – simple, delicious, and always a hit. If you’re looking for a show-stopping dessert that won’t stress you out, this is absolutely the one. I can’t wait for you to try it and see how much your own family and friends adore it. Be sure to let me know in the comments below how yours turns out, and if you have any fun variations or traditions you add! Happy baking, and enjoy every delicious slice!

4th of July Pie
Ingredients
Crust
- 1.5 cups graham cracker crumbs
- 6 tablespoons melted butter
- 2 tablespoons granulated sugar
Filling
- 2 packages cream cheese, softened
- 1 cup granulated sugar
- 1 teaspoon vanilla extract
- 1 cup sour cream
- 0.5 cup whipped cream
Topping
- 0.5 cup strawberry jam
- 0.5 cup blueberry jam
- 0.25 cup red food coloring
- 0.25 cup blue food coloring
Instructions
Preparation Steps
- Preheat oven to 350°F (175°C).
- In a medium bowl, combine graham cracker crumbs, melted butter, and sugar. Press mixture evenly into the bottom and up the sides of a 9-inch pie plate.
- Bake for 8-10 minutes until golden brown. Let cool completely.
- In a large bowl, beat cream cheese and sugar until smooth. Stir in vanilla extract and sour cream.
- Gently fold in the whipped cream until just combined.
- Divide the filling into three equal portions. Tint one portion red with food coloring, another blue, and leave the third one white.
- Spoon alternating dollops of the red, white, and blue filling into the cooled pie crust. Swirl gently with a knife or skewer to create a marbled effect.
- Dollop spoonfuls of strawberry jam and blueberry jam over the filling. Swirl again to create a patriotic pattern.
- Refrigerate for at least 4 hours, or until firm.
- Serve chilled.