roasted broccoli
There’s something almost magical about roasting broccoli that completely changes the game. When I was a kid, broccoli always felt like a chore on my plate — steamed and mushy, it hardly sparked joy. But then I discovered roasted broccoli, and honestly, it feels like a little green treasure each time it comes out of the oven. The edges get beautifully caramelized, crisp but tender, with this slightly nutty, smoky depth that’s so much more interesting than your typical boiled version. It’s become a staple in my kitchen, especially on those busy weeknights when I want something fast, wholesome, and irresistibly tasty. Plus, it pairs beautifully with just about anything — kind of like your favorite roasted potatoes, but way greener and more exciting. Honestly, I can’t wait to share my go-to roasted broccoli recipe with you because it’s just that good.
What is roasted broccoli?
Think of roasted broccoli as broccoli’s glow-up moment. It’s essentially fresh broccoli tossed with a little oil, salt, and sometimes a few extra simple seasonings, then popped into a hot oven until the edges develop that perfect golden-brown char. Unlike steamed or boiled broccoli, roasting brings out a richer flavor, with hints of nuttiness and a lovely crunch. The name is pretty straightforward — it’s broccoli cooked by roasting — but the magic lies in how that high-heat cooking transforms the vegetable from something straightforward into a side dish you’ll actually get excited about. It’s one of those dishes that feels fancy but is actually super easy and approachable for any home cook trying to eat more veggies without boring dinner plates.
Why you’ll love this recipe?
Okay, this may sound obvious, but what I absolutely adore about this roasted broccoli recipe is how incredibly flavorful it is without needing anything complicated. The roasting turns the broccoli into this slightly sweet, crispy gem that’s so different from the usual bland green side. Sometimes I swear the smell alone — that toasty, buttery scent — pulls my family into the kitchen faster than anything else.
Another reason this one’s a lifesaver is its simplicity. You’re basically tossing florets with olive oil, salt, and a couple of pantry staples, then letting the oven do its thing. No babysitting the broccoli, no standing over the stove stirring. And seriously, it’s budget-friendly; broccoli is affordable and freezes well if you want to stretch your produce. I’ve made this countless times during grocery droughts to great effect.
Plus, versatility is huge for me. Sometimes I add a squeeze of lemon or sprinkle some Parmesan, other times I go bold with chili flakes or garlic powder — it’s really up to your mood. This roasted broccoli pairs nicely as a side with everything from weeknight pasta to grilled chicken and can even be tossed into grain bowls, salads, or tacos. If you’re into roasted veggies, you might also love my roasted Brussels sprouts or charred cauliflower recipes—they’ve got that same golden edge and deep flavor that makes veggies something to actually look forward to.
How do I make roasted broccoli?
Quick Overview
This is one of those recipes that’s almost foolproof but yields spectacular results. You start by preheating your oven and prepping your broccoli — chopping it into nice bite-sized pieces that roast evenly. Toss it in a good splash of olive oil and just the right amount of salt. Then spread it out on a baking sheet so the florets get plenty of air around them, which is key to crispiness. Pop it in a hot oven, and about 20-25 minutes later, you’re rewarded with broccoli that’s tender in the middle and caramelized on the edges. The whole process is hands-off enough that you can multitask in the kitchen or relax for a bit while it cooks.
Ingredients
What is the recipe for Roasted Broccoli?
- 1 large head of fresh broccoli (look for firm stalks and rich green florets – fresher is better for roasting)
- 3 tablespoons extra virgin olive oil (I always use good-quality olive oil here — it really makes a difference)
- 1/2 teaspoon kosher salt (you can adjust based on your preference)
- Freshly ground black pepper (a few twists gives a subtle kick)
Optional Seasonings & Toppings:
- 1/2 to 1 teaspoon garlic powder or 2 minced garlic cloves (added before roasting for more intense flavor)
- 1/2 teaspoon chili flakes (if you like a little heat)
- The juice of 1/2 lemon (squeezed right after roasting)
- 2 tablespoons grated Parmesan cheese (sprinkled on top once out of the oven)
- Toasted pine nuts or slivered almonds (for crunch and nuttiness)
Step-by-Step Instructions
Step 1: Preheat & Prep Pan
First things first, preheat your oven to 425°F (220°C). That high temp is crucial to get those crisp, caramelized edges that make roasted broccoli so irresistible. Line a baking sheet with parchment paper or lightly grease it with a bit of olive oil. This helps prevent sticking and makes cleanup a breeze.
Step 2: Prepare the Broccoli
Wash your broccoli thoroughly, then cut it into florets of similar size — roughly bite-sized pieces work best. Don’t throw out the stalks! If they’re fresh and tender, peel the tough outer layer and slice them thinly. They roast beautifully and add great texture variety.
Step 3: Toss with Oil and Seasonings
Place the broccoli in a large bowl. Drizzle with olive oil and sprinkle with salt, pepper, and any optional seasonings you love. I find tossing with hands is the quickest way to make sure every floret is nicely coated. A good coating of oil is what helps each piece get that fragrant, golden crust in the oven.
Step 4: Spread on Baking Sheet
Arrange the broccoli in a single layer on your prepared baking sheet with the florets cut side down if possible – this helps maximize their caramelization. Avoid overcrowding — if the pieces are too close together, they’ll steam, and you lose that crispy magic.
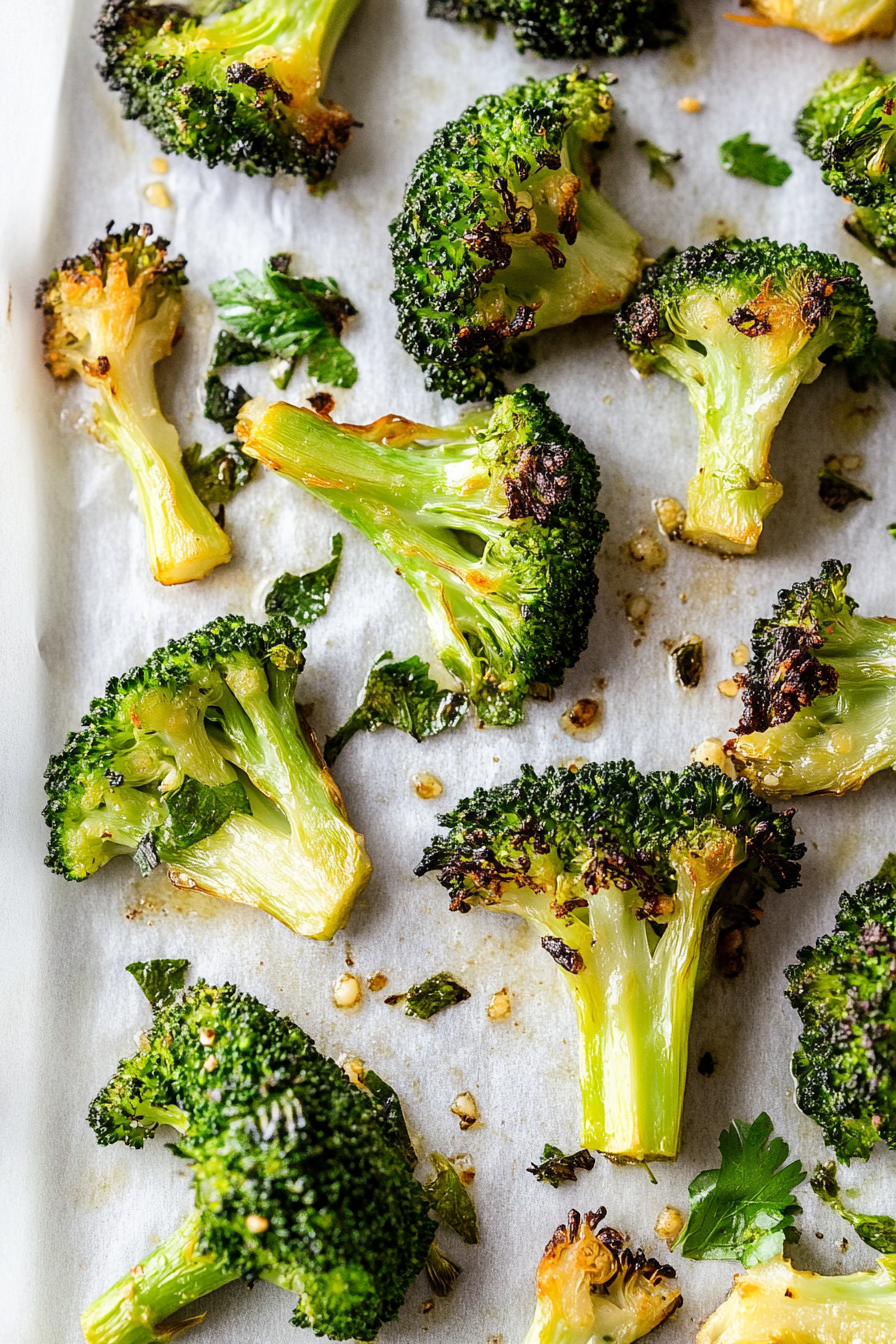
Step 5: Roast
Slide the baking sheet into your hot oven. Roast for about 20-25 minutes, flipping the broccoli once about halfway through for even color and texture. You’re looking for florets that are tender when pierced with a fork and beautifully browned at the edges. Keep an eye on them after 20 minutes to avoid burning, but trust me, that slight bit of extra char really enhances the flavor.
Step 6: Add Finishing Touches
Once out of the oven, immediately squeeze a little fresh lemon juice over the top for brightness, then sprinkle with Parmesan or toasted nuts if using. The warm broccoli will help the cheese melt slightly and the flavors meld beautifully. Serve immediately for best texture and flavor.
Step 7: Serve
Transfer to a serving dish and watch how quickly this disappears. My family always sneaks bites before dinner is even ready! This side dish is a total crowd-pleaser and a staple whenever I need a quick veggie fix that *feels* special.
What to Serve It With
For Breakfast: Roasted broccoli is an unsung hero paired with scrambled eggs or an omelet. I love adding it alongside avocado toast for a nutrient-packed start to the day, and a strong cup of coffee on the side makes it feel like a cozy morning treat.
For Brunch: Elevate your brunch spread by adding roasted broccoli to a frittata or a savory tart. It pairs wonderfully with mimosa or a fresh orange juice and looks gorgeous when plated alongside roasted tomatoes and crusty bread.
As Dessert: Okay, broccoli as dessert sounds wild, but here’s a fun idea: toss roasted broccoli florets in a little honey and cinnamon after they cool — it’s unexpected but deliciously sweet and savory for a light, veggie-forward dessert.
For Cozy Snacks: My kids love snacking on cold leftover roasted broccoli tossed with a pinch of salt and a drizzle of ranch or hummus. It’s a perfect afternoon bite that feels indulgent but is totally wholesome. This recipe came from countless family dinners where veggies had to be sneaky but satisfying.
Top Tips for Perfecting Your Roasted Broccoli
Broccoli Prep: Don’t underestimate the power of dry broccoli. After washing, I always pat it thoroughly dry. Excess moisture leads to steaming instead of roasting. Using paper towels or a salad spinner does the trick. Also, cutting florets into uniform sizes ensures they cook evenly—nothing worse than some burnt edges and some raw stalks.
Mixing Advice: Toss your broccoli gently but thoroughly in oil to get even coverage. That oil not only prevents sticking but also promotes that gorgeous crispiness. I’ve found using just the right amount of oil is key — too little, and the broccoli turns out dry; too much, and it gets soggy.
Swirl Customization: While roasting, you can experiment by adding whole garlic cloves or drizzle a balsamic reduction after baking for an added layer of flavor. I once swirled in a little miso paste before roasting, and it deepened the umami in a way that blew us away.
Ingredient Swaps: If you want to try something a little different, avocado oil works great for roasting too – it has a higher smoke point and adds a subtle buttery quality. I’ve also swapped in red pepper flakes for chili flakes for a milder heat that my kids can handle.
Baking Tips: Position the rack in the middle of your oven for the most even heat. If your oven tends to run hot, turn the temperature down to 400°F but watch the roasting time closely. Testing doneness by piercing a floret with a fork is a reliable way to know when it’s tender but still has a bit of bite.
Glaze Variations: I love finishing roasted broccoli with a drizzle of tahini mixed with lemon juice and a tablespoon of warm water for a creamy glaze that’s completely addictive. A sprinkle of nutritional yeast is a great cheese alternative if you’re dairy-free.
I’ve learned that patience is a virtue here — trying to rush the roast by bumping up the temperature usually leads to burnt edges but undercooked insides. Trust the timing, and you’ll get the balance just right every time.
Storing and Reheating Tips
Room Temperature: If you plan to eat your roasted broccoli within a few hours, keep it covered loosely with foil or a clean kitchen towel. That prevents drying out and keeps it crispish, but don’t seal tightly – steam ruins the texture. It’s best eaten fresh but will keep for about 4-6 hours on the counter.
Refrigerator Storage: Store roasted broccoli in an airtight container. It stays delicious for up to 3 days but tends to lose some crispness. To revive a bit of that roasted crunch, you can pop it under the broiler for a couple of minutes or quickly sauté it in a pan with a dash of olive oil.
Freezer Instructions: I don’t usually freeze roasted broccoli because the texture after thawing isn’t quite the same. But if you want to, flash freeze florets on a baking sheet first, then transfer to a freezer bag. It will last up to 3 months. When reheating, defrost fully before warming gently on the stove or in the oven.
Glaze Timing Advice: If you’re glazing or adding cheese, wait until right before serving. Adding these toppings before storing can make them soggy or cause them to separate. Trust me, a last-minute drizzle or a sprinkle of freshly grated cheese makes all the difference.
Frequently Asked Questions
Final Thoughts
This roasted broccoli recipe isn’t just about making a green vegetable more palatable — it’s about rediscovering broccoli’s real potential. The contrast of the crispy, caramelized edges and the tender insides feels cozy and exciting all at once. It’s the kind of dish that sneaks into your weeknight dinners and soon becomes a family favorite, and honestly, I couldn’t be more grateful for it in my rotation.
Whether you’re a longtime veggie fan or someone trying to sneak more greens onto the table (trust me on this one), this recipe will surprise you. Don’t hesitate to get creative with seasoning or toppings — I love hearing how you put your personal spin on it. Drop your comments, share your tips, or tell me how your version turned out. Happy roasting — I can’t wait to hear how yours turns out!
Easy Roasted Broccoli with Garlic
Ingredients
Main Ingredients
- 1.5 lbs broccoli florets cut long with part of stem
- 6 cloves garlic smashed
- 2 tablespoons extra virgin olive oil
- kosher salt and fresh pepper to taste
- Parmesan cheese fresh shaved, optional for topping
Instructions
Preparation Steps
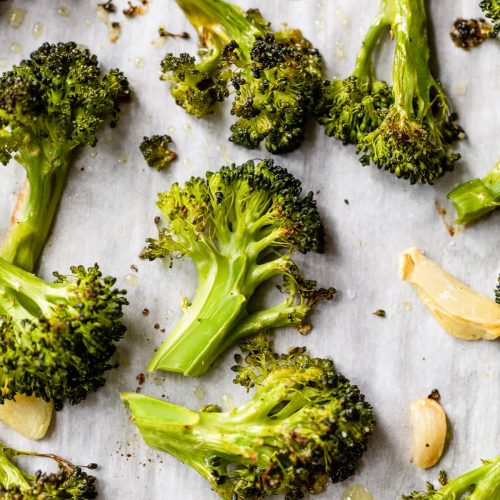
- Preheat the oven to 425°F and line a baking sheet with parchment paper.
- On the prepared baking sheet, toss the broccoli florets with the smashed garlic, olive oil, kosher salt, and fresh pepper.
- Spread the broccoli in a single layer and roast in the center of the oven for 15-20 minutes, until broccoli is golden brown and the stems are crisp-tender.
- Top with fresh shaved Parmesan cheese if desired, then serve warm.