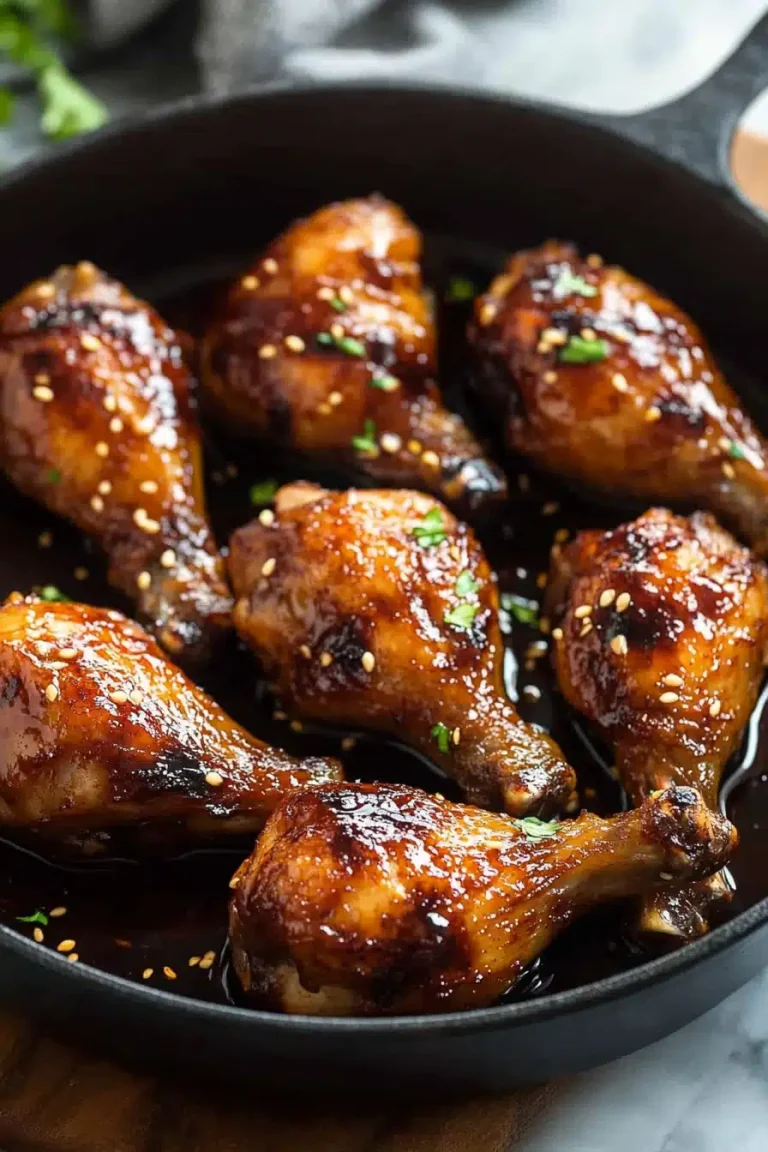
Air Fryer Chicken
There’s something about the smell of crispy fried chicken that just pulls you into the kitchen — like an irresistible invitation to gather ‘round, share stories, and dig in. Growing up, my mom’s fried chicken was always the star of the dinner table, but honestly, the deep-frying always intimidated me a bit. So when I discovered this air fryer chicken recipe, it honestly felt like a game changer. It gives you that golden, crunchy, “I-can’t-believe-it’s-not-deep-fried” magic but without the mess or the guilt. Plus, it’s crazy quick — a lifesaver on those chaotic weeknights when everyone’s hungry, and the clock is ticking. I swear, my kids ask for this more than our local takeout now. This recipe turns the air fryer into your new best friend, transforming humble chicken into something downright celebratory.
What is an air fry chicken?
Think of air fryer chicken as the savvy cousin of traditional fried chicken. Instead of dunking the chicken in gallons of oil, you toss it in your air fryer, where circulating hot air crisps the outside into a crunchy crust while keeping the inside juicy and tender. It’s essentially the magic of “fried” but without frying. The air fryer uses convection to mimic that perfect crisp, which means no standing over a pot of hot oil or worrying about splatters. It’s almost like the chicken gets a spa day: a quick bath in seasoning and breadcrumbs, then a whirl in the hot air until golden perfection. What’s great about this method is that it’s approachable for home cooks — you can’t really mess it up — and genuinely healthier, so you don’t feel like you’re sacrificing flavor or texture when you make it.
Why you’ll love this recipe?
What I love most about this air fryer chicken recipe is how it nails that balance of crunchy, juicy, and downright comforting all at once. The flavor? It’s got this perfect blend of herbs and spices that complement the chicken without overwhelming it. You don’t need fancy ingredients — just straightforward staples like garlic powder, paprika, and a sprinkle of salt and pepper — which makes it super budget-friendly. Plus, the air fryer does most of the heavy lifting, so this one’s a win for busy nights when you want a fill-your-belly meal without sweating over the stove. It’s also crazy versatile. I mean, if you’re craving crispy chicken tenders for a quick lunch, you’ve got it. Want something heartier for dinner? You can pop thighs or breasts in the air fryer with the same method, and it turns out spot-on every time.
Another thing: compared to oven-baked chicken, this one has this unbeatable crispiness that stays even after cooling down for a bit — a must when you’re packing lunches or feeding little ones who want something that feels like a treat. And hey, if you’ve ever tried healthy baked wings or nuggets that ended up dry or sad, this method feels like a breath of fresh (crispy!) air. Trust me, I’ve made this too many times to count, and every batch disappears within minutes at my house. It’s my secret weapon when friends drop by last minute — quick, crowd-pleasing chicken that practically cooks itself.
How do I make an air fryer chicken?
Quick Overview
Alright, here’s the scoop: This recipe is all about layering flavors and using the air fryer to get that irresistible crunch without deep-frying. First, you prep a flavorful seasoned coating that clings to the chicken thanks to a light wet wash (usually buttermilk or an alternative). Then, you dredge the pieces in your dry mix — breadcrumbs mixed with the magic seasonings. Into the air fryer basket they go, spaced out just right to let the hot air crisp every nook and cranny. The best part? You don’t have to babysit the process; just a few flips halfway through and a timer set for less than 20 minutes later, you’ve got perfectly crispy chicken. The kitchen stays clean, and the only sound you hear is the crunch when you bite in.
Ingredients
For the Chicken:
- Chicken pieces (thighs, drumsticks, or breasts): I usually pick bone-in, skin-on for max juiciness and flavor.
- Buttermilk or plain yogurt: Keeps the chicken moist and helps the coating stick — can substitute with almond milk mixed with a splash of lemon juice if you’re dairy-free.
- Salt and pepper: Simple seasonings that bring out the chicken’s natural flavor.
For the Coating:
- Panko breadcrumbs: These create that unbeatable crunchy texture — don’t skip on these!
- All-purpose flour: Helps give structure to the coating.
- Garlic powder, onion powder, smoked paprika: The flavor holy trinity that makes the crust sing.
- Dry herbs like oregano or thyme: For a subtle herbaceous note.
- Cayenne pepper (optional): Adds a little kick if you like it spicy.
For the Finishing Touch:
- Cooking spray or a little olive oil: A light spritz helps the coating crisp up in the air fryer without sticking.
- Lemon wedges (optional): Perfect for a fresh zing when serving.
Step-by-Step Instructions
Step 1: Preheat & Prep the Air Fryer
Before you start, crank your air fryer to 380°F (around 193°C) for about 5 minutes. This preheating step is key — it ensures the chicken hits the basket sizzling, locking in that crispy texture right from the moment it lands. While that’s happening, line your air fryer basket with a little parchment or a perforated liner if you want to make clean-up a breeze (just make sure air can still circulate).
Step 2: Mix Dry Ingredients
In a wide bowl, combine the panko breadcrumbs, flour, and your spices — garlic powder, smoked paprika, a pinch of cayenne, and herbs. Mix everything so the breadcrumbs are evenly coated with seasoning; this little bit of prep is what packs the flavor. Pro tip: I always toss the mixture around with my hands because it helps break up clumps and lets me check for even distribution.
Step 3: Mix Wet Ingredients
In another bowl, pour your buttermilk (or yogurt/almond milk mix). Add a pinch of salt and pepper. The acid in buttermilk tenderizes the chicken while the moisture creates a perfect sticky base for the coating.
Step 4: Combine
Dip each chicken piece into the wet mixture, letting excess drip off (you want enough to coat, not drown it). Then press it firmly into the dry breadcrumb mix, making sure every nook is covered. I’ve found that pressing in the coating rather than just lightly dusting really makes the difference between soft crumbs and that legendary crunch. Give the chicken a gentle shake to knock off any loose bits — those tend to burn or create a mess in the basket.
Step 5: Prepare Filling
This isn’t an actual filling recipe since we’re talking chicken, but if you want to jazz things up, try stuffing the chicken breasts before coating with sliced mozzarella and basil leaves — that surprise gooey moment inside? Next-level stuff. Or, marinate the pieces with garlic and lemon zest for an hour before breading to take the flavor up a notch.
Step 6: Layer & Swirl
For the air fryer, it’s less about layering and more about spacing — arrange the chicken pieces in a single layer, skin-side up, without overcrowding so the air can really flow and crisp everything evenly. I learned this the hard way when a crowded basket gave me soggy spots — no fun! Work in batches if you have a small basket.
Step 7: Cook
Slide the basket in and air fry for 18–20 minutes total, flipping the chicken halfway through to get both sides extra-crispy and golden. The cooking time depends on the size of your pieces, so keep an eye on your first batch to figure out what works best for your air fryer. If you’re unsure, a quick poke and juices running clear is your green light.
Step 8: Cool & Glaze
Once out of the air fryer, let your chicken rest on a wire rack or plate for a few minutes. I usually skip heavy sauces to keep that crisp, but if you want, a thin brush of honey mustard or a squeeze of fresh lemon over the top makes for a bright finishing touch that’s tasty without sogginess.
Step 9: Slice & Serve
If you made chicken breasts, slice against the grain to reveal the juicy meat inside with its crispy coating. Serve immediately while that crispy crust is still at peak crunchiness. My go-to is pairing it with a little fresh slaw or some roasted potatoes — simple but so satisfying.
What to Serve It With
For Dinner: Pair this air fryer chicken with roasted veggies and a tangy coleslaw. The crispness on the chicken contrasts so nicely with soft, caramelized vegetables. I love a drizzle of hot honey on the side — trust me, it’s a game changer.
For Lunch: Shred any leftovers for a quick chicken salad sandwich with a smear of mayo and crunchy pickles. My kids actually gobble this straight from the fridge — cold but still flavorful.
For Casual Snacking: Cut pieces into tenders and serve with garlic aioli or spicy ketchup for dipping. We’ve even had movie nights turn into crispy chicken finger fiestas.
For a Crowd: Throw together a big platter with dips, some crusty bread, and a simple leaf salad. This air fryer chicken disappears fast, so I always make extra!
Top Tips for Perfecting Your Air Fryer Chicken
Chicken Choice: Bone-in, skin-on thighs and drumsticks yield the juiciest_RESULTS but you can use breasts if you prefer lean meat. Just watch cooking times so they don’t dry out.
Dry Mix: Use fresh panko crumbbs whenever possible. If you only have regular breadcrumbs, your crust won’t be as crunchy, but still delicious. Toasting the breadcrumbs lightly in a dry pan before coating elevates texture and nutty depth.
Press, Don’t Dust: When coating, press the crumbs firmly on — it gives you that satisfying crunch every time. Over time, I’ve learned that gently patting instead of tossing in the coating makes all the difference.
Don’t Overcrowd: Give your chicken pieces breathing room in the air fryer basket. Overcrowding traps steam which ruins the crisp.
Flip Halfway: This is crucial for even browning. If you skip the flip, you’ll end up with one side way crispier than the other.
Oil Spray Is Key: A light mist of oil before cooking ensures a golden crust. I use avocado oil spray — it’s neutral and has a high smoke point, perfect for frying textures in the air fryer.
Glaze Experiment: While I usually keep it simple, a brush of honey mustard or a hot sauce glaze near the end of cooking adds an exciting zing. You can also try a sprinkle of parmesan and fresh herbs once out of the fryer for a fancy touch.
Over the years, I’ve tried and retried this recipe. I once skipped preheating and ended up with soggy chicken, so don’t skip that step. Also, using too much wet coating can make the breading slide off, so I recommend letting drips fall back into the bowl before dredging.
Storing and Reheating Tips
Room Temperature: Leftover air fryer chicken will stay crispy if left out for up to 2 hours, covered loosely to protect it from drying out.
Refrigerator Storage: Store in an airtight container lined with paper towels to absorb moisture. It usually keeps well for 3–4 days. To re-crisp, pop it back into the air fryer at 350°F for 3–5 minutes — just enough to bring back the crunch without drying it out.
Freezer Instructions: You can freeze cooked air fryer chicken by wrapping each piece tightly in foil or plastic wrap, then placing it in a freezer bag. It stays good for up to 3 months. Thaw in the fridge overnight before reheating in the air fryer or oven.
Glaze Timing Advice: If you plan to store leftovers, hold off on the glaze until right before serving, as sugary or wet toppings can make the coating soggy over time. If you want to add glaze after reheating, keep it light and fresh for best texture.
Frequently Asked Questions
Final Thoughts
This air fryer chicken has become my kitchen’s little miracle on busy nights and lazy weekends alike. The way it manages to give you that crunchy, comforting goodness without the hassle and mess of traditional frying? It makes feeding my family not just easier, but genuinely fun. I love how the aroma fills the house before anyone even sees the plate — it’s usually my cue to stir up some greens or toss a quick salad. If you haven’t tried cooking chicken in an air fryer yet, this recipe is the perfect place to start, and I can’t wait to hear how it turns out for you. Oh, and don’t be shy about sharing your own twists in the comments — I’m always excited to hear your variations and tips. Happy cooking, friend!
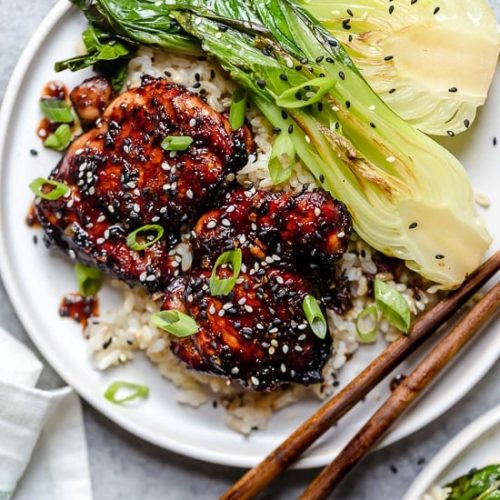
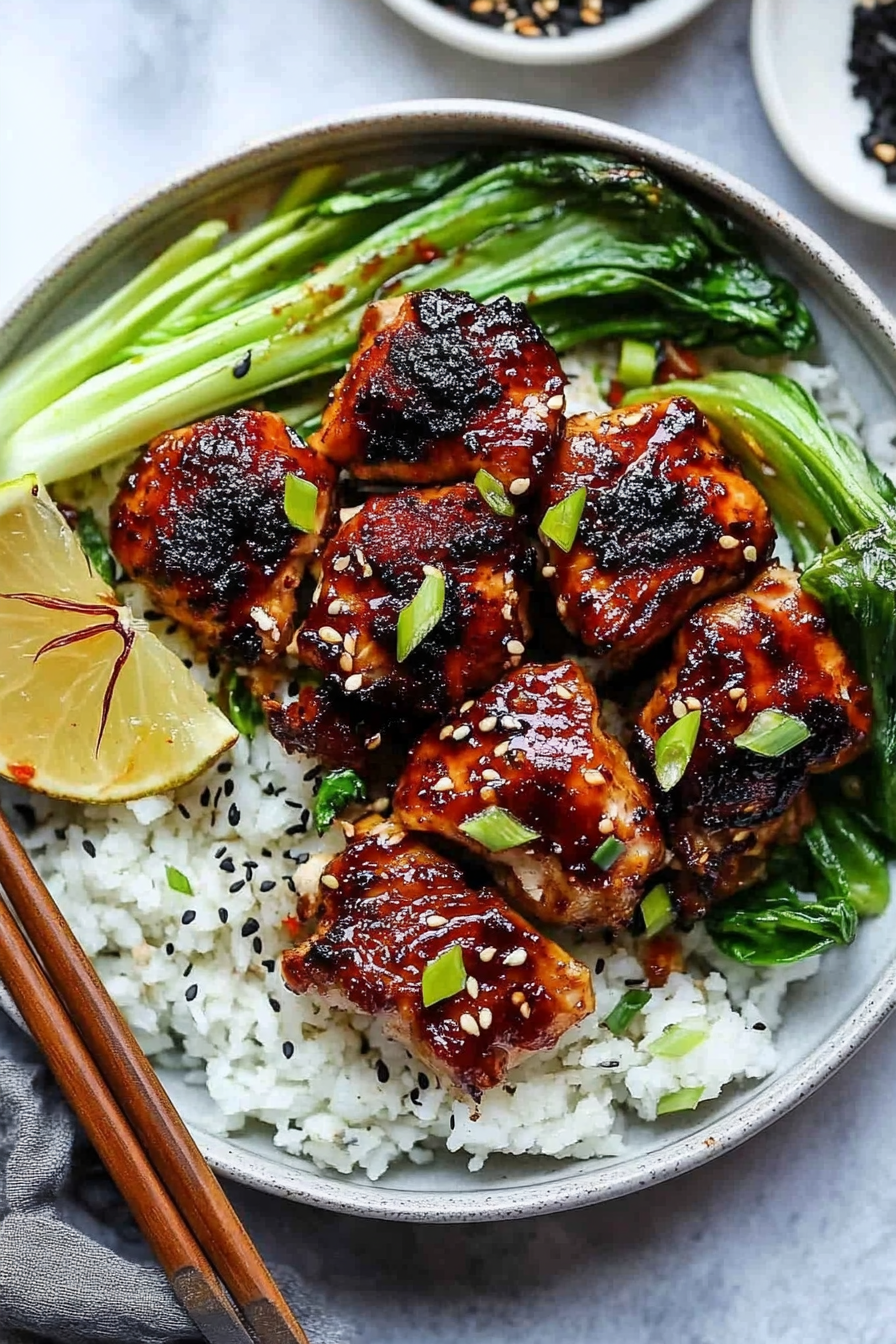
Easy Air Fryer Asian Chicken Thighs
Ingredients
Main Ingredients
- 8 pieces boneless, skinless chicken thighs Trimmed of fat
- 0.25 cup low sodium soy sauce
- 2.5 tablespoons balsamic vinegar
- 1 tablespoon honey
- 3 cloves garlic Crushed
- 1 teaspoon Sriracha hot sauce
- 1 teaspoon fresh grated ginger
- 1 scallion green part only Sliced for garnish
Instructions
Preparation Steps
- In a small bowl, combine the balsamic vinegar, soy sauce, honey, garlic, Sriracha, and grated ginger; mix well.
- Pour half of the marinade (about 0.25 cup) into a large bowl with the chicken, making sure to cover all the meat. Marinate for at least 2 hours or overnight in the refrigerator.
- Reserve the remaining marinade for later use.
- Preheat the air fryer to 400°F.
- Remove the chicken from the marinade and place it in the air fryer basket in a single layer.
- Cook the chicken in batches if needed, air frying for 14 minutes, turning halfway through until cooked through.
- While the chicken cooks, place the reserved marinade in a small pot and heat over medium-low until it thickens slightly, about 1-2 minutes.
- Drizzle the thickened sauce over the cooked chicken and garnish with sliced scallions before serving.