Xylafy dessert
You know those desserts that just… *feel* like a hug? The ones that taste like sunshine and childhood memories all rolled into one? That’s exactly what this xylafy dessert is for me. It’s the kind of treat that instantly transports me back to my grandma’s kitchen, the air thick with the scent of cinnamon and something wonderfully sweet baking. I’ve tried a million variations of this kind of thing over the years, but this particular xylafy Dessert Recipe? It’s the one I always come back to. It’s deceptively simple, uses ingredients I usually have on hand, and the result is just… pure magic. It’s not quite a cake, not quite a cookie, but something uniquely delightful that hits all the right notes. If you’re looking for a showstopper that doesn’t require a culinary degree, or just something to brighten your day, you’ve found it. Seriously, this xylafy dessert is a game-changer.
What is Xylafy Dessert?
So, what exactly *is* this “xylafy dessert” I’m raving about? Honestly, the name itself sounds a bit fancy, doesn’t it? But at its heart, it’s incredibly down-to-earth. Think of it as a sort of rustic, incredibly moist, and flavorful baked good that often incorporates a slightly earthy element, like a root vegetable or a particular type of grain, which gives it that signature depth. The “xylafy” part really just hints at a unique ingredient or a specific textural quality that sets it apart from your everyday bake. It’s not overly sweet, which is something I personally appreciate – it lets the natural flavors of the ingredients really shine through. It’s the kind of dessert that tastes sophisticated enough for a dinner party but is cozy enough for a quiet afternoon with a cup of tea. It’s essentially a warm, inviting hug in edible form, and that’s why I’ve fallen head over heels for it.
Why you’ll love this recipe?
There are so many reasons why this xylafy dessert has become my go-to, and I just know you’re going to fall in love with it too. First off, the flavor profile is just phenomenal. It has this incredible balance of warm spices, a subtle sweetness, and a moist, tender crumb that’s just *chef’s kiss*. It’s not overwhelmingly sweet, which means you can truly savor every bite without feeling that sugar rush. And speaking of sweet, it’s incredibly cost-effective! Most of the ingredients are pantry staples, meaning you don’t need to break the bank for a truly special treat. What I love most about this recipe, though, is its sheer simplicity. I’ve made it countless times when I’m short on time, or when unexpected guests pop over, and it never fails to impress. It’s the kind of dessert that looks like you spent hours on it, but in reality, it comes together surprisingly quickly. Plus, it’s so versatile! You can enjoy it warm, straight from the oven, or chilled. It’s delicious on its own, but also fantastic with a dollop of whipped cream or a scoop of vanilla Ice Cream. It reminds me a bit of a really moist spice cake, but with a unique character all its own. It’s the perfect pick-me-up when you need something comforting and delicious. This xylafy dessert truly delivers on all fronts.
How do I make Xylafy Dessert?
Quick Overview
Making this xylafy dessert is genuinely a breeze, and that’s one of the main reasons I adore it. We’re essentially mixing up a few simple ingredients to create a wonderfully moist batter, folding in a flavorful filling, and then baking it to golden perfection. The whole process from start to finish takes less time than you might think, and the reward is a dessert that’s both comforting and elegant. You’ll be amazed at how something so simple can taste so incredibly good. It’s honestly one of those “lifesaver” recipes for busy weeknights or when you just need a little something sweet without a fuss. The minimal effort involved is truly what makes this xylafy dessert a winner.
Ingredients
For the Main Batter:
I always opt for good quality all-purpose flour here. It’s the foundation of our tender crumb. Make sure it’s fresh, and avoid packing it into your measuring cup – just spoon it in and level it off. We’ll need about 2 cups. For the sweetness, I typically use granulated sugar, around 1.5 cups, but you can adjust this slightly to your preference. A touch of baking soda (1 teaspoon) and baking powder (1 teaspoon) will give us that lovely lift. Don’t forget a pinch of salt (1/2 teaspoon) to really make all those flavors pop. And for that signature moistness and depth, we’re going to use about 1 cup of finely grated… well, that’s the xylafy element! Let’s call it our “secret ingredient” for now, but trust me, it’s a game-changer. And to bring it all together, 1/2 cup of unsalted butter, melted and slightly cooled, and 2 large eggs, at room temperature. A splash of milk (about 1/4 cup) helps achieve the perfect consistency. For extra warmth, I always add 1 teaspoon of ground cinnamon and a pinch of nutmeg.
For the Filling:
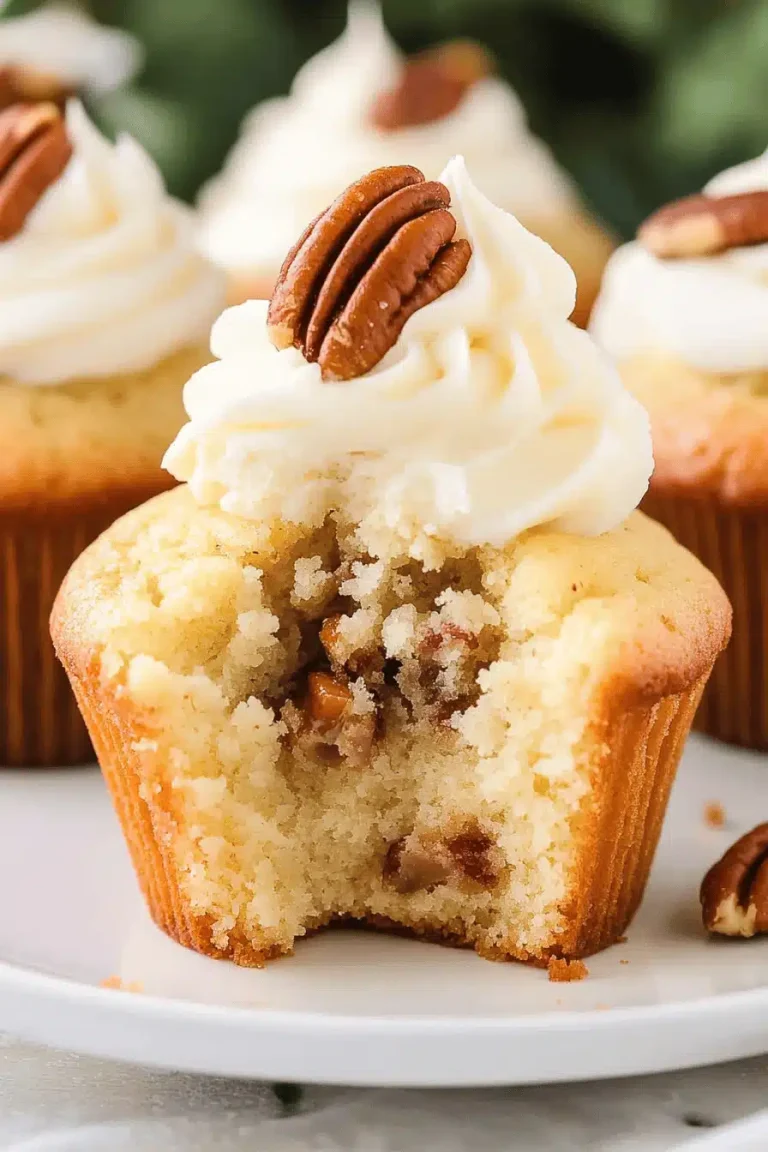
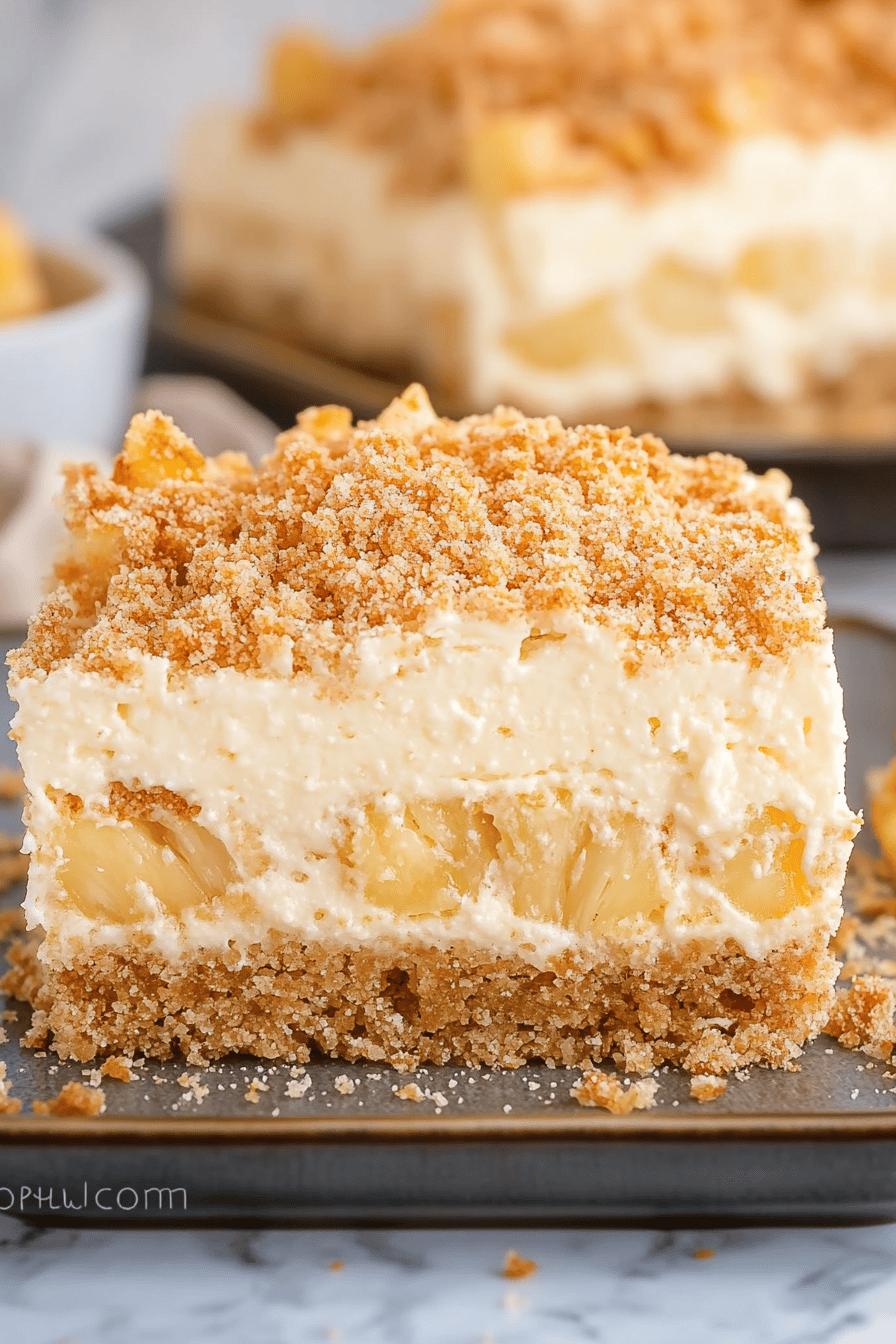
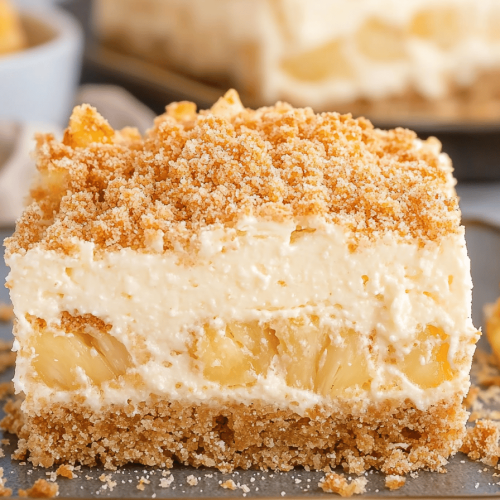
This is where we add another layer of deliciousness! I love using a combination of chopped nuts (walnuts or pecans work beautifully) for a bit of crunch, about 1/2 cup. Then, we’ll add about 1/4 cup of packed Brown Sugar for that caramel-y sweetness, and another 1/2 teaspoon of cinnamon. Sometimes, I’ll throw in a handful of dried cranberries or some chocolate chips if I’m feeling decadent – it’s totally up to you! The key is to have a nice, flavorful mix that will create little pockets of joy within the xylafy dessert.
For the Glaze:
This is optional, but I highly recommend it! It adds a beautiful finish and an extra touch of sweetness. We’ll need about 1 cup of powdered sugar. To thin it down to that perfect drizzling consistency, we’ll use a few tablespoons of milk or even a bit of lemon juice for a brighter flavor. You can add a tiny splash of vanilla extract here too. Aim for a glaze that’s thick enough to coat the back of a spoon but still pourable.
Step-by-Step Instructions
Step 1: Preheat & Prep Pan
First things first, let’s get our oven preheating to 350 degrees Fahrenheit (175 degrees Celsius). This ensures it’s nice and hot when our batter is ready. While the oven is heating up, grab an 8×8 inch Baking Pan. You can grease it generously with butter or baking spray, and then lightly flour it. I like to give it a good shake to distribute the flour evenly, then tap out any excess. This step is super important for ensuring your beautiful xylafy dessert doesn’t stick. Trust me, wrestling a baked good out of the pan is no fun!
Step 2: Mix Dry Ingredients
In a large mixing bowl, whisk together your flour, granulated sugar, baking soda, baking powder, salt, cinnamon, and nutmeg. Give it a good whisk until everything is well combined. You want to make sure there are no clumps of baking soda or powder hiding in there, as this can affect how evenly your dessert bakes. A well-mixed dry base is crucial for a tender crumb.
Step 3: Mix Wet Ingredients
In a separate, medium-sized bowl, whisk together your melted butter and room temperature eggs until they’re nicely incorporated. Then, stir in your milk and your grated “xylafy” ingredient. Make sure it’s well distributed throughout the wet mixture. The eggs should be fully beaten in, creating a smooth, cohesive liquid.
Step 4: Combine
Now, it’s time to bring everything together! Pour the wet ingredients into the bowl with the dry ingredients. Using a spatula or a wooden spoon, gently mix until just combined. Be careful not to overmix! Overmixing can develop the gluten in the flour too much, resulting in a tough dessert. A few streaks of flour are okay; they’ll disappear as we continue. The batter should be thick but pourable.
Step 5: Prepare Filling
In a small bowl, combine your chopped nuts, Brown Sugar, and the remaining cinnamon. If you’re adding dried fruit or chocolate chips, toss them in now too. Give it a quick stir so all the components are evenly distributed. This mixture will create delightful pockets of flavor and texture when it bakes into the xylafy dessert.
Step 6: Layer & Swirl
Pour about half of your batter into the prepared baking pan and spread it out evenly. Sprinkle the filling mixture evenly over this first layer of batter. Then, carefully spoon the remaining batter over the filling, trying to cover it as much as possible. Now, here’s the fun part! You can gently swirl the filling into the batter using a knife or a skewer. Don’t overdo it – just a few gentle swirls will create beautiful patterns. This step adds visual appeal and ensures you get bursts of the filling in every bite.
Step 7: Bake
Place the pan in your preheated oven and bake for about 30-35 minutes. The baking time can vary a bit depending on your oven, so start checking around the 30-minute mark. You’ll know it’s done when a toothpick inserted into the center comes out clean, or with just a few moist crumbs attached. The top should be golden brown and look set.
Step 8: Cool & Glaze
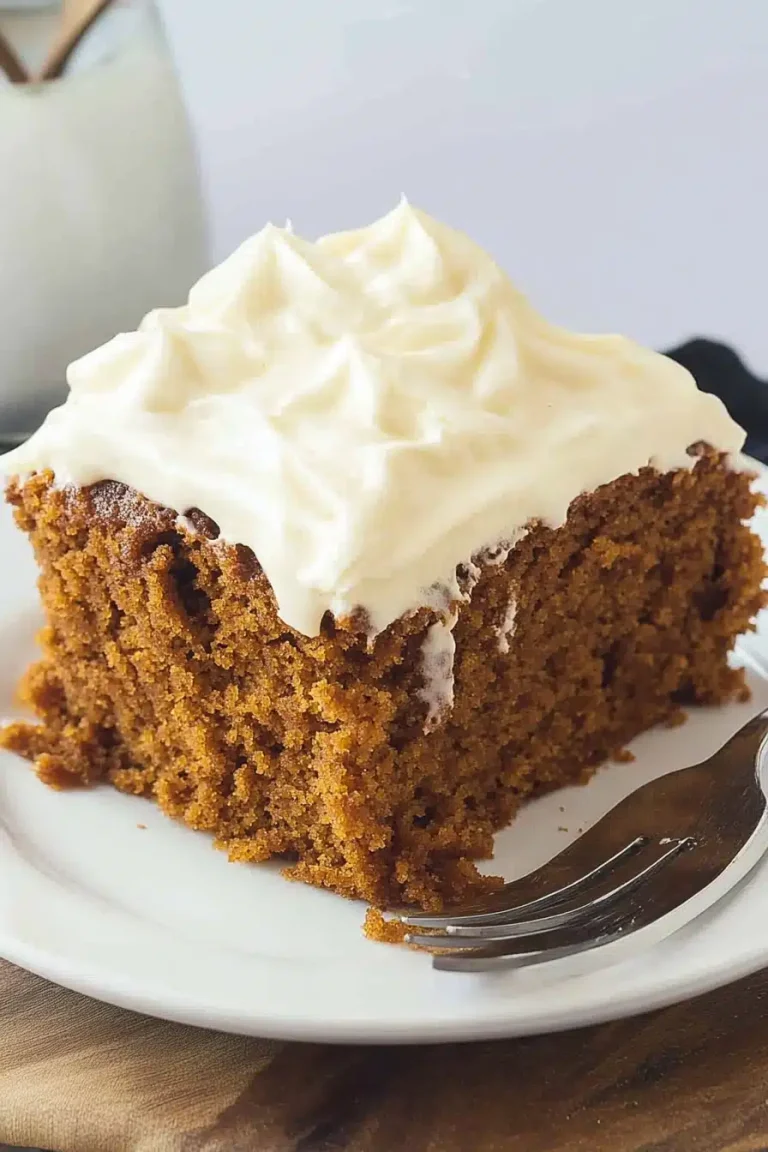
Once baked, carefully remove the pan from the oven and let it cool in the pan on a wire rack for about 15-20 minutes. This allows it to set up properly. While it’s cooling, whisk together your powdered sugar, milk (or lemon juice), and vanilla extract for the glaze. Aim for a consistency that you can easily drizzle. Once the xylafy dessert has cooled a bit, drizzle the glaze over the top. You can do this while it’s still warm for a slightly melted glaze, or wait until it’s completely cool for a firmer glaze.
Step 9: Slice & Serve
After the glaze has set a bit, carefully cut your xylafy dessert into squares. I like to serve it warm, but it’s also absolutely delicious at room temperature. It holds its shape beautifully, making it easy to serve at gatherings. The aromas that will fill your kitchen are just divine!
What to Serve It With
This xylafy dessert is so wonderfully versatile, it truly fits in anywhere! For breakfast, I love cutting a smaller square and serving it alongside a strong cup of coffee. It’s got just enough sweetness to feel like a treat without being overly decadent for the morning. The spices are also incredibly warming and comforting to start the day. When it comes to brunch, this xylafy dessert really shines. You can serve larger slices alongside fresh fruit platters, yogurt parfaits, or even a light quiche. It adds a touch of homemade charm that everyone appreciates. For a more formal dessert setting, a warm slice with a generous dollop of freshly whipped cream or a scoop of high-quality vanilla bean ice cream is absolutely divine. You can also dust it lightly with a bit of extra powdered sugar for an elegant finish. And for those cozy snack moments? Oh boy. A warm piece, maybe with a glass of milk or a mug of hot chocolate, is pure bliss. My kids always ask for this when they’re curled up with a book or watching a movie. It’s the ultimate comfort food. Honestly, I’ve even brought leftovers to potlucks, cut into small bites, and they disappear in minutes!
Top Tips for Perfecting Your Xylafy Dessert
I’ve made this xylafy dessert more times than I can count, and through all those batches, I’ve picked up a few tricks that I think make a world of difference. For the “xylafy” ingredient – whatever you choose it to be – make sure it’s grated finely. This ensures it distributes evenly and contributes to the moistness without creating large chunks. If you find your xylafy ingredient releases a lot of liquid, don’t be afraid to give it a gentle squeeze in a clean kitchen towel after grating; too much moisture can sometimes affect the bake. When it comes to mixing the batter, this is where a lot of people go wrong. Remember, “just combined” is your mantra. Overmixing is the enemy of a tender crumb. You want to stop mixing as soon as you don’t see large streaks of dry flour anymore. The batter will be thick, but it shouldn’t be stiff. For the filling, don’t pack it down too tightly when you sprinkle it over the first layer of batter. You want it to be able to meld into the cake as it bakes. Experiment with your swirl! Some people like a tight swirl, others prefer a more loose, marbled effect. Either way, it adds that beautiful visual element. If you’re unsure about doneness, always err on the side of slightly underbaked rather than overbaked. A slightly fudgy center is far better than a dry, crumbly dessert. You can always pop it back in for another few minutes if needed. For ingredient swaps, I’ve successfully used almond milk in place of regular milk, and it made the glaze even creamier! If you’re out of brown sugar for the filling, you can use a mix of granulated sugar and a teaspoon of molasses, but the flavor will be slightly different. And for the glaze, if it’s too thick, add milk a teaspoon at a time until it reaches your desired consistency. If it’s too thin, add more powdered sugar, also a teaspoon at a time. Patience is key with the glaze!
Storing and Reheating Tips
This xylafy dessert is quite resilient when it comes to storage, which is another reason I love it so much. For storing at room temperature, if it’s not too warm where you live, you can keep it covered with plastic wrap or foil for up to 2 days. The flavors actually tend to deepen and meld even more after the first day, so it’s quite delicious as leftovers! Just make sure it’s completely cooled before you cover it. If you live in a warmer climate or plan to keep it for longer than a couple of days, the refrigerator is your best friend. Store it in an airtight container for up to 4-5 days. The texture will remain wonderfully moist. If you want to freeze portions for later, which is a great idea for “treat emergencies,” let the xylafy dessert cool completely, then wrap individual slices tightly in plastic wrap, followed by a layer of aluminum foil or place them in a freezer-safe bag. It should keep well in the freezer for about 2-3 months. When you’re ready to enjoy a frozen piece, you can thaw it overnight in the refrigerator or gently reheat it. For reheating, if you like it warm, I recommend popping a slice in the microwave for about 20-30 seconds, or in a toaster oven at a low temperature until just warmed through. Be careful not to overheat it, or it can become dry. If you’ve glazed your xylafy dessert, the glaze will hold up well to refrigeration and thawing. I usually add the glaze *after* it’s baked and cooled, so it doesn’t get too messy during storage. It’s just a matter of preference, really!
Frequently Asked Questions
Final Thoughts
So there you have it – my absolute favorite xylafy dessert. It’s more than just a recipe; it’s a feeling, a memory, and a guaranteed crowd-pleaser. I truly believe that this recipe embodies what home baking is all about: simple ingredients, a little bit of love, and a whole lot of deliciousness. It’s the perfect example of how a few well-chosen ingredients can create something truly special, and it’s proof that you don’t need to be a professional baker to create amazing treats. If you enjoyed this recipe, you might also love my [Link to another recipe, e.g., “Moist Chocolate Zucchini Bread”] or my [Link to another recipe, e.g., “Simple Apple Crumble”]. Give this xylafy dessert a try, and I promise it will become a staple in your recipe collection too. I can’t wait to hear how yours turns out! Don’t forget to leave a comment below and let me know your thoughts, or even share any fun variations you’ve come up with. Happy baking, friends!
Easy Sweet Potato Muffins
Ingredients
Main Ingredients
- 1 large sweet potato
- 0.5 cup extra virgin olive oil
- 0.5 cup milk
- 0.75 cup maple syrup plus 2 extra tablespoons for brushing the muffins
- 1 tsp vanilla extract
- 2 cups all-purpose flour
- 2 tsp baking powder
- 2 tsp baking soda
- 1.5 tbsp pumpkin pie spice
- 0.5 tsp salt
Instructions
Preparation Steps
- Preheat the oven to 400°F. Prick the sweet potato a few times with a paring knife or a fork. Bake until soft (when a paring knife can cut through with zero resistance), about 1 hour. Set the sweet potato aside until it’s completely cool.
- Peel the sweet potato, discard the skin and mash the flesh in a mixing bowl with a fork. Whisk the olive oil, milk, maple syrup and vanilla into the sweet potato.
- In a separate bowl, whisk together the flour, baking powder, baking soda, five-spice powder and salt. Fold the dry ingredients into the wet ingredients.
- Line a 12-cup muffin tin with paper liners or grease a muffin tin and evenly distribute the muffin batter among the cups.
- Bake for 20 minutes. Brush the tops with the extra maple syrup and bake 5 minutes or until a toothpick comes out of the center clean.
- Let the muffins cool before serving.