turkey croquettes
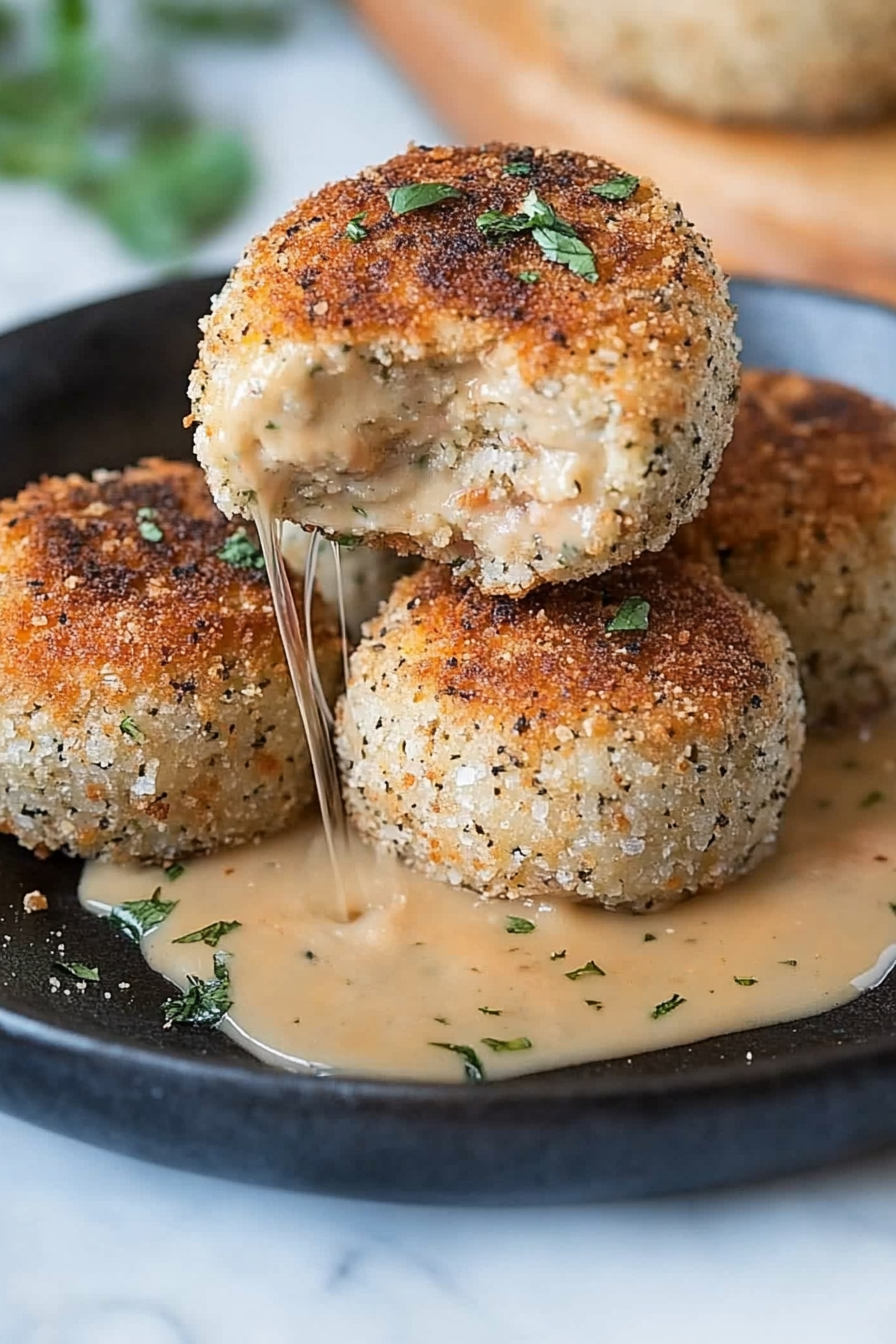
Oh, these turkey croquettes! They’re not just a recipe to me; they’re a little slice of comfort, a memory of cozy evenings, and, let’s be honest, a secret weapon for using up leftover turkey that somehow tastes even better the second time around. If you’ve ever found yourself staring at a bit of roast turkey and thinking, “Now what?” then you’re in the right place. I remember the first time I made these. My usually picky youngest kid, who normally turns up his nose at anything “different,” devoured three in one sitting. That’s when I knew I had stumbled onto something truly special. They’re like the sophisticated cousin of your average fried ball, but with an earthy, savory depth that just can’t be beat. Think of them as little golden treasures, crispy on the outside, incredibly creamy and flavorful on the inside. They’re miles away from those bland, mushy things you might have tried before; these are next-level delicious, and I’m so excited to share them with you!
What are Turkey croquettes?
So, what exactly are turkey croquettes? At their heart, they’re little flavor bombs. Imagine the most delicious, well-seasoned mashed potatoes you can think of, but then we fold in finely chopped or ground cooked turkey, maybe some finely minced veggies for an extra pop of flavor and texture, and then we shape them into little logs or balls. The real magic happens when they’re coated in a crispy breading and fried to a perfect golden brown. They’re essentially a clever, incredibly tasty way to transform simple ingredients into something truly irresistible. The name “croquette” actually comes from the French word “croquer,” which means “to crunch,” and trust me, these deliver on that crunch in the most satisfying way possible. It’s a classic comfort food concept, elevated with wholesome ingredients and a touch of culinary love.
Why you’ll love this recipe?
Honestly, there are so many reasons why this turkey croquette recipe has become a staple in my kitchen, and I’m pretty sure it will in yours too. First off, the flavor! It’s just out of this world. You get that savory goodness from the turkey, a lovely creaminess from the potato base, and that irresistible crunch from the golden-fried exterior. It’s a symphony of textures and tastes that just works. Then there’s the simplicity. Don’t let the frying part scare you; it’s actually quite straightforward, especially with the method I’ll share. Plus, this recipe is a lifesaver for using up leftover turkey from holidays or a Sunday roast, meaning less waste and more deliciousness. It’s incredibly cost-efficient in that regard. And versatility? Oh, you bet. These aren’t just for dinner. They’re fantastic as an appetizer, a light lunch, or even a hearty snack. I’ve even seen my kids sneak them cold from the fridge the next day, which is always a good sign! What I love most is how they feel a little bit fancy, but they’re surprisingly easy to whip up, making them perfect for weeknights or even impressing guests at a casual get-together. They’re a crowd-pleaser, plain and simple.
How do you make Turkey croquettes?
Quick Overview
The process for these turkey croquettes is really quite simple, and I promise it’s not as intimidating as it might sound! We’ll be making a savory potato and turkey mixture, shaping it, coating it, and then frying it until it’s beautifully golden and crispy. The key is to get the potato mixture to the right consistency – not too wet, not too dry – so it holds its shape. Once you’ve got that down, the rest is a breeze. It’s a wonderfully satisfying process, and the smell that fills your kitchen while they’re frying is just heavenly. This method ensures a perfect balance of creamy interior and crunchy exterior every single time.
Ingredients
For the Main Batter:
2 cups mashed potatoes (use fluffy, well-seasoned ones! Leftovers are perfect here.)
1 cup finely chopped or ground cooked turkey (roast turkey, smoked turkey, or even turkey breast works wonderfully)
1/4 cup finely minced onion (about 1/4 of a small onion)
2 tablespoons finely chopped fresh parsley
1 teaspoon dried thyme
1/2 teaspoon salt, or to taste
1/4 teaspoon black pepper, or to taste
Pinch of nutmeg (this is my little secret for warmth!)
1 large egg, lightly beaten
For the Breading Station:
1 cup all-purpose flour
2 large eggs, lightly beaten with 1 tablespoon of milk or water
2 cups Panko breadcrumbs (these give the best crunch!)
Vegetable oil or canola oil, for frying
Step-by-Step Instructions
Step 1: Preheat & Prep Pan
We want to get our frying station ready before we even start mixing. Pour about 2-3 inches of your chosen oil (vegetable or canola) into a heavy-bottomed pot or Dutch oven. We’ll heat this over medium-high heat to about 350°F (175°C). It’s important to get the oil to the right temperature. Too low, and your croquettes will be greasy; too high, and they’ll burn before the inside is heated through. While the oil heats, set up your breading station. You’ll need three shallow dishes or plates: one with the flour, one with the beaten eggs (mixed with a splash of milk or water for a thinner coating), and one with the Panko breadcrumbs. Have a wire rack set over a baking sheet ready for when the croquettes are done frying.
Step 2: Mix Dry Ingredients
In a large mixing bowl, combine the mashed potatoes, finely chopped turkey, minced onion, chopped parsley, dried thyme, salt, pepper, and that pinch of nutmeg. The key here is to have your mashed potatoes be nice and fluffy. If they’re too wet or sticky, your croquettes might fall apart. If you’re using leftover mashed potatoes, make sure they’re not too buttery or creamy, as that can also affect the texture. Gently mix everything together until it’s just combined. You don’t want to overwork the potatoes, or they can become gummy. We’re aiming for a mixture that holds together when you squeeze it.
Step 3: Mix Wet Ingredients
In a small bowl, whisk together the two large eggs with about a tablespoon of milk or water. This is for our egg wash, which helps the breadcrumbs stick beautifully. Don’t over-beat it; just a good whisk until the yolks and whites are combined is perfect. This is also where you might add a tiny pinch of salt or pepper to the egg wash itself if you’re feeling particularly adventurous, but it’s not strictly necessary.
Step 4: Combine
Now, add the lightly beaten egg from the “main batter” ingredients into the potato and turkey mixture. Gently fold it in until everything is just incorporated. This egg acts as a binder, helping to hold all those delicious ingredients together. Again, don’t overmix. You want to see the ingredients combined, but still have a pleasant texture. If the mixture feels a little too wet, you can add a tablespoon or two more of the flour from your breading station, mixing it in gently. If it feels too dry, a tiny splash more of the egg wash or a little more mashed potato can help.
Step 5: Prepare Filling
This step is essentially done in Step 2 and 4 when we mix all the main ingredients together! The “filling” in this case is the entire glorious mixture of mashed potato and turkey. You’re looking for a consistency that’s firm enough to shape but still moist and flavorful. If you’ve made mashed potatoes from scratch for this, ensure they’re cool before mixing; warm potatoes can make the mixture too soft. I find that chilling the mixture for about 20-30 minutes in the fridge at this stage can make it much easier to shape, especially if your potatoes were a little softer than usual.
Step 6: Layer & Swirl
This step is about shaping! Take about 2 tablespoons of the mixture and roll it between your hands into a log shape, about 3 inches long and 1 inch thick. You can also make them into little balls if you prefer. Don’t make them too big, or they’ll be tricky to fry evenly. Once you have your shaped croquettes, it’s time to bread them. First, roll each one gently in the flour, tapping off any excess. Then, dip it into the egg wash, letting any excess drip off. Finally, roll it thoroughly in the Panko breadcrumbs, pressing gently so the crumbs adhere all over. Ensure they’re fully coated for that ultimate crispy texture. Place the breaded croquettes on the prepared wire rack as you work.
Step 7: Bake
Actually, we fry these! Heat your oil in a heavy-bottomed pot or Dutch oven to 350°F (175°C). Carefully, using tongs or a slotted spoon, lower a few croquettes into the hot oil at a time. Don’t overcrowd the pot, as this will lower the oil temperature and make them greasy. Fry for about 3-5 minutes, turning them occasionally, until they are a deep golden brown and heated through. The Panko breadcrumbs will turn a beautiful, crispy golden color. Use a slotted spoon to remove them from the oil and place them on the wire rack to drain. If you’re making a big batch, you can keep them warm in a low oven (around 200°F/95°C) while you fry the rest. I learned the hard way that trying to fry too many at once makes them soggy, so patience is key here!
Step 8: Cool & Glaze
Let the croquettes cool on the wire rack for a few minutes after frying. This allows the excess oil to drain off and lets the interior set a bit. If you were planning to glaze these (which is a whole other level of delicious, but not traditional for these savory croquettes), this would be the time. For these savory turkey croquettes, there’s no glaze needed; the beauty is in their crispy exterior and savory filling. Just make sure they’re not piping hot when serving, so no one burns their tongue!
Step 9: Slice & Serve
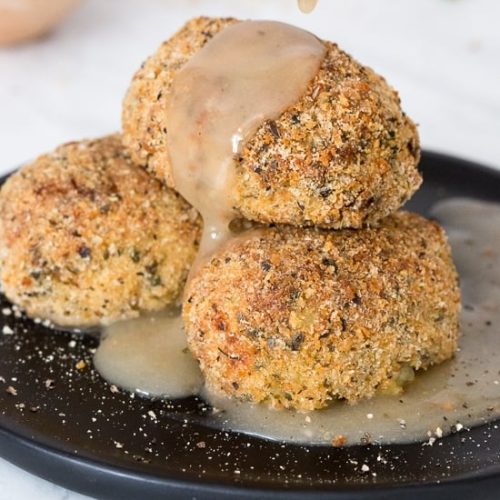
These turkey croquettes are best served warm. If you’ve made them into logs, they’re perfect for dipping. If you made them into balls, they’re delightful on their own. You can slice them in half if you’re serving them as appetizers to make them go further and show off that lovely creamy interior. They look fantastic arranged on a platter. I love serving them with a dollop of your favorite dipping sauce on the side. They’re just so satisfying to bite into – that initial crunch giving way to the soft, flavorful center.
What to Serve It With
These turkey croquettes are so versatile, it’s almost silly! They really do fit into so many meal occasions. For breakfast, if you’re feeling a bit indulgent or have some leftover from dinner, they’re surprisingly delightful alongside a perfectly poached egg. The savory crunch is a fantastic contrast to the runny yolk. For brunch, they absolutely shine. Imagine them as part of a larger spread: nestled next to some fresh fruit salad, a platter of artisanal cheeses, and maybe a light quiche. They add a wonderful texture and savory element that balances out sweeter brunch dishes. As a dessert, while not traditional, I’ve seen people get creative and serve them with a lightly sweetened dipping sauce or a sprinkle of powdered sugar for a sweet and savory play, but for these specific turkey croquettes, I think that’s best left for other recipes! For cozy snacks, they are unbeatable. Picture yourself curled up on the couch with a good book, a plate of these warm, crispy croquettes, and maybe a side of ranch dressing or a spicy aioli. My family loves them as an after-school snack – they’re gone in minutes! I’ve also found they pair wonderfully with a simple green salad dressed with a light vinaigrette for a quick and easy lunch or light dinner. My personal favorite is serving them with a tangy cranberry-orange relish during the holidays; it’s a beautiful nod to the turkey!
Top Tips for Perfecting Your Turkey Croquettes
I’ve made these turkey croquettes more times than I can count, and I’ve definitely learned a few tricks along the way that I’m happy to pass on. When it comes to the turkey itself, make sure it’s really finely chopped or even ground. You don’t want big chunks in there; it should be well-integrated with the potato. If you’re using leftover roast turkey, make sure to remove any skin or gristle. For the mashed potatoes, the consistency is key. If your potatoes are too wet, the mixture will be too soft to shape properly. If you’ve made them recently, letting them cool completely and even chilling them for a bit in the fridge before mixing will help immensely. I’ve found that adding a tablespoon or two of flour to the potato-turkey mix if it’s too wet is a lifesaver, but do it gently! Overmixing can make the potatoes gummy. When shaping, wet your hands slightly before rolling the mixture into logs or balls. This prevents the mixture from sticking to your hands and helps you get a smoother shape. For the breading, don’t skip the flour-egg-breadcrumb steps. Each layer is important for creating that shatteringly crisp crust. And for the love of all that is delicious, make sure your oil is at the correct temperature (350°F/175°C). I use a kitchen thermometer for this, and it’s been a game-changer. If the oil isn’t hot enough, you’ll end up with greasy, soggy croquettes, and nobody wants that! Fry them in batches; this is crucial. Trying to cram too many into the pot will drop the oil temperature and ruin the texture. Patience is your friend here. I’ve learned that lesson the hard way more than once. If you’re making a big batch and want to serve them all hot, you can keep the fried ones warm on a baking sheet in a low oven (around 200°F/95°C) while you finish frying the rest.
Storing and Reheating Tips
These turkey croquettes are absolutely best enjoyed fresh from the fryer, but life happens, and sometimes we have leftovers! If you find yourself with some, don’t despair. They store surprisingly well. At room temperature, I wouldn’t leave them out for more than about 2 hours, just for food safety reasons. They’ll start to lose their crispness after a while anyway. For refrigerator storage, let them cool completely first. Then, store them in an airtight container, ideally with a layer of paper towel at the bottom to absorb any excess moisture, which helps them stay a bit crisper. They should keep well in the fridge for about 2-3 days. When it comes to reheating, the goal is to get them crispy again. The microwave is generally a no-go for fried foods if you want that crunch! The best method is to reheat them in a preheated oven or toaster oven at around 350°F (175°C) for about 8-10 minutes, or until they’re heated through and crispy again. Some people swear by a quick pan-fry in a little oil to revive them, but the oven method is usually sufficient and less fuss. For freezer instructions, it’s best to freeze them *before* frying if possible, or freeze the already-fried ones in a single layer on a baking sheet until solid, then transfer to a freezer bag. They can last in the freezer for about 1-2 months. Thaw them in the refrigerator overnight before reheating in the oven as mentioned above. If you were making a sweet glaze, you’d always add that *after* reheating, never before storing or freezing!
Frequently Asked Questions
Final Thoughts
So there you have it – my absolute favorite turkey croquettes! I really hope you give these a try. They’re more than just a way to use up leftovers; they’re a genuinely delicious dish that brings smiles to faces. The combination of creamy mashed potatoes, savory turkey, and that irresistibly crispy coating is just pure comfort food magic. They’re perfect for a casual dinner, a game-day appetizer, or even a fun family meal. What I love most is that they feel special without being complicated, proving that incredible flavor can come from simple ingredients and a little bit of love in the kitchen. If you’re a fan of this recipe, you might also enjoy my [link to another savory recipe, e.g., Shepherd’s Pie Bites] or my [link to another leftover-friendly recipe, e.g., Turkey Pot Pie Casserole]. I can’t wait to hear how your turkey croquettes turn out! If you make them, please leave a comment below and let me know what you think, or share your own favorite serving suggestions. Happy cooking, everyone!
Easy Baked Turkey Croquettes Recipe
Ingredients
Main Ingredients
- 12 oz cooked turkey breast chopped fine
- 3 medium potatoes peeled, cooked and mashed
- 0.75 cup chicken broth
- 2 tsp olive oil
- 3 cloves garlic
- 1 medium onion chopped
- 0.5 cup parsley chopped
- salt and fresh pepper
- 0.5 cup seasoned whole wheat bread crumbs
- 1 egg egg whisked
- olive oil spray
- leftover turkey gravy for serving (optional)
Instructions
Preparation Steps
- In a large bowl, mash potatoes with 0.25 cup of chicken broth, salt, and pepper. Set aside.
- Sauté garlic and onions in olive oil over low heat. Add parsley, salt, and pepper and cook until soft, about 2-3 minutes.
- Add turkey and the remaining 0.5 cup broth, mix well and turn off heat.
- Add turkey mixture to mashed potatoes and mix thoroughly using clean hands. Taste and adjust salt if needed.
- Preheat oven to 450°F.
- Measure 0.25 cup of mixture and form into croquettes. Place on waxed paper. Repeat with remaining mixture.
- Dip each croquette in whisked egg, then coat with breadcrumbs. Place on a parchment-lined cookie sheet. Spray generously with olive oil (about 1 tbsp). Bake for about 15 minutes or until golden.
- Optionally, serve with leftover turkey gravy.