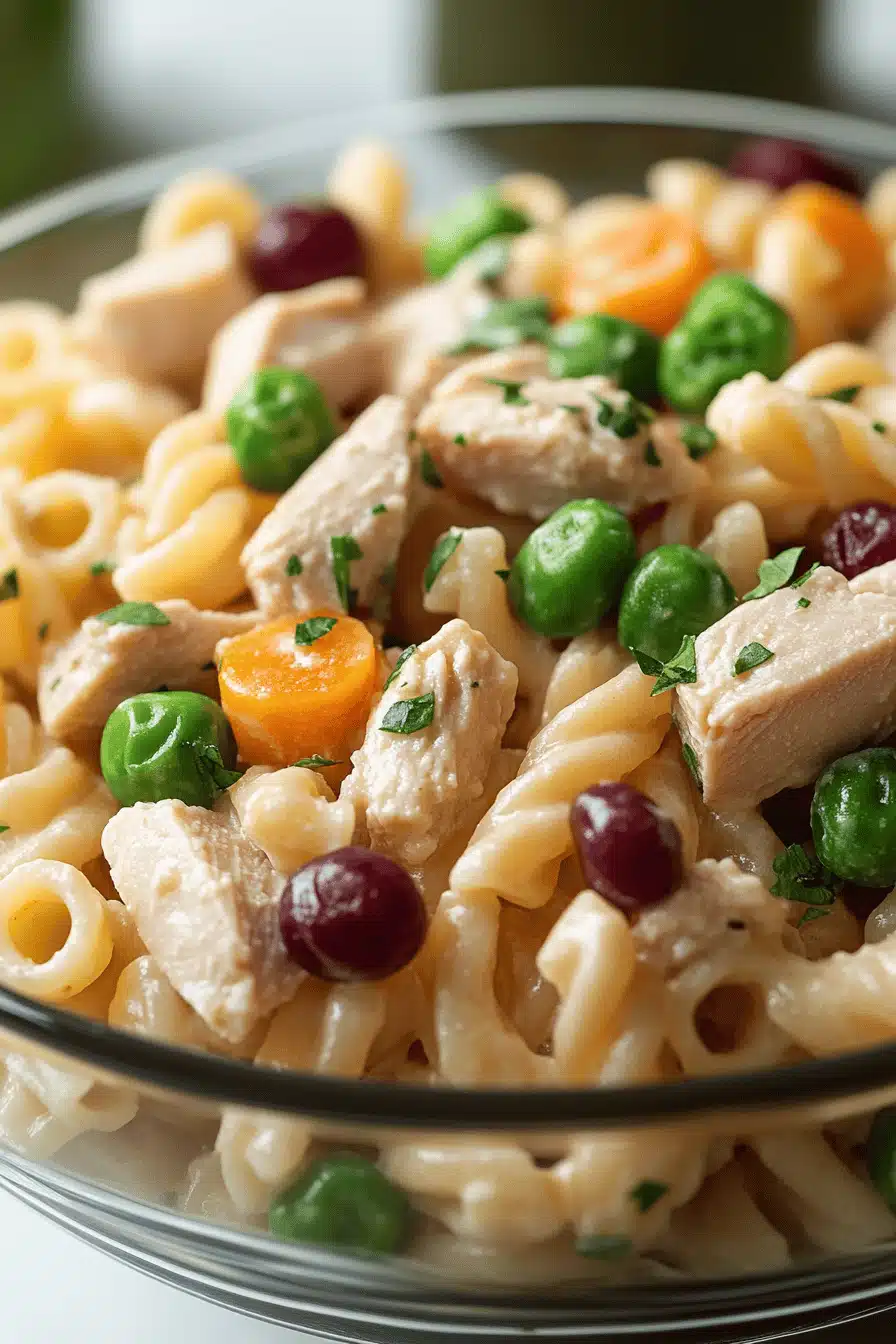
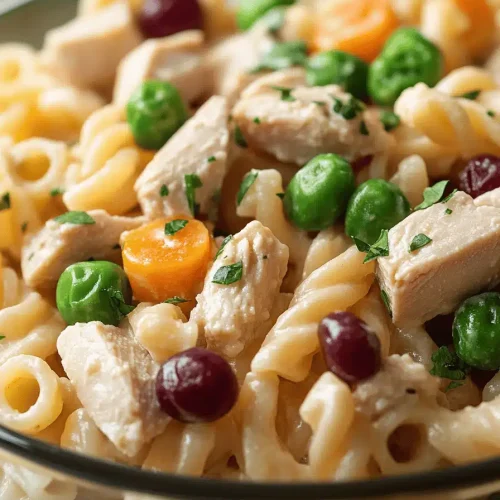
Tuna Pasta Salad
Oh, Tuna Pasta Salad. It’s one of those dishes that just screams comfort food, doesn’t it? For me, it’s deeply tied to summer picnics, quick weeknight dinners when I’m just too tired to think, and honestly, those moments when you just need something utterly satisfying without a lot of fuss. I’ve tried a million versions over the years – some too dry, some drowning in mayo, some just… bland. But this one? This is the one that makes my whole family cheer. It’s bright, it’s creamy, it has just the right amount of tang, and it never, ever fails to disappear in minutes. If you’re looking for a tuna pasta salad recipe that actually tastes like a million bucks but is surprisingly simple to whip up, you’ve found it. It’s like the classic you know and love, but elevated just enough to make it special. Forget those sad, watery versions; this tuna pasta salad is the real deal.
What is tuna salad?
So, what exactly *is* tuna Pasta Salad? At its heart, it’s a classic cold pasta dish, usually featuring cooked pasta, flaked tuna, and a creamy dressing, often mayonnaise-based. But oh, it’s so much more than that! Think of it as a blank canvas for deliciousness. The “tuna” part is, of course, canned tuna, but the real magic happens with what you mix in. We’re talking about crisp veggies for crunch, maybe some tangy pickles or relish, and seasonings that wake everything up. It’s essentially a hearty, flavorful salad that can be a meal on its own or a fantastic side dish. It’s the kind of thing you can throw together on a Sunday afternoon and have ready for lunch all week long. It’s casual, it’s crowd-pleasing, and it’s ridiculously versatile. It’s the perfect antidote to a busy day when you want something nourishing and tasty without spending hours in the kitchen.
Why you’ll love this recipe?
There are so many reasons why this particular tuna Pasta Salad recipe has earned a permanent spot in my recipe box, and I just know you’re going to adore it too. First off, let’s talk about the flavor. It’s not just creamy; it’s got this beautiful balance of savory tuna, tender pasta, and a dressing that’s perfectly seasoned. The little bursts of freshness from the celery and onion, plus that hint of acidity from dill pickles or relish, just make it sing. It’s incredibly satisfying without feeling heavy. Then there’s the simplicity. Seriously, this is a lifesaver on busy weeknights. You can have it ready in under 30 minutes if you time it right, especially if you have some cooked pasta on hand. It requires no fancy techniques, just straightforward mixing and assembling. And the cost-efficiency! Canned tuna and pasta are pantry staples that don’t break the bank, making this a budget-friendly meal option that still feels a bit indulgent. What I love most about this tuna pasta salad, though, is its sheer versatility. It’s fantastic on its own, stuffed into a sandwich, served alongside grilled chicken, or even scooped onto lettuce wraps for a lighter option. It’s the kind of recipe that feels both familiar and excitingly new every time you make it. It’s a step up from your average tuna salad, but still has that comforting, homemade quality that makes you feel good.
How do I make tuna salad?
Quick Overview
This tuna Pasta Salad is all about bringing together perfectly cooked pasta with tender flaked tuna and a rich, flavorful dressing, all enhanced by fresh, crunchy vegetables. You’ll boil your pasta, drain and flake your tuna, chop your veggies, and then whisk together a simple, delicious dressing. Everything gets tossed together until beautifully coated. It’s a straightforward process that results in a dish bursting with flavor and texture. The key is in the quality of your ingredients and a little bit of love in the mixing. This method ensures every bite is packed with that classic, comforting taste we all crave.
Ingredients
For Pasta Base: For Pasta Base: For Pasta Base: For Pasta Base: For
1 pound elbow macaroni, rotini, or penne pasta (I love rotini because the little spirals hold onto the dressing so well!)
Salt for boiling pasta
For the Tuna & Veggies:
2 (5-ounce) cans solid white albacore tuna in water, drained well (using albacore makes a big difference in texture and flavor, trust me!)
2 celery stalks, finely chopped (for that essential crunch!)
1/2 medium red onion, finely chopped (or use green onions for a milder flavor)
1/4 cup chopped fresh dill pickles or sweet pickle relish (dill gives it a lovely tang, sweet is great if you prefer a bit more sweetness)
For the Creamy Dressing:
1 cup mayonnaise (use good quality mayo, it really does matter!)
2 tablespoons Dijon mustard (adds a nice zip and depth)
1 tablespoon fresh lemon juice (brightens everything up)
1/2 teaspoon garlic powder
1/4 teaspoon Black Pepper, plus more to taste
Salt to taste (start with 1/4 teaspoon and adjust)
Step-by-Step Instructions
Step 1: Cook the Pasta
Bring a large pot of generously salted water to a rolling boil. Add your pasta and cook according to package directions until it’s al dente – meaning it’s tender but still has a slight bite to it. I usually pull it off about a minute before the package says because it will continue to cook a little as it cools. Once cooked, drain the pasta well in a colander. You can rinse it briefly with cool water to stop the cooking process and prevent it from sticking, then let it drain thoroughly. Make sure there’s no excess water left; we don’t want a soupy salad!
Step 2: Prepare the Tuna
While the pasta is cooking, open your cans of tuna. Drain them really, really well – I usually press down on the lid to squeeze out as much liquid as possible. This is crucial for preventing a watery salad. Then, transfer the drained tuna to a medium bowl. Use a fork to flake the tuna into bite-sized pieces. You don’t want it mushy, but you also don’t want huge chunks. Just nice, manageable flakes that will distribute evenly through the pasta.
Step 3: Chop the Veggies
Now for the textural elements! Finely chop your celery and red onion. The finer you chop them, the better they’ll integrate into the salad and provide that delightful crunch in every bite. If you’re using pickles, give them a fine chop too. If you’re using relish, you can skip chopping the pickles. The goal here is to have small, consistent pieces that complement the tuna and pasta.
Step 4: Whisk the Dressing
In a separate small bowl, whisk together the mayonnaise, Dijon mustard, fresh lemon juice, garlic powder, and black pepper. Start with 1/4 teaspoon of salt, whisk it all together, and then taste. Adjust salt and pepper as needed. This dressing is where a lot of the magic happens, so don’t be shy about tasting and tweaking until it’s perfect for your palate. The lemon juice adds a wonderful brightness that cuts through the richness of the mayo.
Step 5: Combine Everything
Once your pasta is drained and cooled slightly, add it to a large mixing bowl. Add the flaked tuna, chopped celery, chopped red onion, and your chopped pickles or relish. Pour the prepared dressing over the mixture. Gently toss everything together with a large spoon or spatula until all the ingredients are evenly coated in the creamy dressing. Be careful not to overmix, as this can make the pasta mushy. You want everything to be nicely incorporated.
Step 6: Chill for Flavors to Meld
This is an important step that many people skip, and it’s a game-changer! Cover the bowl tightly with plastic wrap and refrigerate for at least 30 minutes, or ideally an hour or two, before serving. This allows all the flavors to meld together beautifully and the pasta to absorb some of that delicious dressing. It really makes a difference in the overall taste.
Step 7: Taste and Adjust
Just before serving, give the tuna pasta salad another gentle stir. Taste it again and adjust seasonings if necessary. Sometimes the pasta absorbs a bit more salt, or you might want a little more pepper or lemon juice. This is your chance to fine-tune it to perfection!
Step 8: Serve
Serve your creamy tuna pasta salad chilled. It’s ready to be enjoyed as is, or used in various ways (more on that in a bit!).
Ingredients
For the Pasta Base:
1 pound elbow macaroni, rotini, or penne pasta (I love rotini because the little spirals hold onto the dressing so well!)
Salt for boiling pasta
For the Tuna & Veggies:
2 (5-ounce) cans solid white albacore tuna in water, drained well (using albacore makes a big difference in texture and flavor, trust me!)
2 celery stalks, finely chopped (for that essential crunch!)
1/2 medium red onion, finely chopped (or use green onions for a milder flavor)
1/4 cup chopped fresh dill pickles or sweet pickle relish (dill gives it a lovely tang, sweet is great if you prefer a bit more sweetness)
For the Creamy Dressing:
1 cup mayonnaise (use good quality mayo, it really does matter!)
2 tablespoons Dijon mustard (adds a nice zip and depth)
1 tablespoon fresh lemon juice (brightens everything up)
1/2 teaspoon garlic powder
1/4 teaspoon black pepper, plus more to taste
Salt to taste (start with 1/4 teaspoon and adjust)
Step-by-Step Instructions
Step 1: Cook the Pasta
Bring a large pot of generously salted water to a rolling boil. Add your pasta and cook according to package directions until it’s al dente – meaning it’s tender but still has a slight bite to it. I usually pull it off about a minute before the package says because it will continue to cook a little as it cools. Once cooked, drain the pasta well in a colander. You can rinse it briefly with cool water to stop the cooking process and prevent it from sticking, then let it drain thoroughly. Make sure there’s no excess water left; we don’t want a soupy salad!
Step 2: Prepare the Tuna
While the pasta is cooking, open your cans of tuna. Drain them really, really well – I usually press down on the lid to squeeze out as much liquid as possible. This is crucial for preventing a watery salad. Then, transfer the drained tuna to a medium bowl. Use a fork to flake the tuna into bite-sized pieces. You don’t want it mushy, but you also don’t want huge chunks. Just nice, manageable flakes that will distribute evenly through the pasta.
Step 3: Chop the Veggies
Now for the textural elements! Finely chop your celery and red onion. The finer you chop them, the better they’ll integrate into the salad and provide that delightful crunch in every bite. If you’re using pickles, give them a fine chop too. If you’re using relish, you can skip chopping the pickles. The goal here is to have small, consistent pieces that complement the tuna and pasta.
Step 4: Whisk the Dressing
In a separate small bowl, whisk together the mayonnaise, Dijon mustard, fresh lemon juice, garlic powder, and black pepper. Start with 1/4 teaspoon of salt, whisk it all together, and then taste. Adjust salt and pepper as needed. This dressing is where a lot of the magic happens, so don’t be shy about tasting and tweaking until it’s perfect for your palate. The lemon juice adds a wonderful brightness that cuts through the richness of the mayo.
Step 5: Combine Everything
Once your pasta is drained and cooled slightly, add it to a large mixing bowl. Add the flaked tuna, chopped celery, chopped red onion, and your chopped pickles or relish. Pour the prepared dressing over the mixture. Gently toss everything together with a large spoon or spatula until all the ingredients are evenly coated in the creamy dressing. Be careful not to overmix, as this can make the pasta mushy. You want everything to be nicely incorporated.
Step 6: Chill for Flavors to Meld
This is an important step that many people skip, and it’s a game-changer! Cover the bowl tightly with plastic wrap and refrigerate for at least 30 minutes, or ideally an hour or two, before serving. This allows all the flavors to meld together beautifully and the pasta to absorb some of that delicious dressing. It really makes a difference in the overall taste.
Step 7: Taste and Adjust
Just before serving, give the tuna pasta salad another gentle stir. Taste it again and adjust seasonings if necessary. Sometimes the pasta absorbs a bit more salt, or you might want a little more pepper or lemon juice. This is your chance to fine-tune it to perfection!
Step 8: Serve
Serve your creamy tuna pasta salad chilled. It’s ready to be enjoyed as is, or used in various ways (more on that in a bit!).
What to Serve It With
This tuna pasta salad is so wonderfully versatile, it pairs with pretty much anything! For a classic breakfast or brunch feel, I love serving a scoop alongside some fresh fruit. Think bright berries or juicy melon – the sweetness is a lovely contrast to the savory salad. It’s also fantastic stuffed into croissants or brioche rolls for a more substantial brunch item. As a main course, it’s perfect with some crusty bread for dipping or alongside a simple green salad dressed with a light vinaigrette. On a hot day, it’s just pure bliss served cold. And for those cozy snack moments? I love scooping it onto some crisp lettuce leaves or even using it as a filling for mini bell peppers. My kids are obsessed with it on crackers, and honestly, I can’t blame them! It’s one of those dishes that just makes everyone happy, no matter how you serve it.
Top Tips for Perfecting Your Tuna Pasta Salad
I’ve made this tuna pasta salad more times than I can count, and over the years, I’ve picked up a few tricks that I think really elevate it. First, when it comes to the tuna, don’t skimp on draining it. Seriously, give it a good squeeze. I’ve learned the hard way that too much liquid makes for a sad, watery salad. Using solid white albacore tuna really does make a difference in texture; it stays more flaky and less “mushy” than chunk light, which I sometimes find gets lost in the mix. For the pasta, al dente is key. Overcooked pasta turns mushy and can absorb too much dressing, turning your lovely salad into a pasta soup. I always cook mine a minute or two less than the package suggests and then give it a quick rinse under cold water to stop the cooking. This also helps prevent it from clumping together. When it comes to the veggies, I find dicing them quite finely makes a big difference. It means you get a little bit of crunch and flavor in every single bite, rather than a big chunk of onion or celery. If you’re not a fan of raw onion, a quick soak in ice water for 10 minutes can mellow out its bite, or you can swap it for finely chopped green onions for a milder flavor. And the dressing! While mayonnaise is the base, don’t be afraid to customize. I’ve played around with adding a dollop of sour cream or Greek yogurt for extra tanginess and creaminess, though it changes the texture slightly. Dijon mustard is my secret weapon here; it adds a depth of flavor that plain mayo just can’t match. And always, always taste and adjust. Your salt preference might be different from mine, or you might want a bit more lemon juice to brighten it up. The best tuna pasta salad is the one that’s perfect for *you*. Finally, patience! Letting it chill in the fridge for at least 30 minutes before serving is non-negotiable for me. It’s like letting a good stew simmer – it allows all those wonderful flavors to meld and deepen. I’ve made the mistake of serving it straight away and while it’s still good, it’s just not *as* good as when it’s had time to rest.
Storing and Reheating Tips
Storing this tuna pasta salad is pretty straightforward, and luckily, it holds up well! At room temperature, I wouldn’t leave it out for more than two hours, just to be safe. For refrigeration, once it’s made and chilled, it’s best kept in an airtight container. I usually use glass containers because they don’t absorb odors. It stays wonderfully fresh in the fridge for about 3 to 4 days. The flavors actually tend to get even better on the second day as everything melds together! If you’re planning to freeze it, I’d recommend doing so without the pasta first, or at least being aware that the texture of the pasta might change slightly upon thawing. Freezing the dressing and tuna mixture separately and then combining it with freshly cooked and cooled pasta is an option. If you do freeze the whole salad, wrap it tightly in plastic wrap and then in foil to prevent freezer burn. It should last for about 1 to 2 months. When you’re ready to thaw, transfer it to the refrigerator overnight. For reheating, I almost always serve this tuna pasta salad cold, so reheating isn’t typically necessary. However, if you wanted to serve it warm, you could gently warm it in a saucepan over low heat, stirring constantly, or microwave it in short intervals. Just be mindful that the texture of the pasta might soften a bit when heated. Honestly, though, its creamy, chilled state is where it truly shines.
Frequently Asked Questions
Final Thoughts
There you have it – my absolute favorite creamy tuna pasta salad! It’s honestly more than just a recipe; it’s a little taste of home, a reliable friend in the kitchen, and a guaranteed crowd-pleaser. I hope you give it a try and fall in love with it as much as my family and I have. It’s proof that simple ingredients, prepared with a little bit of care, can create something truly special. If you end up making it, please, please, please let me know how it turns out in the comments below! I love hearing your feedback, seeing your variations, and knowing that this recipe is making its way into your own kitchens. And if you’re a fan of comforting, easy pasta dishes, you might also want to check out my [link to another pasta recipe, e.g., “Simple Lemon Garlic Pasta”] or my [link to a salad recipe, e.g., “Classic Potato Salad”]. Happy cooking, and I can’t wait to hear all about your tuna pasta salad adventures!
Tuna Pasta Salad
Ingredients
Main Ingredients
- 0.5 pound pasta any short pasta like rotini or elbow macaroni
- 5 ounce canned tuna drained
- 0.5 cup celery chopped
- 0.25 cup red onion finely chopped
- 0.5 cup mayonnaise
- 1 tablespoon Dijon mustard
- 0.25 teaspoon salt
- 0.25 teaspoon black pepper
- 0.25 cup fresh parsley chopped
Instructions
Preparation Steps
- Cook pasta according to package directions. Drain and rinse with cold water.
- In a large bowl, flake the drained tuna with a fork.
- Add the chopped celery and red onion to the bowl with the tuna.
- In a small bowl, whisk together the mayonnaise and Dijon mustard.
- Pour the mayonnaise mixture over the tuna and vegetable mixture. Season with salt and pepper.
- Add the cooked and cooled pasta to the bowl. Gently stir to combine all ingredients.
- Stir in the chopped fresh parsley.
- Cover and refrigerate for at least 30 minutes before serving to allow the flavors to meld.