Sweet Christmas Trees Delightful Edible Crafts
You know, there’s just something about the holidays that makes me want to bake. It’s more than just the craving for something sweet; it’s the feeling of warmth, of gathering, of making memories. Every year, as soon as Thanksgiving dinner is over, my mind starts drifting to all the festive treats I can whip up. And this year, I’ve been absolutely obsessed with the idea of edible Christmas trees. I’ve seen them around, of course, little green cones dusted with powdered sugar snow, but I wanted to create something that felt truly homemade, something that tasted as good as it looked. I wanted a recipe that would be the star of our dessert table, something the kids would be absolutely thrilled to help decorate, and something that would make our guests’ eyes light up. Forget those store-bought gingerbread kits that can sometimes be a bit… meh. This is the real deal, a showstopper that’s surprisingly simple to make. It’s like a fluffy, spiced cake sculpted into the most iconic symbol of the season, and honestly, it’s become my New Favorite holiday tradition. It’s the perfect blend of festive fun and deliciousness, and I can’t wait to share it with you.
What are edible Christmas trees?
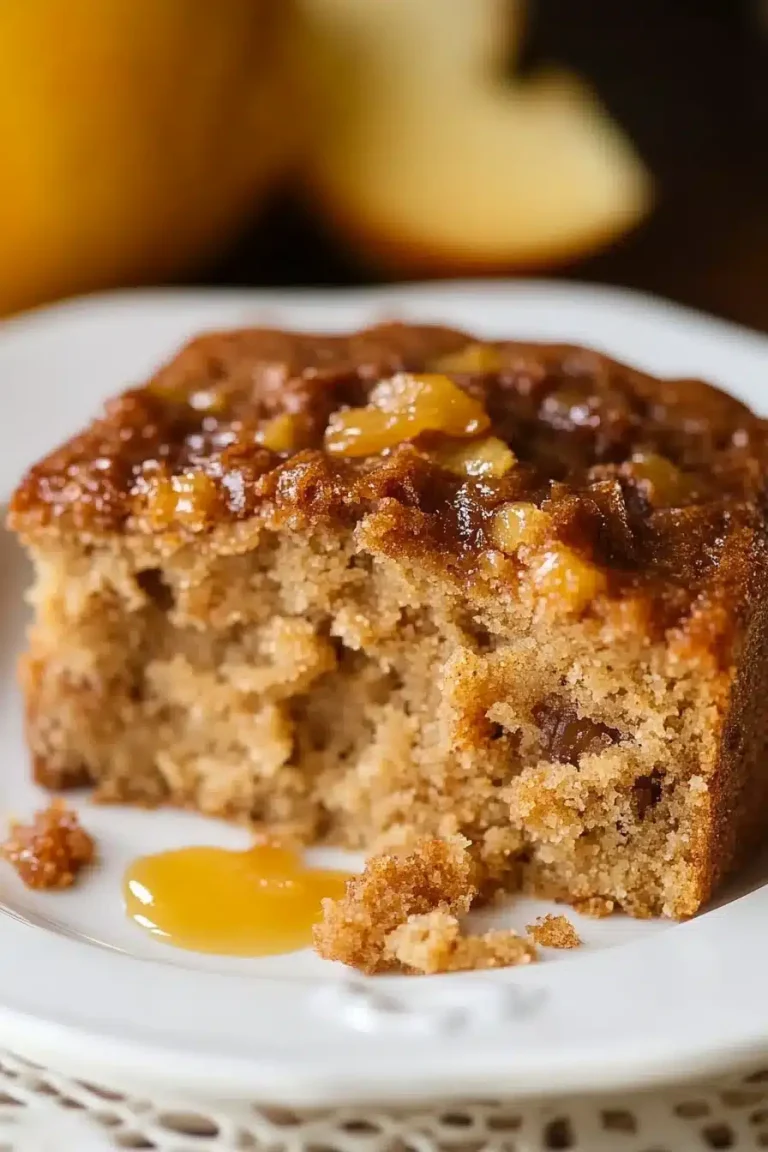
So, what exactly are these delightful edible Christmas trees? At their heart, they’re essentially a beautiful, moist cake baked into a conical shape, then decorated to resemble a mini evergreen. Think of it like a playful, edible sculpture! The “tree” itself is usually made from a simple yet incredibly flavorful cake batter – often spiced with cinnamon and nutmeg to evoke those cozy holiday aromas. Once baked and cooled, it’s transformed into a winter wonderland with frosting, sprinkles, and maybe even some candy ornaments. It’s not a complicated dessert at all; it’s essentially taking a beloved Cake Recipe and giving it a festive, whimsical makeover. The magic really happens in the shaping and decorating. It’s less about a specific, rigid recipe and more about the spirit of creativity and joy. It’s the kind of dessert that brings out the inner child in all of us, and let me tell you, it’s incredibly satisfying to see a perfectly formed, edible Christmas tree come to life on your counter.
Why you’ll love this recipe?
What is your favorite edible Christmas tree recipe?flavor! This isn’t just a pretty face; it’s a seriously delicious cake. It’s got this incredible warmth from the spices – cinnamon, nutmeg, a hint of ginger – that just screams holiday cheer. It’s moist, tender, and has just the right amount of sweetness without being overpowering, especially once you add the glaze. It’s the kind of cake that makes your whole kitchen smell like a winter wonderland. Then there’s the simplicity. Honestly, I was a little intimidated at first, thinking it would be a fiddly process, but it’s surprisingly straightforward. The baking part is just like making any regular cake, and the shaping is all done with the mold, which makes it so much easier. You don’t need to be a master decorator to make these look amazing. What I also love is how cost-effectiveIs it a good idea to use everyday pantry staples, and the ingredients are all budget-friendly, which is a huge bonus during theversatility is fantastic! You can totally customize the flavors, the frosting, and the decorations. Want a chocolate cake tree? Go for it! Prefer a lemon glaze? Absolutely. You can make them small and individual or one grand centerpiece. It’s also incredibly kid-friendly – my little ones have an absolute blast helping to ‘decorate’ their own trees, and it keeps them entertained for ages, which is a lifesaver on those hectic December days! Compared to making intricate Sugar Cookies or a complicated Yule log, this edible Christmas tree recipe hits that perfect sweet spot of impressive presentation and manageable effort. It’s a winner, every single time.
How to Make Edible Christmas Trees
Quick Overview
This recipe is all about creating a delightful, spiced cake that’s baked in a special cone mold to form our tree shape. We’ll mix up a simple yet flavorful batter, bake it until golden, let it cool completely, and then get creative with a sweet glaze and festive decorations. The beauty of this method is that the mold does most of the heavy lifting in terms of shaping, so you can focus on making it look like a wintery masterpiece. It’s a joy from start to finish, and the resulting edible Christmas trees are guaranteed to impress.
Ingredients
For the Main Batter:
2 ½ cups all-purpose flour
1 ½ teaspoons baking soda
½ teaspoon salt
1 teaspoon ground cinnamon
½ teaspoon ground nutmeg
¼ teaspoon ground ginger (optional, but adds a lovely warmth)
1 cup (2 sticks) unsalted butter, softened
1 ½ cups granulated sugar
3 large eggs, at room temperature
1 teaspoon vanilla extract
1 cup buttermilk, at room temperature
*Tip: Make sure your butter, eggs, and buttermilk are at room temperature. This is super important for a smooth, well-emulsified batter that bakes up evenly. Cold ingredients can lead to a dense cake, and nobody wants that! I usually take them out about an hour before I plan to start mixing.*
For the Glaze:
2 cups powdered sugar, sifted
3-4 tablespoons milk (or lemon juice for a zesty kick!)
½ teaspoon vanilla extract
Optional food coloring (green is classic, but white or even pastel colors are fun too!)
*Sourcing Note: You can find green food coloring in most grocery stores in the baking aisle. If you want a natural green, a tiny bit of matcha powder can work, but it will alter the flavor slightly.*
For Decoration:
Sprinkles (stars, jimmies, nonpareils – whatever you like!)
Small candies (like mini M&Ms, silver dragees, or edible glitter)
Edible gold or silver dust (for a touch of sparkle)
Step-by-Step Instructions
Step 1: Preheat & Prep Pan
First things first, let’s get our oven ready. Preheat it to 350°F (175°C). Now, for the tree mold – you’ll need a specific Christmas Tree-shaped baking pan for this. They usually come in different sizes, so pick the one you like. Grease it really, really well with butter or non-stick cooking spray, and then dust it with a little flour. Make sure you get into all those nooks and crannies! You can even use a small pastry brush to ensure even coverage. This step is crucial to prevent your beautiful trees from sticking. If you don’t have a tree mold, you could try baking cupcakes and then shaping them later, but the mold makes it so much easier!
Step 2: Mix Dry Ingredients
In a medium bowl, whisk together the flour, baking soda, salt, cinnamon, nutmeg, and ginger. Give it a good whisk until everything is well combined. This ensures that all the leavening agents and spices are evenly distributed throughout the batter, which means your trees will rise beautifully and have that wonderful spiced flavor in every bite. I always sift my flour and powdered sugar for glazes, too, it really makes a difference in getting a smooth texture.
Step 3: Mix Wet Ingredients
In a large bowl, using an electric mixer (or a stand mixer with the paddle attachment), cream together the softened butter and granulated sugar until light and fluffy. This usually takes about 3-5 minutes. It should look pale yellow and significantly increased in volume. Then, beat in the eggs one at a time, making sure each one is fully incorporated before adding the next. Stir in the vanilla extract. This is where you start to build that rich, tender cake base.
Step 4: Combine
Now, we’re going to alternate adding the dry ingredients and the buttermilk to the wet ingredients. Start by adding about a third of the dry ingredients to the butter mixture and mix on low speed until just combined. Then, add half of the buttermilk and mix again. Repeat this process, ending with the dry ingredients. Be careful not to overmix! Overmixing develops the gluten in the flour, which can lead to a tough cake. Mix just until there are no streaks of dry flour visible. It’s okay if there are a few tiny lumps; that’s better than overmixing. This is a common mistake I used to make – I’d keep mixing until it was *perfectly* smooth, and then wonder why my cakes were dense!
Step 5: Prepare Filling
This step is actually for if you’re making one large tree and want to fill it. For individual trees, you won’t need a separate filling. But if you’re making a larger centerpiece tree, after you’ve baked and cooled the cake, you can carefully hollow out the center and fill it with a complementary frosting, like Cream Cheese Frosting or a rich chocolate ganache. For this recipe, we’re focusing on the individual trees where the glaze will be the main decorative element. So, no separate filling needed today!
Step 6: Layer & Swirl
This step is actually more for things like cinnamon rolls or marbled cakes, and doesn’t apply directly to our edible Christmas tree batter. For our trees, we’ll be pouring the batter directly into the prepared mold(s). Don’t overfill the mold; usually, filling it about two-thirds to three-quarters full is perfect, as the cake will rise. If you’re using multiple small molds, distribute the batter evenly among them.
Step 7: Bake
Carefully pour the batter into your prepared tree mold(s). Gently tap the mold(s) on the counter a couple of times to release any air bubbles. Place the mold(s) on a baking sheet (this makes it easier to transfer them in and out of the oven and catches any potential drips). Bake for 25-35 minutes for smaller molds, or 40-50 minutes for a larger tree mold, or until a wooden skewer inserted into the thickest part of the cake comes out clean. Baking times can vary depending on your oven and the size of your mold, so keep an eye on them. It’s better to underbake slightly and add a few more minutes than to overbake and have dry trees!
Step 8: Cool & Glaze
Once baked, let the trees cool in the mold for about 10-15 minutes before carefully inverting them onto a wire rack to cool completely. This is super important! Trying to glaze a warm cake will just result in a melted mess. Once they are completely cool – and I mean *completely* cool, don’t rush this part! – it’s time for the glaze. In a medium bowl, whisk together the sifted powdered sugar, milk (start with 3 tablespoons and add more if needed for a thinner consistency), and vanilla extract until smooth. If you want green trees, add a few drops of green food coloring and mix well. You want a glaze that is thick enough to coat the tree without dripping off too quickly, but thin enough to spread easily. Drizzle the glaze over the cooled trees, letting it drip down the sides like snow. Add your sprinkles and candies while the glaze is still wet so they stick.
Step 9: Slice & Serve
Once the glaze has set a bit, your edible Christmas trees are ready to be admired and enjoyed! For individual trees, they’re perfect served as is. If you made a large centerpiece tree, you can slice it like a regular cake. They are absolutely delightful served with a dollop of whipped cream or a scoop of vanilla ice cream. These look stunning on a dessert platter and are sure to be a conversation starter at any holiday gathering. Honestly, the joy on people’s faces when they see these is priceless!
What to Serve It With
These edible Christmas trees are so versatile and festive, they really shine on their own, but here are some ideas for how to serve them that make them feel extra special:
For Breakfast: Imagine waking up on Christmas morning and being greeted by one of these little beauties! Serve them with a steaming mug of coffee or a warm glass of spiced apple cider. A few fresh berries on the side add a lovely pop of color and freshness. They’re a cheerful way to start the most magical day of the year.
For Brunch: Elevate your holiday brunch spread with these charming trees. They look gorgeous arranged on a tiered stand. Pair them with a mimosa or a festive cranberry punch. They add that perfect touch of whimsical elegance to any brunch table, making it feel truly celebratory.
As Dessert: This is where they truly steal the show! Serve them as individual desserts after a holiday feast. A light dusting of powdered sugar can mimic fresh snow, and a small scoop of peppermint ice cream makes for an incredible flavor combination. They’re a delightful, less fussy alternative to a traditional bûche de Noël.
For Cozy Snacks: Sometimes, you just need a little sweet treat to enjoy with a good book or a holiday movie. These trees are perfect for an afternoon pick-me-up. Serve them with a warm mug of hot chocolate. They are the ultimate cozy companion for those chilly winter evenings. My family loves them with hot chocolate after a day of playing in the snow!
One of our favorite family traditions is to make a batch of these on the first weekend of December. We set up a “decorating station” with all the sprinkles and candies, put on some Christmas music, and spend the afternoon creating our own edible winter wonderland. It’s messy, it’s fun, and the memories we make are just as sweet as the trees themselves.
Top Tips for Perfecting Your Edible Christmas Trees
Over the years, I’ve learned a few tricks and tips that have helped me make these edible Christmas trees absolutely perfect every time. Here are my best pieces of advice:
Zucchini Prep: Okay, this might seem a bit odd, but some recipes for this style of cake use shredded zucchini for moisture. If your recipe calls for it, make sure to really squeeze out as much liquid as possible! You can do this by placing the shredded zucchini in a clean kitchen towel or cheesecloth and wringing it out. Excess moisture can make your cake soggy. For this particular recipe, we’re sticking to classic cake ingredients for simplicity, but it’s a good tip to keep in mind for other moist cakes!
Mixing Advice: I cannot stress this enough: do NOT overmix the batter once you add the flour. Seriously. Mix just until the dry ingredients are incorporated. A few tiny lumps are perfectly fine! Overmixing develops gluten, leading to a tough, dense cake. I learned this the hard way after a few ‘brick-like’ cakes in my early baking days. Use a light hand and stop mixing as soon as you don’t see dry flour.
Swirl Customization: This tip is more for if you were doing a marble effect, but for decorating the trees, think about your drizzle! For the glaze, aim for a consistency that’s pourable but not runny. If it’s too thick, add milk or lemon juice a teaspoon at a time. If it’s too thin, whisk in a little more powdered sugar. When drizzling, start from the top and work your way down, letting gravity do most of the work. For the decorations, think about contrast! White glaze with green sprinkles, or green glaze with silver dragees, really make each element pop.
Ingredient Swaps: If you don’t have buttermilk, you can make your own substitute by adding 1 tablespoon of white vinegar or lemon juice to 1 cup of milk and letting it sit for 5-10 minutes. It will curdle slightly, and that’s exactly what you want! For the spices, feel free to adjust to your liking. If you love ginger, add a little more. If you’re not a fan of nutmeg, you can omit it. The goal is to make it taste like *your* perfect holiday cake.
Baking Tips: Always use an oven thermometer to ensure your oven is at the correct temperature. Ovens can be notoriously inaccurate! For the tree mold, if you notice the tips are browning too quickly, you can loosely tent the top with aluminum foil for the last part of baking. To check for doneness, a wooden skewer or toothpick inserted into the thickest part of the cake should come out clean, with no wet batter clinging to it. If it comes out with a few moist crumbs, that’s usually perfect – it means the cake is moist but not underbaked.
Glaze Variations: Don’t be afraid to experiment with the glaze! For a lemon-flavored tree, use lemon juice instead of milk for the liquid. A touch of almond extract can also add a lovely dimension. You can also make a simple royal icing for a stiffer, more decorative finish that dries hard, which is great if you want to stack candies or create more intricate designs. For a richer flavor, you can whisk in a tablespoon of melted unsalted butter into the glaze.
Storing and Reheating Tips
These edible Christmas trees are delightful fresh, but sometimes you make more than you can eat in one sitting, or you want to get a head start on holiday prep. Here’s how to keep them tasting their best:
Room Temperature: If they are fully glazed and decorated, and the glaze has set firmly, you can store them at room temperature for up to 2 days. Keep them in an airtight container or covered loosely with plastic wrap to prevent them from drying out. This is ideal for when you’ve just finished decorating and want to display them, or if you plan to serve them within a day or two.
Refrigerator Storage: For longer storage, up to 4-5 days, the refrigerator is your best bet. Place them in an airtight container. Make sure the glaze is completely set before refrigerating. The cool air can sometimes make the cake a little firmer, but it will soften up at room temperature. If you’re worried about condensation, you can place a paper towel in the bottom of the container.
Freezer Instructions: These freeze beautifully! Once the cake is completely cooled and the glaze is fully set, wrap each tree tightly in plastic wrap, followed by a layer of aluminum foil. This double layer helps prevent freezer burn. They can be stored in the freezer for up to 2-3 months. To thaw, unwrap them and let them come to room temperature on a wire rack for a few hours. This allows any condensation to dissipate, keeping the glaze looking its best.
Glaze Timing Advice: If you plan to freeze your trees, it’s often best to freeze them *un-glazed* or with a very simple dusting of powdered sugar. Then, glaze and decorate them after thawing. However, if you glaze them before freezing, make sure the glaze is completely dry and hard. Some glazes might soften slightly upon thawing, but the flavor will still be great. If you are storing them for just a day or two, glazing just before serving is always the freshest option.
Frequently Asked Questions
Final Thoughts
Honestly, making these edible Christmas trees is more than just baking a dessert; it’s about creating a little bit of holiday magic. It’s the perfect project to get the whole family involved, and the end result is so rewarding. Seeing those perfectly formed, deliciously spiced trees ready to adorn your holiday table just fills me with so much joy. They’re a testament to how simple ingredients and a little bit of festive spirit can create something truly special. If you’re looking for a show-stopping dessert that’s also surprisingly easy to pull off, I truly can’t recommend this recipe enough. It’s a hug in cake form, and it’s guaranteed to bring smiles all around. Give it a try, and I promise you won’t be disappointed! I’d love to hear how your edible Christmas trees turn out, so please share your photos and any creative twists you’ve added in the comments below. Happy baking, and Merry Christmas!