Strawberry Heaven Cake
Oh, this Strawberry Heaven Cake. Just thinking about it makes my heart do a little happy dance! It’s one of those recipes that’s become an absolute staple in my kitchen, especially when I need a guaranteed crowd-pleaser or just a little slice of sunshine on a cloudy day. I remember the first time I made it, thinking it might be a bit fussy with the swirling and the glaze, but honestly, it’s surprisingly straightforward. It has that perfect balance of sweet, slightly tangy strawberries and a tender, moist cake that just melts in your mouth. It’s not quite a Pound Cake, and it’s definitely not a simple sponge, but it has the comforting, reliable nature of both, elevated by that vibrant strawberry goodness. If you’re a fan of my popular Lemon Blueberry Loaf, you’re going to adore this one, too. It’s got that same homey feel, but with a gorgeous pink hue and a flavor that’s just… pure bliss.
What is strawberry heaven cake?
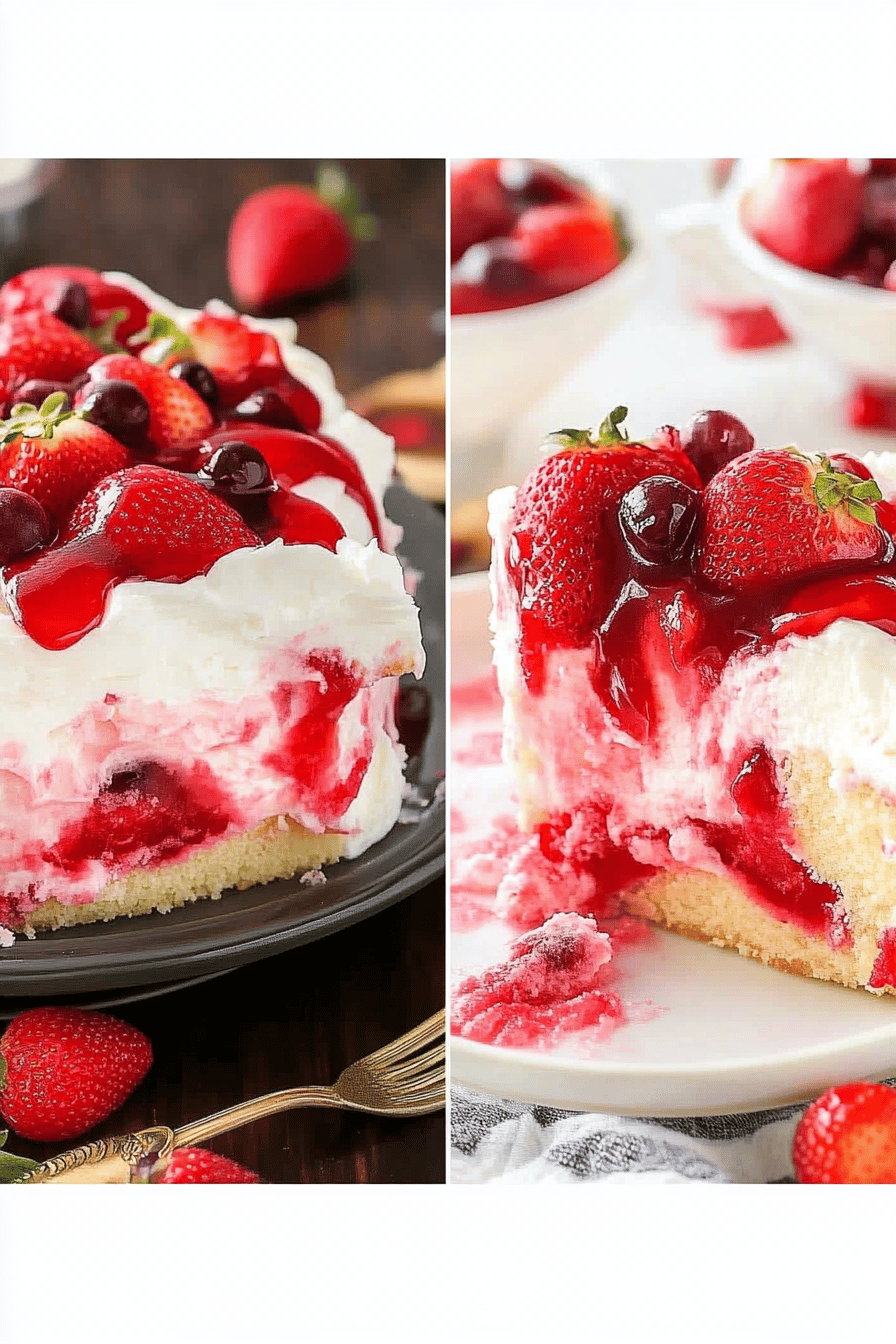
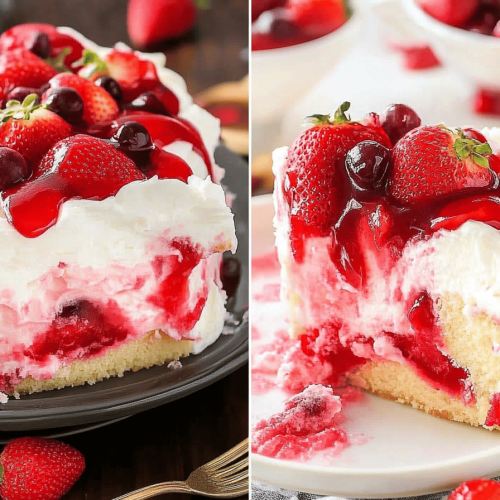
So, what exactly is this Strawberry Heaven Cake I’m raving about? Think of it as your ultimate comfort cake, but dressed up for a special occasion. It’s a wonderfully moist and tender cake, studded with real strawberries, and often features a beautiful, marbled swirl of even more strawberry goodness. The “heaven” part? That comes from the incredible aroma that fills your kitchen while it bakes, the unbelievably soft texture, and of course, the bursts of fresh, sweet strawberry flavor in every single bite. It’s not overly complicated; it’s essentially a dream of a cake that’s meant to be shared and savored. It’s the kind of cake that makes you close your eyes with the first bite and let out a little sigh of contentment. It’s a celebration in cake form, really, whether you’re celebrating a birthday or just surviving a Tuesday.
Why you’ll love this recipe?
There are so many reasons why this Strawberry Heaven Cake has earned its top spot in my recipe binder, and I’m genuinely excited to share them with you! First and foremost, the FLAVOR is just out of this world. The fresh strawberries aren’t just a fleeting hint; they infuse the entire cake with their natural sweetness and a lovely, subtle tang. When you combine that with a perfectly balanced cake base, you get something truly special. And SIMPLICITY? Don’t let the pretty swirl fool you. This cake is surprisingly easy to whip up, even on a busy weeknight. The ingredients are mostly pantry staples, which leads me to COST-EFFICIENCY. You don’t need any fancy, expensive additions to make this cake sing. Fresh strawberries are the star, and they’re pretty accessible most of the year. Beyond that, the VERSATILITY is a huge plus. I love it as a light dessert with a dollop of whipped cream, but it’s also phenomenal with a cup of coffee in the morning or as a sweet treat with afternoon tea. It holds up beautifully, making it perfect for picnics or potlucks. What I love most about this cake, though, is its ability to bring a smile to everyone’s face. It’s pure, unadulterated joy in cake form, and that’s something truly precious.
How do I make strawberry heaven cake?
Quick Overview
Making this Strawberry Heaven Cake is a delightful journey that involves a simple batter, a vibrant strawberry swirl, and a luscious glaze. You’ll whisk together your dry ingredients, combine your wet ingredients, fold them together gently, and then create that signature swirl before baking. The result is a moist, flavourful cake that looks as good as it tastes. It’s a process that’s forgiving and incredibly rewarding, perfect even if you’re just starting out in the kitchen.
Ingredients
For the Main Batter:
You’ll need 2 ½ cups all-purpose flour. I always recommend sifting your flour for the lightest texture. If you can find cake flour, even better! You’ll also need 1 ½ cups granulated sugar – this gives it that perfect sweetness without being cloying. A teaspoon of baking soda and ½ teaspoon of baking powder are essential for lift, and don’t forget a ½ teaspoon of salt to balance all those sweet flavors. For that incredible moisture, we’ll use 1 cup of unsalted butter, softened to room temperature. I like to use good quality butter; it really does make a difference. Then, 2 large eggs, also at room temperature – this helps them emulsify better. You’ll need 1 teaspoon of vanilla extract for that classic warm aroma. And for the liquid element, 1 cup of buttermilk. If you don’t have buttermilk, you can easily make your own by mixing 1 tablespoon of lemon juice or white vinegar with 1 cup of milk and letting it sit for 5-10 minutes. It works like a charm! Finally, 1 ½ cups of fresh or frozen strawberries, finely chopped. If using frozen, don’t thaw them completely; they’ll add extra moisture and a beautiful color.
For the Filling:
This is where the extra strawberry magic happens. You’ll need about 1 cup of fresh strawberries, mashed until they form a thick pulp. You can do this with a fork or a potato masher. A ¼ cup of granulated sugar is added to sweeten this mixture and help draw out more of the strawberry juices. You might also want to add a tablespoon of cornstarch here if you want a slightly thicker, more jam-like swirl, though it’s totally optional.
For the Glaze:
For that finishing touch, you’ll need 1 ½ cups of powdered sugar, sifted to avoid any lumps. Then, 2-3 tablespoons of fresh strawberry puree or juice. This is what gives the glaze its beautiful pink color and subtle strawberry flavor. If you don’t have enough strawberry juice, a little milk or even water can be used as a substitute, though it won’t be quite as flavorful. A splash of vanilla extract can also enhance the sweetness.
Step-by-Step Instructions
Step 1: Preheat & Prep Pan
First things first, let’s get your oven ready! Preheat it to 350 degrees Fahrenheit (175 degrees Celsius). You’ll want to grease and flour a 9×13 inch Baking Pan. I like to use butter for greasing and then give it a light dusting of flour, tapping out any excess. For an even easier release, you can also line the bottom of your pan with parchment paper. This step is crucial to ensure your beautiful cake doesn’t stick!
Step 2: Mix Dry Ingredients
In a large bowl, whisk together your sifted all-purpose flour, granulated sugar, baking soda, baking powder, and salt. Give it a good whisk until everything is thoroughly combined. You want to make sure the leavening agents are evenly distributed so your cake rises beautifully and consistently. The mixture should look light and fluffy.
Step 3: Mix Wet Ingredients
In a separate medium bowl, beat the softened butter until it’s creamy. Gradually add the granulated sugar and continue beating until light and fluffy. Then, add the eggs one at a time, beating well after each addition. Stir in the vanilla extract. Make sure everything is well combined and no streaks of egg yolk remain visible. This forms the base of our moist cake.
Step 4: Combine
Now, we’re going to bring the wet and dry ingredients together. Gradually add the dry ingredients to the wet ingredients, alternating with the buttermilk. Start and end with the dry ingredients. Mix on low speed or by hand until just combined. Be careful not to overmix! Overmixing can lead to a tough cake, and we definitely don’t want that. You should have a thick, smooth batter.
Step 5: Prepare Filling
While the oven preheats, let’s get that luscious strawberry filling ready. In a small bowl, combine your mashed strawberries with the ¼ cup of granulated sugar. If you’re using cornstarch, stir it in now until smooth. This mixture will be spooned and swirled into the Cake Batter, creating those gorgeous pockets of intense strawberry flavor and color. It should be thick but pourable.
Step 6: Layer & Swirl
Pour about two-thirds of your cake batter into the prepared baking pan. Dollop spoonfuls of the strawberry filling over the batter. Then, carefully pour the remaining cake batter over the top of the filling. You can use a toothpick or a knife to gently swirl the filling into the batter. Don’t over-swirl; you want distinct ribbons of strawberry, not a uniform pink mess. Aim for a beautiful marbled effect!
Step 7: Bake
Place the pan in the preheated oven. Bake for 30-35 minutes, or until a toothpick inserted into the center comes out clean. The top should be golden brown, and the cake should spring back when lightly touched. Keep an eye on it, as oven temperatures can vary.
Step 8: Cool & Glaze
Once baked, let the cake cool in the pan on a wire rack for about 15-20 minutes before inverting it onto the rack to cool completely. While the cake is cooling, prepare your glaze. In a small bowl, whisk together the sifted powdered sugar with the strawberry puree or juice until smooth and pourable. If it’s too thick, add a tiny bit more liquid; if it’s too thin, add more powdered sugar. Once the cake is completely cool, drizzle or spread the glaze evenly over the top. This glaze is simple, but it adds a lovely sweetness and a beautiful finish. I sometimes add a drop of pink food coloring if I want an extra vibrant color, but it’s not necessary!
Step 9: Slice & Serve
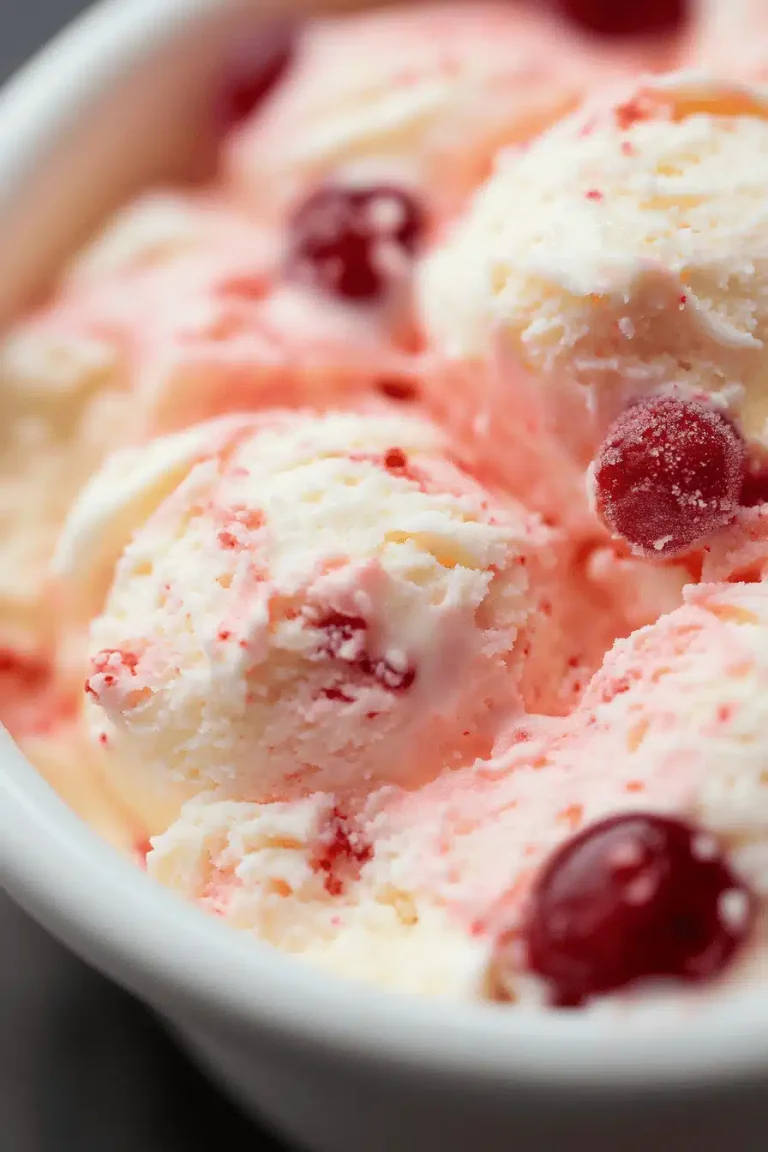
Once the glaze has set slightly, slice your Strawberry Heaven Cake into squares or rectangles. This cake is divine served slightly warm or at room temperature. It’s wonderful on its own, but I often serve it with a dollop of fresh whipped cream or a scoop of vanilla bean Ice Cream. The contrast is absolutely heavenly!
What to Serve It With
This Strawberry Heaven Cake is a star on its own, but pairing it with the right accompaniments can elevate it even further. For a lovely BREAKFAST treat, I love a warm slice with a strong cup of black coffee – the bitterness cuts through the sweetness perfectly. It also makes for a wonderful addition to a weekend brunch spread; serve it alongside fresh fruit salad and perhaps some yogurt parfaits for a vibrant and appealing display. As a DESSERT, it truly shines. A light dusting of powdered sugar can be lovely, or for something a bit more decadent, serve it with a generous dollop of freshly whipped cream, a scoop of good quality vanilla Ice Cream, or even a drizzle of raspberry coulis for an extra berry kick. It’s also incredibly comforting as a COZY SNACK, perhaps with a glass of milk or a cup of herbal tea when you need a little pick-me-up. My family’s favorite tradition is to have a slice with a small bowl of fresh strawberries on the side – it really doubles down on that delicious berry flavor we all love so much!
Top Tips for Perfecting Your Strawberry Heaven Cake
I’ve made this Strawberry Heaven Cake more times than I can count, and through those baking adventures, I’ve picked up a few tricks that I think will really help you achieve cake perfection. For the strawberries, whether you’re using fresh or frozen, chopping them finely is key for even distribution and a lovely texture within the cake. If using fresh, make sure they’re ripe and fragrant; it makes a world of difference! When it comes to MIXING the batter, my biggest advice is gentle does it. Overmixing develops the gluten in the flour, leading to a tougher cake. Once the wet and dry ingredients meet, just mix until they’re *just* combined. A few small lumps are totally fine, trust me! The SWIRL is where you can really have fun. Don’t overdo it; you want distinct ribbons of strawberry goodness, not a uniform pink mass. A gentle zig-zag motion with a knife or toothpick usually does the trick. For Ingredient Swaps, I’ve found that if you’re out of buttermilk, the DIY version (milk + acid) works beautifully. And while vanilla extract is classic, a touch of almond extract can add a sophisticated note to the cake batter if you enjoy that flavor. When it comes to BAKING, I always recommend knowing your oven. Ovens can be tricky, so use the toothpick test as your guide. If your cake seems to be browning too quickly on top before the center is cooked, you can loosely tent it with foil for the last 10-15 minutes of baking. And for the GLAZE, the key is consistency. You want it pourable but not too thin. Start with the smaller amount of liquid and add more as needed until you reach that perfect drizzling consistency. It’s better to add liquid slowly than to end up with a glaze that’s too runny!
Storing and Reheating Tips
One of the things I love most about this Strawberry Heaven Cake is how well it keeps, making it perfect for planning ahead. STORED AT ROOM TEMPERATURE, an unfrosted cake (or one with a glaze that has set) can stay fresh for about 2-3 days. I usually cover it loosely with plastic wrap or a cake dome to keep it from drying out. If you’ve glazed it, I often wait until the glaze is fully set before covering. For REFRIGERATOR STORAGE, the cake will last even longer, usually up to 5 days. Keep it in an airtight container or tightly wrapped to prevent it from absorbing any fridge odors. When you’re ready to enjoy a slice from the fridge, you can let it sit at room temperature for about 20-30 minutes to soften up, or you can gently reheat a slice in the microwave for about 10-15 seconds. For FREEZER INSTRUCTIONS, this cake freezes beautifully. Let it cool completely, then wrap it tightly in plastic wrap, followed by a layer of aluminum foil or a freezer-safe bag. It should keep well for up to 3 months. To thaw, simply remove it from the freezer and let it defrost at room temperature. If you plan to freeze a glazed cake, it’s often best to freeze it plain and add the glaze *after* thawing to prevent it from cracking or becoming too sticky.
Frequently Asked Questions
Final Thoughts
So there you have it – my beloved Strawberry Heaven Cake! It’s more than just a recipe to me; it’s a little piece of happiness that I love sharing. It’s the kind of cake that makes everyone ask for the recipe, and the best part is, it’s genuinely achievable for anyone who loves to bake. I hope you’ll give it a try and experience that pure joy I get every time I bake (and eat!) it. If you’re looking for other delightful berry-infused recipes, be sure to check out my recipe for my Raspberry Almond Scones – they’re another family favorite! I can’t wait to hear how your Strawberry Heaven Cake turns out, so please leave a comment below and share your thoughts, any variations you tried, or how quickly it disappeared at your house! Happy baking!
Strawberry Heaven Cake
Ingredients
Cake Layers
- 2.5 cups all-purpose flour
- 1.5 cups granulated sugar
- 1 tablespoon baking powder
- 0.5 teaspoon salt
- 1 cup unsalted butter, softened
- 4 large eggs
- 1 teaspoon vanilla extract
- 1 cup milk
Strawberry Filling
- 2 cups fresh strawberries, hulled and chopped
- 0.5 cup granulated sugar
- 2 tablespoons cornstarch
Cream Cheese Frosting
- 8 ounces cream cheese, softened
- 0.5 cup unsalted butter, softened
- 4 cups powdered sugar
- 1 teaspoon vanilla extract
- 2 tablespoons heavy cream
Instructions
Cake Preparation
- Preheat oven to 350°F (175°C). Grease and flour two 9-inch round cake pans.
- In a large bowl, whisk together flour, sugar, baking powder, and salt.
- Add softened butter and mix until the mixture resembles coarse crumbs.
- In a separate bowl, whisk together eggs, vanilla extract, and milk.
- Gradually add the wet ingredients to the dry ingredients, mixing until just combined. Do not overmix.
- Divide the batter evenly between the prepared cake pans.
- Bake for 30-35 minutes, or until a wooden skewer inserted into the center comes out clean.
- Let the cakes cool in the pans for 10 minutes before inverting them onto a wire rack to cool completely.
Strawberry Filling Preparation
- In a medium saucepan, combine chopped strawberries, sugar, and cornstarch. Stir to combine.
- Cook over medium heat, stirring constantly, until the mixture thickens and bubbles. This should take about 5-7 minutes.
- Remove from heat and let it cool completely.
Frosting Preparation
- In a large bowl, beat together cream cheese and softened butter until smooth and creamy.
- Gradually add powdered sugar, one cup at a time, beating well after each addition.
- Stir in vanilla extract and heavy cream until the frosting is smooth and spreadable.
Assembly
- Place one cooled cake layer on a serving plate. Spread the cooled strawberry filling evenly over the cake layer.
- Top with the second cake layer.
- Frost the entire cake with the cream cheese frosting.
- Garnish with fresh strawberries if desired. Chill before serving.