Salted Caramel Pie
Oh, where do I even begin with this salted caramel pie? It feels less like a recipe and more like a hug in dessert form. I remember the first time I tasted something like this – it was at my aunt Carol’s house years ago, and it was pure magic. The way the sweet, rich caramel met that hint of salt… I was hooked! Now, it’s a staple in my kitchen, especially when I need a showstopper that doesn’t require a full day of baking. Honestly, if you’re looking for a dessert that’s a little bit fancy but surprisingly easy to whip up, this is it. It’s like the sophisticated cousin to a classic Apple Pie, but with a gooey, irresistible caramel heart. This salted caramel pie has truly saved me on more than one occasion when unexpected guests have shown up!
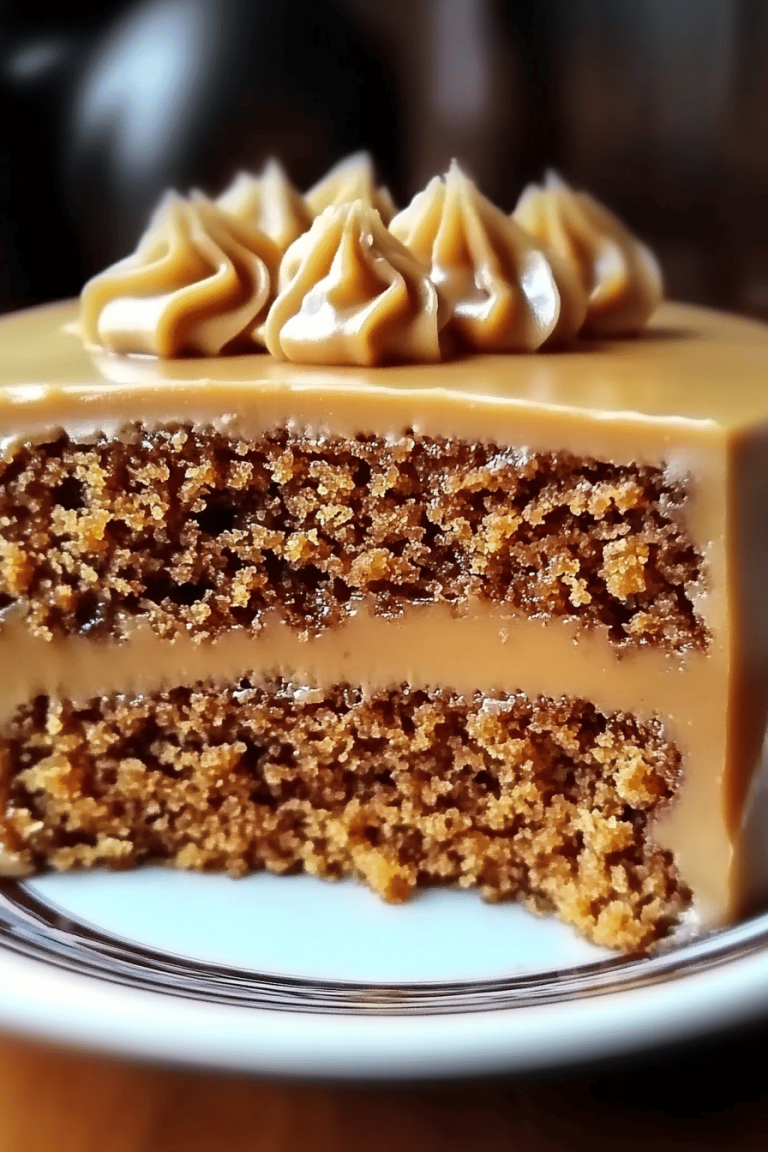
What is Salted Caramel Pie?
So, what exactly *is* this glorious creation? Think of it as a celebration of caramel! We’re talking about a flaky, buttery crust that cradles a luscious, homemade Salted Caramel filling. It’s not just caramel, though; it’s got this depth of flavor from a touch of sea salt that just elevates everything. It’s essentially a rich, smooth caramel custard, baked to perfection within a tender pie shell. My version is a bit unique because I have a secret step for the filling that makes it extra creamy and smooth – I’ll get to that! The name itself, “Salted Caramel Pie,” perfectly captures the essence: the perfect balance of sweet and salty. It’s the kind of dessert that makes people close their eyes in pure enjoyment after the first bite.
Why you’ll love this recipe?
There are so many reasons why I just adore this salted caramel pie, and I’m pretty sure you will too! First and foremost, the flavor is out of this world. That deep, buttery caramel flavor, with those little pops of sea salt cutting through the richness? It’s addictive. Seriously, I’ve seen people go back for seconds (and sometimes thirds!). Beyond the taste, what I really love is the simplicity. For something that tastes so incredibly decadent, it’s surprisingly manageable for even novice bakers. You don’t need any fancy equipment, just a few basic kitchen tools. Plus, the ingredients are pretty budget-friendly, which is always a win in my book! You likely have most of them in your pantry already. It’s also wonderfully versatile. While it’s divine on its own, it’s also spectacular served with a dollop of whipped cream or a scoop of vanilla bean Ice Cream. It’s perfect for holidays, birthdays, or just a “treat yourself” kind of Tuesday. Honestly, it’s one of those recipes I can always count on, whether I’m craving something sweet late at night or need to impress at a potluck. It never disappoints!
How do I make Salted Caramel Pie?
Quick Overview
Making this Salted Caramel pie is a straightforward process that breaks down into a few key stages: preparing a killer pie crust (or using a store-bought one in a pinch!), creating that dreamy, salty-sweet caramel filling, baking it until it’s just set, and then letting it cool to perfection. The magic really happens in the caramel-making, where we coax simple sugar into a rich, glorious sauce. Don’t be intimidated by caramel; it just needs a little patience and attention. My method ensures a super smooth, creamy filling every time, no grainy texture in sight!
Ingredients
For the Main Batter:
- 1 ½ cups all-purpose flour
- ½ teaspoon salt
- ½ cup (1 stick) unsalted butter, very cold, cut into cubes
- 4-6 tablespoons ice water
For the crust, I always go for homemade because it really does make a difference. Use really cold butter and ice water; that’s the key to a flaky crust. If you’re in a rush, a good quality store-bought crust will work too, no judgment here!
For the Filling:
- 1 cup granulated sugar
- ¼ cup water
- ½ cup heavy cream, warmed
- 4 tablespoons unsalted butter, cut into pieces
- 1 teaspoon flaky sea salt (plus more for topping)
- 3 large eggs
- ½ cup half-and-half or whole milk
- 1 teaspoon vanilla extract
This is where the magic happens! The combination of sugar cooked to a deep amber, rich cream, butter, and that essential sea salt creates the most incredible flavor. Warming the cream helps prevent the caramel from seizing up, and using good quality sea salt makes those salty notes really sing. The eggs and half-and-half are what give it that custard-like texture that sets up beautifully.
For the Glaze (Optional, but recommended!):
- ¼ cup powdered sugar
- 1-2 tablespoons milk or cream
- A pinch of sea salt
This is a simple drizzle that adds an extra touch of sweetness and visual appeal. It’s totally optional, but I think it really finishes the pie off perfectly.
Step-by-Step Instructions
Step 1: Preheat & Prep Pan
First things first, preheat your oven to 375°F (190°C). Get a 9-inch pie plate ready. If you’re making your own crust, you’ll want to have that prepared and fitted into the pie plate. I usually do this the day before or at least a few hours ahead of time. If you’re using a store-bought crust, unroll it and gently press it into your pie plate. You can crimp the edges however you like – I’m a fan of a simple fork crimp. Don’t blind bake the crust for this recipe; we’ll bake it along with the filling.
Step 2: Mix Dry Ingredients (for Crust)
In a medium bowl, whisk together the 1 ½ cups of all-purpose flour and ½ teaspoon of salt. This ensures the salt is evenly distributed throughout the dough, which is important for flavor. Make sure your butter is really cold – I mean, fridge-cold and cut into small cubes. This is what creates those flaky layers when it melts in the oven.
Step 3: Mix Wet Ingredients (for Crust)
Cut the cold butter into the flour mixture using a pastry blender, your fingertips, or a food processor until it resembles coarse crumbs with some pea-sized pieces of butter still visible. This is crucial for flakiness! Gradually add the ice water, 1 tablespoon at a time, mixing until the dough just comes together. Be careful not to overmix; we want to keep those butter pockets intact. You might not need all 6 tablespoons of water. The dough should be shaggy but hold together when you squeeze it.
Step 4: Combine (for Crust)
Gather the dough into a ball, flatten it into a disc, wrap it tightly in plastic wrap, and refrigerate for at least 30 minutes. This chilling step is super important; it lets the gluten relax and makes the dough easier to roll out, plus it keeps the butter firm. Once chilled, roll out the dough on a lightly floured surface to about 12 inches in diameter. Carefully transfer it to your 9-inch pie plate, gently pressing it into the bottom and up the sides. Trim any excess dough and crimp the edges. You can also prick the bottom of the crust a few times with a fork if you’re worried about puffing, though it’s usually not too much of an issue with this recipe.
Step 5: Prepare Filling
Now for the star of the show: the Salted Caramel filling! In a medium saucepan (a heavy-bottomed one is best!), combine the 1 cup granulated sugar and ¼ cup water. Stir it just until the sugar is moistened. Cook over medium heat, swirling the pan occasionally but resisting the urge to stir with a spoon. You want the sugar to dissolve and then start to bubble and turn an amber color. This can take anywhere from 5 to 10 minutes. Keep a close eye on it; sugar can go from perfect to burnt in seconds! Once it reaches a nice amber hue, immediately and carefully (it will steam up!) pour in the warmed heavy cream. The mixture will bubble up vigorously. Whisk gently until smooth. Stir in the 4 tablespoons of butter and 1 teaspoon of flaky sea salt until the butter is melted and everything is well combined. Remove from heat and let it cool slightly for about 5-10 minutes.
In a separate bowl, whisk together the 3 large eggs, ½ cup half-and-half (or milk), and 1 teaspoon vanilla extract. Once the caramel mixture has cooled slightly (you don’t want to scramble the eggs!), slowly whisk the egg mixture into the caramel. This is my secret for a super smooth, creamy filling. Make sure it’s all incorporated beautifully.
Step 6: Layer & Swirl
Pour the prepared salted caramel filling into the unbaked pie crust. The filling should come up almost to the top of the crust edge. If you’re adding a sprinkle of extra flaky sea salt on top, now’s the time to do it. I like to scatter it artfully over the surface just before baking.
Step 7: Bake
Carefully place the pie in the preheated oven. Bake for 40-50 minutes, or until the edges of the filling are set and the center is just slightly jiggly. A knife inserted near the center should come out mostly clean, but you want a little bit of wobble. If the crust edges start to brown too quickly, you can loosely tent them with aluminum foil. Once baked, remove the pie from the oven and place it on a wire rack to cool completely. This is a crucial step for the filling to set properly.
Step 8: Cool & Glaze
Let the pie cool at room temperature for at least 2-3 hours. I know, it’s the hardest part! But this allows the filling to firm up. If you can’t resist, you can pop it in the fridge for an hour to speed things up. While the pie is cooling or once it’s fully cooled, you can make the optional glaze. In a small bowl, whisk together ¼ cup powdered sugar, 1-2 tablespoons of milk or cream (add a little at a time until you get your desired drizzling consistency), and a tiny pinch of sea salt. Drizzle this over the top of the cooled pie. It adds a lovely touch!
Step 9: Slice & Serve
Once the pie is completely cool and the glaze has set (if you used it), it’s time to slice! Use a sharp knife, wiping it clean between each slice for the neatest cuts. Serve at room temperature or slightly chilled. It’s absolutely divine on its own, but a dollop of lightly sweetened whipped cream or a scoop of good vanilla ice cream is pure heaven. Enjoy every single bite!
What to Serve It With
This salted caramel pie is truly a star on its own, but it also pairs beautifully with so many things! For breakfast, imagine a thin slice alongside a rich, dark roast coffee. The sweetness of the pie is a wonderful contrast to the bitterness of the coffee, and it feels like such a treat to start the day that way. For a more elegant brunch setting, I love to serve it with a small spoonful of crème fraîche or a dollop of Chantilly cream. A crisp sparkling wine or a light rosé also complements the caramel notes beautifully. As a dessert, it’s a no-brainer with vanilla bean ice cream, of course, or a strong espresso to cut through the richness. For those cozy snack moments, sometimes I just have a small sliver with a glass of milk – it’s pure comfort! My kids also love it with a sprinkle of chocolate shavings on top. Honestly, any time you have a craving for something sweet, this pie is the answer.
Top Tips for Perfecting Your Salted Caramel Pie
Over the years, I’ve picked up a few tricks for making this salted caramel pie absolutely perfect every time. Let’s talk about the caramel itself. The biggest thing is to resist stirring it with a spoon once the sugar starts to cook. Swirling the pan is your best friend here! It helps the sugar cook evenly without crystallizing. If it does start to crystallize, a tiny bit of lemon juice or corn syrup can sometimes help, but it’s best to avoid it by swirling gently. For the filling’s texture, make sure your cream and butter are ready to go when the sugar reaches that amber stage. Adding them quickly stops the cooking process and emulsifies beautifully. When you’re tempering the eggs, whisk them gently into the caramel *after* the caramel has cooled slightly. Pouring hot caramel into raw eggs is a surefire way to get scrambled eggs, and nobody wants that! Another thing I learned is about the salt. Don’t be afraid of the flaky sea salt. It’s not there to make it overtly salty, but to enhance the caramel’s sweetness and add a delightful contrast. I’ve tested this with finer sea salt, and while it works, the flaky kind gives you those little bursts of flavor that are so satisfying. For the crust, always use cold ingredients. I mean, really cold butter and ice water. And don’t overwork the dough! The less you handle it, the flakier it will be. If your dough gets too warm while you’re rolling it out, just pop it back in the fridge for a bit. It’s better to be patient than to end up with a tough crust. Lastly, for baking, keep an eye on it. Ovens can be so different! You want the filling to be set around the edges but still have a slight wobble in the very center. It will continue to set as it cools, which is exactly what we want for that luscious texture.
Storing and Reheating Tips
Storing this delicious salted caramel pie is pretty straightforward, and thankfully, it holds up well! If you have any leftovers (which is rare at my house!), you can keep it covered at room temperature for up to two days. I usually just cover it loosely with plastic wrap or aluminum foil, or pop it into a pie carrier. Make sure it’s completely cooled before covering it. For longer storage, the refrigerator is your best friend. Tightly cover the pie with plastic wrap, pressing it gently against the surface of the filling to prevent it from drying out, and then add a layer of foil. It will keep well in the fridge for up to 4-5 days. The texture might firm up a bit more in the fridge, which is totally fine. If you want to freeze it, I recommend doing so before glazing. Wrap the cooled, un-glazed pie very tightly in a double layer of plastic wrap, followed by a layer of heavy-duty aluminum foil. It can stay in the freezer for up to 2-3 months. To thaw, remove it from the freezer and let it thaw completely at room temperature, or overnight in the refrigerator. If you froze it, you can add the glaze once it’s fully thawed. For reheating, I honestly find it best served at room temperature or slightly chilled. If you do want it warm, a brief stint in a low oven (around 300°F or 150°C) for about 10-15 minutes should do the trick, but be careful not to overheat it, or the filling can become too soft.
Frequently Asked Questions
Final Thoughts
So there you have it – my go-to recipe for the most amazing salted caramel pie. It’s a dessert that truly captures that perfect balance of sweet, rich, and salty that we all crave. I hope you feel inspired to give it a try, whether it’s for a special occasion or just because you deserve a treat. Remember, don’t be afraid of the caramel-making process; a little patience goes a long way, and the result is so worth it. This salted caramel pie is a recipe I come back to time and time again because it never fails to impress and always brings a smile to people’s faces. If you love this recipe, you might also enjoy my Brown Butter Pecan Pie or my Classic Chocolate Cream Pie – they’re other family favorites! I can’t wait to hear how your salted caramel pie turns out. Please leave a comment below with your thoughts, or share any of your own special twists on this recipe! Happy baking!

Salted Caramel Pie
Ingredients
For the Crust
- 200 grams graham cracker crumbs
- 113 grams unsalted butter melted
- 2 tablespoons granulated sugar
For the Caramel Filling
- 1 can sweetened condensed milk 14 ounce
- 170 grams unsalted butter cubed
- 150 grams brown sugar packed
- 1 teaspoon vanilla extract
- 0.5 teaspoon sea salt or to taste
For the Topping (Optional)
- 1 cup whipped cream
- 1 tablespoon caramel sauce
- 0.5 teaspoon flaky sea salt
Instructions
Preparation Steps
- Preheat oven to 350°F (175°C).
- In a medium bowl, combine graham cracker crumbs, melted butter, and granulated sugar. Mix until well combined. Press the mixture firmly into the bottom and up the sides of a 9-inch pie plate.
- Bake the crust for 8-10 minutes, or until lightly golden. Let cool completely.
- While the crust cools, prepare the caramel filling. In a medium saucepan, combine sweetened condensed milk, cubed butter, and brown sugar. Cook over medium heat, stirring constantly, until the mixture thickens and turns a deep caramel color, about 10-15 minutes. Be careful not to burn it.
- Remove from heat and stir in the vanilla extract and sea salt.
- Pour the warm caramel filling into the cooled pie crust. Smooth the top with a spatula.
- Chill the pie in the refrigerator for at least 4 hours, or until firm. This can also be done overnight.
- Once chilled, top with whipped cream, drizzle with caramel sauce, and sprinkle with flaky sea salt before serving, if desired.