Reese’s peanut butter cookie dough
There’s something about the way the kitchen smells when I whip up a tray of these Reese’s Peanut Butter Cookie Dough bars that instantly slows down the world. I can almost hear my grandma’s voice reminding me to savor the moment while the chocolate glazes melt into glossy ribbons. This recipe is a cozy, indulgent riff on classic cookie dough—but safe to eat, no raw eggs required, and endlessly adaptable. It’s the kind of treat I reach for on busy weeknights, when a quick dessert somehow feels like a warm hug. You’ll love how the peanut butter and chocolate mingle with a chewy, cookie-dough texture, and I’d bet you’ll find yourself reaching for a second piece before you know it. If you’ve ever compared a homemade brownie to a store-bought square, you know the joy of something you can customize with your own favorite toppings—and this Reese’s peanut butter cookie dough recipe is the perfect canvas for that. I’ve got a little trick I always do: I heat-treat the flour so the dough stays silky and safe, and I chill the dough layers so the bars slice like a dream. Trust me on this one…
What is Reese’s Peanut Butter Cookie dough?
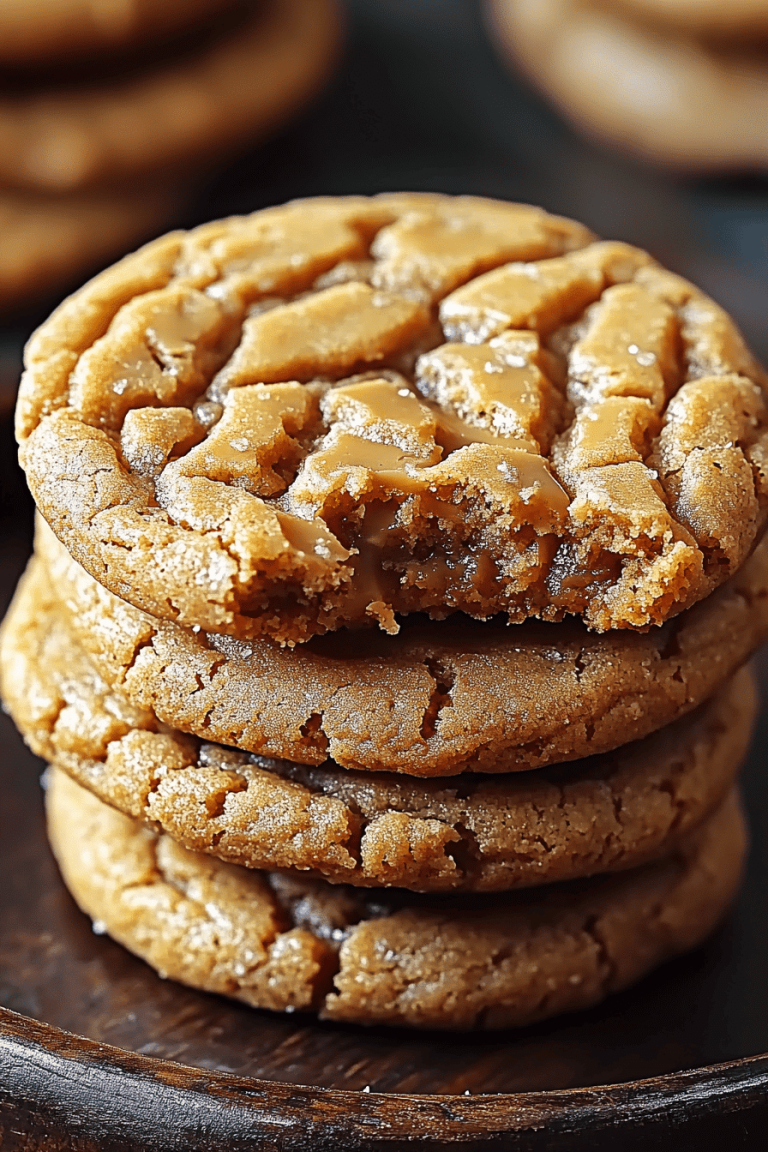
Think of Reese’s peanut butter cookie dough as a grown-up, elegant take on edible cookie dough—without the eggs or raw worry, with a spontaneous bite of chocolate and peanut butter. It’s essentially a chewy, butter-and-peanut-butter-forward dough that’s studded with chopped Reese’s Peanut Butter Cups or chunks, then baked into bars or cut into cookies with a glossy chocolate glaze. The name comes from the irresistible Reese’s candy cups that melt into the mix, creating that familiar, irresistible peanut butter and chocolate flavor combination we all crave. It’s a little dessert, a little snack, and a lot of comforting nostalgia all rolled into one. I love the way the dough stays soft and fudgy in the middle, with a crisp edge that’s perfect for slicing. And yes, you can absolutely tailor it to your pantry—swap in almond butter for a nuttier twist, or use a gluten-free flour blend for a lighter, crumbly finish. It’s basically a friendly blank canvas that wears a peanut butter hat.
Why you’ll love this recipe?
What I love most about this Reese’s Peanut Butter cookie dough is how forgiving it is—yet it tastes like a treasured bakery treat. It’s a lifesaver on busy nights, and my family gobbles it up faster than I can plate it. Here are a few reasons this recipe earns a permanent spot on my baking rack:
- Flavor: The peanut butter glaze and the chocolate drizzle bring out the best in every bite. The balance of salty, sweet, and a touch of
- Simplicity: The dough comes together in one bowl, no eggs, no fuss. It’s a one-pan moment that’s
- Cost-efficiency: You’re basically using pantry staples and a few candy-bar add-ins, which makes these bars a smart pick for entertaining without blowing the budget.
- Versatility: This recipe plays nicely with mix-ins—crushed pretzels for a salty crunch, crushed cookies for texture, or a splash of espresso powder to deepen the chocolatey notes. It also scales up or down with ease for a bake sale or a weeknight snack.
What’s extra lovely is the way the dough stays soft after chilling. My kids actually ask for seconds, and I catch myself sneaking a corner bite while the glaze sets. It’s the kind of treat that feels special enough for guests but simple enough to make for a family movie night. And if you’ve got a chocolate lover in the house, you’ll hear shouts of delight the moment the pan hits the counter. This recipe is for all the cozy kitchen moments—the ones where everyone lingers at the table, trading stories and crumbs.
How to Make Reese’s peanut butter cookie dough
Quick Overview
You’ll start with a rich, chewy cookie dough base, then dollop a Peanut Butter filling in swirls, and top it off with a glossy chocolate glaze. The process is classic bar-baking: mix the dough, press it into a pan, add the peanut butter swirls, swirl with a knife, bake until just set, and finish with a shiny chocolate finish. It’s a simple, make-ahead dessert that rewards you with slices that look as pretty as they taste. The trick is to keep the dough moist but not greasy, chill the layers to hold their shape, and drizzle the glaze right before serving for that clean, glossy finish. You’ll notice how the cookie dough develops a delicate chew and the peanut butter ribbon stays creamy and bright against the chocolate. It’s the kind of treat that’s better the moment you slice it, but still keeps well in the fridge for a couple of days.
Ingredients
For the Main Batter:
- 1 cup heat-treated all-purpose flour (see note on flour safety below) or 1 cup gluten-free flour blend
- 1/2 cup unsalted butter, softened
- 1/2 cup Creamy Peanut Butter
- 1/2 cup light brown sugar, packed
- 1/4 cup granulated sugar (optional, for a crisper edge)
- 1 teaspoon vanilla extract
- 1/4 teaspoon fine salt
- 2–3 tablespoons milk or cream, as needed
- 1 cup mini Reese’s Peanut Butter Cups, chopped (plus extra for sprinkling on top, if you like)
For the Filling:
- 1/2 cup creamy peanut butter
- 2 tablespoons powdered sugar
- 1 tablespoon light corn syrup or honey (to loosen)
- Pinch of salt
- 1 teaspoon vanilla (optional)
For the Glaze:
- 1/2 cup semisweet chocolate chips
- 1 tablespoon butter or coconut oil
- Optional pinch of flaky sea salt or crushed peanuts for crunch
Step-by-Step Instructions
Step 1: Preheat & Prep Pan
Heat your oven to 350°F (175°C). Line an 8×8-inch square pan with parchment paper, leaving overhang for easy removal. I like to spray a touch of nonstick spray on the parchment to keep everything tidy. This is where the magic begins, so give the pan a quick wipe and a moment to breathe while your ingredients gather on the counter. The scent of vanilla in the air while the pan waits is a small joy you’ll appreciate later.
Step 2: Mix Dry Ingredients
In a bowl, whisk the heat-treated flour (or gluten-free blend) with salt. If you’re using gluten-free flour, you might want to use a blend that includes a bit of xanthan gum to keep the dough cohesive. I’ve learned that a quick whisk helps distribute any clumps and ensures an even bake. Set this aside for a moment while you cream the butter and sugars.
Step 3: Mix Wet Ingredients
In another bowl, beat the softened butter with the peanut butter and brown sugar until creamy and pale. The mixture should look like a thick, glossy paste—the kind that makes your spatula stand up straight. Beat in the vanilla and a pinch of salt. If the mixture looks a touch oily, that’s okay; you’ll balance it with the dry ingredients. If you’re teaching little helpers, this is the moment to let them press the buttons on the mixer and smell that peanutty aroma rise.
Step 4: Combine
Fold the dry ingredients into the wet, adding milk or cream a teaspoon at a time until the dough comes together but still feels thick and holds its shape. Don’t overmix; you want a soft, cohesive dough that’s easy to press into the pan. Stir in the chopped Reese’s cups so every bite has a little chocolatey punch. The dough will look invitingly speckled with tiny candy bits—a promise of what’s to come.
Step 5: Prepare Filling
In a small bowl, blend the peanut butter with powdered sugar, corn syrup, salt, and vanilla until silky. It should be thick but spreadable. If it’s too stiff, add a pinch more corn syrup or a touch of milk. You want a filling that pockets into the top layer with a soft, creamy feel, not a runny mess. Taste and adjust a touch of salt or sugar if you think it needs it; this is where personal preference comes into play and I always recommend a quick sample taste-test.
Step 6: Layer & Swirl
Press about three-quarters of the main dough into the prepared pan in an even layer. It should be about 1/4 inch thick. Drop spoonfuls of the filling over the dough, then swirl with a knife to create ribbons of peanut butter that peek through the surface. Scatter a handful of chopped Reese’s pieces across the top for extra texture and color. Dollop the remaining cookie dough on top and gently press to cover the filling. Use a spatula or the back of a spoon to smooth the surface so you’ve got a neat, uniform edge. The marbling effect looks gorgeous and tastes even better—the peanut butter swirl peeks through the chocolatey cookie dough like a treasure map, guiding you to flavor heaven.
Step 7: Bake
Bake for 22–28 minutes, until the edges are set and the center just looks slightly soft but not shiny or wet. If you insert a toothpick into the center, it should come out with a few moist crumbs. This is where patience pays off—every oven is a little different, so start checking at the 22-minute mark. If you’ve got an oven with hot spots, rotate the pan halfway through. Let the bars cool completely in the pan on a rack; they’ll firm up as they rest, and that makes slicing a breeze.
Step 8: Cool & Glaze
Melt the chocolate chips with the butter until glossy and smooth. I like to stir slowly and watch as the color deepens into that rich, indulgent shade that makes you want to bite the pan. Drizzle the glaze over the cooled bars and sprinkle with a pinch of flaky salt if you’re into that extra-savory finish. Let the glaze set a few minutes before you slice, or you’ll end up with chocolatey fingerprints all over your kitchen. The glaze adds a sheen that makes the bars feel showroom-worthy even though you baked them in your own kitchen.
Step 9: Slice & Serve
Lift the bars out of the pan using the parchment overhang, then slice into neat squares. The first bite should deliver a chewy, caramel-kissed bite with pockets of peanut butter and crunchy chocolate candy. Serve with a glass of cold milk or a hot cup of coffee; both pair beautifully with the richness. If you’re sharing, I find these cut into tidy squares are perfect for plates at gatherings—the kind of treat that invites conversation as much as indulgence. Leftovers keep well in an airtight container in the fridge for up to 4 days, though I’ve never seen them last that long in our house.
What to Serve It With
This is one of those recipes that feels special no matter how you present it. Here are some ideas for different occasions, all inspired by family favorites and a few modern twists:
For Breakfast: A tall glass of cold milk or a cup of strong coffee, plus a delicate dusting of powdered sugar on top if you’re feeling fancy. I love serving a small bar with fruit and yogurt for a more balanced morning treat.
For Brunch: Slice into elegant little bars and arrange on a platter with fresh berries and whipped cream. A light, creamy latte or an iced mocha would pair nicely with the chocolate-peanut butter notes.
As Dessert: Warm a bar briefly in the microwave for a gooey center and serve with vanilla ice cream. A drizzle of extra glaze or a scattering of chopped peanuts elevates the plate for guests who expect a little theater on the dessert table.
For Cozy Snacks: Keep a container in the fridge and break out a bar with a mug of tea or hot cocoa after a long day. It’s a “soft landing” treat that feels like a mini celebration without going overboard.
My family has a soft spot for these with coffee after dinner; sometimes we pair them with a small plate of strawberries to cut the richness. The chocolate-peanut butter harmony is a nostalgic nod to old-school candy bar dreams, but the homemade touch makes them feel special and uniquely yours.
Top Tips for Perfecting Your Reese’s peanut butter cookie dough
These practical, friend-tested tips have saved countless batches from weekend baking disasters and turned mealtime into a little science experiment that always pays off.
Flour & Texture: If you’re using heat-treated flour, you’ll notice the dough stays light and silky. If you opt for almond flour or a gluten-free blend, you may need a splash more milk to bring the dough together. The goal is a dough that’s cohesive but still soft and sliceable, not crumbly.
Mixing & Overmixing: Overmixing can make cookies tough; mix until the ingredients are just combined, then fold in the candy pieces. A few confident folds beat a long, tiresome whisking session every time.
Swirl Customization: When you swirl the peanut butter filling, aim for an even distribution but keep some pockets of pure peanut butter for dramatic swirls. You can also layer dollops of melted peanut butter on top of the base dough and swirl in with a skewer for a more marbled look.
Ingredient Swaps: Swap in almond butter for a different nutty aroma, or try a dark chocolate glaze for a deeper finish. You can also swap half of the flour for finely chopped toasted oats for a heartier bite. If you’re using gluten-free flour, add a touch more vanilla to keep flavor vibrant.
Baking Tips: Oven temperatures vary, so start checking at 22 minutes. If the edges turn brown before the center is set, cover the pan loosely with foil and finish baking. Don’t rush cooling; allow the glaze to set fully for clean slicing.
Glaze Variations: If you want a punchier chocolate flavor, mix in a teaspoon of espresso powder with the glaze. For a white chocolate twist, drizzle with melted white chocolate and a pinch of sea salt for contrast. The glaze can set quickly, so drizzle and move fast for a smooth finish.
Lessons learned over the years? I’ve found that keeping the dough a touch on the soft side helps the bars slice cleanly after chilling, and a light cooling rack makes the chocolate glaze glisten without cracking. It’s a small, magical detail that makes a big difference when you’re serving to guests or snapping photos for a blog post. This is the kind of recipe that rewards patience and a little experimentation, and it’s always a hit with family and friends who crave that classic Reese’s combo but want something a little more comforting than a candy bar.
Storing and Reheating Tips
Proper storage keeps the chocolate glaze glossy and the cookie dough soft.
Room Temperature: Store in an airtight container for up to 2 days. If you live in a warm climate, refrigerate to prevent the glaze from becoming tacky. Allow bars to come to room temperature for about 15 minutes before serving for the best texture.
Refrigerator Storage: In a sealed container, these bars stay nice for up to 5 days. Layer with parchment between layers to prevent sticking. The cool environment helps the bars keep their shape and the flavors meld together.
Freezer Instructions: Freeze individual squares wrapped tightly in plastic wrap and then placed in a freezer bag for up to 2 months. Thaw in the fridge or at room temperature for best texture. The flavor remains bright, and a slight chill can accentuate the rich chocolate and peanut butter pairing.
Glaze Timing Advice: If you’re freezing the bars, apply the glaze after thawing and bring back to room temp; the glaze adheres best when the surface is not cold from the fridge. If you’re serving soon, you can glaze immediately after cooling for a crisp, polished finish.
I’ve found that this flexible approach makes it easy to plan ahead for a party or a last-minute dessert craving. The bars store beautifully, and the flavors evolve a bit after a night in the fridge, which I’ve learned is a sign of a truly good recipe—ones that taste better the more you revisit them.
Frequently Asked Questions
Final Thoughts
If you’re looking for a recipe that feels like a warm invitation—something you can make to celebrate a small moment or a big milestone—this Reese’s peanut butter cookie dough is it. It’s a treat that rewards patient technique (don’t rush the bake, give the glaze a moment to set) while still delivering quick gratification. The peanut butter and chocolate union is timeless, and the way you can tailor it to your pantry and your guests’ preferences makes it instantly repeatable. My friends say this is their favorite “coffee chat” dessert because it travels well, looks elegant on a plate, and tastes like a hug in bar form. I’ve made it countless times and it never fails to bring a grin. If you try it, drop a comment with your favorite mix-ins or glaze tweak—I’d love to hear what you did differently. Happy baking, friend, and may your kitchen always smell like cocoa and peanut butter!
Reese's Peanut Butter Cookie Dough Dip
Ingredients
Main Ingredients
- 0.5 cup unsalted butter
- 0.5 cup light brown sugar packed
- 0.25 cup creamy peanut butter
- 8 oz cream cheese softened
- 0.75 cup powdered sugar
- 0.5 cup semi sweet mini chocolate chips
- 8 ounce Reese's peanut butter cup Minis or about 1.5 cups chopped Reese's cups
Instructions
Preparation Steps
- In a small saucepan over medium heat, melt butter and whisk in the brown sugar and peanut butter. Heat until sugar dissolves (about one minute). Remove from heat immediately and allow to cool to room temperature (very important).
- In a large mixing bowl, beat cream cheese with powdered sugar until creamy (about 3-4 minutes, don't skimp on the beating time). On low speed, add in the cooled brown sugar mixture. Mix until combined.
- Fold in the mini chocolate chips and mini Reese's cups. Serve immediately or store in the refrigerator until ready to serve. Enjoy with pretzels, animal crackers, and graham sticks.