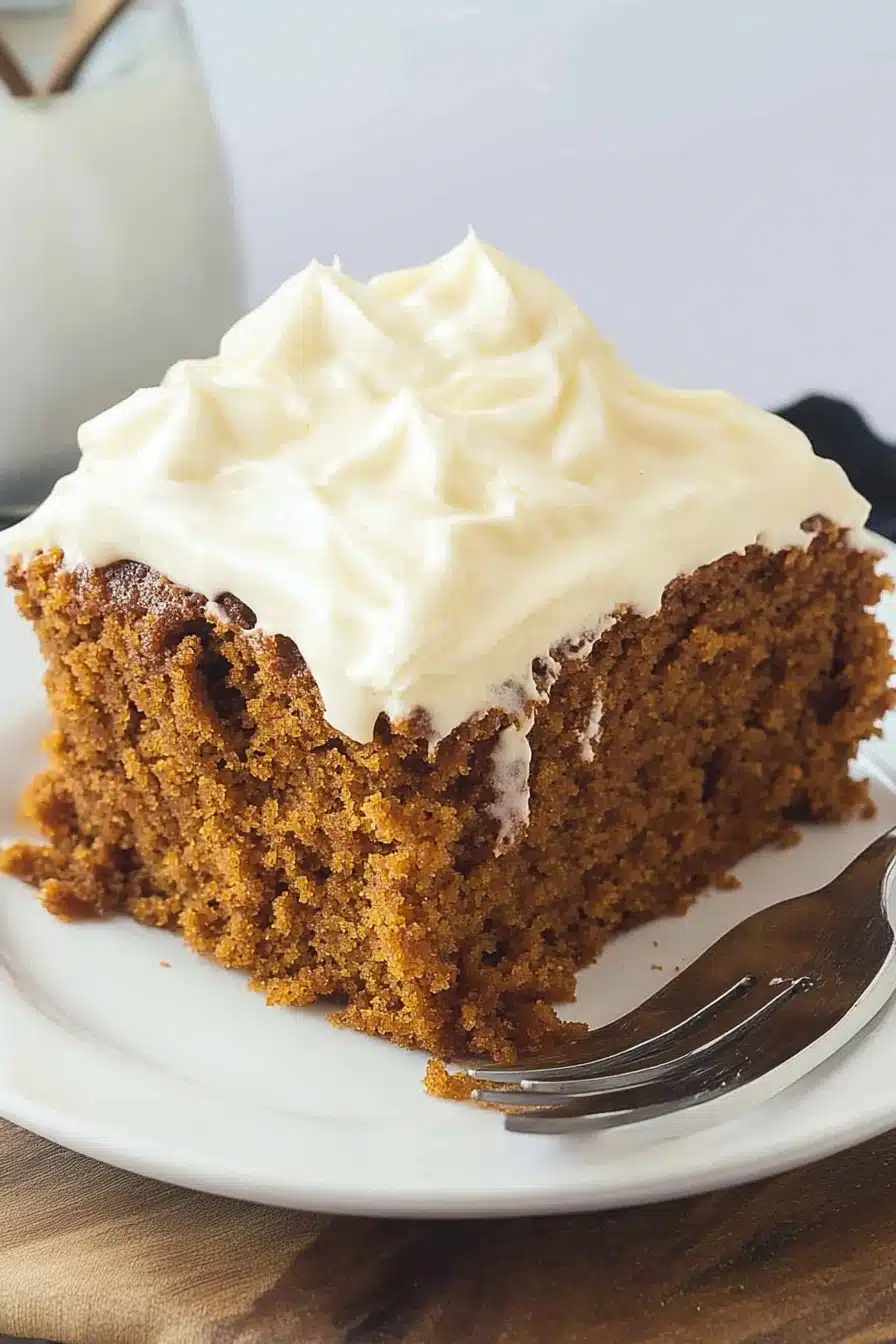
Pumpkin Earthquake Cake a Simple Slice
Oh, I am SO excited to share this one with you guys! You know those recipes that just feel like a warm hug in a pan? This pumpkin earthquake cake is exactly that. It’s the kind of dessert that makes your kitchen smell absolutely divine, and it’s honestly surprisingly easy to whip up, even on a weeknight when you’re feeling that sweet craving hit hard. I remember the first time I made it; I was a little intimidated by the name, thinking “earthquake cake” sounded complicated, but it’s just this fun, rustic swirl that makes it so special. It’s like a cross between a super moist pumpkin bread and a decadent Chocolate Cake, all swirled together in the most beautiful, imperfect way. If you’ve ever loved a gooey blondie or a rich chocolate lava cake, you’re going to fall head over heels for this pumpkin earthquake cake. It’s truly a game-changer for fall baking, or really, any time you want something truly comforting.
What is a pumpkin earthquake cake?
So, what exactly *is* a pumpkin earthquake cake? Don’t let the name scare you! It’s essentially a dense, incredibly moist pumpkin cake batter that’s swirled with a rich, gooey chocolate filling and a sweet Cream Cheese mixture, creating those “earthquake” cracks and pockets of deliciousness as it bakes. The beauty of it is that it’s meant to be a little messy and imperfect. That’s where all the flavor is hiding! It’s not a neat, frosted layer cake; it’s rustic, comforting, and bursting with autumnal flavors. Think of it as the ultimate mashup of your favorite cozy fall spices, rich chocolate, and creamy cheesecake, all baked into one glorious pan. It’s the kind of dessert that doesn’t require perfect piping skills or fussy decorations – its charm is in its wonderfully chaotic, yet utterly delicious, appearance.
Why you’ll love this recipe?
What are the reasons why I love this pumpkin earthquake cake?flavor is just out of this world. The warm spices from the pumpkin batter – cinnamon, nutmeg, ginger – pair perfectly with the deep, fudgy chocolate pockets and the subtle tang of the cream cheese. It’s a symphony of fall flavors that just sings. Then there’s the simplicity. I know I keep saying this, but it’s true! You’re basically mixing a few batters and swirling them together. No fancy techniques required. It’s the kind of dessert that impresses without stressing you out. Plus, it’s super cost-effectiveWhat I love about this is its simplicity. Most of the ingredients are pantry staples, and even the fresh ones like pumpkin and cream cheese are usually quiteversatility. You can serve it warm with a scoop of vanilla Ice Cream for a truly decadent dessert, or enjoy it at room temperature with a cup of coffee for a satisfying breakfast treat. It’s even fantastic as a brunch centerpiece! I’ve compared it to our family-favorite chocolate lava cake, and while both are amazing, this pumpkin earthquake cake brings that comforting spice element that just screams autumn. It’s a recipe that always gets rave reviews, and honestly, it’s the one I reach for when I need a guaranteed crowd-pleaser.
How to Make Pumpkin Earthquake Cake
Quick Overview
Making this pumpkin earthquake cake is surprisingly straightforward. You’ll prepare a simple pumpkin cake batter, then dollop and swirl in a luscious chocolate and Cream Cheese Filling. The magic happens in the oven as the different layers bake together, creating those signature “earthquake” cracks and gooey pockets. It’s a forgiving recipe, meaning even if your swirls aren’t perfect, the end result will be stunning and delicious. This method focuses on layering flavors and textures for maximum impact with minimal fuss, making it perfect for bakers of all levels.
Ingredients
For the Main Batter:
You’ll need 15 ounces of pumpkin puree (make sure it’s 100% pumpkin, not pie filling!), about 1 ¾ cups. Always go for the pure stuff; it gives the best texture and flavor. Make sure it’s at room temperature if you can, it blends better. I also like to use a good quality all-purpose flour, around 2 cups. For richness and moisture, we’ll use ½ cup of unsalted butter, melted and slightly cooled. For sweetness, about 1 cup of granulated sugar and then ½ cup of packed light brown sugar, which adds that lovely caramel note. Eggs are crucial for binding and structure, so grab 2 large ones, also at room temperature if possible. For that classic Pumpkin Spice vibe, you’ll need 1 teaspoon of ground cinnamon, ½ teaspoon of ground nutmeg, and ¼ teaspoon of ground ginger. Don’t forget the leavening – 1 teaspoon of baking soda and ½ teaspoon of baking powder for a nice lift. And a pinch of salt to balance everything out, about ½ teaspoon.
For the Filling:
This is where the decadence comes in! For the chocolate layer, you’ll need about 1 cup of semi-sweet chocolate chips, but you can totally use milk chocolate or even dark chocolate if that’s your jam. I love using the mini chips because they melt more easily. Then, we have the cream cheese swirl, which adds such a lovely tangy contrast. You’ll need 4 ounces of cream cheese, softened to room temperature. This is key so it blends smoothly. To sweeten it slightly, we’ll use ¼ cup of granulated sugar. And to make it extra creamy and help it swirl beautifully, 1 large egg yolk, also at room temperature.
For the Glaze:
This is optional, but I highly recommend it for that extra touch of sweetness and shine! For a simple glaze, you’ll need about 1 cup of powdered sugar, sifted to avoid lumps. Then, 2-3 tablespoons of milk (or even a bit of heavy cream for richness). You can also add a splash of vanilla extract for flavor. If you want a cream cheese glaze, you’ll use 2 ounces of softened cream cheese, 1 cup powdered sugar, and 1-2 tablespoons of milk.
Step-by-Step Instructions
Step 1: Preheat & Prep Pan
First things first, let’s get that oven fired up to 350 degrees Fahrenheit (175 degrees Celsius). While it’s preheating, grab a 9×13 inch baking pan. You want to make sure nothing sticks, so grease it really well with butter or non-stick spray. For extra insurance, especially with gooey cakes like this, I like to line the bottom and sides with parchment paper, leaving a little overhang on the sides. This makes it so much easier to lift the cake out later!
Step 2: Mix Dry Ingredients
In a medium-sized bowl, whisk together your flour, baking soda, baking powder, salt, cinnamon, nutmeg, and ginger. Give it a good whisk so everything is evenly distributed. This ensures your spices and leavening agents are spread out evenly throughout the batter, leading to a consistent texture and flavor. You don’t want pockets of baking soda, trust me!
Step 3: Mix Wet Ingredients
In a larger bowl, combine the melted butter, granulated sugar, and brown sugar. Whisk them together until they’re well combined. Then, beat in the pumpkin puree and the 2 large eggs, one at a time, making sure each is fully incorporated before adding the next. This is your beautiful, fragrant pumpkin base!
Step 4: Combine
Now, gradually add the dry ingredients to the wet ingredients. Mix them together with a spatula or a wooden spoon until *just* combined. It’s really important not to overmix here. A few small lumps are totally fine! Overmixing can lead to a tougher cake, and we want this to be super tender and moist.
Step 5: Prepare Filling
Let’s get that gooey filling ready. In a small bowl, melt your semi-sweet chocolate chips. You can do this in the microwave in 30-second intervals, stirring in between, or over a double boiler. Set aside. In another small bowl, beat the softened cream cheese with the ¼ cup of sugar until it’s smooth and creamy. Then, beat in the egg yolk until it’s well combined. You want this mixture to be smooth and luscious.
Step 6: Layer & Swirl
Pour about half of the pumpkin batter into your prepared baking pan and spread it out evenly. Then, dollop spoonfuls of the melted chocolate mixture and the cream cheese mixture over the batter. Don’t be shy! Now, pour the remaining pumpkin batter over the top. It’s okay if it doesn’t cover everything perfectly. Finally, take a knife or a skewer and gently swirl the batters together. You want to create those beautiful, chaotic “earthquake” patterns. Don’t over-swirl, or you’ll lose the distinct layers. Just a few passes should do it!
Step 7: Bake
Pop the pan into your preheated oven. Bake for about 30-40 minutes. You’ll know it’s done when a toothpick inserted into the center comes out with moist crumbs attached, not wet batter. The edges should look set, and the top will be a beautiful golden-brown with those signature cracks starting to appear.
Step 8: Cool & Glaze
Once it’s baked, let the cake cool in the pan on a wire rack for at least 20-30 minutes. This is crucial for it to set up properly. While it’s cooling, you can prepare your glaze if you’re using one. Whisk together the powdered sugar and milk (or cream) until you reach a smooth, pourable consistency. Once the cake has cooled significantly, drizzle the glaze over the top. I like to let the glaze set a bit before slicing.
Step 9: Slice & Serve
Once it’s cooled enough to handle (a little warm is divine!), slice it into squares and serve. The best way to serve this is while it’s still a little warm. The gooey chocolate and creamy swirls are absolutely irresistible. If you like, serve it with a dollop of whipped cream or a scoop of vanilla ice cream. Enjoy that incredible texture and flavor!
What to Serve It With
This pumpkin earthquake cake is incredibly versatile, making it perfect for so many occasions. For Breakfast, it’s a fantastic treat. Imagine slicing into a warm piece with your morning coffee. The spices are so warming and comforting, it feels like a treat to start the day. I like to keep the slices a bit smaller for morning servings. For Brunch, it really shines. Present it in the pan, or unmold it onto a nice platter. It looks beautiful and rustic. Pair it with a sparkling cider or a mimosa for a festive touch. It’s a wonderful addition alongside other brunch favorites like quiches and fruit salads. As Dessert, it’s pure indulgence. Serve it warm with a generous scoop of vanilla bean ice cream – the contrast of the warm cake and cold ice cream is divine! A drizzle of extra caramel sauce is also never a bad idea. For Cozy Snacks, this cake is your best friend. Cut a square, warm it up slightly, and pair it with a mug of hot chocolate or a spiced chai latte. It’s the ultimate comfort food for a chilly afternoon or a quiet evening. My family often requests this when we’re having movie nights, and it always disappears in minutes!
Top Tips for Perfecting Your Pumpkin Earthquake Cake
I’ve made this pumpkin earthquake cake more times than I can count, and I’ve picked up a few tricks along the way that I think will really help you achieve perfection! First, when it comes to the zucchini prep (oops, I meant pumpkin prep!), make sure you’re using canned pumpkin puree, not pumpkin pie filling. The pie filling has added sugar and spices that will throw off your measurements. Also, make sure your pumpkin puree isn’t watery. If it seems a bit thin, you can drain off any excess liquid. For mixing advice, remember that golden rule: don’t overmix the batter. Mix the dry and wet ingredients until they’re *just* combined. A few lumps are okay! Overmixing develops the gluten in the flour, which can result in a tough cake. When it comes to swirl customization, embrace the imperfection! The beauty of an “earthquake” cake is its rustic look. Don’t try to make perfect patterns; just gentle swirls with a knife or skewer will create those gorgeous cracks and pockets of filling. For ingredient swaps, if you don’t have all the spices, you can use a pre-made pumpkin pie spice blend, just adjust the amount to taste. If you’re out of brown sugar, you can use all granulated sugar, but the brown sugar adds a wonderful depth of flavor and moisture. For baking tips, ovens can vary, so start checking for doneness around the 30-minute mark. A toothpick should come out with moist crumbs, not wet batter. If the top is browning too quickly, you can loosely tent it with foil. And for glaze variations, if you want a thicker glaze, just add less liquid. If you prefer a cream cheese glaze, ensure your cream cheese is very soft and whisk it until completely smooth before adding powdered sugar and milk.
Storing and Reheating Tips
The great news about this pumpkin earthquake cake is that it keeps wonderfully, making it perfect for making ahead. Room temperature storage is actually my preferred method for the first day or two. Once the cake has completely cooled, cover the pan tightly with plastic wrap or transfer it to an airtight container. It should stay fresh and delicious at room temperature for about 2-3 days. For longer storage, refrigerator storage is your best bet. Wrap the cake tightly in plastic wrap, then in foil, or place it in an airtight container. It will keep well in the fridge for up to a week. When you’re ready to enjoy it from the fridge, you can eat it cold (it’s still good!), or warm it up slightly. For freezer instructions, this cake freezes beautifully! I like to cut it into individual portions before freezing. Wrap each piece very tightly in plastic wrap, then in foil, and place them in a freezer-safe bag or container. It can be stored in the freezer for up to 2-3 months. To thaw, unwrap the pieces and let them come to room temperature, or gently warm them in the microwave. For glaze timing advice, it’s best to apply the glaze *after* the cake has cooled down completely, whether you plan to store it at room temperature, in the fridge, or freeze it. If you glaze it while it’s warm, the glaze can melt and become messy.
Frequently Asked Questions
Final Thoughts
I truly hope you give this pumpkin earthquake cake a try. It’s one of those recipes that brings so much joy, not just in the baking, but in the sharing and enjoying. It’s the perfect blend of cozy, comforting, and decadent, and honestly, it’s just plain fun to make! Whether you’re looking for a showstopper for your fall gatherings, a special breakfast treat, or just a way to satisfy that sweet tooth, this cake has you covered. It’s a recipe I’ll be passing down, and I know you’ll want to share it too. If you love this recipe, you might also enjoy our spiced apple crumble or our classic pumpkin pie – they’re other fall favorites that bring that same comforting vibe. I can’t wait to hear how your pumpkin earthquake cake turns out! Please leave a comment below and let me know what you think, or share any fun variations you tried. Happy baking, everyone!