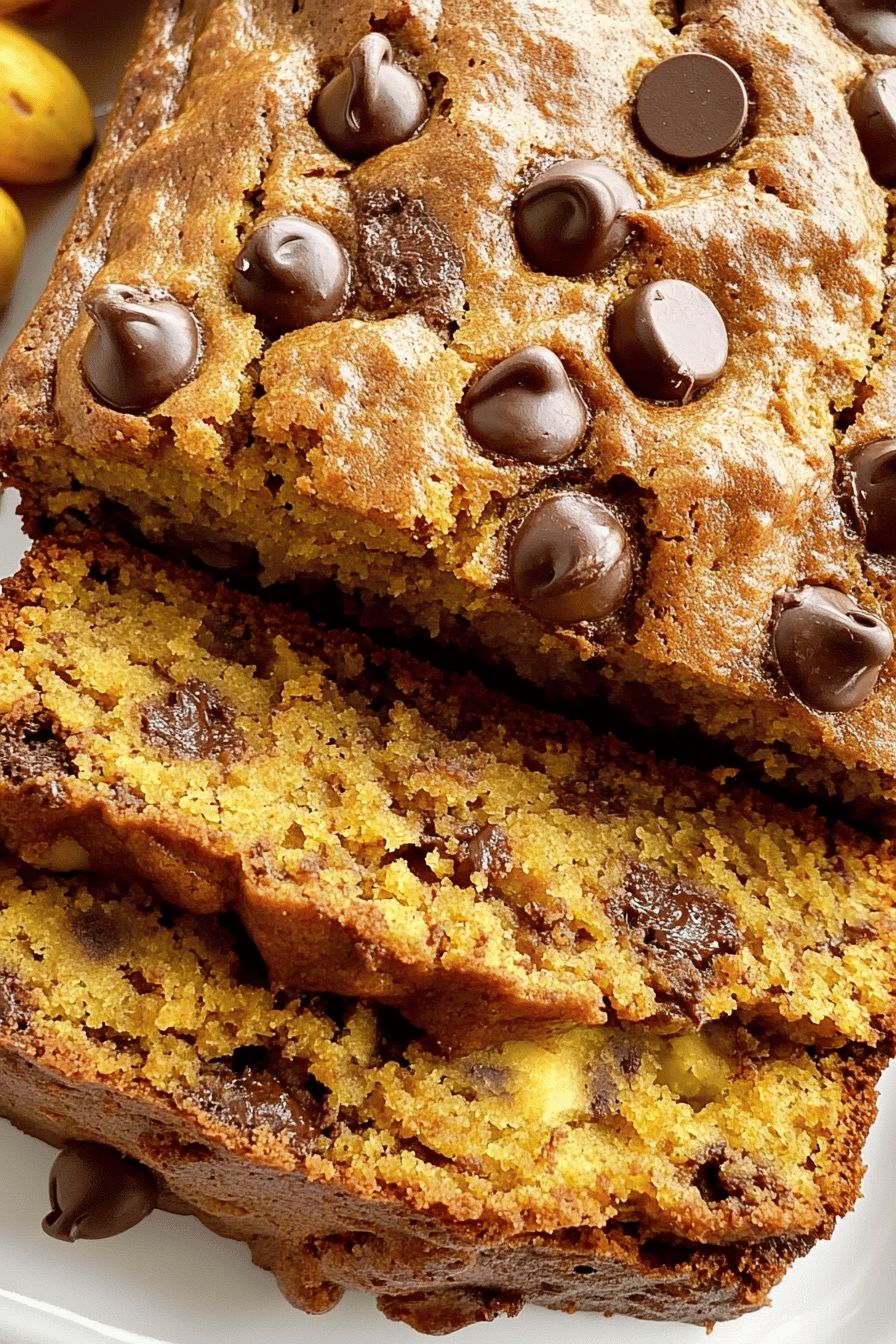
pumpkin chocolate bread
I’ll never forget the first time I sniffed Pumpkin Spice drifting through grandma’s kitchen, a warm swirl of cinnamon and roasted sugar filling the air. It felt like fall had finally invited itself to stay. That memory is why I keep a loaf of pumpkin chocolate bread in my pantry from October to December—it tastes like a hug you can slice. This isn’t a fussy dessert; it’s a tender, cozy loaf with pockets of melted chocolate that disappear in minutes at my house. I’m not shy about saying it’s a crowd-pleaser—the kind of bake that makes weekend mornings feel like a little celebration. If you’ve got a coffee mug in your hand and a friend to share with, you’ve got the perfect setup for pumpkin chocolate bread. I don’t use secret ingredients, just a little patience and a lot of love, and yes, this one’s a lifesaver on busy nights too.
What is pumpkin chocolate bread?
Think of pumpkin chocolate bread as the autumn cousin of Banana Bread with a maple-tinged hug from pumpkin puree. It’s essentially a moist, softly spiced quick bread—no yeast, just a few pantry staples—swirled with chocolate chips or chunks for that happy chocolate-to-pumpkin balance. The name is simple because this loaf is exactly that: pumpkin goodness folded into a bread you can slice and share. I love using a mix of spices that speak to fall without shouting; a touch of cinnamon, a hint of nutmeg, and a kiss of vanilla bring the flavor forward. It’s a loaf that tastes like Sunday morning but works as a quick bake on a Tuesday evening too. Cozy, comforting, and surprisingly versatile, pumpkin chocolate bread is a reminder that simple ingredients can become something memorable with a little love and heat.
Why you’ll love this recipe?
What I love most about this pumpkin chocolate bread is how it checks all the boxes without asking for your entire day. The flavor is warm and balanced—the pumpkin keeps it mellow while the chocolate adds a sweet, comforting contrast. The texture is the sweet spot between cake and bread: tender crumb with a gentle, not-too-dense bite. It’s incredibly forgiving, which makes it perfect for bakers of all levels. And the best part? It’s cost-efficient. You probably have most of these ingredients already in your pantry, and if you’ve got a bag of chocolate chips begging to be used, you’re in luck. This loaf adapts to your morning routine, your snacking moments, and your dessert cravings alike. What I love most about this is how it fills the house with that cozy bakery aroma, and my kids actually ask for seconds. If you’re feeding a crowd, you can mix up the glaze or swirl to match your vibe—spiced, chocolatey, or glossy-sweet.
- Flavor:What are some of the best melted chocolates?
- Simplicity: One bowl for the batter, a few quick folds, and you’re almost there.
- Cost-efficiency: Pantry-friendly ingredients mean you don’t break the bank for a show-stopping loaf.
- Versatility: Enjoy it for breakfast with coffee, as a grab-and-go snack, or as a cozy dessert.
If you’ve ever baked Pumpkin Bread and wished for a touch more oomph, this version delivers. The chocolate isn’t overpowering—it peeks through with little bursts of sweetness that feel like a friendly surprise. I’ve even swapped half the butter for yogurt in a pinch, and the crumb stayed tender—trust me, it’s a trick that works when you’re short on time but still want that soft, loaf-y crumb. So grab a mug, preheat the oven, and let’s turn autumn’s simplest ingredients into something that tastes like a memory.
How to Make pumpkin chocolate bread
Quick Overview
This recipe comes together with a simple mix-and-melt method that keeps your hands clean and your kitchen calm. You’ll whisk dry ingredients, whisk wet ingredients, then fold them together just until they’re combined. The filling and glaze are optional but seriously worth it for that extra layer of richness. Bake until the top springs back and a toothpick comes out with a few moist crumbs. The result is a loaf that looks homey and tastes a little bit like celebrations—perfect when friends drop by or you want a perfect pull-apart slice on a weeknight. It’s also forgiving if you want to bake it in muffin tins for faster portions.
Ingredients
For the Main Batter:
– 1 1/2 cups all-purpose flour (or 1 1/2 cups 1:1 gluten-free flour blend for GF option)
– 1 teaspoon baking powder
– 1/2 teaspoon baking soda
– 1/2 teaspoon salt
– 1 teaspoon ground cinnamon
– 1/4 teaspoon ground nutmeg
– 1 cup pumpkin puree (canned or homemade, smooth and well-drained)
– 2 large eggs
– 1/2 cup granulated sugar
– 1/3 cup neutral oil or melted butter (or a mix) for moisture
– 1/2 cup milk (dairy or plant-based, like almond or oat)
– 1 teaspoon vanilla extract
For the Filling:
– 4 ounces Cream Cheese, softened
– 2 tablespoons powdered sugar
– 1 tablespoon pumpkin puree (optional, to keep it orange-tinged and silky)
For the Glaze:
– 1/2 cup powdered sugar
– 1 1/2-2 tablespoons milk or dairy-free milk
– 1/4 teaspoon vanilla extract
– Optional: 1 teaspoon cocoa powder for a chocolate glaze

Step-by-Step Instructions
Step 1: Preheat & Prep Pan
Heat your oven to 350°F (175°C). Grease a 9×5-inch loaf pan well and line the bottom with parchment if you have it. A quick spray with nonstick spray and a light dusting of flour is my go-to—this loaf loves to release cleanly. If you’re making muffins instead, fill cups 2/3 full and bake for 18-22 minutes, checking with a toothpick. I always save a little butter to grease, because a shiny loaf comes from nice, even lubrication and a prepped pan.
Step 2: Mix Dry Ingredients
In a medium bowl, whisk together flour, baking powder, baking soda, salt, cinnamon, and nutmeg. Sift if you have a sifter handy; it keeps the crumb light and avoids lumpiness. I like to whisk twice—once with the dry ingredients, and again after I’ve measured out everything else—so nothing clumps in the batter. This step matters because even distribution of spices and leaveners helps the loaf rise evenly and stay tender.
Step 3: Mix Wet Ingredients
In a separate bowl, whisk pumpkin puree, eggs, sugar, oil (or melted butter), milk, and vanilla until smooth. The mixture should be warm but not hot; you don’t want to cook the eggs. If your pumpkin is a touch drier in the jar, add a tablespoon more milk and give it a stir. My pumpkin purée is usually silky, which keeps the loaf extra-moist and the chocolate chips glistening in every bite.
Step 4: Combine
Pour the wet ingredients into the dry ingredients and fold gently with a spatula until just combined. A few streaks are okay—that’s the sign you haven’t overmixed. Overmixing is the thief of tender crumb, so I stop as soon as you don’t see streaks of flour. If you’re adding chocolate chips, fold them in now so they’re evenly distributed rather than sinking to the bottom.
Step 5: Prepare Filling
For a ribbon of cream-cheesy goodness, whisk the softened Cream Cheese with powdered sugar and pumpkin puree until smooth. Spoon dollops along the center of the batter in the pan, or if you’re feeling extra fancy, swirl it in with a knife after half the batter is poured. The filling adds a little tang and a lot of visual excitement—my kids go crazy for the swirls. If you’d rather not bother with a filling, you can skip this step and just fold in a handful of chocolate chips for a simpler, classic loaf.
Step 6: Layer & Swirl
Pour half the batter into the prepared loaf pan, then spoon on the filling in a line or several dollops, and top with the remaining batter. Use a knife or skewer to swirl the filling into the batter in a gentle figure-eight, creating pretty ribbons that will bake into a marbled look. The visual payoff is as tasty as the taste—swirls hint at a more complex bite without adding work.
Step 7: Bake
Place the loaf in the center rack and bake for 55-65 minutes, or until a toothpick inserted into the center comes out with a few moist crumbs. If the top darkens too quickly, loosely tent with foil after 40 minutes. Oven temperatures vary, so start checking at about 50 minutes. If you’re making muffins, start checking at 18 minutes and pull when a toothpick comes out clean or with a few crumbs clinging to it. The house will start to smell incredible long before it’s done—that’s your signal that the clock is on your side.
Step 8: Cool & Glaze
Let the loaf rest in the pan for 15 minutes, then turn it out onto a rack to cool completely. I know it’s tempting to slice right away, but the steam continues to finish the bake. Once cooled, whisk together glaze ingredients until smooth; you want a pourable but not runny consistency. Drizzle it over the loaf in a zigzag or simple stream, and let it set for a few minutes. If you’re avoiding glaze, a light dusting of powdered sugar is lovely, and you can add a pinch of cocoa powder for a chocolate touch.
Step 9: Slice & Serve
Run a sharp serrated knife along the edges, then slice into thick, homey wedges. The loaf is best served at room temperature, with a mug of coffee or a glass of cold milk. If you’ve made muffins, they’re perfect with a pat of butter that melts into every nook. The chocolate will remain visible as you cut, giving you little pockets of sweetness in every slice. My family loves a warm slice with a smear of cream cheese, and I won’t pretend I don’t sneak a spoonful of glaze straight from the bowl—it’s a guilty little indulgence that makes the whole kitchen feel like a bakery.
What to Serve It With
This pumpkin chocolate bread is versatile enough to shine in several scenarios. Here are a few ideas that keep it exciting and easy.
For Breakfast: A thick slice with a warm mug of coffee or chai, maybe with a pat of butter that melts into the crumb. If you’ve got a few extra minutes, toast a slice until the edges bronze and the chocolate chips glisten. The aroma alone makes it feel like a special morning, even on a weekday.
For Brunch: Serve alongside a fruit skewers platter, a yogurt bar, and a light maple syrup for drizzling. A drizzle of vanilla yogurt over the bread creates a creamy counterpoint to the pumpkin spices and chocolate.
As Dessert: Slice thick, dust with powdered sugar, and pair with a dollop of cinnamon whipped cream or vanilla ice cream. The warm loaf with a cool topping is pure comfort, especially after a long day.
For Cozy Snacks: Wrap a slice in parchment and tuck in a small spoonful of mascarpone or ricotta for a creamy bite. It’s perfect for movie nights or late-night cravings when a full cake just isn’t in the cards.
Sharing this loaf is a small ritual—every slice carries a memory of busy kitchens and lazy Sundays. It’s become part of our family’s autumn rhythm, and I suspect it’ll become a favorite in yours, too. I love that it feels almost like a care package you bake for someone you adore: comforting, not fussy, and generously sliceable. If you think you’re too busy to bake something that tastes this indulgent, you’re wrong—this recipe is friendly to your calendar and your cravings.
Top Tips for Perfecting Your pumpkin chocolate bread
Here’s what I’ve learned after baking this loaf dozens of times. A few tweaks here and there can make a big difference, especially if you’re experimenting with different flours or milks.
Zucchini Prep: This isn’t zucchini bread, but it’s a good reminder that moisture matters. If your puree seems particularly watery, you can simmer it gently to reduce moisture or blot with a clean kitchen towel. You want just enough moisture to keep the crumb tender but not so much that the loaf sinks.
Mixing Advice: Overmixing is the enemy here. Fold with a light hand until you just see dry streaks disappear. If you whisk too aggressively, you’ll develop more gluten and end up with a tougher crumb. Think gentle, not aggressive.
Swirl Customization: For a more dramatic swirl, add a second blanket of filling only in the middle and don’t swirl all the way to the edges. You’ll get a surprising marbled effect that looks bakery-perfect and tastes divine.
Ingredient Swaps: If you want a richer crumb, swap half the oil for applesauce or Greek yogurt. For a deeper chocolate note, fold in 1/4 cup cocoa powder with the dry ingredients. If you’re swapping to gluten-free flour, choose a blend labeled for baking and add 1/2 teaspoon xanthan gum if your blend doesn’t include it. You may need an extra tablespoon or two of milk to loosen the batter slightly.
Baking Tips: Oven hot spots will cause uneven browning, so rotate the loaf halfway through if your oven tends to bake unevenly. Use a digital thermometer in a pinch—the center should read around 205°F (96°C) for a fully baked, moist crumb. If you’d prefer a slightly drier crumb, bake a few minutes longer and test again with the toothpick.
Glaze Variations: The glaze is optional but adds a glossy finish. For a tangier glaze, add a splash of lemon juice or a pinch of salt to balance the sweetness. If you want a chocolate glaze, whisk in 1 tablespoon cocoa powder and a pinch of espresso powder for depth.
Lessons learned: the loaf is forgiving, but patience pays off. Let the filling distribute gently, don’t chase a perfect marble, and keep your loaf wrapped once cooled if you’re not slicing immediately. A little butter on the knife helps you glide through clean slices, especially with a chocolate-laden bite. My kitchen smells like a cozy bakery, and I’m not mad about it—this is the scent of home.
Storing and Reheating Tips
Storage is where many home cooks slip up. Bread becomes dry quickly if left exposed, and the glaze can soften too much in the fridge. Here’s how I keep pumpkin chocolate bread tasting as fresh as day one.
Room Temperature: Store wrapped tightly in plastic wrap or in an airtight container for up to 3 days. If you’re serving within a day or two, a quick reheat in the toaster or toaster oven makes the edges feel fresh and the chocolate melt-y again.
Refrigerator Storage: In the fridge, it’ll stay fresh for up to 5 days, but the crumb can become firmer. Reheat slices briefly in the microwave or a quick warm-up in a toaster oven to restore softness. If you’ve added glaze, I’d wait to glaze until you’re ready to serve to prevent soggy edges.
Freezer Instructions: Slice the loaf into portions, wrap each slice tightly in plastic wrap, then seal in a freezer bag. It’ll keep for up to 3 months. Thaw at room temperature and reheat gently if you want the chocolate to soften again. For best results, glaze after thawing and reheating to maintain a lively glaze color and texture.
Glaze Timing Advice: If you’re freezing, skip the glaze until you’re ready to serve. The glaze can crack a bit when frozen and thawed. If you do glaze ahead, store in a cool place and rewarm briefly to set the glaze anew before slicing.
These storage tips keep the pumpkin chocolate bread tasting like a fresh-baked offering, no matter when you cut into it. A little planning means you can have that cozy loaf on a random weekday and pretend it’s a grand Sunday brunch.
Frequently Asked Questions
Final Thoughts
When autumn moods drift in with cooler air, I reach for this pumpkin chocolate bread and let the kitchen fill with warmth—the kind that makes a quiet house feel like a celebration. It’s not just a recipe; it’s a small ritual that invites you to slow down, measure a little precisely, and savor the moment between whisk and bake. The pumpkin keeps the crumb tender and moist, the cinnamon reminds us of spice jars in a grandmother’s cabinet, and the chocolate is a friendly wink that says, “We’ve got this.” If you’re craving something sweet that doesn’t demand a towering cake or hours of effort, this loaf is your answer. I’ve tested it with almond milk, extra vanilla, and a touch more pumpkin—each variation brings a tiny story to the table. I’d love to hear which twist you try. Tell me in the comments how your loaf turned out, what you swapped, and who you shared it with. Happy baking!