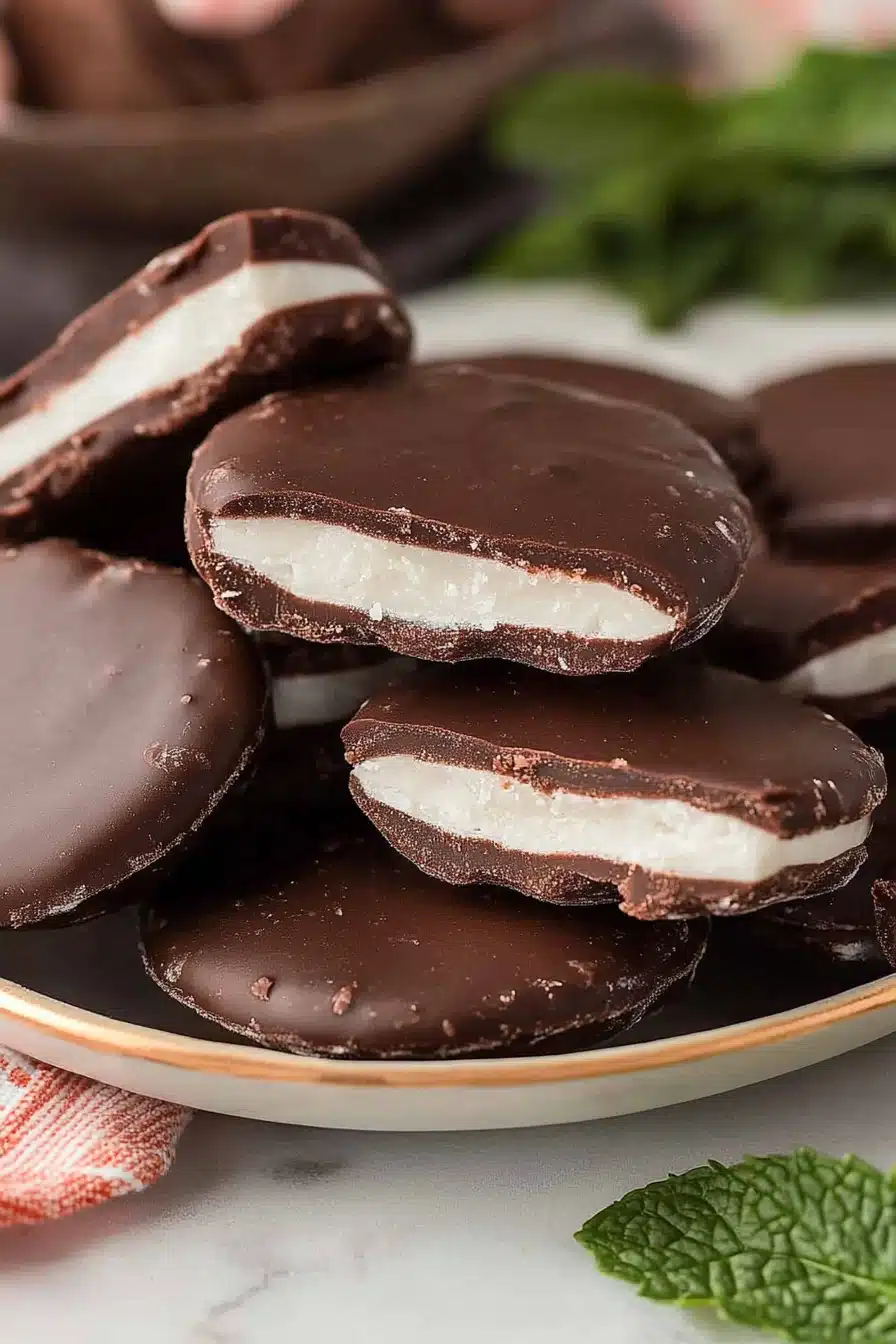
peppermint patties
There’s something almost magical about peppermint patties. I still remember the very first time I made these little delights in my kitchen, nervously mixing up the filling while eagerly sneaking tastes before they set. The crisp, cool peppermint flavor paired with the silky smooth chocolate made my whole kitchen smell like a holiday bazaar — but honestly, they’re so good I make them all year round. If you’re someone who loves the refreshing bite of mint chocolate candies but wants to skip the store-bought versions packed with mystery ingredients, this recipe will quickly become your go-to. Unlike complicated candy-making that can feel intimidating, these peppermint patties come together with surprisingly simple ingredients and just the right touch of sweetness. Trust me, once you try these homemade peppermint patties, you’ll never reach for the box again!
What is Peppermint Patties?
Think of peppermint patties as little irresistible minty pillows, coated in a glossy layer of chocolate. They’re essentially candy bites with a creamy, cool peppermint center wrapped in dark or milk chocolate. The name probably rings a bell if you’ve ever wandered down the candy aisle; it comes from the classic confection known for its fresh, minty punch. What’s wonderful about making peppermint patties at home is that you can customize the intensity of the peppermint and the thickness of the chocolate coating, which is something you don’t always get with store-bought versions. In my kitchen, these treats have become an exciting little antidote to the everyday sweet tooth — fresh, simple, and with that nostalgic charm everyone loves.
Why you’ll love this recipe?
Let me just say, what I love most about this peppermint patties recipe is how it balances brightness and indulgence. The peppermint flavor is vibrant without being overpowering, just like a gentle breeze on a winter night. Plus, the creaminess of the filling contrasts beautifully with the smooth snap of the chocolate shell. And guess what? It’s a lot easier to make than you’d think — there’s no need for fancy candy thermometers or complicated candy shops supplies. You only need a handful of pantry staples that won’t break the bank, making this a perfect go-to when you want something special without a fuss.
Another huge perk is versatility. I’ve enjoyed these peppermint patties frozen on a hot day and at room temperature with a strong cup of coffee as a little pick-me-up. They also double as charming homemade gifts; every time I bring a batch to friends, they’re gone in minutes — I swear my kids could eat the whole batch if I let them! And if you’re a fan of other minty classics, you might also want to check out how these peppermint patties compare with a tried-and-true mint chocolate brownies recipe I’ve shared before. But honestly, the simple clean flavors and the melt-in-your-mouth texture make these patties unique and addictive in the best way possible.
How do I make peppermint patties?
Quick Overview
Here’s the deal: making peppermint patties at home is a breeze. First, you whip up a soft, peppermint-scented filling that’s light yet rich. Then you shape it into little discs—kind of like making tiny cookies without baking—and let them chill. After that, they get dipped or drizzled with melted chocolate, which hardens into a glossy, snappy shell. What makes this method special is how hands-on it is without ever being stressful; you can tweak peppermint levels on the fly and decide how thick you want the chocolate shell. The whole process takes just about an hour from start to finish, including chilling, making it a perfect project for a cozy afternoon in.
Ingredients
For the Filling:
- 1 ½ cups powdered sugar (sifted for smoothness) – This is the base that gives the filling its sweet, melt-in-your-mouth body.
- ½ cup unsweetened shredded coconut (optional for texture) – Adds a subtle chew and helps hold the shape without overpowering the mint.
- 3 tbsp light corn syrup or golden syrup – Keeps the filling soft and pliable; don’t skip this or it can turn crumbly.
- 2 to 3 tbsp heavy cream or whole milk – For that creamy, luscious texture. Sometimes I swap half the milk for almond milk, and it actually adds a nice subtle nuttiness.
- 1 ½ tsp peppermint extract (adjust to taste) – The star of the show! I usually start with 1 ½ tsp, but if you like it more intense, add a touch more. Just be careful; too much can taste artificial.
- A pinch of salt – Enhances all the flavors and balances sweetness perfectly.
For the Chocolate Coating:
- 12 ounces dark or semi-sweet chocolate chips or chopped chocolate – For that rich coating with a good snap. I prefer dark chocolate for the contrast, but milk chocolate works beautifully too.
- 1 tsp coconut oil or vegetable oil – Helps thin out the chocolate for easier dipping and a nice sheen when it sets.
Step-by-Step Instructions
Step 1: Prep Your Workspace
Line a baking sheet or flat tray with parchment paper. This is where your patties will chill, so make sure it’s flat and roomy. Place it in the fridge so it’s cold and ready for the patties to firm up quickly after you shape them.
Step 2: Mix the Dry Ingredients
In a large bowl, sift the powdered sugar to avoid lumps. Then, stir in the shredded coconut if you’re using it, along with a generous pinch of salt. Sifting and thorough mixing here ensure your filling is silky and smooth—no gritty surprises later.
Step 3: Combine Wet Ingredients
In a separate small bowl or measuring cup, mix the corn syrup, cream (or milk), and peppermint extract together. This combo creates that smooth, minty liquid base that’s going to bring your filling to life.
Step 4: Bring It All Together
Pour the wet ingredients into the bowl with the dry mix and stir gently at first, then more confidently as everything starts coming together. You’re aiming for a dough-like consistency that’s soft but holds its shape. If it feels too sticky, add a touch more powdered sugar. If too dry, a teaspoon or two more cream can work wonders. This is when you get a little feel for the texture—don’t rush it.
Step 5: Shape the Patties
Roll bits of the filling between your hands to form small balls about the size of a walnut, then flatten them gently on the parchment-lined tray to create discs roughly 1½ inches across. This part is super fun because you can adjust the size based on your sweet tooth — bite-sized or generously chunky. Once formed, pop the tray into the fridge for at least 30 minutes to allow the patties to firm up.
Step 6: Prepare the Chocolate Coating
While the patties chill, melt your chocolate in a heatproof bowl set over simmering water (double boiler method) or gently in the microwave, stirring every 20 seconds until silky smooth. Stir in the coconut or vegetable oil to thin the chocolate just enough for easy dipping — it should coat your finger smoothly without dripping like water.
Step 7: Dip the Patties
Using a fork or toothpick, dip each chilled peppermint patty into the melted chocolate, letting excess drip back into the bowl before carefully placing it back on parchment. Don’t worry about a perfect finish; the charming little irregularities make them feel homemade. If you want a glossy finish, give the tray a gentle tap on the counter to level the chocolate coating.
Step 8: Set and Store
Return the dipped patties to the fridge for about 15 minutes or until the chocolate shell is firm and snap-worthy. I usually cover them loosely with plastic wrap if I’m storing overnight, just to keep any fridge odors away. Once set, they’re officially ready to enjoy.
Step 9: Serve and Enjoy
Serve these peppermint patties chilled or at room temperature alongside a cozy mug of tea or coffee. They’re perfect little pick-me-ups for afternoon cravings or holiday treats for friends and family.
What to Serve It With
For Breakfast: A peppermint patty tucked next to a steaming cup of freshly brewed coffee is surprisingly delightful. It’s like a little secret sweet hit that brightens the morning without overloading your palate.
For Brunch: These patties add a whimsical touch when served on a platter with fresh fruit and mimosas. I love arranging them with colorful berries and not-so-guilty sips of sparkling water with a twist of lime — keeps things fresh and festive.
As Dessert: Serve peppermint patties alongside a scoop of vanilla ice cream or a dollop of whipped cream for a classic combo. Sometimes I crumble a few over homemade hot chocolate for an indulgent minty twist that never fails to delight guests.
For Cozy Snacks: On lazy evenings when I’m curled up with a book, these patties feel like a cozy hug. Pair them with a glass of cold milk or even a peppermint tea for a comforting, no-fuss snack.
My family has this tradition of popping one just after Christmas dinner — the perfect little refresher that also satisfies the sweet tooth without feeling heavy. It’s always a crowd-pleaser, and honestly, I think it’s become as much about the memories made around these treats as the candy itself.
Top Tips for Perfecting Your Peppermint Patties
Filling Consistency: It’s easy to under- or over-hydrate the filling. If it’s too sticky, toss in more powdered sugar bit by bit until it holds its shape. Too dry? A splash more cream will soften it. I learned this the hard way after ending up with crumbly filling that just wouldn’t stick together.
Mixing Technique: Stir gently but thoroughly to avoid air bubbles that can create cracks later. Lumps hide in powdered sugar, so sift before mixing. I usually use a rubber spatula — it gives me the best control.
Chocolate Coat Thickness: Adding just a teaspoon or so of coconut oil helps thin the chocolate for a smoother dip and shinier finish. Without it, you risk too-thick chocolate that cracks unevenly or dulls in the fridge.
Mint Intensity: Peppermint extract varies in strength. Start slow and add more after tasting your filling. I’ve learned that a little too much can taste artificial, so go easy especially if you’re using a strong extract.
Swirl Variation: If you’re feeling creative, try mixing melted white chocolate into half your dark chocolate for a marbled effect. It adds a beautiful visual contrast and a touch of sweetness that kids adore.
Cooling Time: Don’t rush the chilling. Proper chilling ensures smooth, firm patties that won’t lose shape while dipping. I always set mine overnight if I have the time; it makes a noticeable difference.
Ingredient Swaps: For a dairy-free twist, replace heavy cream with full-fat coconut milk — it creates a silkier texture with a subtle coconut undertone. I also tested this with powdered erythritol for a lower sugar version, and while slightly less creamy, it still made an excellent treat.
Storing and Reheating Tips
Room Temperature: Peppermint patties keep well for about 2 days at room temp if stored in an airtight container in a cool, dry spot. This avoids condensation that can dull the chocolate’s shine.
Refrigerator Storage: Store covered in a sealed container or wrapped individually in parchment paper to prevent fridge smells from creeping in. They last about 2 weeks chilled and maintain their texture beautifully.
Freezer Instructions: These patties freeze wonderfully. Wrap each one in plastic wrap then place them in a freezer-safe container or zip-top bag. Freeze up to 3 months. Thaw in the fridge overnight before enjoying to preserve texture and mint intensity.
Glaze Timing Advice: If you plan to store for more than a few days, apply the chocolate coating before storing to keep them fresh. Adding glaze right before serving works if you want the freshest crunchy chocolate shell but limits storage time.
Frequently Asked Questions
Final Thoughts
I can’t even count how many batches of these peppermint patties I’ve made — each time, they bring back memories of cozy chats around the kitchen table and sweet smiles all around. These little candies are proof that sometimes the simplest recipes make the biggest impact, especially when shared with people you love. If you get a chance, try tweaking the peppermint level or playing with different chocolates — that’s part of the fun and magic in the kitchen with this one. And if you’re hungry for more minty magic, take a peek at my peppermint bark or mint chocolate truffle recipes next. Please don’t be shy about sharing how yours turn out — comments, photos, and even secret tweaks are always welcome. Happy baking, and here’s to many delicious, minty moments ahead!

Easy Peppermint Candy Recipe
Ingredients
Main Ingredients
- 7 oz marshmallow cream (Fluff)
- 10 Tbsp unsalted butter softened
- 1.5 tsp vanilla extract
- 1 tsp peppermint extract
- 5.5 cups powdered sugar
- 16 oz Ghirardelli dark chocolate melting wafers
- 8 oz Ghirardelli white chocolate melting wafers optional for football shapes
Instructions
Preparation Steps
- In a large mixing bowl, beat marshmallow cream, softened butter, vanilla, and peppermint extracts until fully combined. Slowly add powdered sugar and mix on medium speed until well blended and a dough forms.
- Line a large baking sheet with parchment paper. Use about 1 tablespoon of filling to shape into balls, then flatten into discs for traditional patties. For football shapes, pinch the ends of the ball to form ovals. Repeat until all filling is used.
- Cover shaped patties with plastic wrap and freeze for about 2 hours or overnight to firm up.
- Melt the dark chocolate wafers according to package instructions. Using a toothpick or fork, dip frozen patties into the melted chocolate, tap off excess, and place back on parchment paper to set.
- If making footballs, melt white chocolate wafers and pipe laces onto the shapes using a small plastic bag with the corner cut off. Let set for a few minutes.
- Store peppermint patties at room temperature in an airtight container.