peanut butter bars
Okay, so, I have to tell you about these peanut butter bars. Honestly, if there’s one recipe that has saved my sanity on countless occasions, it’s this one. You know those days when you’re craving something sweet, something comforting, something that feels like a warm hug, but you *really* don’t want to spend hours in the kitchen? This is it. This is the recipe. It’s like a perfect hybrid between a blondie and a fudge, with that irresistible salty-sweet peanut butter magic. I’ve been making these peanut butter bars for years, and they never, ever disappoint. My kids beg for them, my friends always ask for the recipe, and even my notoriously picky husband devours them. They’re just so darn good and surprisingly simple.
What are peanut butter bars?
So, what exactly are we talking about when I say “peanut butter bars”? Think of them as a dense, chewy, incredibly satisfying bar that’s loaded with peanut butter flavor. It’s not quite a cookie, and it’s definitely not a cake. It’s got that perfect fudgy texture, almost like a no-bake dessert but with the satisfaction of having baked them yourself. The name is pretty straightforward, right? They’re bars, and they’re made with peanut butter, but oh, the magic that happens when those simple ingredients come together is something else. It’s the kind of dessert that makes you close your eyes with the first bite and just savor it. It’s that familiar, comforting taste of peanut butter, but elevated into something truly special and easy to share.
Why you’ll love this recipe?
Where do I even begin with why you’ll fall head over heels for these peanut butter bars? First off, the flavor is just out of this world. It’s that perfect balance of sweet and salty, with the rich, nutty depth of peanut butter shining through in every single bite. It’s not overwhelmingly sweet, which is something I really appreciate in a dessert. Plus, the texture is just divine – dense, chewy, and wonderfully moist. It’s the kind of thing that melts in your mouth. Then there’s the simplicity. Seriously, this is a lifesaver on busy weeknights or when unexpected guests pop over. You probably have most of the ingredients in your pantry right now! I’m talking basic pantry staples, which makes it incredibly cost-effective too. No fancy, hard-to-find items here. And versatility? Oh yeah. While they’re incredible on their own, I’ll get into some serving suggestions later that show just how adaptable these bars are. What I love most about this particular peanut butter bars recipe is that it’s consistently perfect. I’ve made it a hundred times, and it always turns out exactly the way I want it to. It’s reliable, it’s delicious, and it’s just plain happy-making food.
How do I make peanut butter bars?
Quick Overview
The process is wonderfully straightforward. You’ll mix up a simple batter, spread it into a pan, maybe add a little swirl of something extra if you’re feeling fancy (but it’s great without too!), bake it until it’s just set, and then let it cool before slicing. That’s it! The magic happens in the oven as everything comes together into a dense, chewy, bar of pure deliciousness. The beauty is in its simplicity; you don’t need any special equipment or techniques, and the results are always impressive.
Ingredients
For the Main Batter:
You’ll need about 1 cup (2 sticks) of unsalted butter, softened. Make sure it’s softened, not melted, for the best texture. And unsalted is key so you can control the saltiness yourself. Then, grab 2 cups of granulated sugar. Don’t skimp on the sugar; it contributes to that amazing chewy texture. Next up, 2 large eggs. I always use large eggs, and room temperature ones incorporate a bit better. And for that signature flavor, you’ll want 1 cup of creamy peanut butter. The standard Jif or Skippy works like a charm, but if you prefer natural peanut butter, just make sure it’s well-stirred and not too oily. A teaspoon of vanilla extract is non-negotiable for rounding out the flavors. Finally, 1 ½ cups of all-purpose flour. I usually just use whatever all-purpose flour I have on hand. And, because we want just the right amount of saltiness to balance the sweet, ½ teaspoon of salt.
For the Filling (Optional but Highly Recommended!):
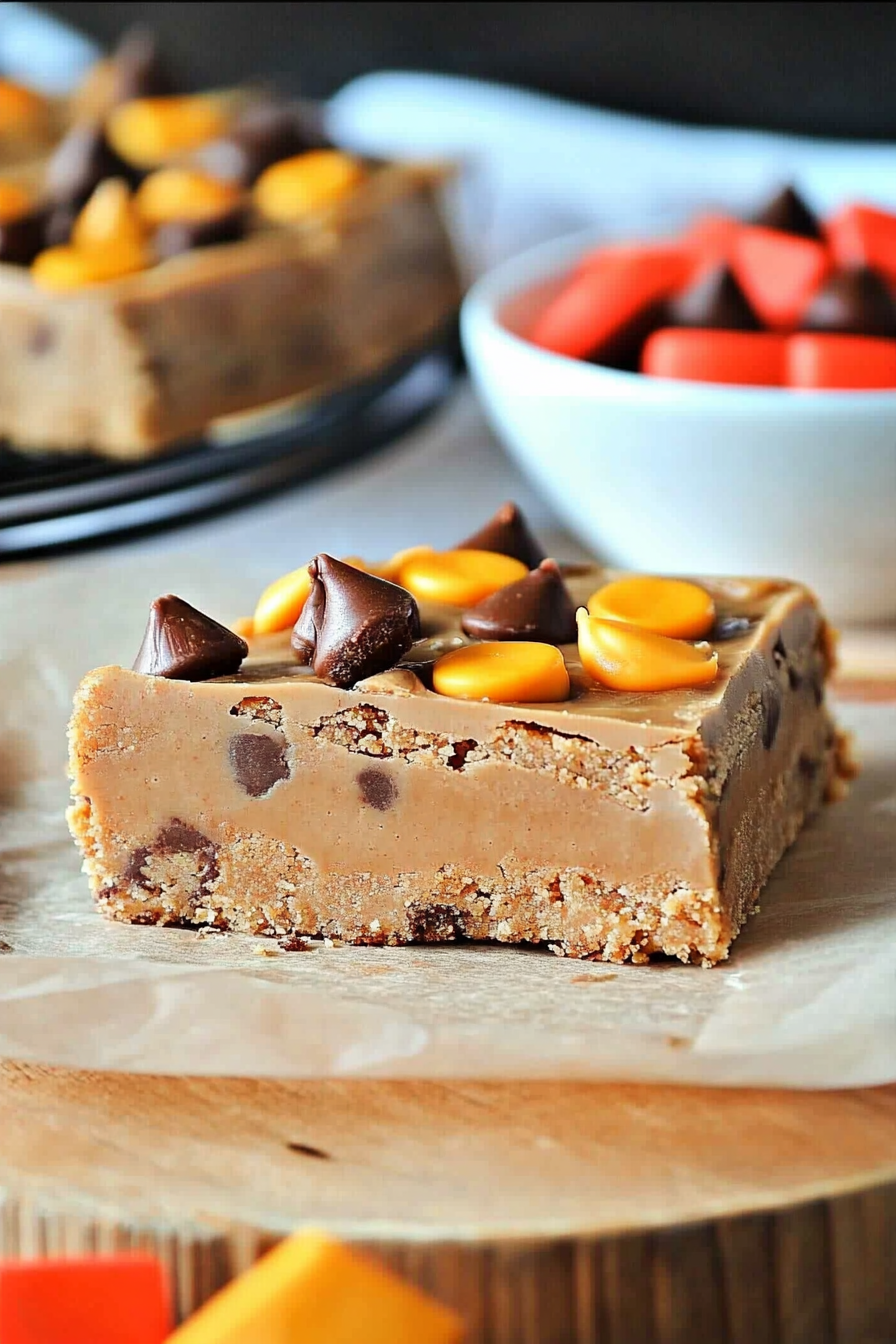
This is where you can have a little fun. My absolute favorite addition is a swirl of more peanut butter! About ½ cup of creamy peanut butter works perfectly. You can even drizzle a little melted chocolate over it if you’re feeling extra indulgent. Some people love adding a layer of jelly or jam – grape is a classic! Just be mindful that a very wet jam might change the texture slightly.
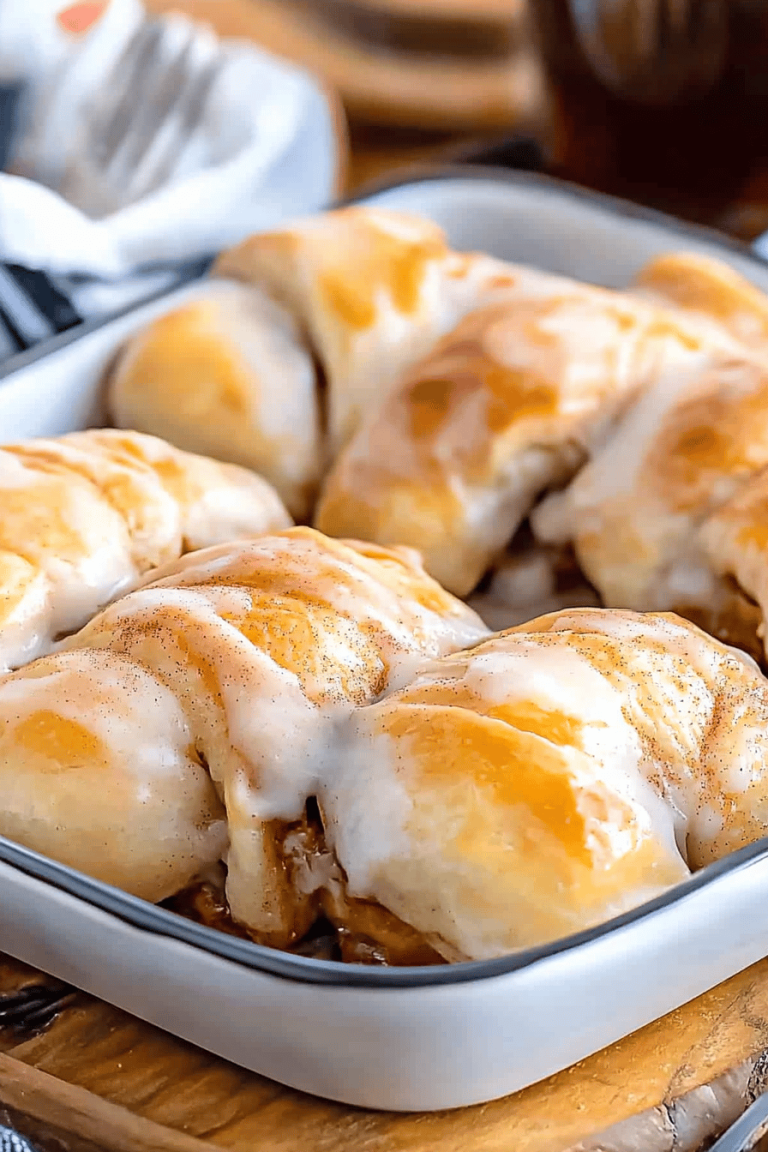
For the Glaze (Optional, but Oh So Pretty!):
This is what takes these peanut butter bars from great to absolutely show-stopping. It’s super simple: 1 cup of powdered sugar, about 2 tablespoons of milk (or heavy cream for extra richness), and another tablespoon of creamy peanut butter. You just whisk it all together until it’s smooth and pourable. The consistency is key here – you want it thick enough to coat the bars but thin enough to drizzle nicely.
Step-by-Step Instructions
Step 1: Preheat & Prep Pan
First things first, get that oven preheated to 350°F (175°C). This is a pretty standard baking temperature, and it works perfectly for these bars. While the oven is heating up, grab an 8×8 inch baking pan. I always like to line mine with parchment paper, leaving an overhang on the sides. This makes lifting the bars out of the pan so much easier, trust me! Then, just grease the parchment and the exposed sides of the pan lightly with butter or cooking spray.
Step 2: Mix Dry Ingredients
In a medium bowl, whisk together the 1 ½ cups of all-purpose flour and ½ teaspoon of salt. Whisking them together ensures that the salt is evenly distributed throughout the batter, so you don’t get any salty surprises in one bite. It’s a small step, but it makes a difference!
Step 3: Mix Wet Ingredients
In a large bowl, cream together the 1 cup (2 sticks) of softened unsalted butter and 2 cups of granulated sugar until light and fluffy. This is best done with an electric mixer, but you can totally do it by hand if you’re feeling ambitious. Then, beat in the 2 large eggs, one at a time, making sure each is fully incorporated before adding the next. Stir in 1 teaspoon of vanilla extract and 1 cup of creamy peanut butter. Mix until everything is well combined and smooth. It will look a little thick and might seem a bit separated – that’s totally normal at this stage!
Step 4: Combine
Now, gradually add the dry ingredients (flour and salt mixture) to the wet ingredients. Mix on low speed or stir with a spatula until just combined. Be careful not to overmix! Overmixing can lead to tough bars, and we definitely don’t want that. You should have a thick, dough-like batter. If it seems a bit too dry, you can add a tablespoon of milk, but usually, it’s just right.
Step 5: Prepare Filling
If you’re adding a filling, now’s the time to get it ready. If you’re doing a peanut butter swirl, just have your extra ½ cup of creamy peanut butter ready to go. If you’re using jam, have about ½ cup of your favorite spread measured out. For a chocolate drizzle, melt about ½ cup of chocolate chips with a teaspoon of oil or butter.
Step 6: Layer & Swirl
Spoon about two-thirds of the batter into your prepared baking pan and spread it evenly. Now, if you’re adding a filling, gently dollop spoonfuls of your extra peanut butter (or jam, or chocolate) over the batter. Then, take the remaining one-third of the batter and dollop it over the filling. Using a knife or a skewer, gently swirl the top batter with the filling to create a marbled effect. Don’t over-swirl; you want to see distinct ribbons of flavor!
Step 7: Bake
Pop the pan into your preheated oven and bake for 25-30 minutes, or until the edges are lightly golden brown and the center is set. You can test for doneness by inserting a toothpick into the center; it should come out with a few moist crumbs attached, but not wet batter. It’s important not to overbake these, or they can become dry. I usually start checking around the 25-minute mark.
Step 8: Cool & Glaze
Once they’re done, carefully remove the pan from the oven and let the bars cool completely in the pan on a wire rack. This is crucial! If you try to cut them while they’re hot, they’ll just fall apart. Patience, my friends! While they’re cooling, you can whip up the glaze. Whisk together the powdered sugar, milk, and peanut butter until smooth. Once the bars are completely cool, drizzle the glaze over the top. Let the glaze set for about 15-20 minutes before slicing.
Step 9: Slice & Serve
Once the glaze has set, use the parchment paper overhang to lift the entire block out of the pan. Place it on a cutting board and slice into bars. I usually cut mine into 16 squares. They’re delicious served at room temperature, but a slightly chilled bar is also amazing. Enjoy them with a glass of milk, or maybe a cup of coffee!
What to Serve It With
These peanut butter bars are so versatile, they truly fit into any part of your day or any occasion! For breakfast, they’re surprisingly good with a hot cup of coffee. They feel like a treat but provide a good energy boost. You can even crumble a small piece over some Greek yogurt. For brunch, they add a touch of homemade charm to your spread. Arrange them on a nice platter with some fresh berries or a dollop of whipped cream – instant elegance! As a dessert, well, they’re in their element. Serve them after a savory meal with a scoop of vanilla ice cream or a drizzle of caramel sauce. They’re also perfect for a cozy snack. Honestly, I’ve been known to grab one (or two!) straight from the pan with a cold glass of milk after a long day. My kids also love them warmed up slightly in the microwave for about 10 seconds – it makes them extra gooey and delicious. It’s just that perfect little something sweet when you need it.
Top Tips for Perfecting Your Peanut Butter Bars
I’ve learned a thing or two making these peanut butter bars over the years, and I’m happy to share them! First, about the butter and sugar creaminess: really take the time to cream them until they’re light and fluffy. This incorporates air, which is essential for the texture. Don’t rush this step! For the peanut butter, I find that standard commercial creamy peanut butter (like Jif or Skippy) gives the most consistent and best texture. If you use natural peanut butter, make sure it’s very well stirred, as the oil separation can sometimes make the bars a bit greasy. When combining the wet and dry ingredients, “just combined” is the golden rule. Overmixing develops gluten in the flour, leading to tough bars. You want them tender and chewy, remember?
For the swirl, the less you swirl, the more distinct and pretty the patterns will be. A few gentle passes with a knife are all you need. Regarding baking, every oven is different! Start checking for doneness a few minutes before the recipe suggests. You’re looking for the edges to be lightly golden and the center to be set, not jiggly. A toothpick should come out with moist crumbs. If you overbake, they’ll be dry, and nobody wants a dry peanut butter bar! For the glaze, the consistency is key. If it’s too thick, add milk a *tiny* bit at a time until it’s pourable. If it’s too thin, add more powdered sugar. I’ve also experimented with different flavors for the glaze – a little almond extract instead of vanilla, or even a hint of espresso powder can be amazing!
A really important tip: let them cool completely before slicing. I know, it’s torture! But cutting them warm will result in a crumbly mess. Use the parchment paper sling to lift them out easily, and then slice with a sharp knife. For ingredient swaps, while these are designed for peanut butter, you *could* try other nut butters, but results may vary in texture and flavor. I stick with peanut butter because, well, it’s peanut butter bars!
Storing and Reheating Tips
Storing these peanut butter bars is pretty straightforward, but doing it right ensures they stay delicious. At room temperature, they’re best enjoyed within 2-3 days. Keep them in an airtight container so they don’t dry out. If your kitchen is particularly warm, or if you’ve added a glaze, the refrigerator is a safer bet. In the fridge, they’ll keep well for up to a week. I usually store them in a single layer in a container or stacked with parchment paper in between layers to prevent sticking. They’re actually really good cold from the fridge!
For longer storage, these bars freeze beautifully. Wrap them tightly in plastic wrap, then place them in a freezer-safe bag or container. They can stay frozen for up to 3 months. When you’re ready to enjoy them, you can thaw them overnight in the refrigerator, or if you’re impatient like me, you can let them come to room temperature on the counter for about an hour. They also reheat wonderfully! Pop a bar in the microwave for about 10-15 seconds – just enough to warm it through and make it extra gooey and fudgy. This is my favorite way to enjoy them a few days after baking. If you’ve glazed them, the glaze generally holds up well to both refrigeration and freezing. Just let them come back to room temp before indulging.
Frequently Asked Questions
Final Thoughts
Honestly, these peanut butter bars are more than just a recipe to me; they’re a little bit of comfort and joy in bar form. They’re proof that you don’t need complicated steps or fancy ingredients to create something truly delicious that everyone will love. The way they come together so easily, the incredible peanut butter flavor, and that perfectly chewy texture are just unmatched. They’re the perfect companion for a cup of coffee, a satisfying after-dinner treat, or a welcome addition to any potluck or bake sale. If you love peanut butter, you simply *have* to give these a try. You might find, like I did, that they become your go-to recipe for a guaranteed win!
I really hope you enjoy making and eating these as much as I do. If you give them a whirl, please let me know in the comments below how they turn out! I’d love to hear about your own variations or any family traditions you create with them. And if you’re a fellow peanut butter enthusiast, you might also love my {link to another peanut butter recipe} – it’s another family favorite! Happy baking!
Easy Nutty Bars Recipe You'll Love
Ingredients
Main Ingredients
- 0.5 cup butter flavored Crisco
- 0.75 cup creamy peanut butter
- 2 Tbsp milk
- 1.25 cup light brown sugar (packed)
- 1 large egg
- 1.75 cup all purpose flour
- 0.5 tsp kosher salt
- 0.75 tsp baking soda
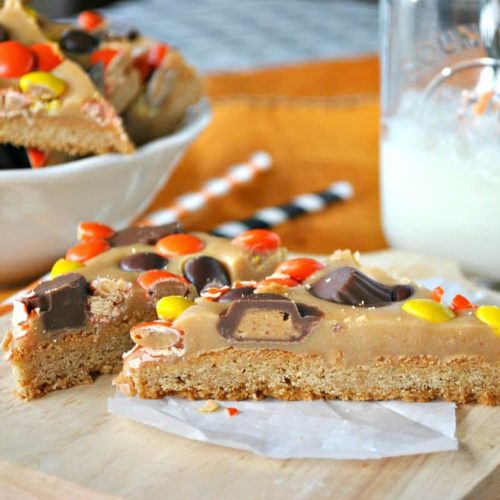
- 14 oz sweetened condensed milk
- 2 Tbsp unsalted butter
- 10 oz peanut butter morsels
- 14 oz Reese's pieces
- 8 oz Reese's MINI peanut butter cups
Instructions
Preparation Steps
- Beat Crisco with creamy peanut butter, milk, and light brown sugar until creamy. Add egg and mix well. Stir in flour, kosher salt, and baking soda until fully combined.
- Press the cookie dough evenly into a lightly greased 15x10 inch baking sheet. Bake at 375°F for 15-18 minutes until the edges are golden brown. Remove from oven.
- While baking, warm the sweetened condensed milk with unsalted butter over low heat. Remove from heat and whisk in peanut butter morsels until melted and smooth. Pour mixture over the warm cookie crust.
- Immediately press Reese's pieces and MINI peanut butter cups into the peanut butter fudge layer. Allow bars to set for about one hour before slicing and serving.