Little Debbie cake balls
Oh, how I wish you could smell this right now! There’s something magical about that first bite of a Little Debbie cake, isn’t there? It instantly transports me back to simpler times, those lazy afternoons spent sprawled on the floor, devouring a Cosmic Brownie or a Swiss Roll. For years, I’ve tried to recapture that exact magic, that perfect balance of soft cake and creamy frosting, in my own kitchen. And honestly? It felt like a quest worthy of a seasoned baker. Then, one day, staring at a leftover box of my favorite snack cakes, a crazy idea sparked: what if I could recreate that iconic Little Debbie flavor and texture, but in a bite-sized, irresistible form? What if I could make my own version of Little Debbie cake balls? This recipe is the culmination of those cravings and kitchen experiments, and trust me, it’s a total game-changer. It’s like bottling up that pure, unadulterated joy of a childhood treat and serving it up in a perfect little orb. Forget complicated baking marathons; this is pure, delightful indulgence, ready in a fraction of the time.
What are Little Debbie cake balls?
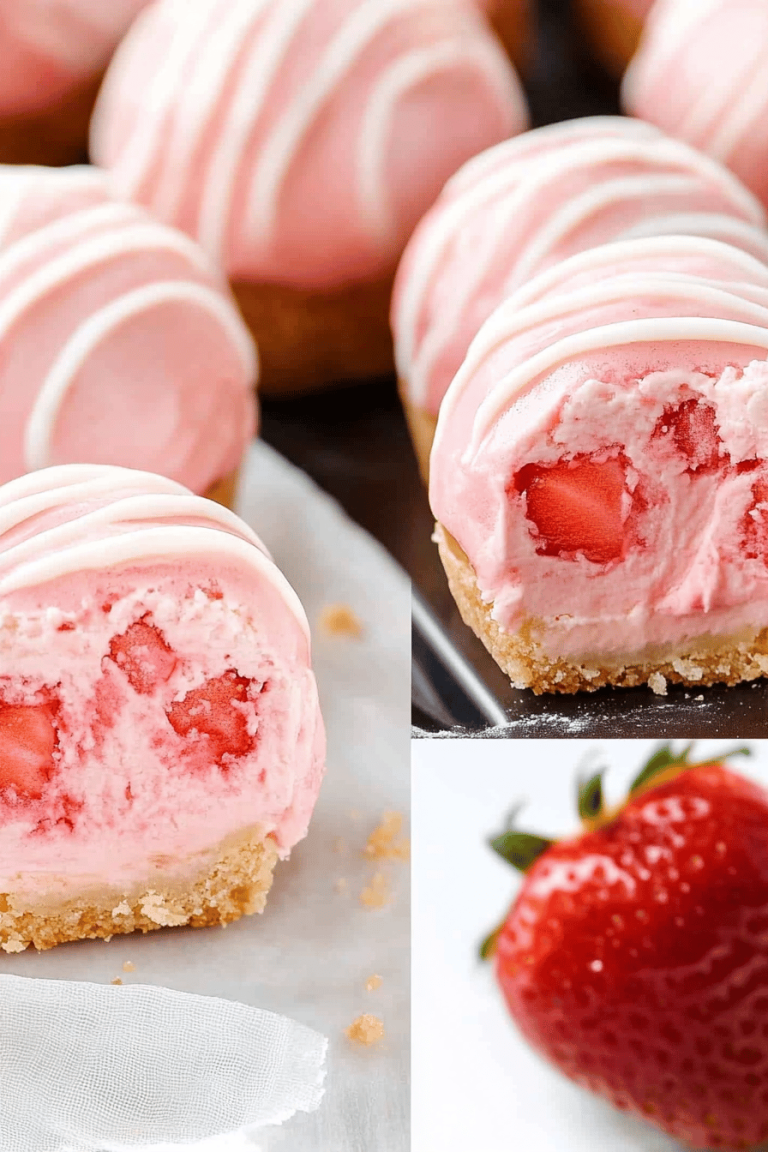
So, what exactly are we talking about when I say “Little Debbie cake balls”? Think of them as the ultimate homage to those beloved snack cakes we all grew up with. It’s not about replicating a specific kind, but rather capturing that essence – that impossibly moist, tender cake and that dreamy, often chocolatey, frosting. We’re taking the soul of a Little Debbie treat and transforming it into perfect, poppable spheres. Imagine the softest chocolate cake, crumbled and mixed with just enough creamy frosting to bind it, rolled into little balls, and then enrobed in a luscious chocolate coating. It’s like a no-bake truffle meets your favorite childhood cake. The beauty of these Little Debbie cake balls is that they’re incredibly versatile. You can lean into a specific flavor profile, like a chocolate-on-chocolate vibe reminiscent of a Fudge Brownie, or get a little more creative. It’s essentially a bite-sized celebration of all things sweet and nostalgic, and the best part? You don’t even need an oven for the main assembly!
Why you’ll love this recipe?
What is the secret behind this recipe?flavor is just out of this world. It’s that comforting, familiar sweetness that we all associate with those iconic treats, but elevated. The cake itself is super moist and tender, and when it’s combined with the creamy frosting and the crisp chocolate shell, it’s pure bliss. My kids declare them “better than the real thing,” and coming from them, that’s high praise indeed! Then there’s the simplicity. I’m all about making delicious treats accessible, and this recipe is surprisingly straightforward. You don’t need advanced baking skills. In fact, most of the magic happens without even turning on the oven! It’s a lifesaver for those moments when you’re craving something sweet but don’t have hours to spare. And let’s talk about Cost-efficiency: What is the best way to measure cost-efficiency?. Using cake mixes and standard frosting makes this a budget-friendly way to get a gourmet-tasting dessert. It’s way more economical than buying a huge box of individual treats. Plus, the versatility is a huge draw. While the classic chocolate is divine, you can easily swap out cake flavors, frosting types, and even add-ins to create your own unique Little Debbie cake ball variations. I’ve even seen people use different colored candies for the coating to mimic specific cake designs. It’s a fantastic base for endless creativity. What I love most about these Little Debbie cake balls is that they bring back such happy memories for me, and now I get to share that joy with my family and friends. They’re perfect for parties, bake sales, or just a Tuesday afternoon pick-me-up. They truly hit that sweet spot between familiar comfort and exciting newness!
How to Make Little Debbie Cake Balls
Quick Overview
The process for these Little Debbie cake balls is wonderfully simple and incredibly rewarding. You’ll basically start by crumbling up a pre-baked cake, mixing it with a binder (usually frosting), rolling it into balls, and then dipping them in melted chocolate. That’s it! It’s a no-bake assembly for the most part, which is a huge win. The key is getting the right consistency when you mix the cake and frosting – you want it moist enough to hold its shape but not so wet that it’s sticky. Then, a careful chill helps firm them up before the final dip. It’s a foolproof method that guarantees a delightful treat every single time.
Ingredients
For the Base Cake:
You’ll need one box of your favorite cake mix (around 15.25 oz). I’m partial to a chocolate cake mix because it feels the most classic, but a yellow or vanilla cake mix works beautifully too if you prefer a lighter flavor. Make sure to bake it according to the box directions and let it cool completely. This is crucial; warm cake will just turn into mush when you try to crumble it.
For the Binder/Frosting:
About 1 cup of store-bought frosting. Again, chocolate frosting is my go-to for that double chocolate punch, but vanilla or cream cheese frosting can be fun too! You might not use the whole cup, it just depends on the moisture of your cake and how you like the texture. Start with about half a cup and add more as needed until the mixture holds together when you squeeze it.
For the Coating:
About 12 ounces of good quality chocolate melting wafers or chocolate chips. I find that melting wafers give the smoothest, glossiest finish and are less prone to seizing, but good quality semi-sweet or dark chocolate chips work in a pinch. If using chips, you might need a little bit of shortening or coconut oil (about 1-2 teaspoons) to help them melt smoothly. I also like to have some sprinkles or decorative edible glitter on hand for an extra festive touch!
Step-by-Step Instructions
Step 1: Bake and Cool the Cake
First things first, bake your cake according to the package instructions. I usually opt for a 9×13 inch pan as it’s easy to crumble. Once it’s out of the oven, let it cool in the pan for about 10-15 minutes, then turn it out onto a wire rack to cool completely. And I mean *completely*! If it’s even slightly warm, your cake balls won’t hold their shape. This usually takes at least an hour, maybe longer. Patience is key here!
Step 2: Crumble the Cake
Once the cake is totally cool, break it into small crumbs. You can do this by hand, or if you want to be super efficient (and a little less messy!), you can pulse it a few times in a food processor until you have fine crumbs. Don’t over-process it into a paste; we still want some texture. Think of it like making graham cracker crust crumbs, but with cake!
Step 3: Mix in the Frosting
Now, transfer your cake crumbs to a large bowl. Add about half a cup of frosting to start. Use a sturdy spoon or your (clean!) hands to mix it all together. You want to combine it until the mixture is moist enough to stick together when you squeeze a bit in your palm. If it seems too dry and crumbly, add another tablespoon or two of frosting at a time, mixing well after each addition, until it reaches the right consistency. It should feel like a slightly moist dough.
Step 4: Roll into Balls
Once you’ve achieved that perfect dough-like consistency, it’s time to roll! Grab a small cookie scoop or a tablespoon measure to portion out the dough. Roll each portion firmly between your palms to create smooth, evenly sized balls. Aim for about 1-inch to 1.5-inch spheres. Don’t make them too big, or they’ll be hard to coat. As you roll them, place them on a parchment-lined baking sheet.
Step 5: Chill the Cake Balls
This is a super important step for success! Once all your cake balls are rolled, pop the entire baking sheet into the refrigerator for at least 30 minutes, or into the freezer for about 15-20 minutes. This chilling step helps them firm up, which makes them much easier to dip and prevents them from falling apart in the melted chocolate.
Step 6: Melt the Chocolate
While the cake balls are chilling, prepare your chocolate coating. Place your melting wafers or chocolate chips in a microwave-safe bowl. Microwave in 30-second intervals, stirring well after each interval, until the chocolate is smooth and fully melted. Be careful not to overheat it! If you’re using chocolate chips and find they are too thick, stir in 1-2 teaspoons of vegetable shortening or coconut oil until smooth. You can also do this over a double boiler on the stovetop if you prefer.
Step 7: Dip the Cake Balls
Retrieve your chilled cake balls from the fridge or freezer. Using a fork or a toothpick dipped in the melted chocolate (to prevent sticking), carefully dip each cake ball into the melted chocolate, turning to coat it completely. Let any excess chocolate drip back into the bowl. Gently place the coated cake ball back onto the parchment-lined baking sheet. If you’re adding sprinkles or decorations, do it immediately after dipping while the chocolate is still wet!
Step 8: Let Them Set
Once all your cake balls are dipped, allow them to set completely. You can leave them at room temperature for a bit if your kitchen isn’t too warm, or pop them back into the refrigerator for about 10-15 minutes to speed up the process. You’ll know they’re set when the chocolate coating is firm to the touch.
Step 9: Serve and Enjoy!
And there you have it! Your very own delicious Little Debbie cake balls. Arrange them on a platter and watch them disappear. They’re best enjoyed at room temperature or slightly chilled. These are so fun to make and even more fun to eat!
What to Serve It With
These Little Debbie cake balls are so wonderfully versatile, they fit in almost anywhere! For Breakfast, I love to serve a couple alongside a steaming mug of coffee. They’re not overly sweet, so they don’t feel like a dessert at all in the morning. They add a little touch of whimsy to an otherwise ordinary morning. For Brunch, they make an absolutely charming addition to a dessert table. Picture them nestled amongst fruit salads and pastries. They’re so pretty and bite-sized, making them perfect for guests to nibble on as they mingle. A light dusting of powdered sugar or a few edible flowers can make them look extra special. As a Dessert, they’re a guaranteed crowd-pleaser! They’re fantastic served after a meal, especially when you want something sweet but not too heavy. They pair wonderfully with a scoop of vanilla ice cream or a small glass of milk. For Cozy Snacks, this is where they truly shine in my house. After dinner, when that sweet craving hits, these are my go-to. They’re the perfect little pick-me-up with a cup of tea or a warm glass of milk. My family loves grabbing one (or two!) while we’re watching a movie. My personal favorite tradition is to make a big batch around the holidays and have them available for impromptu gatherings. They’re always a hit, and people are always surprised they’re homemade!
Top Tips for Perfecting Your Little Debbie Cake Balls
Over the years of tinkering and tasting (a tough job, I know!), I’ve picked up a few tricks that make these Little Debbie cake balls truly shine. First, regarding the cake prep: make sure your cake is *completely* cooled. I can’t stress this enough! If it’s even a little warm, it’ll be mushy and difficult to roll. For crumbling, I find using my hands gives the best control, but a food processor can work if you pulse it very carefully – you don’t want dust, you want fine crumbs. When it comes to mixing advice, start with less frosting than you think you need. You can always add more, but you can’t take it away! The mixture should just barely hold together when you squeeze it. Overmixing with too much frosting will make them sticky and hard to handle. For swirl customization, if you’re feeling adventurous, you can melt a small amount of white chocolate and drizzle it over the dipped balls in a contrasting pattern. Or, for a more subtle touch, mix some edible glitter or colored sanding sugar into your melted chocolate before dipping. Ingredient swaps can be fun! If you’re not a fan of chocolate cake, a yellow or vanilla cake mix works beautifully. You can also experiment with cream cheese frosting as the binder for a tangier flavor. For baking tips, the only baking involved is the initial cake, so make sure you bake it evenly. If you’re dipping in chocolate and it’s setting too fast because your kitchen is cool, you can warm the bowl of chocolate slightly by placing it over a pan of very warm (not boiling) water for a minute. For glaze variations, beyond the chocolate coating, consider a simple powdered sugar glaze (powdered sugar, a splash of milk, and a tiny bit of vanilla extract) for a different look and flavor. Or, even just a dusting of cocoa powder or powdered sugar can be lovely.
Storing and Reheating Tips
These Little Debbie cake balls are pretty forgiving when it comes to storage, but there are a few things that help keep them tasting their best. For room temperature storage, I usually keep them in an airtight container for up to 3 days. They tend to be best eaten within the first couple of days when the chocolate coating is nice and crisp and the cake is still super moist. If your house is on the warmer side, you might want to store them in the fridge, even if you plan to eat them at room temperature, just to prevent the chocolate from getting too soft. Refrigerator storage is excellent for keeping them fresh for longer, up to a week. Keep them in a single layer in an airtight container or wrap the container well to prevent them from absorbing other fridge odors. When you take them out of the fridge, I often let them sit at room temperature for about 15-20 minutes before serving to take the chill off and soften the cake just a bit. For freezer instructions, these are surprisingly freezer-friendly! I like to flash-freeze them first on a parchment-lined tray until they’re firm, then transfer them to a freezer-safe bag or container. They can stay frozen for up to 2-3 months. To thaw, simply transfer them to the refrigerator overnight, then let them come to room temperature as you would with refrigerated ones. Glaze timing advice is important: always dip and let your cake balls set *before* storing them, especially in the freezer. If you’re planning on storing them for a long time and want the freshest coating, you could even dip them just before serving after thawing, but that’s usually more effort than I have time for! They hold up really well when dipped ahead of time.
Frequently Asked Questions
Final Thoughts
So there you have it – a little slice of childhood nostalgia, ready to be devoured! These Little Debbie cake balls are more than just a treat; they’re a reminder of simple joys and happy times. I truly believe this recipe brings that familiar, comforting flavor into a fun, bite-sized package that everyone can enjoy. They’re proof that you don’t need to be a master baker to create something truly special and delicious. Whether you’re making them for a party, a bake sale, or just because you’re craving something sweet, I promise they’ll be a hit. If you love these, you might also enjoy my recipes for [link to another related recipe, e.g., “Homemade Cosmic Brownies”] or my [link to another related recipe, e.g., “Easy Chocolate Chip Cookies”] – they’re all about bringing that home-baked goodness to your table. I can’t wait to hear how your Little Debbie cake balls turn out! Please leave a comment below with your thoughts, any fun variations you tried, or how much your family devoured them (I won’t judge!). Happy baking, everyone!
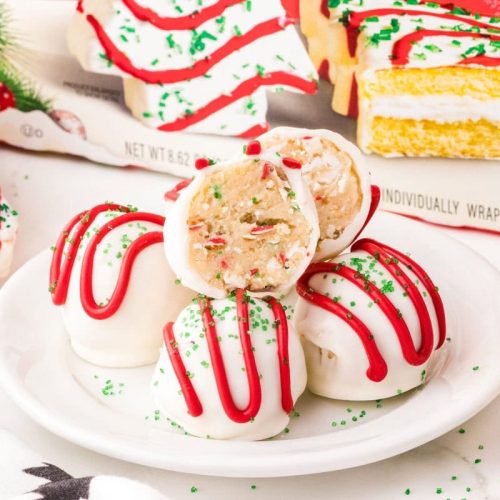
Sweet Little Debbie Cake Bites How To
Ingredients
Main Ingredients
- 10 count Little Debbie vanilla Christmas tree snack cakes unwrapped from 2 boxes (8.62 oz each)
- 8 ounce cream cheese softened to room temperature
- 20 ounce white chocolate melting wafers
- 6 ounce red vanilla flavored melting candy wafers
- 1 tablespoon green sanding sugar sprinkles
Instructions
Preparation Steps
- Line two large baking sheets with parchment paper or a silicone mat and set aside.
- Beat the softened cream cheese in a large mixing bowl with a hand mixer on medium speed for 1-2 minutes until fluffy and smooth.
- Break the Little Debbie snack cakes into small pieces and add to the cream cheese. Mix on low speed until fully combined with small pieces still visible.
- Using a small cookie scoop, scoop out 1 tablespoon portions of mixture and roll into smooth balls.
- Place each cake ball onto one of the prepared baking sheets. Repeat for all balls.
- Freeze the cake balls for 30-45 minutes until solid for easier coating.
- Melt the white chocolate wafers in a medium bowl according to package instructions and stir until smooth.
- In a separate bowl, melt the red vanilla candy wafers and transfer to a small piping bag with the tip cut off.
- Dip each frozen cake ball in melted white chocolate, coat all sides, then lift with a fork and tap off excess chocolate.
- Place the coated cake balls on the second baking sheet. Pipe red candy in a decorative zig-zag pattern and sprinkle with green sanding sugar to mimic the original look.
- Let the cake balls set for 15-20 minutes until the chocolate coating firms before serving.