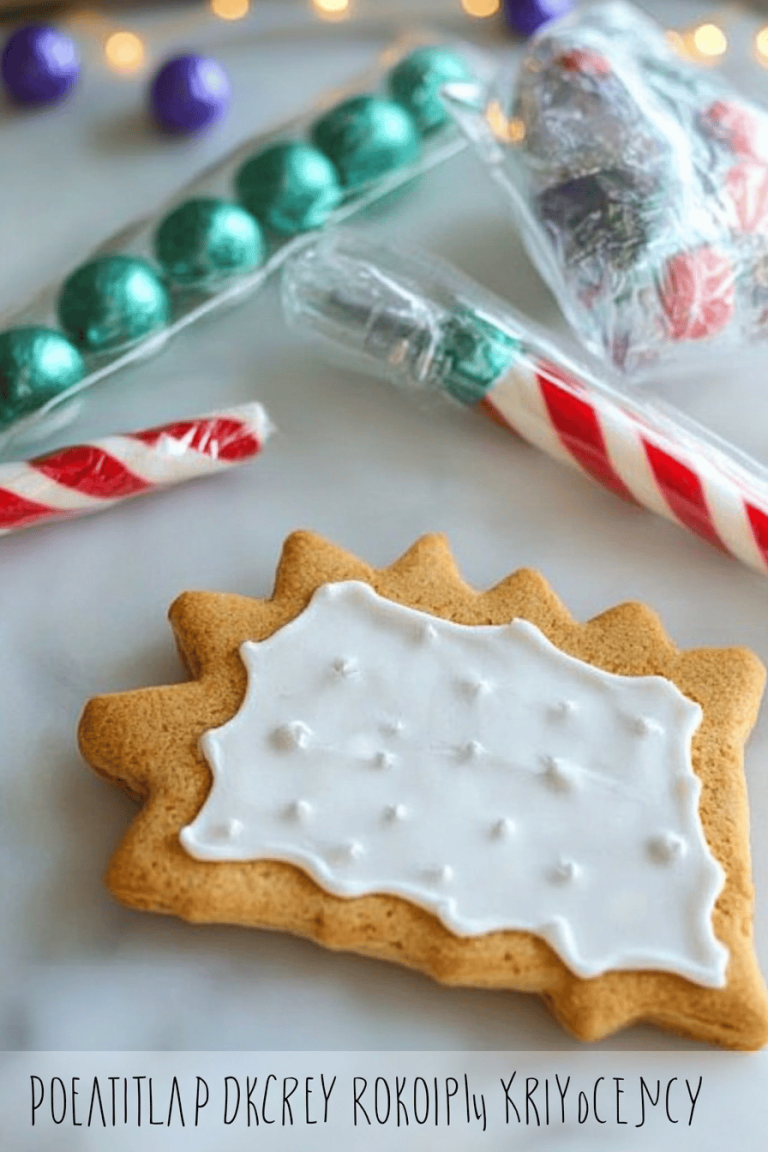
Jack-o’-Lantern Cookies
Oh, how I love this time of year! The crisp air, the crunch of leaves underfoot, and the scent of cinnamon wafting from the kitchen – it just fills my heart with so much joy. And speaking of joy, have you ever made Jack-o’-Lantern cookies? They sound so festive and, honestly, a little intimidating, right? I used to think they were only for the super-skilled bakers out there. But let me tell you, after years of tinkering and a few kitchen mishaps (which I’ll definitely share!), I’ve perfected a version that’s surprisingly simple and utterly delightful. These aren’t just cookies; they’re little edible celebrations that bring smiles to everyone’s faces. Forget those elaborate, multi-layered cakes; these Jack-o’-Lantern cookies are my go-to for a quick but impressive treat. They remind me so much of my own childhood, helping my mom roll out dough and decorate little pumpkin shapes, and now my kids are just as obsessed. They’re truly a taste of pure autumn magic, and I can’t wait to share them with you.
What are Jack-o-lantern cookies?
So, what exactly are these delightful little treats? Think of them as the perfect marriage between a tender, slightly spiced cookie and a vibrant, edible pumpkin. The “Jack-o’-Lantern” part comes from their adorable appearance – we’ll be using orange food coloring to give the dough that signature pumpkin hue, and then a simple, sweet glaze piped on to create that classic carved-face design. They’re essentially a wonderfully spiced Sugar Cookie base, but with a festive twist that makes them perfect for Halloween or any fall gathering. The name itself just conjures up images of cozy nights and trick-or-treating fun, doesn’t it? It’s essentially a classic cutout cookie, but we’re dressing it up to look like everyone’s favorite Halloween icon. They’re designed to be cheerful, easy to decorate, and most importantly, incredibly delicious. No complicated techniques here, just pure, unadulterated cookie joy!
Why you’ll love this recipe?
Honestly, where do I even begin? There are so many reasons why this Jack-o’-Lantern cookie recipe has become a staple in my kitchen. First and foremost, the flavor is just spot-on. It’s that perfect balance of sweet, buttery cookie with a subtle hint of warm spices – think cinnamon and a touch of nutmeg. It’s not overpowering, just enough to make you close your eyes and savor each bite. And the texture? Oh, it’s divine! They’re soft enough to melt in your mouth but with just the right amount of chewiness. Then there’s the simplicity factor. I know, I know, decorating cookies can sound daunting. But I’ve streamlined this process so much that even if you’re a beginner baker, you’ll feel like a pro. The glaze is super easy to make, and even if your piping isn’t perfect, the rustic charm of a homemade Jack-o’-Lantern is part of its appeal! It’s also surprisingly cost-effective. The ingredients are all pantry staples, and you can make a big batch for a fraction of what you’d pay for store-bought decorated cookies. Plus, they are incredibly versatile. While they’re perfect for Halloween, you can adjust the spice level, add a pinch of ginger for a spicier kick, or even leave out the orange coloring for a simple spiced Sugar Cookie. What I love most about this recipe is the sheer delight it brings. Seeing the kids’ eyes light up when they see these bright orange faces is priceless, and the smell that fills the house while they bake? Pure bliss. They’re a comforting hug in cookie form, and that’s something I can always get behind.
How do I make Jack-o-lantern cookies?
Quick Overview
The process is pretty straightforward, really. We start by mixing up a lovely, tender Cookie Dough with a hint of warming spices and that essential orange hue. Then, we chill it briefly so it’s easy to handle. Next, we roll it out, cut out our pumpkin shapes (or any fun fall shapes you like!), and bake them until they’re perfectly golden around the edges. Once cooled, we whip up a simple powdered sugar glaze, tint it, and pipe on those happy Jack-o’-Lantern faces. It’s a simple, rewarding process that yields incredibly festive and delicious results. You’ll be surprised at how quickly you can go from ingredients to a platter full of cheerful pumpkins!
Ingredients
For the Main Batter:
This is our sturdy-yet-tender cookie base that holds its shape beautifully. We want a cookie that’s not too crumbly and has a lovely flavor all on its own. I always opt for unsalted butter; it gives me better control over the saltiness. Make sure your butter is softened, not melted, for the best texture. And for the flour, all-purpose is perfect. I’ve found that using cake flour can sometimes make them too delicate, and we want these to withstand a bit of decorating! Using good quality vanilla extract really makes a difference here – you can taste it! And of course, the star of the show for color: orange food coloring. Gel food coloring is best as it gives a vibrant color without adding too much liquid to the dough. A little goes a long way!
For the Filling:
Okay, so for these specific Jack-o’-Lantern cookies, the “filling” is really just the glaze. We’re not doing a separate filling in the cookie itself for this version, which keeps it super simple! The glaze is what gives us that wonderful contrasting color and a touch of extra sweetness to really make those faces pop. It’s a basic confectioners’ sugar glaze, but we’ll add a bit of liquid to make it piping consistency.
For the Glaze:
This is the fun part where we bring our Jack-o’-Lanterns to life! We’ll use powdered sugar, a little bit of milk or water (milk makes it a touch richer, water is fine too!), and a splash of vanilla extract. For the orange color, you’ll want some orange food coloring. If you want to make little black details for the eyes and mouth, you’ll need a tiny bit of black food coloring or a black food coloring pen. The key here is getting the consistency just right – thick enough to pipe without spreading too much, but thin enough to flow smoothly. I’ll explain how to get that perfect consistency below!
Step-by-Step Instructions
Step 1: Preheat & Prep Pan
First things first, let’s get our oven ready to work its magic. Preheat your oven to 350°F (175°C). While the oven heats up, grab a couple of baking sheets and line them with parchment paper. This is a lifesaver for easy cleanup and ensures your cookies don’t stick. I always have my parchment paper ready to go before I even start mixing. It’s one of those little things that makes the whole baking process smoother.
Step 2: Mix Dry Ingredients
In a large bowl, whisk together your all-purpose flour, baking powder, salt, and your warming spices (like cinnamon and a pinch of nutmeg, if using). Give it a good whisk to make sure everything is evenly distributed. This step is important because it ensures your leavening agents and spices are spread throughout the dough, giving you consistent results in every cookie. You don’t want one cookie to be bland and the next to be overly spiced!
Step 3: Mix Wet Ingredients
In a separate, larger bowl (or the bowl of your stand mixer), cream together the softened unsalted butter and granulated sugar until light and fluffy. This usually takes a few minutes. Beat in your egg and vanilla extract until well combined. Then, add your orange food coloring, starting with a few drops and adding more until you achieve a lovely pumpkin orange hue. Mix until it’s uniform. Seeing that beautiful orange color always makes me so excited!
Step 4: Combine
Now, it’s time to bring our wet and dry ingredients together. Gradually add the dry ingredients to the wet ingredients, mixing on low speed (or with a spatula) until just combined. Be careful not to overmix! Overmixing can develop the gluten in the flour, leading to tough cookies. Stop mixing as soon as you no longer see streaks of flour. The dough should be soft and pliable.
Step 5: Prepare Filling (Glaze)**
While the dough is chilling, let’s get our glaze ready. In a medium bowl, whisk together the powdered sugar and 1-2 tablespoons of milk (or water) until you have a smooth, thick but pourable consistency. Add a few drops of orange food coloring and mix until the color is uniform. If it’s too thick, add a tiny bit more liquid, a teaspoon at a time. If it’s too thin, add a little more powdered sugar. For the black details, you can use a separate small bowl for black icing, or get a black food coloring pen which is super handy for details!
Step 6: Layer & Swirl (Cut & Shape Cookies)**
Okay, back to the dough! Turn the dough out onto a lightly floured surface. Gently form it into a disc, cover it with plastic wrap, and chill in the refrigerator for at least 30 minutes. This makes it much easier to roll and cut. Once chilled, roll the dough out to about 1/4-inch thickness. Use your favorite pumpkin-shaped cookie cutter (or any fall shape!) to cut out cookies. Re-roll scraps gently as needed, but try not to overwork the dough. Place the cut cookies onto your prepared baking sheets, about 1 inch apart.
Step 7: Bake
Bake for 8-10 minutes, or until the edges are lightly golden and the centers are set. Don’t overbake them, or they’ll become crisp instead of soft and chewy. I always keep a close eye on them during the last couple of minutes. Once baked, let them cool on the baking sheet for 5 minutes before transferring them to a wire rack to cool completely. This is crucial before decorating!
Step 8: Cool & Glaze
Once the cookies are completely cool – and I mean *completely* cool, otherwise your glaze will melt right off! – it’s time to decorate. Spoon your orange glaze into a piping bag fitted with a small round tip (or a zip-top bag with a tiny corner snipped off). Pipe an outline around the edge of each cookie. Then, fill in the center with the glaze, using a toothpick to spread it evenly if needed. Let this orange layer set for about 15-20 minutes. Once the orange glaze is mostly set, use your black icing or food coloring pen to draw on the Jack-o’-Lantern faces – eyes, nose, and a spooky or happy mouth!
Step 9: Slice & Serve
These cookies are best enjoyed at room temperature. Once the glaze is fully dry (give it an hour or two to be safe, especially if it’s humid), they are ready to be devoured! Arrange them on a festive platter and watch them disappear. They’re perfect for sharing with friends, family, or anyone who needs a little bit of Halloween cheer.
What to Serve It With
These Jack-o’-Lantern cookies are so versatile, they fit into almost any occasion! For breakfast, they’re a fun treat to surprise the kids with – imagine their delight seeing a pumpkin cookie next to their cereal! They pair wonderfully with a glass of cold milk or a warm mug of APPLE CIDER. For a more elegant brunch spread, I love to arrange them on a tiered stand with some fresh fruit and other pastries. They add such a cheerful, colorful element that guests always comment on. As a dessert, they’re fantastic on their own, but you can also serve them alongside a scoop of vanilla bean ice cream or a dollop of whipped cream for an extra indulgence. And for those cozy, spontaneous snack times? They are absolutely perfect. Grab a cookie (or three!) and curl up with a good book and a hot chocolate. My family tradition is to have these out on Halloween night for a pre-trick-or-treating energy boost, along with some warm caramel apple cider. It just feels so festive and comforting. They’re also amazing alongside a mug of coffee for an afternoon pick-me-up!
Top Tips for Perfecting Your Jack-o’-Lantern Cookies
Okay, let’s talk about making these cookies absolutely perfect. I’ve learned a few things over the years, and I’m happy to share them with you!
Orange Color Control: When adding the orange food coloring to the dough, start with just a few drops. You can always add more, but you can’t take it away! Gel coloring is your best friend here for a vibrant hue without affecting the dough consistency. For the glaze, aim for a color that’s reminiscent of a real pumpkin. It doesn’t have to be exact, but that bright orange is key!
Don’t Overmix the Dough: This is probably my biggest tip for soft, tender cookies. Once you add the dry ingredients to the wet, mix only until *just* combined. A few tiny streaks of flour are okay; they’ll incorporate as you handle the dough. Overmixing develops gluten, which leads to tough cookies, and nobody wants that!
Chilling is Key: I know it’s tempting to skip this step, but chilling the dough for at least 30 minutes is crucial. It firms up the butter, making the dough much easier to roll out without sticking to your counter or getting misshapen. It also helps the cookies keep their shape during baking, preventing them from spreading too much.
Rolling Evenly: Aim for a consistent dough thickness, around 1/4-inch. If some cookies are thicker than others, they’ll bake at different rates. I sometimes use rolling pin guides or even just eyeball it, but consistency is your goal for even baking and uniform appearance.
Cool Completely Before Decorating: I cannot stress this enough! If your cookies are even slightly warm when you apply the glaze, it will melt, run everywhere, and make a mess. Patience is a virtue here. Let them cool on a wire rack until they are completely at room temperature.
Glaze Consistency is Everything: For piping, you want a glaze that’s thick enough to hold its shape but still flows smoothly. If it’s too thick, add liquid a *tiny* bit at a time. If it’s too thin, add powdered sugar a tablespoon at a time. Test it on a piece of parchment paper first. The black icing for the faces should be similar, or you can use a food coloring pen for easy detail work.
Perfect Piping: Don’t worry if your lines aren’t perfectly straight or your shapes aren’t symmetrical. That’s the charm of homemade! If you mess up, you can often gently scrape off the wet glaze and try again, or just embrace the rustic look. A toothpick is your best friend for spreading glaze in the center and for fine-tuning those facial features.
Ingredient Swaps: If you don’t have orange food coloring for the dough, you can still make these! Just make a standard Sugar Cookie dough and frost them with the orange glaze. You can also swap out the spices. A little bit of ginger or allspice can add a nice warmth. For a dairy-free option, you can use vegan butter sticks and a plant-based milk for the glaze.
Baking Time Variations: Ovens can be finicky! My oven runs a little hot, so 8-10 minutes is usually perfect. Yours might need a minute or two longer or shorter. Keep an eye on them; the edges should be lightly golden, and the centers should look set, not wet. They’ll continue to set up as they cool.
Storing and Reheating Tips
These Jack-o’-Lantern cookies are pretty resilient, but proper storage is key to keeping them tasting their best. If you’ve got a few leftover (which is rare in my house!), here’s what I do:
Room Temperature Storage: Once the glaze is completely dry – and I mean *fully* dry, which can take a couple of hours, especially in humid weather – you can store these cookies in an airtight container at room temperature for up to 3-4 days. Make sure they’re not all squished together; I like to layer them between sheets of parchment paper or wax paper to prevent sticking and protect the decorations.
Refrigerator Storage: I generally don’t recommend refrigerating decorated cookies like these, as the moisture in the fridge can sometimes make the glaze sticky or the cookie a bit too soft. However, if you live in a very warm climate and need to, place them in an airtight container with a piece of bread to help absorb moisture. They should still be good for about the same 3-4 days, but the texture might change slightly.
Freezer Instructions: For longer storage, you can absolutely freeze these cookies! I like to freeze them *before* decorating them with the glaze, if possible. Lay them flat on a baking sheet and freeze until solid, then transfer them to a freezer-safe bag or airtight container. They’ll last in the freezer for up to 2-3 months. If you want to freeze them decorated, wrap each cookie individually in plastic wrap, then place them in a freezer-safe container. To thaw, bring them to room temperature gradually, still in their packaging, to prevent condensation.
Glaze Timing Advice: If you’re freezing undecorated cookies, wait until they are fully thawed and at room temperature before glazing. This ensures the glaze applies smoothly and dries properly. If you are freezing decorated cookies, ensure the glaze is completely dry before wrapping and freezing. The cold temperature might affect the glaze’s appearance slightly upon thawing, but they’ll still be delicious!
Frequently Asked Questions
Final Thoughts
I truly hope you give these Jack-o’-Lantern cookies a try! They’re more than just a sweet treat; they’re a way to bring a little bit of autumn magic into your kitchen and share it with the people you love. The combination of the tender, spiced cookie and the fun, festive decoration makes them a winner every single time. They’re the perfect reminder that sometimes, the simplest recipes can bring the biggest smiles. If you enjoy this recipe, you might also love my Spiced Apple Cider Cookies or my Easy Pumpkin Bread – they’re all perfect for this cozy season! I can’t wait to hear what you think, and I’d absolutely love to see your creations. Please feel free to leave a comment below with your own tips, variations, or just to say hello! Happy baking, and may your homes be filled with the wonderful aroma of these cheerful little pumpkins!
Jack-o'-Lantern Cookies
Ingredients
Cookie Dough
- 1 cup unsalted butter softened
- 1.5 cup granulated sugar
- 2 large eggs
- 1 teaspoon vanilla extract
- 3 cup all-purpose flour
- 1 teaspoon baking soda
- 0.5 teaspoon salt
Royal Icing Decorations
- 3 cup powdered sugar
- 0.25 cup milk
- 1 teaspoon light corn syrup
- 0.5 teaspoon almond extract optional
- orange food coloring
- black food coloring
Instructions
Cookie Preparation
- In a large bowl, cream together the softened butter and granulated sugar until light and fluffy.
- Beat in the eggs one at a time, then stir in the vanilla extract.
- In a separate bowl, whisk together the flour, baking soda, and salt.
- Gradually add the dry ingredients to the wet ingredients, mixing until just combined.
- Divide the dough in half. Wrap each half in plastic wrap and flatten into a disc. Refrigerate for at least 1 hour.
- Preheat oven to 350°F (175°C). Line baking sheets with parchment paper.
- On a lightly floured surface, roll out one disc of dough to about 1/4-inch thickness. Cut out pumpkin shapes using a cookie cutter.
- Place cookies on the prepared baking sheets, about 2 inches apart.
- Bake for 8-10 minutes, or until edges are lightly golden.
- Let cookies cool on the baking sheet for a few minutes before transferring them to a wire rack to cool completely.
Icing and Decoration
- In a medium bowl, whisk together the powdered sugar, milk, and light corn syrup until smooth. If using, stir in the almond extract.
- Divide the icing into two bowls. Tint one bowl orange with food coloring and the other black.
- Once the cookies are completely cool, use the orange icing to fill in the pumpkin shape. Use the black icing to pipe eyes, nose, and mouth details.
- Let the icing dry completely before serving or storing.