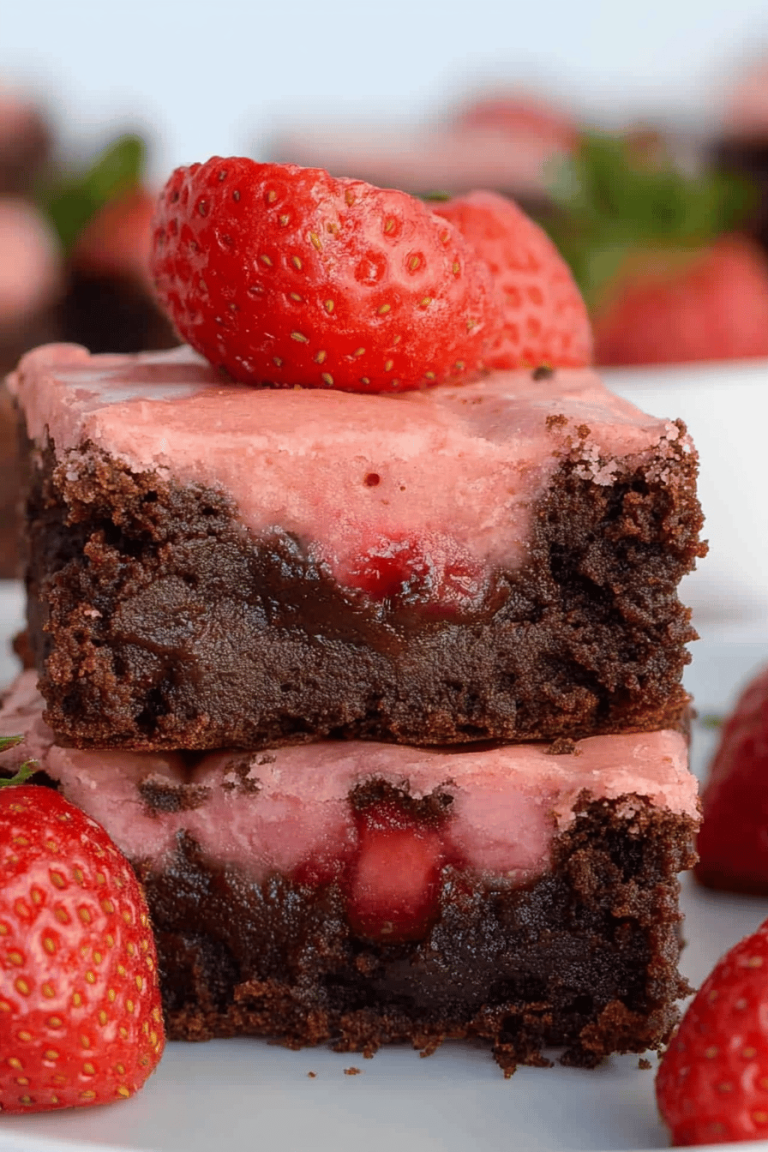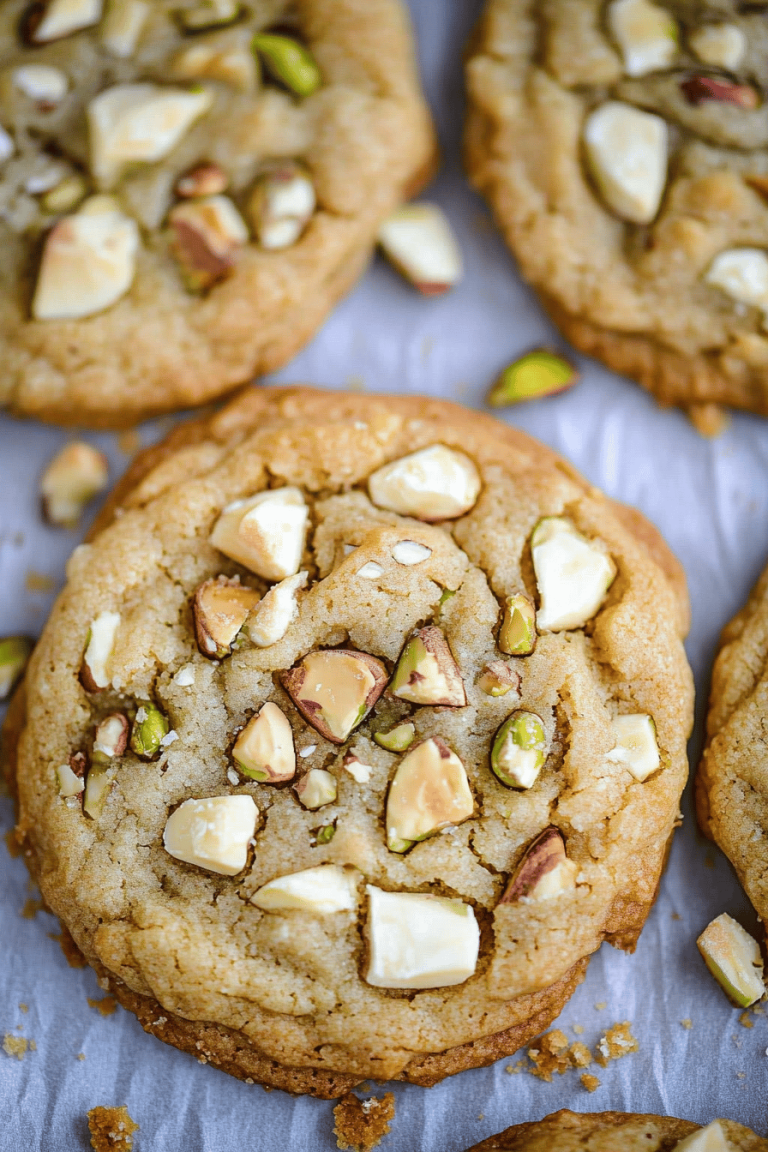
healthy fudgy brownie bites
The first time I made these, I stood at the counter with a mug of coffee and a fridge full of little leftovers from the week. My mom used to bake full-sized brownies, and while they were delicious, they felt a bit heavy after a long day. These healthy fudgy Brownie Bites are like a best-of-both-worlds moment—soft, deeply chocolatey, and incredibly easy to stash in a lunch box or on a busy weeknight. I remember packing a tray for the kids on a car ride, and the scent of cocoa riding the air made everyone pause to sniff the moment. It’s amazing how something so small can spark such a happy, comforting reaction. If you’ve ever reached for a brownie but wished for something a touch lighter and more portable, this is your answer. I’m telling you, healthy fudgy brownie bites disappear in minutes at my house—the flavor is that good and the texture is addictive. I always keep a batch in the fridge for quick snack-attacks, and yes, my kids actually ask for seconds.
What are the health benefits of brownie bites?
Think of healthy fudgy brownie bites as brownie-style bliss that fits into your day without weighing you down. It’s essentially a compact, crowd-pleasing treat that borrows the fudgy, rich character of a brownie and pairs it with smarter ingredients and everyday swaps. The name itself hints at the balance: indulgent chocolate flavor, a moist crumb, and a touch of veggie moisture that keeps things honest. I like to say they’re brownies you can grab with one hand—perfect for busy mornings, quick after-school snacks, or a little dessert that travels well. These are fudgy, not cakey, and they’ve got a whisper of sweetness that never overpowers the chocolate. If you’ve ever wondered whether you can enjoy dessert without overdoing it, this recipe is your friendly answer. They’re versatile, forgiving, and surprisingly forgiving—a snack that becomes a small ritual around the kitchen table.
Why you’ll love this recipe?
What I love most about healthy fudgy brownie bites is how approachable they are. They feel special enough for company, but they’re genuinely simple enough to whip up on a weeknight. Here’s why they’ve earned a regular spot in my kitchen:
- Flavor: Rich cocoa, a hint of vanilla, and a touch of sweetness that honors the dark chocolate without shouting. The texture stays fudgy and moist, which makes every bite feel like a tiny, comforting celebration.
- Simplicity:What are some good recipes to make with a sleepy brain?
- Cost-efficiency: What is the best way to measure cost-efficiency? Pantry-friendly ingredients add up to big flavor without a big price tag. No exotic ingredients here—just things you probably already have.
- Versatility: You can tuck in zucchini to boost moisture, swap flours to suit dietary needs, or switch up the filling and glaze to create new flavors. A few swaps, and you’ve got a new brownie bite personality.
What makes this recipe extra cozy is the way the bites feel like a tiny, personal indulgence. I’ve served them as a quick after-school treat, tucked into lunch boxes, or enjoyed with a coffee when the kitchen settles into evening quiet. If you’ve had a long day and need something that feels like a hug, these bites deliver—without making you feel overstuffed. My kids ask for this all the time, and I love that it’s easy to tweak to suit everyone’s tastes. It’s the kind of recipe that earns a spot in the weekly rotation because it’s reliably good, surprisingly versatile, and downright comforting.
How to Make Healthy Fudgy Brownie Bites
Quick Overview
In a nutshell, you whisk dry ingredients, whisk wet ingredients, combine gently, and bake in a mini muffin tin until the centers stay soft and shiny. The magic happens when you spoon a little filling into the center and swirl it with more batter, then bake until the edges pull away just a touch. The result is a tray of bite-sized, fudgy wonders with optional cream-cheese or peanut-butter swirls and a glossy chocolate glaze if you’re feeling extra pampered. The method is forgiving—overmixing is the enemy, so you’ll look for a lightly cohesive batter with a glossy sheen. This approach keeps the texture tender and the crumb moist. If you’ve never baked with zucchini before, you’ll be surprised how a quiet veggie can lift the moisture and keep the bites fudgy rather than dense.
Ingredients
For the Main Batter:
– 1 cup finely grated zucchini, squeezed to remove excess moisture
– 3/4 cup almond flour (or your favorite gluten-free blend)
– 1/2 cup unsweetened cocoa powder
– 1/4 cup maple syrup (or honey, to taste)
– 1/4 cup unsweetened applesauce
– 2 large eggs (or 2 flax eggs for vegan option)
– 2 tablespoons melted coconut oil or light Olive Oil
– 1 teaspoon vanilla extract
– 1/4 teaspoon salt
– 1/2 teaspoon baking powder
– 1/4 teaspoon baking soda
For the Filling (optional):
– 2 ounces cream cheese, softened, or 2 tablespoons Peanut Butter
– 1 tablespoon maple syrup or honey
– A pinch of vanilla (optional)
For the Glaze (optional):
– 1/4 cup Dark Chocolate chips or chopped dark chocolate
– 1 tablespoon coconut oil or cream to thin if needed
– Optional: 1 teaspoon espresso powder for depth
Step-by-Step Instructions
Step 1: Preheat & Prep Pan
Heat your oven to 350°F (175°C). Lightly grease a 24-cup mini muffin tin with a neutral oil or line with mini paper liners. I love the quick clean-up of liners here, plus they release so easily when they’re fresh and warm. If you’re not using liners, a quick spray of nonstick is perfect, and a light dusting of cocoa powder helps prevent sticking.
Step 2: Mix Dry Ingredients
In a medium bowl, whisk together almond flour, cocoa powder, baking powder, baking soda, and salt. Sift if you have a sifter handy to avoid any stubborn clumps. A smooth, unified dry mix is the foundation for a tender crumb and even color.
Step 3: Mix Wet Ingredients
In a separate bowl, whisk eggs (or flax eggs) with vanilla, then whisk in applesauce and melted coconut oil. Fold in the grated zucchini until the mixture looks glossy and cohesive. The zucchini will release a bit of moisture as you whisk, which is exactly what keeps these bites fudgy.
Step 4: Combine
Pour the wet ingredients into the dry and mix just until everything comes together. Resist the urge to overbeat; a few tiny lumps are totally fine. The batter should be thick and glossy, not runny. If it feels a touch too thick, you can add a teaspoon of milk or almond milk, but add gradually.
Step 5: Prepare Filling
If you’re including a filling, mix the cream cheese (or Peanut Butter) with maple syrup and a splash of vanilla until smooth. It should be creamy and scoopable but not runny. I love a little tang from the cream cheese, but peanut butter keeps things nutty and cozy. Keep the filling cool while you’re tasting the batter, so it doesn’t soften and blur the swirls.
Step 6: Layer & Swirl
Drop about a teaspoon of batter into each mini muffin cup. If you’re using filling, place a small amount in the center of each cup, then cover with another teaspoon of batter. Use a toothpick or skewer to swirl gently, creating a pretty marbled effect. You want distinct swirls but not so much that the centers lose their fudgy character.
Step 7: Bake
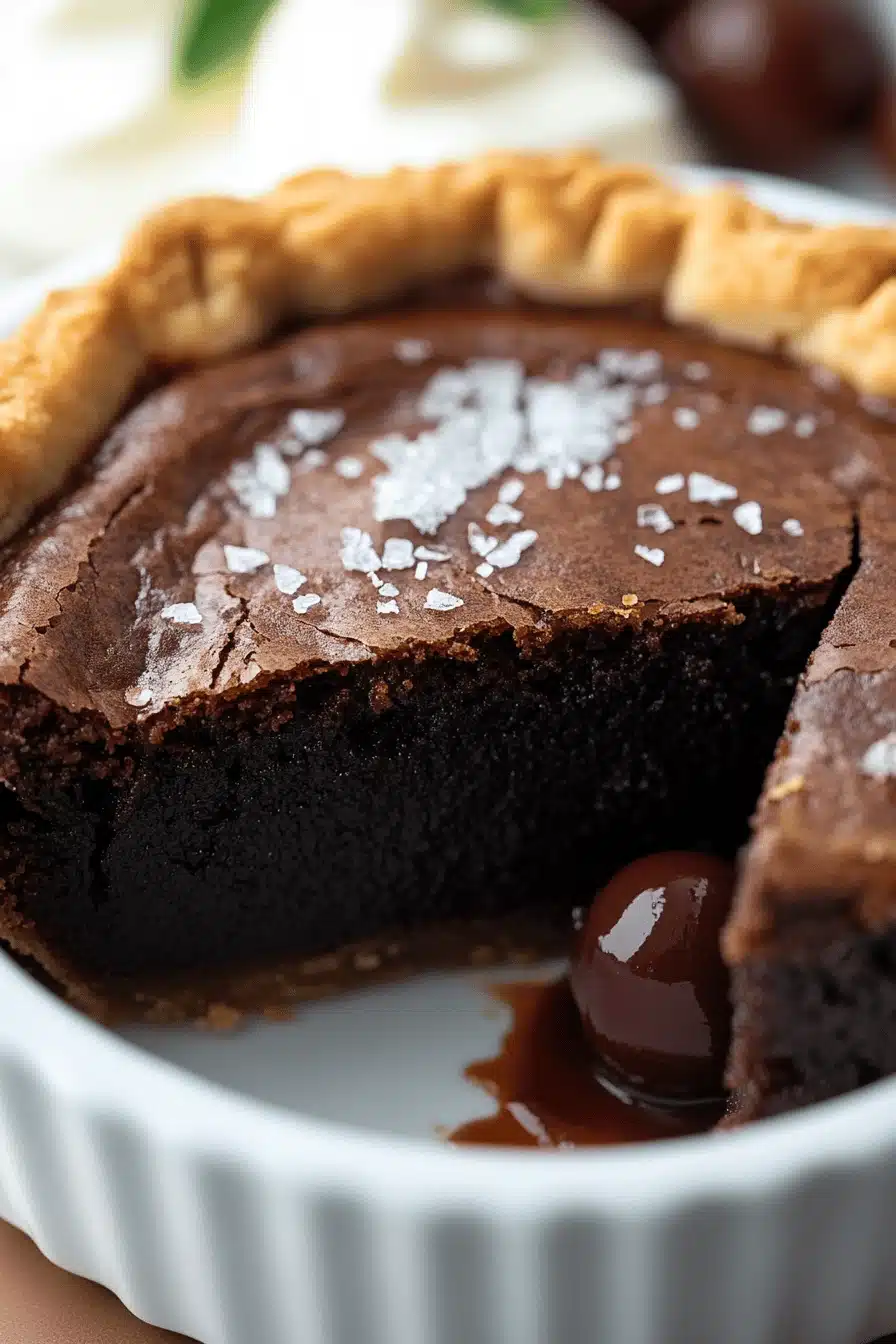
Bake for 12–14 minutes, or until the tops look set and a toothpick inserted into the center comes out with a few moist crumbs. Mini bites can go from underdone to overdone quickly, so start checking at the 12-minute mark. If your oven runs hot, drop the temperature to 345°F (175°C) and extend by a couple of minutes. The goal is a soft center with a slightly pull-away edge—pure fudgy magic.
Step 8: Cool & Glaze
Allow the bites to cool in the pan for about 10 minutes, then transfer to a wire rack to finish cooling. If you’re glazing, melt the chocolate with the coconut oil until smooth, stir in espresso powder if you’re using it, and drizzle over the cooled bites. The glaze firms up as it sits, so a gentle layer is all you need. If you prefer no glaze, a light dusting of powdered sugar or a pinch of flaky sea salt also gives a nice finish and a little contrast to the deep chocolate.
Step 9: Slice & Serve
These bites are best enjoyed slightly warm or at room temperature. They pair beautifully with a glass of milk, a mug of coffee, or a dollop of whipped cream for a more indulgent moment. Because they’re bite-sized, you can plate them neatly on a small platter or keep the tray on the counter for a casual snack station. The texture is the kind that begs for a second bite, so I always make a double batch when we’re entertaining or hosting a playdate. Trust me on this one—the saying “one bite is never enough” will be ringing true in your kitchen too.
What to Serve It With
These little brownie bites aren’t fussy, which is part of their charm. Here are some thoughtful ways to enjoy them, organized by occasion:
For Breakfast: Pair with a bold coffee, a dollop of yogurt, and a few fresh berries. A bacon or sausage crostini on the side adds a savory balance if you’re serving a crowd that loves a mix of flavors. I’ve even pressed a tiny sprinkle of flaky sea salt on the glaze to mimic a dessert-meets-mavorite-morning moment.
For Brunch: Arrange on a marble platter with citrus wedges and a pot of hot cocoa or Spanish latte. A sprig of mint or a dusting of powdered sugar makes them look extra inviting for company.
As Dessert: Serve with vanilla ice cream or whipped cream and a few toasted almonds for crunch. The contrast between the cool cream and fudgy bite is irresistible. If you’re feeling fancy, drizzle a little extra glaze and finish with cacao nibs.
For Cozy Snacks: A mug of tea or hot chocolate and a small dish of bites gone cold is a perfect night-time wind-down. They travel well in a lunchbox or a small tin for a neighborly drop-off during a busy week. This is the kind of treat that makes you feel loved without requiring a full-bore dessert session.
Family traditions creep in here, too. I’ve always kept a tray of these ready for after-school moments, and my sister swears the zucchini in the batter makes the bites mysteriously more forgiving to the palate—less sweetness, more chocolate whisper. It’s become a little ritual, and I adore watching the kids grab a bite and trade flavors with giggles. It’s a simple thing, but it sticks with you: a small plate of bites can carry big comfort.
Top Tips for Perfecting Your Healthy Fudgy Brownie Bites
These tips aren’t about high-tech tricks; they’re about the little adjustments that make all the difference after you’ve baked this many times and learned a few lessons the hard way.
Zucchini Prep: Moisture is your friend here, but too much can thin the batter. I always squeeze the grated zucchini well and pat it dry with a clean towel. If you want an extra boost of moisture without thinning the batter, you can pulse the zucchini briefly in a processor to break it down a touch, then squeeze again. It’s amazing how a small change in moisture can affect the fudgy outcome.
Mixing Advice: Overmixing is the sneaky culprit behind cake-like brownies. Stir just until the dry ingredients disappear into the wet; a few little lumps are totally fine and will yield a tender crumb. If your batter looks a touch thick, a teaspoon or two of milk is enough to loosen it—but add gradually and don’t overdo it.
Swirl Customization: The swirl is your moment of personality. Use a toothpick or skewer to make gentle zigzags, not a thorough swirl. That way, you’ll preserve the fudgy pockets created by the filling while still showing a pretty marbled pattern. You can also add a few dark chocolate chips or a teaspoon of peanut butter swirls between layers for extra contrast.
Ingredient Swaps: Almond flour works beautifully, but you can swap in a gluten-free blend if that’s what you have. If you’re avoiding dairy, go for coconut yogurt instead of cream cheese and a plant-based chocolate for the glaze. For a nuttier bite, toss in a tablespoon of finely chopped walnuts or pecans—just fold them in with the dry ingredients to distribute evenly.
Baking Tips: Oven temperatures vary, so you may need to adjust by a couple of minutes. Start checking at 12 minutes and rely on a few moist crumbs for fudgy centers. If you test too early, you’ll end up with a more batter-like texture; if you go too far, they’ll dry out. The goal is a balance between set edges and a soft center.
Glaze Variations: The glaze adds a glossy finish and a touch more sweetness. If you skip the glaze, finish with a light dusting of powdered sugar or a sprinkle of sea salt to bring out the chocolate notes. For dairy-free options, a thin glaze with coconut oil and cocoa powder works beautifully, and you can add a splash of vanilla to deepen the chocolate character.
Lessons learned over the years? I’ve learned to trust the tiny cues—the way the batter clings to the spoon, the scent of cocoa as the tray emerges from the oven, and that your taste buds tell the truth before your eyes do. These little bites became a reliable go-to because they’re forgiving, flexible, and deeply comforting. They aren’t flashy, but they’re honest and deeply satisfying. If you’re cooking for picky eaters, know that these bites hover perfectly in that sweet spot where kids smile and grown-ups feel a little lighter after a bite or two. And yes, I’ve swapped zucchini for shredded carrot in a pinch, and the texture held strong. You’ll find your own little tricks in time, I promise.
Storing and Reheating Tips
Storing these bites properly keeps that fudgy texture intact and makes it easy to grab-and-go. Here’s how I do it, depending on how soon I plan to eat them again.
Room Temperature: In an airtight container for up to 2 days. If your kitchen is warm, store them in the fridge for a bit more resilience and bring to room temp before serving for the best texture.
Refrigerator Storage: Keep in an airtight container for up to 5 days. The glaze (if you used it) stays glossy for a day or two, then becomes a tad stiff. A quick 10–15 second zap in the microwave or a warm napkin wrap softens them beautifully.
Freezer Instructions: Freeze in a single layer on a parchment-lined tray, then transfer to a zippy freezer bag for up to 3 months. Thaw at room temperature or warm gently in the microwave for a moister bite. Glaze can be added after thawing for the freshest finish.
Glaze Timing Advice: If you’re freezing and plan to glaze later, hold off on the glaze and add it right before serving. A fresh glaze brings the most shine and the best flavor when you’re serving straight from the fridge or after a short defrost.
Frequently Asked Questions
Final Thoughts
If you’ve been hunting for a treat that feels indulgent but travels well, this is it. Healthy fudgy brownie bites are the kind of recipe that earns a permanent spot on the recipe board: a little chocolate magic, a whisper of veggie moisture, and a lot of everyday joy. They’re forgiving enough to batch on a Sunday and thoughtful enough to serve to guests without a fuss. My kitchen is one long, cheerful chorus of “just one more bite,” and I love that this recipe supports that moment—one small, satisfying bite at a time. I hope you’ll try them, tweak them to your liking, and let me know your personal favorite twist. Happy baking, friend, and may your coffee be as good as these bites taste. Don’t forget to leave a comment with your variations and how your family reacted—the stories are half the fun.

Fudgy Brownie Bites Easy Guilt Free Indulgence
Ingredients
Main Ingredients
- 0.67 cup cashews raw, unsalted
- 0.33 cup unsweetened natural cocoa powder
- 1 cup soft medjool dates pitted and loosely packed (about 20 medium dates)
- 1 tablespoon vanilla extract
- 1 tablespoon agave nectar or more, as needed
- sprinkles for dredging (optional)
Instructions
Preparation Steps
- Add cashews and cocoa powder to a food processor and blend until pulverized into fine crumbs, about 15 seconds. Be careful not to over-process, as it can quickly become chocolate-cashew butter.
- Add the pitted dates and vanilla extract. Process until the mixture begins to combine. If the mixture is sandy and not combining, add agave nectar, one tablespoon at a time, pulsing after each addition until it starts to stick together.
- The dough is ready when it forms a softball-sized mound and travels around the canister in one ball. It should be tacky but not wet or sloppy. If too loose, add a tablespoon or two more cocoa powder or cashews. If too dry, add another date or tablespoon of agave.
- Transfer the dough to a plate or bowl, cover with plastic wrap, and refrigerate for at least 2 hours, or up to 1 week, before rolling into balls. Chilled dough is easier to handle.
- Once chilled, scoop small amounts of dough and roll between your palms into smooth balls, about 0.75 to 1 inch in diameter. Work quickly as the dough will soften with warmth.
- Optionally, dredge the balls through sprinkles to help absorb any tackiness. This step is purely for aesthetics and texture.
- Store the brownie bites in an airtight container in the refrigerator for many months or in the freezer for 6+ months. They can also be kept at room temperature for many weeks.