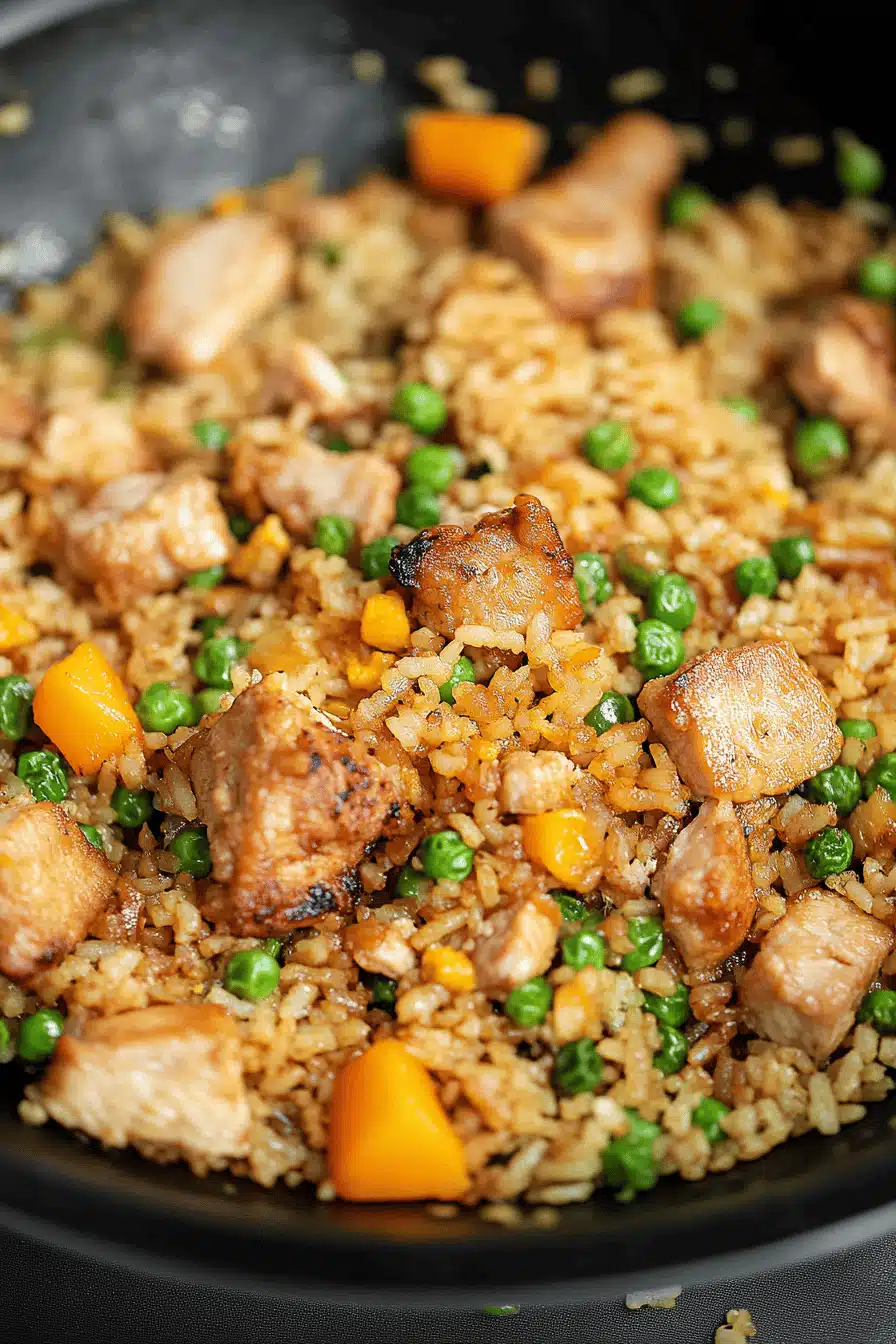
Easy Takeout Style Chicken Fried Rice At Home
There’s something magical about the moment the wok hits the stove and the aroma of sizzling rice fills the kitchen. I still remember sitting at my grandma’s kitchen table as a kid, watching her toss a handful of leftover rice into a hot pan, and within minutes the whole house smelled like a cozy, savory hug. Years later, that memory turned into my go‑to chicken fried rice recipe – the one that disappears in seconds whenever we have friends over, and the one I crank out on busy Tuesdays when I need a comforting dinner in under thirty minutes. It’s simple enough for a rookie, but layered with enough flavor that even the pickiest eaters beg for seconds. If you love a dish that’s both nostalgic and endlessly adaptable, keep reading – you’re about to discover why this chicken fried rice will become a staple in your pantry.
What is chicken fried rice?
Think of chicken fried rice as the ultimate kitchen remix: leftover rice meets tender chicken, veggies, and a splash of soy, all dancing together in a hot pan. The name itself comes from the classic Chinese‑style stir‑fry that’s been popularized worldwide, but the beauty of this dish is that you can call it whatever you like – “leftover rice makeover,” “quick weeknight stir‑fry,” or simply “the best thing I’ve ever made with a bag of frozen peas.” At its core, it’s a one‑pan wonder that turns humble pantry staples into a hearty, satisfying meal. The rice gets a light crisp on the edges while staying fluffy inside, the chicken stays juicy, and the veggies add a pop of color and crunch. It’s essentially comfort food that you can whip up in the time it takes to watch an episode of your favorite sitcom.
Why you’ll love this recipe?
First off, the flavor profile is pure comfort with a little kick. The soy sauce and a dash of sesame oil give it that umami depth, while a whisper of garlic and ginger adds brightness. I love that the dish is incredibly forgiving – you can swap the chicken for shrimp, tofu, or even leftover pork, and it still shines. Simplicity is another big win; the ingredient list is short, the steps are straightforward, and you only need one wok or large skillet, which means less cleanup (a huge plus after a long day). Budget‑wise, it’s a champion: you’re using rice that might otherwise sit in the fridge, a few chicken thighs or breasts, and whatever veggies you have on hand. Versatility is the cherry on top – serve it as a main course, pack it for lunch, or even turn it into a fried‑rice “bowl” with a fried egg on top for a brunch twist. What I love most is that every time I make it, the kids claim it tastes “different” – not because I change the recipe, but because the love (and occasional surprise ingredient) I sprinkle in each time keeps it exciting.
How do I make chicken fried rice?
Quick Overview
Start by cooking the rice ahead of time (or use day‑old rice from the fridge). While the rice cools, dice the chicken and veggies, then stir‑fry everything in a hot pan with a splash of oil, soy sauce, and a pinch of sesame oil. Finish with a quick scramble of eggs and a drizzle of green onions for that fresh pop. The whole process takes about 25 minutes, and the result is a bowl of fragrant, slightly crispy rice speckled with golden chicken and bright veggies – perfect for a quick dinner or a satisfying lunch.
Ingredients
For the Chicken:
- 2 boneless, skinless chicken breasts (about 1 lb), cut into ½‑inch cubes – I prefer thighs for extra juiciness, but breasts work fine.
- 1 Tbsp soy sauce – adds depth and helps the chicken brown.
- ½ tsp freshly ground black pepper – a tiny kick.
For the Fried Rice:
- 3 cups cooked rice, preferably day‑old and chilled – it’s drier, so it crisps up better.
- 2 Tbsp vegetable oil (or peanut oil for extra nuttiness).
- 1 cup frozen peas and carrots, thawed – you can swap in corn, bell peppers, or broccoli.
- 3 large eggs, lightly beaten.
- 2 cloves garlic, minced.
- 1 tsp fresh ginger, grated.
- 3 Tbsp soy sauce, divided.
- 1 tsp sesame oil – just a drizzle for that signature aroma.
- 2 Tbsp chopped green onions (plus extra for garnish).
- Optional: ½ tsp chili flakes for heat.
For the Glaze (Optional Sweet Finish):
- 1 Tbsp honey or maple syrup.
- 1 tsp soy sauce.
- ½ tsp rice vinegar.
Step-by-Step Instructions
Step 1: Preheat & Prep Pan
Heat a large wok or skillet over medium‑high heat until a drop of water sizzles and evaporates instantly. Add 1 Tbsp oil, swirling to coat the surface. While the pan heats, pat the chicken pieces dry with paper towels – this ensures they brown rather than steam.
Step 2: Mix Dry Ingredients
In a small bowl, combine the soy sauce and black pepper, then toss the chicken cubes to coat evenly. This quick marination adds flavor without needing hours of soaking.
Step 3: Mix Wet Ingredients
Whisk the beaten eggs in a separate bowl. If you’re using the optional glaze, whisk honey, soy sauce, and rice vinegar together now; set aside for later.
Step 4: Combine
Place the marinated chicken into the hot pan. Let it sit undisturbed for about 1‑2 minutes to develop a golden crust, then stir‑fry until just cooked through, about 4‑5 minutes. Transfer the chicken to a plate and keep warm.
Step 5: Prepare Filling
In the same pan, add the remaining 1 Tbsp oil. Toss in the minced garlic and grated ginger, stirring quickly to avoid burning – you’ll hear a faint sizzle and the kitchen will fill with that irresistible aroma. Add the peas and carrots, stirring for 2 minutes until they’re heated through but still bright.
Step 6: Layer & Swirl
Push the veggies to the side of the wok, then pour the beaten eggs into the cleared space. Let them sit for a few seconds, then scramble gently, breaking them into small curds. Once the eggs are just set, fold everything together, then add the chilled rice. Break up any clumps with the back of your spatula, and let the rice sit for a minute to get a slight crisp on the bottom.
Step 7: Bake
Oops, no baking needed! This step is all about the final stir‑fry. Drizzle the remaining 2 Tbsp soy sauce and the sesame oil over the rice, then toss everything vigorously. Return the cooked chicken to the pan, mixing until the rice is evenly coated and the chicken is reheated. Taste and adjust seasoning – a pinch more soy sauce or a splash of fish sauce if you like extra depth.
Step 8: Cool & Glaze
If you’re using the glaze, drizzle it over the hot fried rice now and give it a quick toss. The heat will slightly caramelize the honey, adding a subtle sweet‑savory sheen that kids adore.
Step 9: Slice & Serve
Spoon the chicken fried rice into bowls, sprinkle with chopped green onions, and, if you’re feeling fancy, add a few drops of extra sesame oil. Serve immediately while it’s hot and fragrant. A side of sliced cucumber or a simple miso soup rounds out the meal perfectly.
What to Serve It With
Chicken fried rice is a chameleon on the plate – it pairs beautifully with a range of dishes, depending on the time of day and the vibe you’re after.
For Breakfast: Serve a modest portion alongside a sunny‑side‑up egg and a mug of strong black coffee. The egg’s richness complements the salty rice, and the coffee cuts through the savory notes, making a hearty start to the day.
For Brunch: Turn the fried rice into a “fried‑rice toast” by spreading it over toasted sourdough, topping with avocado slices, and sprinkling everything with everything bagel seasoning. Pair with a sparkling mimosas for a festive feel.
As Dessert: Yes, you read that right! If you add a drizzle of honey glaze and a pinch of cinnamon, the rice takes on a sweet‑savory profile that works as a light after‑dinner treat, especially when served with a scoop of vanilla ice cream.
For Cozy Snacks: Spoon the rice into small ramekins, sprinkle with toasted sesame seeds, and serve with a side of soy‑ginger dipping sauce. It’s the perfect comfort bite for movie night or a rainy afternoon.
In my family, we love to serve chicken fried rice with a simple cucumber salad dressed in rice vinegar and a few red pepper flakes – the crispness balances the warm, umami‑rich rice beautifully. It’s become a tradition at our Sunday gatherings, and I’m sure you’ll find your own favorite combos as you experiment.
Top Tips for Perfecting Your Chicken Fried Rice
After making this dish dozens of times, I’ve gathered a handful of tricks that take the fried rice from good to unforgettable.
Rice Prep: Use day‑old rice that’s been refrigerated for at least a few hours. If you’re in a hurry, spread freshly cooked rice on a baking sheet and let it cool for 15 minutes; the steam will evaporate, giving you drier grains that crisp up nicely.
Chicken Technique: Pat the chicken dry and season just before cooking. A hot pan will give you that coveted caramelized edge. If you like extra tenderness, marinate the cubes in a splash of soy sauce and a teaspoon of cornstarch for 10 minutes – the cornstarch creates a protective barrier that keeps the meat juicy.
Veggie Timing: Add frozen peas and carrots directly to the pan; they thaw quickly and retain their bright color. For fresh veggies like bell peppers or snow peas, stir‑fry them for a minute less to keep the crunch.
Egg Integration: Cook the eggs in a cleared space of the wok rather than mixing them with the rice immediately. This prevents the rice from getting soggy and gives the eggs a light, fluffy texture.
Seasoning Balance: Start with 2 Tbsp soy sauce, then taste before adding more. A dash of fish sauce or a sprinkle of white pepper can add depth without overwhelming the dish.
Glaze Variations: Swap honey for brown sugar, add a splash of orange juice for citrus zing, or stir in a teaspoon of sriracha for heat. The glaze should be thin enough to coat the rice but thick enough to cling – think a light drizzle, not a flood.
Ingredient Swaps: Try swapping chicken for diced pork belly for extra fattiness, or use shrimp for a seafood twist. If you’re vegetarian, replace the chicken with firm tofu cubes that have been pressed and lightly fried.
Cooking Vessel: A well‑seasoned cast‑iron skillet works just as well as a wok, but a wok’s high, sloped sides make it easier to toss the rice without spilling.
One mistake I made early on was over‑mixing the rice, which turned it mushy. The key is to toss gently, allowing each grain to stay separate. Also, never crowd the pan – if you have a lot of rice, work in batches. Trust me, the extra effort pays off in texture.
Storing and Reheating Tips
Chicken fried rice keeps well, making it a great make‑ahead meal.
Room Temperature: If you’re serving it at a buffet, keep the rice covered with foil and a clean kitchen towel for up to 2 hours. Stir occasionally to prevent the bottom from drying out.
Refrigerator Storage: Transfer the leftover rice to an airtight container. It stays fresh for 3‑4 days. When reheating, add a splash of water or broth and stir‑fry over medium heat to revive the texture.
Freezer Instructions: Portion the rice into freezer‑safe bags, flatten them, and label with the date. It freezes well for up to 2 months. Thaw overnight in the fridge, then reheat in a hot pan with a little oil, stirring until heated through.
Glaze Timing Advice: If you plan to store the fried rice, hold off on adding the glaze until just before serving. The glaze can make the rice a bit sticky if it sits too long, but a quick drizzle after reheating restores that glossy finish.
When reheating, avoid the microwave if you can; the stovetop method preserves the rice’s slight crispness. If you must use a microwave, cover the bowl with a damp paper towel and heat in 30‑second bursts, stirring in between.
Frequently Asked Questions
Final Thoughts
There you have it – my tried‑and‑true chicken fried rice that’s as comforting as a warm hug and as flexible as your pantry allows. Whether you’re feeding a crowd, prepping meals for the week, or just craving something quick and tasty, this recipe delivers flavor, simplicity, and that nostalgic feeling of home cooking. I can’t wait to hear how you make it your own – maybe you’ll add a splash of orange zest, or swap the chicken for tofu. Drop a comment below with your tweaks, rate the recipe, and feel free to share a photo of your masterpiece. Happy cooking, and enjoy every bite!