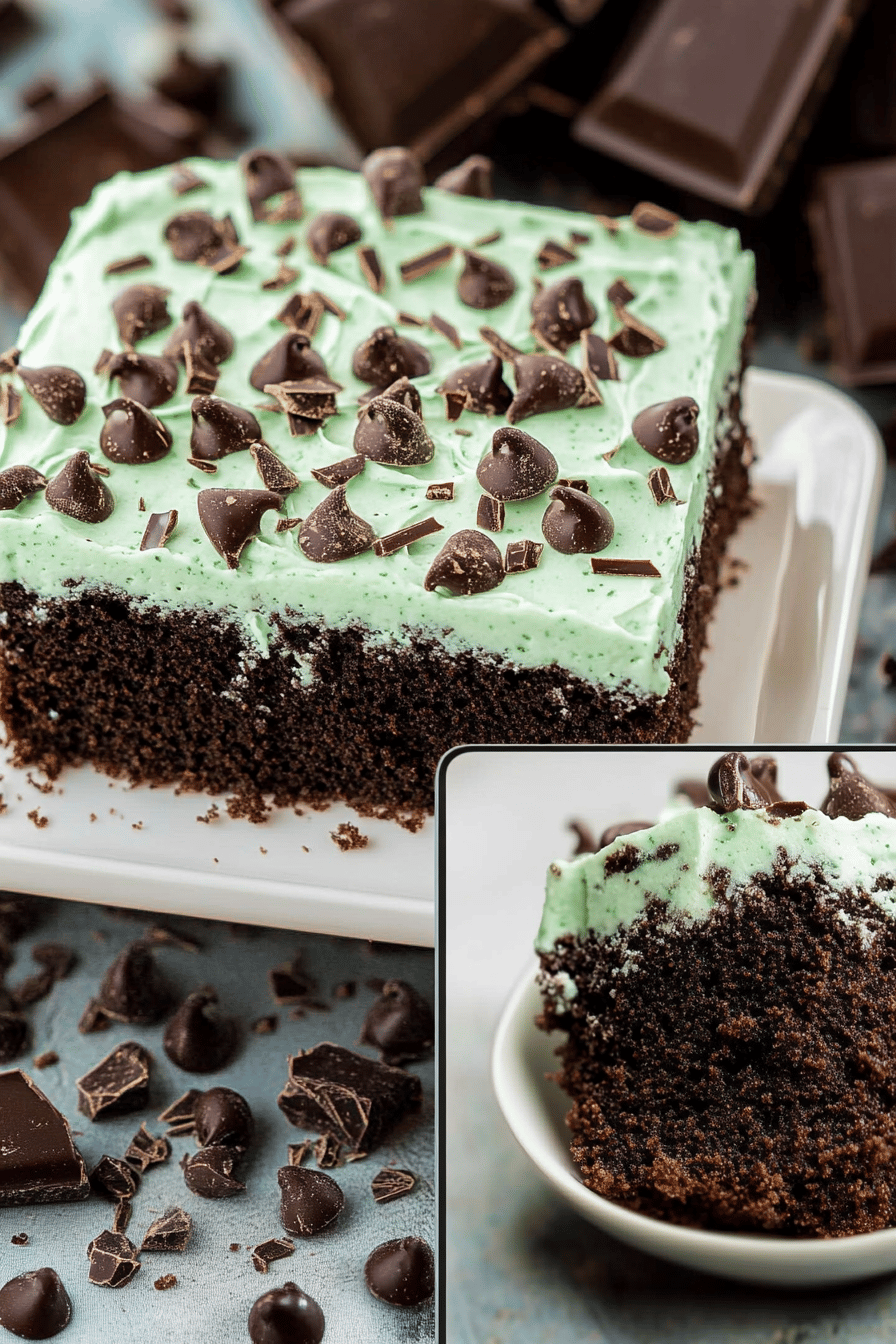
Easy Rich Chocolate Poke Cake Bliss
You know those recipes that just feel like a warm hug? The ones that bring a smile to your face the moment you start making them, and then have everyone begging for seconds (and thirds)? Well, this chocolate poke cake is absolutely one of those for me. I remember the first time I made it, completely on a whim because I had a carton of cream and some cocoa powder staring at me from the pantry. I was aiming for something impressive but didn’t want the fuss of a complicated layer cake. What I ended up with was pure, unadulterated chocolate bliss, so moist and decadent it felt like it came from a fancy bakery. It’s honestly one of the easiest ways to get that intensely rich, fudgy chocolate flavor without a ton of effort, and it always feels like a special occasion treat, even on a random Tuesday. If you’ve ever loved a classic Texas Sheet Cake but wanted something a little more… well, *poke-able*, you’re going to adore this. It’s become my go-to when I need a crowd-pleaser or just a serious chocolate fix.
What is a chocolate poke cake?
So, what exactly *is* this magical chocolate Poke Cake? Think of it as the ultimate shortcut to a ridiculously moist and flavorful chocolate cake. The “poke” part is key here – it means we’re going to poke holes all over the warm cake after it bakes. Then, we pour a luscious, creamy, chocolatey mixture over the top. This mixture seeps down into all those little holes, infusing the entire cake with incredible flavor and moisture. It’s essentially a regular chocolate cake that gets a supercharged upgrade. It’s not a fancy, complicated dessert that requires hours of decorating. Instead, it’s wonderfully approachable, using simple ingredients you probably already have. It’s the kind of cake that looks impressive when you cut into it, with all those wonderful, gooey pockets of chocolate goodness, but the process itself is so straightforward. It’s less about precision and more about creating something utterly delicious and comforting.
Why you’ll love this recipe?
Honestly, where do I even begin with why this chocolate Poke Cake is a winner? First off, the flavor is just out of this world. We’re talking deep, rich chocolate in every single bite. The cake itself is wonderfully tender, and then you have that gooey, fudgy topping that just melts in your mouth. It’s incredibly satisfying! And the simplicity? Oh my goodness, it’s a lifesaver. You can whip up the batter in minutes, and the rest is just waiting for it to bake. No fancy techniques, no multiple bowls to wash – it’s genuinely straightforward. Even if you’re not an experienced baker, you’ll feel like a pro making this. Plus, it’s so budget-friendly! The ingredients are common pantry staples, so you don’t need to run out and buy anything expensive. It’s the perfect recipe for when you want something impressive without breaking the bank. What I truly love most about this chocolate poke cake, though, is its incredible versatility. You can jazz it up with different toppings, serve it warm or cold, and it’s always a hit. It’s that perfect balance of easy, delicious, and impressive that makes it a recipe you’ll want to make again and again. It’s way more forgiving than a delicate sponge cake and infinitely more forgiving than a finicky soufflé! It’s just pure, unadulterated chocolate joy.
How do I make a chocolate poke cake?
Quick Overview
This recipe is all about creating a moist, tender Chocolate Cake and then transforming it with a rich, pourable chocolatey filling. You’ll mix a simple cake batter, bake it until perfectly done, then immediately poke holes and pour over a luscious glaze. The magic happens as the glaze soaks into the warm cake, creating an unbelievably moist and decadent dessert. It’s a straightforward process that guarantees incredible results every single time, making it perfect for busy bakers and special occasions alike.
Ingredients
For the Main Batter:
2 cups all-purpose flour – Make sure it’s fresh! I find using all-purpose flour gives the best structure for this cake.
2 cups granulated sugar – For that classic sweetness and tender crumb.
3/4 cup unsweetened cocoa powder – Use a good quality one! It makes a huge difference in the chocolate flavor. Dutch-processed gives a deeper, darker hue and smoother taste.
2 teaspoons baking soda – This is crucial for that lovely lift and tenderness.
1 teaspoon baking powder – A little extra insurance for a perfect rise.
1 teaspoon salt – Balances the sweetness and enhances the chocolate flavor.
1 cup buttermilk, room temperature – This is a secret weapon for a tender cake! If you don’t have buttermilk, you can easily make a substitute by adding 1 tablespoon of white vinegar or lemon juice to 1 cup of milk and letting it sit for about 5-10 minutes until it looks curdled.
1/2 cup vegetable oil – Or canola oil. It keeps the cake incredibly moist. You could try a light Olive oil in a pinch, but vegetable oil is my go-to.
2 large eggs, room temperature – Room temperature eggs incorporate better into the batter.
2 teaspoons vanilla extract – Don’t skimp on the vanilla; it really rounds out the chocolate flavor.
1 cup hot water or hot brewed coffee – Coffee intensifies the chocolate flavor beautifully! If you’re not a coffee drinker, hot water works just fine, but I highly recommend the coffee.
For the Filling:
1 (14-ounce) can sweetened condensed milk – This is the base of our super moist filling. It’s rich and sweet and creates that lovely gooey texture.
1/2 cup unsweetened cocoa powder – Again, quality matters here for that deep chocolate punch.
1/4 cup butter, softened – Unsalted is best so you can control the salt content.
For the Glaze:
1 cup powdered sugar – For that classic smooth glaze consistency.
1/4 cup milk – You can use regular milk, or even a little bit of the leftover buttermilk for extra tang, or even a dairy-free milk like almond or oat milk.
1 teaspoon vanilla extract – For a hint of warmth.
Step-by-Step Instructions
Step 1: Preheat & Prep Pan
First things first, preheat your oven to 350°F (175°C). While that’s getting up to temperature, lightly grease and flour a 9×13 inch baking pan. I like to use a baking spray that has flour in it, or just a good old-fashioned butter and flour combo. This prevents any sticking and ensures your beautiful cake comes out in one piece. Make sure to get all the corners!
Step 2: Mix Dry Ingredients
In a large mixing bowl, whisk together the flour, granulated sugar, cocoa powder, baking soda, baking powder, and salt. Give it a good whisk to make sure everything is evenly distributed. You want to avoid any pockets of baking soda or salt, and this also helps aerate the dry ingredients, contributing to a lighter cake.
Step 3: Mix Wet Ingredients
In a separate medium bowl, whisk together the buttermilk, vegetable oil, eggs, and vanilla extract until well combined. Make sure those eggs are fully incorporated.
Step 4: Combine
Pour the wet ingredients into the bowl with the dry ingredients. Mix on low speed (or with a whisk) until just combined. Don’t overmix! Overmixing develops the gluten in the flour, which can make your cake tough. Then, carefully pour in the hot water or hot brewed coffee. The batter will be quite thin – don’t worry, that’s exactly what you want! This thin batter is what helps make the cake so incredibly moist. Gently whisk until smooth. Again, just until combined.
Step 5: Prepare Filling
While the cake is baking, let’s get that glorious filling ready. In a medium saucepan over medium-low heat, combine the sweetened condensed milk, cocoa powder, and softened butter. Whisk constantly until the butter is melted and the mixture is smooth and slightly thickened. It should be a luscious, pourable consistency. Keep it warm, but don’t let it boil vigorously.
Step 6: Layer & Swirl
This is where the fun begins! Once the cake is baked, take it straight out of the oven. While it’s still hot, use the handle of a wooden spoon or a skewer to poke holes all over the surface of the cake. Make them about an inch apart. Don’t be shy – the more holes, the more filling it will soak up!
Step 7: Bake
Pour the warm filling evenly over the hot cake, letting it seep into all those wonderful holes you just made. Then, let the cake cool in the pan for about 10-15 minutes before you prepare the glaze. This allows the filling to set up a bit.
Step 8: Cool & Glaze
While the cake is cooling, whisk together the powdered sugar, milk, and vanilla extract in a small bowl until smooth. If it’s too thick, add a tiny bit more milk; if it’s too thin, add a little more powdered sugar. Once the cake has cooled slightly, drizzle the glaze over the top. You can make pretty patterns or just cover the whole cake.
Step 9: Slice & Serve
This cake is best served warm or at room temperature. I like to let it cool completely in the pan after glazing, but you can also serve it once the glaze has set a bit. Cut into squares and prepare for compliments!
What to Serve It With
This chocolate poke cake is so versatile, it’s pretty much perfect for any occasion you can think of. For a cozy breakfast or brunch, I love a slice with a strong cup of coffee. The bitterness of the coffee really cuts through the sweetness of the cake and the glaze, and it just feels so decadent to start the day that way. Sometimes I’ll even top a small slice with a dollop of fresh whipped cream for a little extra indulgence. When we have friends over for a more formal brunch, I’ll serve it warm, perhaps with some fresh berries on the side. The tartness of the berries is a lovely contrast to the rich chocolate. As a dessert, oh boy, this is where it really shines! It’s fantastic served with a scoop of vanilla bean ice cream – the warm cake and cold ice cream combo is pure heaven. You can also serve it with a drizzle of raspberry sauce or a dollop of crème fraîche. And for those times when you just need a comforting, sweet treat after a long day, this cake is your best friend. Just a forkful, maybe enjoyed straight from the pan while watching your favorite show, is pure bliss. My family has a tradition of having this on movie nights; it’s always a hit!
Top Tips for Perfecting Your Chocolate Poke Cake
Okay, so while this cake is incredibly forgiving, I’ve picked up a few tricks along the way that I think really elevate it. For the cake batter, I always, always, *always* use room temperature ingredients, especially the eggs and buttermilk. They emulsify so much better, leading to a smoother batter and a more tender cake. And that hot water or coffee? Make sure it’s truly hot. It helps bloom the cocoa powder, intensifying that chocolate flavor, and it contributes to the cake’s incredible moistness. When it comes to poking the holes, don’t be afraid to make plenty of them, and make them go deep! The more places for that delicious filling to seep into, the better. I learned this the hard way early on; I was too gentle, and the cake wasn’t quite as moist. For the filling, I tend to warm it up gently and keep it warm while I’m poking the cake. This helps it flow beautifully into those holes. If it cools down too much, it can get a bit thick and might not penetrate as well. For the glaze, consistency is key. I aim for something that’s pourable but not too runny. If it seems too thick, a teaspoon of milk at a time is your friend. If it’s too thin, a bit more powdered sugar will do the trick. I’ve also experimented with adding a little espresso powder to the glaze for an extra caffeine kick, or even a touch of peppermint extract for a chocolate-minty twist. It’s amazing how a tiny addition can change the flavor profile! Lastly, resist the urge to overbake. A toothpick inserted into the center should come out with a few moist crumbs attached, not completely clean. That slight moistness is what you want for a tender cake.
Storing and Reheating Tips
The great thing about this chocolate poke cake is that it stays wonderfully moist for a few days, which is why it’s perfect for making ahead. At room temperature, covered tightly with plastic wrap or a cake dome, it should be good for about 2 days. I usually find it disappears long before then, though! If you need to store it for longer, the refrigerator is your best bet. Place it in an airtight container or cover it very well with plastic wrap. It will keep its best quality in the fridge for about 3-4 days. When it comes to reheating, I often prefer to eat it at room temperature, but if you love it warm, you can gently reheat a slice. I usually pop a slice in the microwave for about 15-20 seconds, just to take the chill off and make it gooey again. Be careful not to overheat it, though! If you plan on storing it for longer periods, like a week or more, freezing is an option. It’s best to freeze the cake *without* the glaze if possible, or at least frost it after thawing. Wrap individual slices or the whole cake tightly in plastic wrap, then in a layer of aluminum foil, and store in the freezer for up to 2-3 months. To thaw, let it come to room temperature overnight in the refrigerator. You can then add a fresh glaze if desired, or reheat as mentioned above.
Frequently Asked Questions
Final Thoughts
So there you have it – my absolute favorite chocolate poke cake recipe! It’s one of those recipes that feels like a culinary superpower. You can whip up something incredibly delicious and impressive with minimal effort, and it always hits the spot. The deep chocolate flavor, the unbelievably moist texture, and that decadent, gooey filling just make it a winner every time. It’s the kind of cake that brings people together, sparks joy, and leaves everyone asking for the recipe. If you’re looking for a dessert that’s both comforting and exciting, and that truly satisfies a chocolate craving, this is the one. I hope you give it a try and love it as much as my family and I do! If you do make it, please let me know in the comments how it turns out, or share any fun variations you’ve tried. Happy baking!