Easy Chocolate Cupcakes That Melt in Your Mouth
There’s something about the smell of chocolate that always pulls me back to my childhood kitchen, where afternoons felt endless and cupcakes were the ultimate comfort food. These chocolate cupcakes remind me of those cozy moments—simple, satisfying, and just a little bit magical. I have to admit, I used to think chocolate cupcakes were just glorified muffins with frosting. But after perfecting this recipe, I’ve realized: they’re so much more than that. Silky yet tender crumb, not too sweet, with just the right amount of rich cocoa flavor—it’s the kind of cupcake that disappears in minutes at my house, leaving everyone begging for more. If you’re a fan of classic chocolate cake but want something quick, personal, and with a little twist (I sneak in a creamy swirl that makes each bite fun), then you’re going to love this recipe as much as I do.
What is chocolate cupcake?
Think of chocolate cupcakes as the miniature cousins of your classic chocolate cake—bite-sized gems packed full of cocoa goodness, perfect for celebrations or just a cheeky after-dinner treat. It’s essentially a small cake baked in a muffin tin, topped with frosting or glaze, so you get all the joy of cake without the fuss of slicing or extra layers. The name says it all: a cupcake is simply cake-sized for your hands, and chocolate cupcakes bring that beloved deep, earthy, slightly bittersweet cocoa flavor to each tiny bundle of joy. What’s lovely about them is how approachable they are; whether you’re new to baking or a seasoned pro, these little guys are both forgiving and endlessly customizable. I love to think of these cupcakes as a canvas—you can stick to classic chocolate or add your favorite fillings and toppings without breaking a sweat.
Why you’ll love this recipe?
What I adore most about this chocolate cupcake recipe is how effortlessly it balances rich flavor with simplicity. First off, the taste—oh, it’s like a warm chocolate hug. The cocoa powder I use gives it just the right bittersweet punch, nothing too sugary, and the texture is moist without being dense, which, let me tell you, is a real win. You won’t find dry crumbs here, even a day later. This recipe is seriously easy to whip up; I often make a batch after dinner because it doesn’t demand a dozen bowls or a standing mixer. Just a few bowls, some stirring, and patience while they bake. Plus, most ingredients are things you probably already have in your pantry—no need to hunt down anything fancy or expensive, which is always a relief during budget-conscious weeks.
I’ve played around with different ways to make these special, like swirling in a luscious cream cheese filling or topping them with a silky chocolate glaze instead of traditional frosting. Versatility is key here. You can dress them up with nuts, sprinkle with a bit of sea salt, or keep them classic to share with kids at a school event. My kids actually ask for seconds, which feels like my official stamp of approval. If you’ve ever loved recipes like brownies or classic chocolate cake, this takes all that nostalgia and delivers it in perfectly portioned cupcakes you can grab without any knives or plates. It’s my little secret weapon whenever I need to impress without stress.
How do I make chocolate cupcakes?
Quick Overview
The process is as comforting as the final cupcakes themselves: mix your dry ingredients, whisk the wet ingredients separately, combine gently to keep that fluffiness, fold in a creamy filling if you’re feeling fancy, then bake to perfection. It’s a quick method that never fails me and ensures even baking without cracking. I love it because it’s so forgiving—once you get the hang of the basic steps, playing with flavors or fillings is a breeze. Plus, no special gadgets needed, just a trusty mixer or even a sturdy whisk will do.
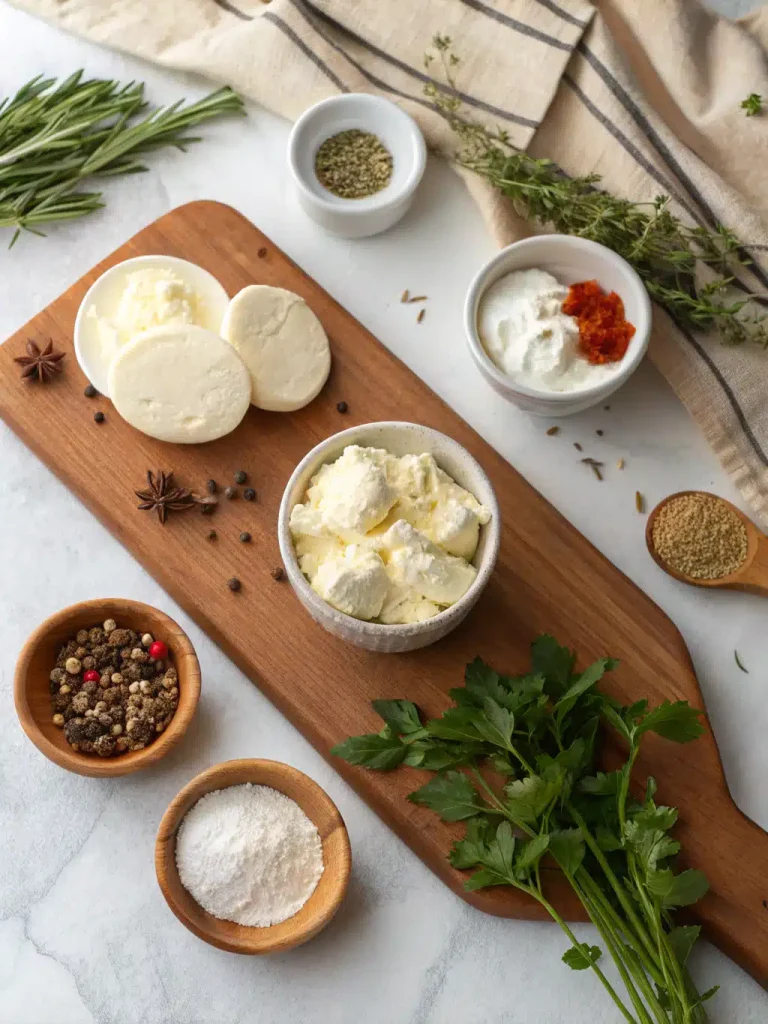
Ingredients
For the Main Batter:
- 1 cup all-purpose flour — I always sift this to avoid lumps and keep it light.
- 1 cup granulated sugar — you can experiment with brown sugar for a deeper molasses note.
- ¼ cup unsweetened cocoa powder — my go-to is natural cocoa for that classic chocolate bite.
- ½ tsp baking powder and ½ tsp baking soda — the little leaveners that keep these cupcakes fluffy.
- ¼ tsp salt — balances sweetness and enhances chocolate flavor perfectly.
- 1 large egg at room temperature — helps with structure and richness.
- ½ cup whole milk — I sometimes swap for almond milk and it actually makes the crumb creamier.
- ¼ cup vegetable oil — keeps things moist without overpowering the chocolate.
- 1 tsp pure vanilla extract — adds warmth and depth to the flavor.
For the Filling:
- 4 oz cream cheese, softened — it creates that dreamy tangy swirl inside.
- 2 tbsp sugar — balances the cream cheese tang.
- ½ tsp vanilla extract — to keep everything harmonious.
For the Glaze:
- ½ cup powdered sugar — sifted for smoothness.
- 2 tbsp cocoa powder — for a chocolate glaze that’s neither too thick nor too thin.
- 3-4 tbsp milk or cream — added slowly to find the perfect pourable consistency.
- ½ tsp vanilla extract — it’s the quiet hero in every glaze I make.
Step-by-Step Instructions
Step 1: Preheat & Prep Pan
Preheat your oven to 350°F (175°C). I always line my cupcake tin with paper liners; it makes for easier cleanup and those adorable little wrappers are perfect for gifting. If you’re skipping liners, generously grease the pan to prevent sticking. A little tip: I like to place the oven rack in the center to ensure even heat distribution.
Step 2: Mix Dry Ingredients
In a large bowl, sift together the flour, sugar, cocoa powder, baking powder, baking soda, and salt. Using a whisk, give it a good stir—this is crucial to avoid any clumps of cocoa or baking soda, which can cause uneven baking or bitter spots. A smooth, uniform mixture is your base for perfect cupcakes.
Step 3: Mix Wet Ingredients
In a separate bowl, beat the egg lightly, then whisk in the milk, oil, and vanilla extract. Make sure your milk isn’t cold straight from the fridge; room temp ingredients blend more seamlessly and give the cupcakes a better rise. The wet mixture will look glossy and inviting.
Step 4: Combine
Spoon the wet ingredients into the dry and gently fold together using a spatula. Mix until just combined—don’t overdo it! The batter should be smooth but still a bit thick. Overmixing leads to tough cupcakes, and nobody wants that. I always scrape the sides of the bowl to make sure every bit of cocoa goodness is incorporated.
Step 5: Prepare Filling
In a small bowl, combine the softened cream cheese, sugar, and vanilla. Whip it together until silky smooth. I’ve found that if your cream cheese isn’t fully softened, the filling will be lumpy and tough to swirl. This tangy filling adds a delightful richness that cuts through the chocolate perfectly.
Step 6: Layer & Swirl
Spoon half of the chocolate batter into each cupcake liner (about 2 tablespoons each), then dollop a teaspoon of cream cheese filling on top. Add the remaining chocolate batter over the filling. Using a toothpick or skewer, gently swirl the batter and filling together to create pretty marbled patterns. Don’t over-swirl or the filling will just disappear.
Step 7: Bake
Bake for 18-22 minutes, depending on your oven, until a toothpick inserted near the center comes out with a few moist crumbs but no raw batter. The cupcakes will rise and have a slightly domed top. Every oven is different, so start checking around 18 minutes to avoid overbaking—dry cupcakes are the worst heartbreak.
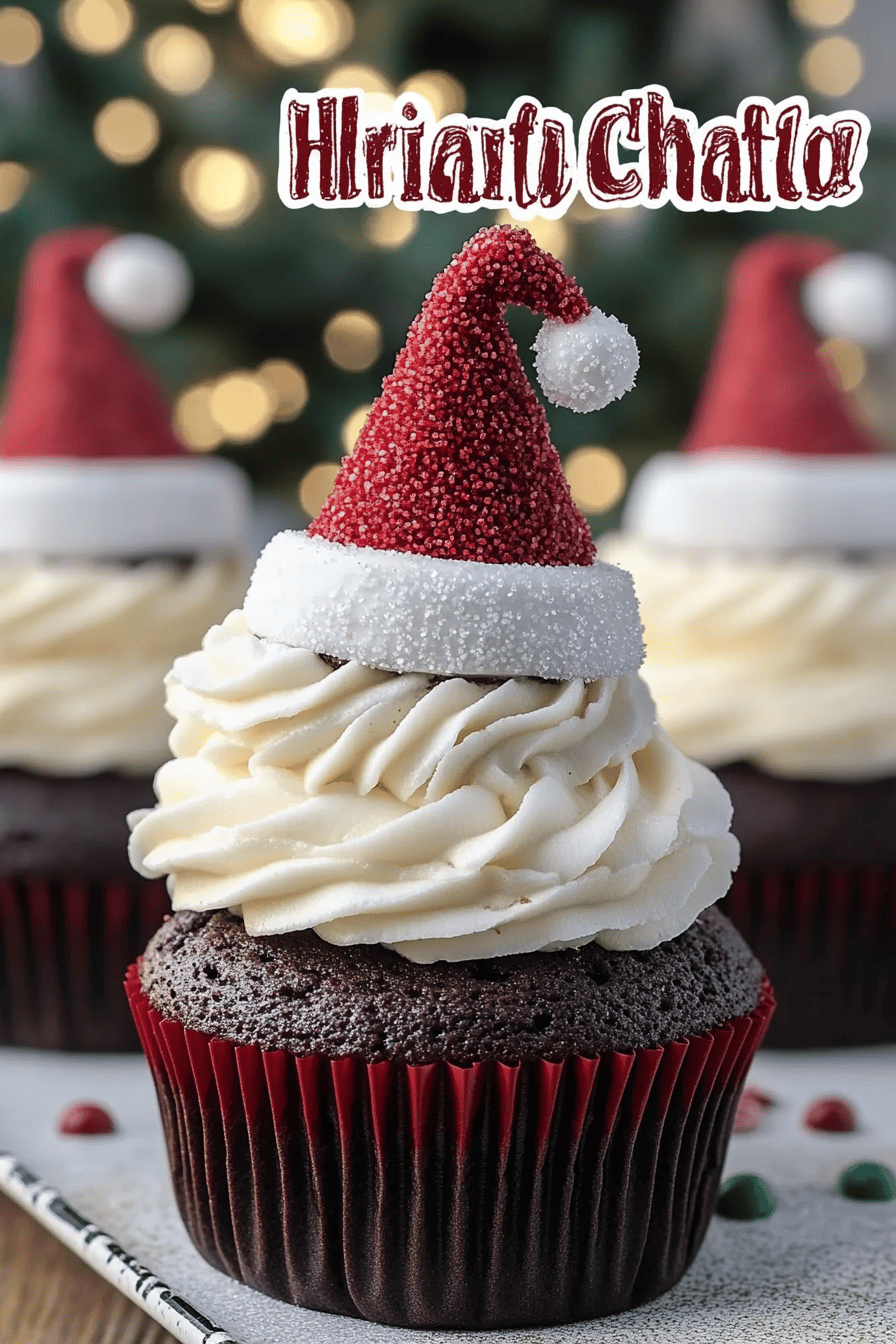
Step 8: Cool & Glaze
Once baked, let the cupcakes cool in the pan for about 10 minutes, then transfer them to a wire rack to cool completely. When cool, whisk together your glaze ingredients until smooth and drizzle generously over the tops. The glaze should be pourable but not runny; adjust with more milk or powdered sugar to reach your desired consistency. The shine on the glaze just makes these irresistible.
Step 9: Slice & Serve
These cupcakes are best enjoyed at room temperature to savor the moist crumb and sweet-tangy swirl. If you want, cut one in half to show off that lovely marbled interior before serving. They’re perfect on their own or with a scoop of vanilla ice cream for an indulgent finish. At my house, these rarely last past the first sitting!
What to Serve It With
For Breakfast: A strong cup of dark roast coffee or a frothy latte complements the rich chocolate notes beautifully. Serve the cupcakes warm, and perhaps alongside fresh berries to add a bright counterpoint. This little treat feels like a naughty but delightful weekend indulgence.
For Brunch: I like to add a dollop of whipped cream or a swirl of raspberry sauce on top for a splash of color. Pair it with fresh-squeezed orange juice or iced herbal tea infused with mint for a fresh balance. These cupcakes bring that cozy homemade charm to a brunch spread.
As Dessert: After a hearty meal, these cupcakes shine when paired with a scoop of vanilla or espresso ice cream. I often add a sprinkle of toasted almonds or a drizzle of caramel sauce for extra flair. The glaze is shiny and sweet, but the filling keeps the flavors lively and layered.
For Cozy Snacks: Afternoon tea or a quick pick-me-up goes perfectly with these. Sometimes I slap a bit of butter on a warm cupcake or pair it with a glass of cold milk. Nothing fancy needed here—just comfort and chocolate happiness wrapped in a bite-sized hug.
One of my favorite family traditions is to bake these with my kids on lazy Sunday afternoons, then savor them while curled up watching old movies. The sweetness fills the house and hearts alike—these cupcakes are truly a simple pleasure that brings us all together.
Top Tips for Perfecting Your Chocolate Cupcakes
Cocoa Quality: Invest in a good-quality unsweetened cocoa powder. I once tried a cheaper brand and the cupcakes came out flat in flavor. It’s worth spending a little extra for that rich, deep taste.
Mixing Advice: Always mix the batter until just combined. Overmix and you’ll get dense cupcakes that could double as hockey pucks. I learned this the hard way after rushing through my batter. A few lumps in the wet or dry mix are perfectly fine; they tend to disappear during baking.
Swirl Customization: For the cream cheese swirl, less is more. Too much filling and the cupcakes don’t rise properly and can get soggy on the inside. I like to think of the swirl as a flavor tease—just enough to surprise but not overwhelm.
Ingredient Swaps: If you’re dairy-free, I’ve replaced the milk with almond or oat milk, and the cream cheese with vegan cream cheese, which works surprisingly well. Just keep an eye on baking times—they sometimes need an extra minute or two.
Baking Tips: Oven temperatures can be tricky—invest in an oven thermometer if you can. I found out mine runs a bit hot, which is why my cupcakes used to crack on top. Baking low and slow makes a huge difference in texture.
Glaze Variations: Feel free to add a pinch of espresso powder to the glaze for an extra chocolate kick or swap vanilla for orange zest for a citrusy twist. If you want to skip the glaze, a dusting of powdered sugar or a dollop of whipped cream work beautifully too.
I’ve made these dozens of times, and each batch reminds me why I keep coming back. The learning curve was small but valuable: like the time I forgot to swirl the filling and ended up with plain chocolate cupcakes that were still delicious but missed that little surprise.
Storing and Reheating Tips
Room Temperature: You can keep these cupcakes covered at room temp for about 2 days. A cake dome or airtight container works wonders to keep them from drying out. Just make sure the glaze is set before covering.
Refrigerator Storage: If you want to keep them longer, store in an airtight container and refrigerate for up to 4 days. They’ll keep their moist crumb, but I always let them come back to room temperature before serving—they taste best then.
Freezer Instructions: These cupcakes freeze beautifully. Wrap each cooled cupcake tightly in plastic wrap and place in a freezer bag or container. Freeze for up to 2 months. When you’re ready, thaw at room temperature overnight. I usually add the glaze fresh after thawing to keep it glossy.
Glaze Timing Advice: If freezing, I recommend glazing the cupcakes after they thaw to avoid any glaze texture issues. For short-term storage, glaze before storing and just be gentle when handling to keep the shine intact.
Frequently Asked Questions
Final Thoughts
If you’re anything like me and cherish those small moments of joy in the kitchen, these chocolate cupcakes will feel like an old friend. They’re cozy, indulgent, and just complicated enough to impress without causing a baking meltdown. Whether you’re making them for a last-minute treat, a family gathering, or just because the craving hits hard, this recipe has you covered. The moist crumb, the surprise swirl inside, and the glossy glaze make them absolutely unforgettable. I’d love for you to try these out—comment below with your own tips, tweaks, or stories about how they turned out. Baking’s better when shared, and I can’t wait to hear about your kitchen adventures. Happy baking!