Easy Blueberry Dessert Recipe
There’s something about blueberry desserts that instantly transport me back to my grandma’s kitchen. The smell of fresh blueberries simmering on the stove, the way the bright blue speckles peeked through the sweet batter while baking — it was pure magic. This blueberry dessert bar is my little tribute to those memories, except I gave it a twist with a luscious cream cheese swirl that makes every bite feel like a party. Honestly, it’s one of those recipes I grabbed on a hectic weeknight when I needed a quick fix but didn’t want to compromise on flavor or that homemade feeling. The best part? It’s way easier than a fancy cobbler but just as comforting. If you adore the classic blueberry muffin but want something a bit more decadent and perfect for sharing, you’re in for a treat with this one.
What is blueberry dessert bar?
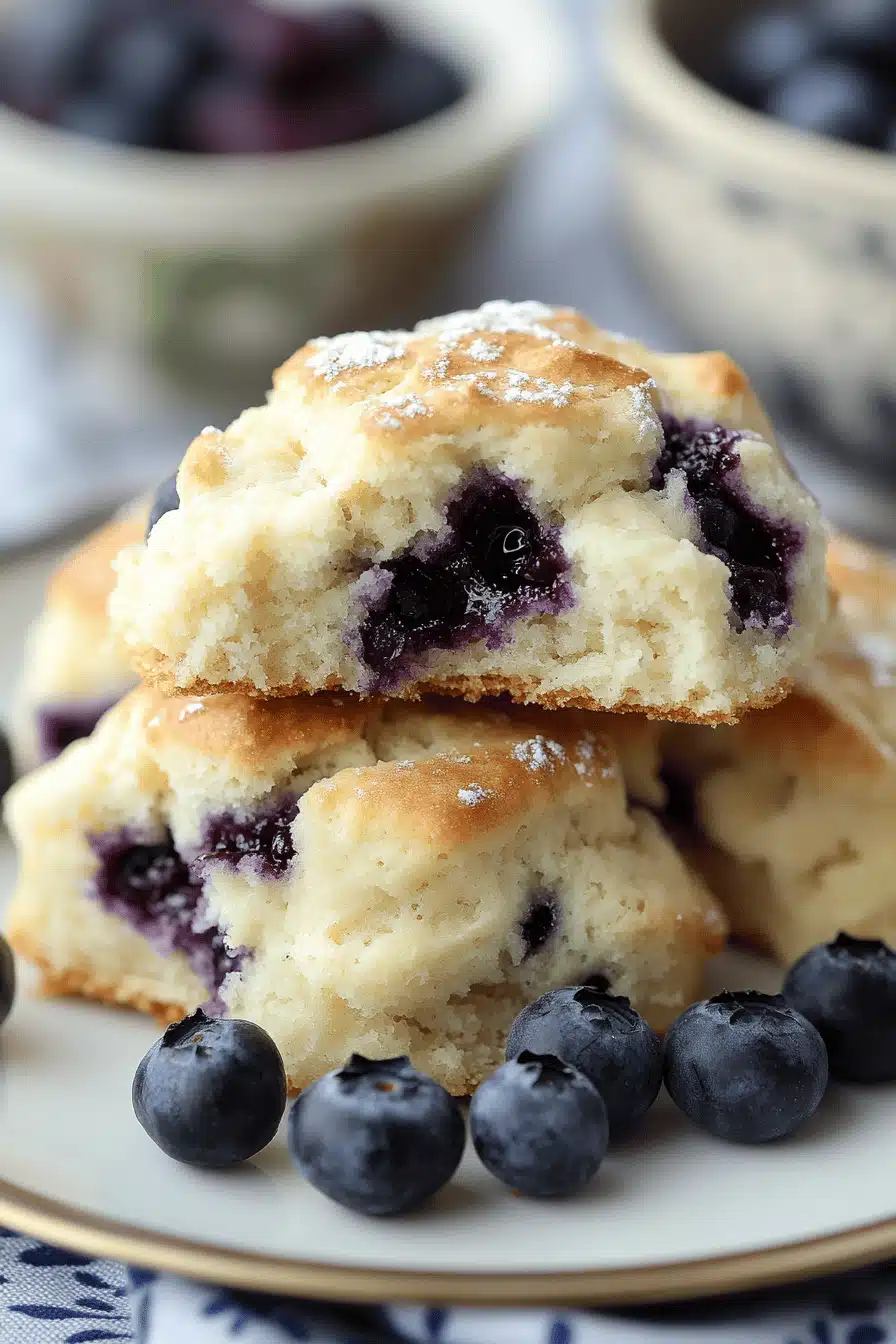
Think of these blueberry dessert bars as the best parts of a blueberry muffin and a cheesecake slice combined — all baked into a single, easy-to-cut rectangle. It’s essentially a soft, cake-like base loaded with juicy blueberries, topped with a dreamy cream cheese filling that’s swirled through to create this gorgeous marbled effect. Unlike pie or crisps, these bars are handheld and portable, which makes them ideal for everything from lazy weekend breakfasts to potluck desserts. The name “blueberry dessert bars” comes from the dessert bar format — somewhat like brownies, but with fruit and a cream cheese component. It’s incredibly versatile and approachable, even if you’re new to baking because you don’t need to fuss with pie crusts or complicated layers.
Why you’ll love this recipe?
What I love most about this blueberry dessert bar is how it nails that perfect balance between sweet and tangy, soft and moist. The blueberries burst with juicy pops, while the cream cheese swirl adds a smooth, slightly tangy richness that lifts the entire dessert from ordinary to utterly addictive. But here’s the real kicker — it’s stupidly simple to make. If you can mix wet and dry ingredients, you’re halfway there. No fancy techniques, no rolling dough or intricate piping; just straightforward baking that doesn’t eat up your entire afternoon.
Another thing I find wonderful is how budget-friendly this recipe is. Blueberries—fresh or frozen—are usually affordable, and the rest of the ingredients are pantry staples. I often use frozen blueberries in the winter, and they still taste like magic. Plus, these bars are incredibly versatile: serve them warm with a dollop of whipped cream or enjoy cold straight from the fridge as a cool snack. It’s a dessert that feels fancy but is forgiving enough to personalize — swap almond milk for cream, add a sprinkle of cinnamon, or even fold in some lemon zest for an extra zing.
If you’re familiar with my other berry recipes, you’ll notice this one hits the sweet spot between a blueberry buckle and a cream cheese danish — yet it stays surprisingly light. It’s honestly become my go-to quick treat when guests drop by or I want to impress my kids without spending hours.
How do I make blueberry dessert bars?
Quick Overview
Here’s the scoop: you whip up a simple cake batter, prepare a luscious cream cheese filling, and then layer and swirl them together to create those irresistible marbled bars. The process is straightforward but feels special—the blueberry berries bobbing through tender sponge and creamy ribbons that melt in your mouth. Baking is quick, and the aroma alone will have everyone sneaking into the kitchen. This method keeps the bars moist but not soggy, making every bite a little burst of blueberry heaven. Trust me, it’s one of those recipes that looks way more complicated than it is.
Ingredients
For the Main Batter:
- 1 ½ cups all-purpose flour — I always sift it to keep things light.
- 1 tsp baking powder — ensures a nice rise without heaviness.
- ½ tsp baking soda — balances the acid from the blueberries.
- ¼ tsp salt — brings out all the sweet flavors.
- ½ cup unsalted butter, softened — real butter is worth it here for that rich flavor.
- ¾ cup granulated sugar — I like to reduce a little if I’m using very ripe berries.
- 2 large eggs — room temperature for better mixing.
- 1 tsp vanilla extract — a must for that cozy aroma.
- ½ cup plain Greek yogurt or sour cream — adds tang and keeps the bars moist.
- 1 ¼ cups fresh or frozen blueberries — frozen works great; just don’t thaw to avoid color bleed.
For the Filling:
- 8 oz cream cheese, softened — this smooth, tangy filling is what takes these bars over the top.
- ¼ cup granulated sugar — adjust if you want it sweeter or creamier.
- 1 large egg yolk — helps give the filling body without it being too dense.
- 1 tsp vanilla extract — harmonizes perfectly with the batter’s vanilla.
- 1 tbsp all-purpose flour — stabilizes the filling so it doesn’t ooze out.
For the Glaze:
- ½ cup powdered sugar — sifted to keep it lump-free.
- 1-2 tbsp fresh lemon juice or milk — thin out the glaze until drippable but not runny.
- Optional: zest of half a lemon for a fresh note.
Step-by-Step Instructions
Step 1: Preheat & Prep Pan
First things first: preheat your oven to 350°F (175°C). Grab a 9×9-inch square baking pan and line it with parchment paper, leaving a little overhang to help lift the bars later — this is a total game changer to avoid crumbling when slicing. Lightly grease the parchment just to be safe; it helps the bars come out in one beautiful piece.
Step 2: Mix Dry Ingredients
In a medium bowl, whisk together the flour, baking powder, baking soda, and salt. The idea is to distribute those leavening agents evenly so your bars rise just right, without peeking too much or falling flat. I like to do this early so nothing gets forgotten — and it’s a peaceful moment before the messier steps.
Step 3: Mix Wet Ingredients
Using a hand or stand mixer, beat the softened butter and sugar on medium speed until light and fluffy—this usually takes around 3-4 minutes. You’ll see it lighten in color and feel like silk between your fingers. Add in the eggs one at a time, mixing well after each addition, then stir in the vanilla extract and Greek yogurt until fully combined. If your eggs are cold, take a moment to warm them in your hand; it makes the batter smoother.
Step 4: Combine
Now, slowly incorporate the dry ingredients into the wet, stirring gently but efficiently. The goal here isn’t to overwork the batter—you want just enough mixing so everything comes together. Overmixing can lead to tough, chewy dessert bars, and nobody wants that. Once combined, gently fold in the blueberries. Frozen blueberries can bleed a bit, but that’s part of the charm — they give the batter those beautiful deep blue streaks.
Step 5: Prepare Filling
In a separate bowl, beat the cream cheese until smooth and creamy—no lumps! Add the sugar, then the egg yolk, vanilla, and flour, mixing on low speed until just combined. The key is to stop before it becomes too dense; you’re aiming for silky but spreadable. I sometimes add a pinch of cinnamon here for a subtle warmth, depending on my mood.
Step 6: Layer & Swirl
Pour half of the blueberry batter into your prepared pan and smooth it with a spatula. Dollop the cream cheese mixture over the batter in spoonfuls, spreading it lightly but not all the way to the edges. Pour the remaining batter on top. Now comes the fun part: take a skewer or butter knife and swirl the batter and cream cheese together by dragging it through in gentle S or figure-eight motions. You want pretty ribbons, not a full mixing, so be gentle.
Step 7: Bake
Bake for 40-45 minutes, rotating the pan halfway through if your oven runs hot. The bars are done when the edges are golden brown and a toothpick inserted in the center comes out with just a few moist crumbs. Avoid overbaking to keep the center soft and luscious. The smell at this point is honestly intoxicating — like a little hug in your kitchen.
Step 8: Cool & Glaze
Let the bars cool completely in the pan on a wire rack. Once cool, whisk together the powdered sugar and lemon juice until smooth and drizzle over the top. The tartness from the lemon cuts through the sweetness perfectly and adds a glossy, elegant finish. If it’s too thick, add a bit more lemon juice or milk by drops. I always find the glaze is the finishing touch that makes these bars look bakery-worthy.
Step 9: Slice & Serve
Using the parchment overhang, lift the entire dessert from the pan and place on a cutting board. Use a sharp knife, wiping it clean between cuts to keep the glaze from smudging. Serve at room temperature or chilled; both ways are fantastic, but warmed slightly (microwave 10-15 seconds) with a scoop of vanilla ice cream? Oh, it’s next level. My kids actually ask for seconds the moment they see those thick, creamy swirls—so fair warning, you might want to hide a few bars for yourself!
What to Serve It With
For Breakfast: This blueberry dessert bar is perfect with a strong cup of black coffee or your favorite creamy latte to start the day on a high note. Serve it alongside your usual scrambled eggs or Greek yogurt for a complete, cozy morning.
For Brunch: Dress it up with a dusting of powdered sugar and a few fresh mint leaves. Pair it with sparkling water infused with lemon or a light white wine if you’re feeling fancy. A side bowl of fresh berries always makes it feel elevated.
As Dessert: Offer a scoop of vanilla or cinnamon ice cream, maybe a drizzle of salted caramel sauce. It’s a crowd-pleaser after a big meal, especially during summer when blueberries are at their sweetest. A dollop of lightly whipped cream and a sprig of rosemary make it look restaurant-worthy.
For Cozy Snacks: Warm these bars up with a hot cup of tea or steaming cocoa on a rainy afternoon. The slight tang of the cream cheese swirl and juicy bursts of blueberry make it the ultimate comfort food to nibble on while curled up with a blanket.
In my family, these bars have become our go-to for all occasions — from lazy Sunday mornings to spontaneous guests or quick lunches packed in a picnic basket. It’s one of those recipes everybody remembers, and trust me, they’ll ask for the recipe too.
Top Tips for Perfecting Your Blueberry Dessert Bars
Blueberry Quality: Using fresh, ripe blueberries makes a big difference, but frozen work perfectly too—just toss them in flour lightly so they don’t sink or bleed too much. I always pat frozen ones slightly with a paper towel before mixing to cut excess moisture.
Mixing Advice: Be gentle when folding the blueberries into the batter. Overmixing develops gluten and makes the bars heavy. The batter should look softly combined but still a little lumpy—it’s totally fine! Same goes for swirling the cream cheese filling; you want distinct ribbons, not a solid block of cream cheese.
Swirl Customization: For a more artistic look, try swirling in some lemon curd or a thin raspberry jam strip alongside the cream cheese. You can also play with different swirl patterns — I love figure eights and spirals the most for visual appeal.
Ingredient Swaps: I’ve experimented with almond milk instead of yogurt, and it made the bars silkier but a bit less tangy. For a gluten-free version, swapping 1:1 with a blend of rice flour and tapioca starch works nicely, although the texture gets a little crumblier.
Baking Tips: Oven temps vary, so start checking from 38 minutes. If your oven runs hot, tent the bars with foil halfway through to prevent over-browning. Position the rack in the middle for even heat circulation; this step really saved me from uneven baking more than once.
Glaze Variations: Feel free to switch lemon for orange juice or even brewed strong chai. If you don’t want glaze, a simple dusting of cinnamon sugar or powdered sugar works just as well and creates a rustic finish.
I learned a lot by trial and error—like how important it is to let the bars cool completely before glazing or you’ll end up with a melting mess—and how the parchment overhang prevents the dreaded crumbling disaster during slicing. It’s the little things that take this from good to unforgettable.
Storing and Reheating Tips
Room Temperature: You can leave these bars wrapped on your countertop for up to 2 days, ideally in an airtight container or wrapped tightly with plastic wrap to keep them moist and soft.
Refrigerator Storage: Stored in an airtight container, they’ll stay fresh for up to 5 days. I usually keep them chilled because the cream cheese filling firms up and tastes a bit fresher. Bring to room temp or heat slightly before serving for the best texture.
Freezer Instructions: Wrap individual bars in plastic wrap and place in a freezer-safe container or bag. Freeze them for up to 3 months. Thaw overnight in the fridge and reheat gently in the microwave or oven. The texture holds up surprisingly well if you freeze before glazing.
Glaze Timing Advice: If you plan on freezing the bars, wait to add the glaze until just before serving. That way it won’t crack or get crumbly after thawing. Similarly, if storing at room temp, glaze once fully cooled so it sets properly.
Frequently Asked Questions
Final Thoughts
If you’ve ever wished for a blueberry dessert that’s both easy and feels homemade, this blueberry dessert bar recipe is just the one to try. It’s a beautiful blend of juicy berries, tender cake, and creamy swirl that I keep coming back to, no matter what season. I love how it brings families to the table with minimal effort and maximum flavor — it’s that kind of recipe that turns everyday moments into something special. Whether you’re baking it for breakfast, brunch, or a sweet treat, it’s always a crowd pleaser.
Don’t forget to share how your batch turns out — I’m always excited to hear your twists or happy accidents with this one. Leave a comment, rate it if you like it, and maybe try pairing it with a few of my other berry-inspired desserts. Happy baking, friend! Can’t wait to hear your stories from the kitchen.