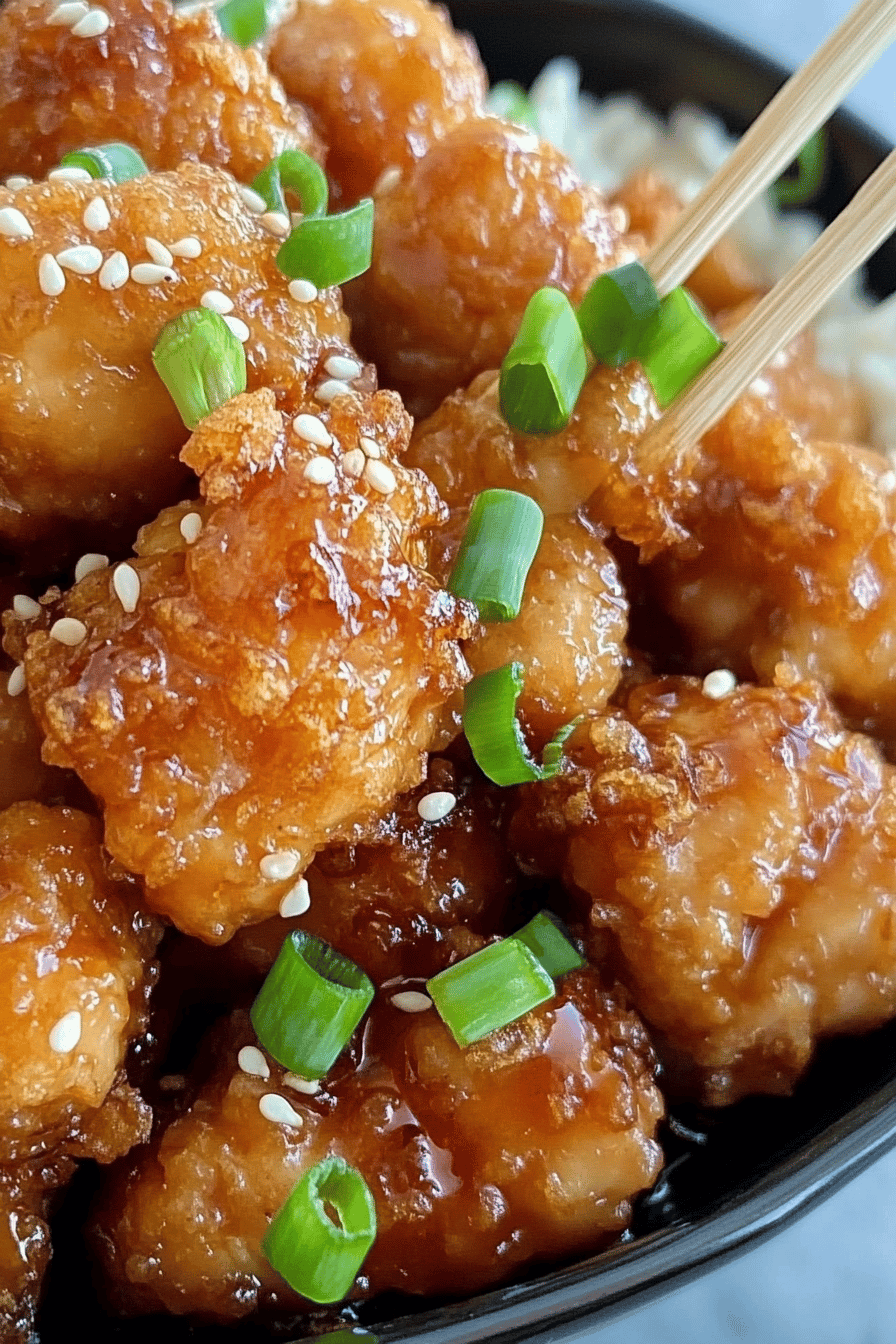
crispy chicken bites
The first time I fried up these Crispy Chicken bites, the kitchen smelled like a street fair and my kids barged in like a small, enthusiastic wave of belly laughs. This recipe is the kind you reach for on a busy weeknight, when you want something comforting, crunchy, and somehow still wholesome enough to feel like you didn’t just cook on autopilot. Think of it as the love child of popcorn chicken and classic chicken tenders—big on flavor, easy to make, and with a little extra oomph from a cheesy filling. I’ve fed this to friends who swear they don’t like “plain chicken,” and they come back begging for another batch. The crunch is unmistakable—the outside crackles with every bite, the inside stays juicy, and the garlicky, Parmesan-kissed finish keeps people reaching for seconds. This dish doesn’t just taste good; it tastes like a tiny celebration in a bite. It’s a lifesaver on busy nights and a crowd-pleaser for kids and grownups alike. I always say, once you try crispy chicken bites, you’ll have a hard time resisting them whenever you need a warm, comforting snack with real personality.

What is Crispy Chicken Bites?
Think of Crispy Chicken bites as bite-sized chicken pieces that wear a glorious, crackly crust and a molten-cheese surprise inside. It’s essentially chicken pieces wrapped in a two-stage coating that melds the tenderness of a good chicken tender with the crunch of a well-seasoned crust. The name is pretty descriptive: you bite into them and you hear that satisfying snap, followed by a juicy interior. Some people stuff a little cheese into the center—mozzarella or cream cheese with herbs—to turn them into cheesy little pockets. Others skip the stuffed variation and focus on layering flavor in the coating itself. The concept is simple: seal in moisture, build a flavor-packed crust, and finish with a glaze or dip that brightens every bite. It’s comfort food that travels well to a family dinner, a game night, or a quick lunch that still feels special.
Why you’ll love this recipe?
What I love most about this crispy chicken bites recipe is how forgiving it is and how boldly it tastes without needing a long list of ingredients. The crust has a little heat from paprika and a ton of aroma from garlic powder and Parmesan, which means you get a savory punch without having to sauce the life out of the dish. The cheese-filled variation is a total game-changer if you’re feeding kids who claim they don’t like “melted stuff,” because it adds a gooey surprise that makes even the pickiest eater beam with pride. The simplicity here is a big win: you mix a dry batter, whisk a wet batter, dip, coat, and bake. It’s also cost-efficient—many pantry staples live in your cabinet and you can tailor the seasonings to what’s in your spice rack. Versatility is another strength: these bites work as a snack, a kid-friendly dinner, or an elegant appetizer when you’re hosting. What I love most about this recipe is how forgiving it is—if you’re short on buttermilk, you can use almond milk and a splash of lemon juice to mimic tang. If you crave extra crunch, bake a touch longer or finish under the broiler for a few seconds to crisp the crust even more. This dish has become a reliable favorite in my house, and I think you’ll feel the same once you try it.
How do I make crispy chicken bites?
Quick Overview
Here’s the quick version: you coat juicy chicken pieces in a seasoned batter, wrap or stuff them with a cheesy filling if you like, then coat again in a crunchy crust and bake until deeply golden. The trick is to keep the inside moist while achieving a crust that stays crisp even after resting. The result is a batch of bites that taste like they came from a cozy kitchen, not a fast-food line. This method is wonderfully forgiving—if you overcoat or undercook by a few minutes, you’ll still end up with something delicious, and the cheese filling (if you choose to use it) adds a moment of gooey delight that friends and family adore. You’ll notice the garlic-Parmesan aroma long before you take a bite, and that fragrance signals just how comforting these bites are—perfect for a family snack or a party spread.
Ingredients
For the Main Batter:
- 1 cup all-purpose flour
- 1/2 cup cornstarch for extra crispness
- 1 teaspoon baking powder
- 1 teaspoon smoked paprika (or regular paprika)
- 1/2 teaspoon garlic powder
- 1/2 teaspoon onion powder
- 1 teaspoon salt, plus a pinch for finishing
- 1/2 teaspoon Black Pepper
- 1 cup buttermilk or unsweetened almond milk (add 1 tablespoon lemon juice if using almond milk)
For the Filling:
- 4 oz mozzarella, cut into small cubes
- 2 oz Cream Cheese, softened (optional but magical in these bites)
- 2 tablespoons chopped fresh basil or chives
- Salt and pepper to taste
For the Glaze:
- 1/3 cup honey or maple syrup
- 1 tablespoon soy sauce or tamari
- 2 teaspoons sriracha or a pinch of chili flakes (optional for heat)
- 1 teaspoon lemon juice or apple cider vinegar
For the Breading & Finish:
- 2 cups panko breadcrumbs or crushed seasoned crackers for extra crunch
- 1/2 cup grated Parmesan cheese
- Salt and pepper to taste
Step-by-Step Instructions
Step 1: Preheat & Prep Pan
Preheat your oven to 425°F (220°C) if you’re baking, and line a sheet pan with parchment. If you prefer extra crisp, you can use a wire rack over the sheet pan so air can circulate around every bite. The key is to keep them from steaming on the pan so the crust stays dry and crackly. I like to give the pan a light spray of oil to help the crust cling and brown beautifully. If you’re frying, heat oil to 350°F (175°C) and have a plate lined with paper towels ready for draining. For the stuffed version, have your mozzarella cubes and cream cheese ready to fill the chicken pockets as you go.
Step 2: Mix Dry Ingredients
Whisk together the flour, cornstarch, baking powder, paprika, garlic powder, onion powder, salt, and pepper. This is the foundation for a crust that stays crisp. A quick tip I learned after too many soggy batches: sift the dry ingredients if you can. It keeps the coating airy and helps it cling to the chicken better.
Step 3: Mix Wet Ingredients
In a separate bowl, combine the buttermilk or almond milk with a splash of lemon juice if you’re using dairy-free milk. This tang helps set the coating and keeps the chicken juicy on the inside. If you’re using almond milk, I’ve found that a tiny pinch more salt in the wet mix can balance the flavor and help the crust adhere. Let the mixture rest for a couple of minutes so the flavors bloom while you prep the chicken.
Step 4: Combine
Dip each chicken piece in the wet mixture, then dredge in the dry batter. If you’re stuffing, create a small pocket in each piece of chicken with a paring knife, insert a cheese cube or a dollop of cream cheese filling, and seal with a gentle press. Coat again in the dry mixture to lock in the filling. Don’t overwork the meat; a light, even coating is all you need. If the filling sinks a little during coating, that’s okay—just press to seal and continue. If the coating feels a little thick, you can dust off excess for a crisper finish.
Step 5: Prepare Filling
If you’re going the stuffed route, mix the mozzarella cubes, softened cream cheese, and herbs with a pinch of salt. You want a creamy, not runny filling. It should hold its shape as you nestle it into the chicken pocket. For a simpler, non-stuffed version, skip this step and focus on a robust crust and a flavorful glaze. The cheese filling is what turns these bites into mini indulgences, and my kids (and guests) can’t get enough of that melty center.
Step 6: Layer & Swirl
Here’s where you can have fun with texture. If you’re using breadcrumbs, mix them with the grated Parmesan and a touch of pepper. For extra flavor, you can add crushed garlic crisps or a spice blend. When you place the coated chicken on the sheet pan, you can lightly press a small pinch of extra crumbs onto the top for a textured, marbled look. If you’re finishing with a glaze, you can brush a thin layer on now and again after baking for a glossy, even finish. For stuffed bites, you can briefly swirl a tiny amount of the glaze into the cheese filling before sealing the bite to amplify that sweet-savory contrast.
Step 7: Bake
Bake for 15–18 minutes on the middle rack, turning once halfway through so both sides get a bronzy, even crust. If you’re frying, fry in batches until golden brown and drain on a rack or paper towels. The chicken should reach 165°F (74°C) internal temperature. If you’re using a glaze, apply a light brush during the last 2–3 minutes of bake for a sticky, shiny finish, then a final quick bake to set it. If you want extra crispness after baking, finish under the broiler for 1–2 minutes, watching closely so they don’t burn.
Step 8: Cool & Glaze
Let the bites rest for 5 minutes so the juices redistribute and the crust sets. Then brush or toss with the glaze. If you stuffed them, you can serve the glaze on the side for dipping or lightly glaze the tops for a cohesive finish. The glaze should cling but not soak; aim for a lacquered sheen that enhances, not overwhelms, the crust.
Step 9: Slice & Serve
Serve hot, with a bright herb salad or a simple yogurt-dill dip on the side. The texture should be crisp on the outside and tender inside, with a little cheesy pull from the filling if you used it. I like to plate them on a warm platter with lemon wedges and a scatter of chopped parsley for color. My family loves these with a dollop of ranch or honey-money mustard for dipping. The first bite is an audible crunch, followed by juicy tenderness—the kind of moment that makes everyone pause and say, “Wow, that’s good.”
What to Serve It With
These crispy chicken bites shine as a versatile, shareable snack, but they pair beautifully with a handful of side dishes that fit different occasions.
For Breakfast: A light herb scramble on the side and a small avocado and tomato salad makes this a playful brunch bite. Add a cup of strong coffee or a chai latte, and you’ve got a cozy morning treat that doesn’t feel heavy.
For Brunch: Serve with a cucumber-dill yogurt dip, a bright lemon-herb slaw, and a sparkling water with citrus slices. The bite-sized nature makes it easy to pass around the table as guests nibble between pours.
As Dessert: If you want to swing for something unexpected, offer a maple-yogurt dipping sauce or a vanilla cream dip alongside a cinnamon-sugar dusted version of the bites. The contrast between savory and sweet is surprising and totally delicious, especially when a small drizzle of honey finishes the plate.
For Cozy Snacks: Pair with a warm bowl of tomato soup or creamy garlic aioli for dunking. A simple crisp salad on the side keeps the meal balanced, and these bites stay a crowd-pleaser any time of day.
Over the years, this is exactly the sort of dish our family reaches for during movie nights or after soccer practice. It’s a little indulgent, a little nostalgic, and completely doable—especially when you’re feeding a lively group. The cheesy center, the crackling crust, and the brightness of the glaze all come together to create something comforting and crave-worthy. And yes, the leftovers (if there are any) reheat beautifully in a hot oven, maintaining that crisp exterior I love so much.
Top Tips for Perfecting Your Crispy Chicken Bites
Here are the small, practical adjustments that keep this recipe consistently delicious. The magic is in the little details, not in big, flashy changes.
Breading & Coating Prep: Dry ingredients should be well mixed and airy. If the coating clumps, sift again and add a touch more cornstarch. The cornstarch is what gives that extra crisp; don’t skip it. For a deeper flavor, toast the paprika in a dry pan for 30 seconds before mixing it with the dry ingredients to wake up the aroma.
Cheese Filling Variations: If you’re using cheese in the center, cut cubes small enough to melt inside without bursting the outer crust. Add a pinch of salt to the cheese filling to balance the richness. If you want a vegan-friendly option, try a plant-based cheese alternative that melts well and still keeps the bite juicy.
Moisture Management: If your chicken pieces release a lot of moisture, you can pat them dry with paper towels before coating. A drier surface helps the crust adhere and crisp up. If you see steam lifting from the pan, give the bites a quick 1–2 minute rest on a rack before baking to reduce steam buildup on the crust.
Mixing Technique: When you mix wet and dry, the goal is even coating, not a pasty batter. Work quickly and let the coating set a moment before you place the pieces on the sheet. Overmixing the batter can develop gluten and lead to a heavier texture, so keep it light and confident.
Swirl & Pattern Customization: If you want a marbled appearance, dust the tops with a little extra paprika or chili powder as soon as the bites land on the sheet. A light swirl of glaze after baking adds a glossy finish and a little extra flavor without weighing the crust down.
Ingredient Swaps: For a dairy-free version, use almond milk with a touch of lemon juice and vegan cheese in the filling. If you’re avoiding gluten, swap the flour for a gluten-free blend and use gluten-free breadcrumbs. The texture may shift slightly, but it will still be wonderfully crisp.
Baking Tips: An oven rack placement can influence browning; if you notice uneven browning, rotate the tray halfway through. If you have convection, reduce the baking time by a few minutes and monitor the crust closely. Use an instant-read thermometer to confirm the interior is safe but still moist—165°F (74°C) is a good target.
Glaze Variations: The glaze is flexible. Try a charred-orange glaze with a splash of tamari and a pinch of chili for a smoky, bright finish, or keep it simple with a traditional honey mustard glaze. The glaze should cling lightly; if it’s too thick, whisk in a teaspoon or two of warm water to loosen it before applying.
Over the years I’ve tweaked this recipe countless times, and the biggest lesson is that the bites’ personality comes from the crust and the cheese inside. If you’re new to this, start with the non-stuffed version to nail the crust and then experiment with fillings once you’ve got the hang of crisping and baking. My kids actually ask for seconds even when they’re not hungry, which is the surest sign this version is a keeper. Trust me on this one: the first bite will remind you of the best fried chicken you’ve had, but with the convenience and charm of bite-sized snacks. Happy testing in your own kitchen!
Storing and Reheating Tips
Leftover crispy chicken bites aren’t just possible—they can taste just as good as fresh if you store and reheat them properly. Here’s how I handle them for next-day meals or quick leftovers.
Room Temperature: If you’re keeping them for a few hours, spread them on a plate in a single layer and cover lightly with foil. They’re best eaten within 2 hours of cooking, but a little patience with the reheat is worth it for the crisp finish you want later.
Refrigerator Storage: In an airtight container, they’ll stay good for 2–3 days. If you stuffed them, consider storing the filling separately and reassembling when reheating to avoid sogginess. Reheat in a 400°F (200°C) oven for 6–8 minutes until crisp again, or in an air fryer at 375°F (190°C) for a quicker return to crunch.
Freezer Instructions: Freeze unbaked bites on a sheet pan, then transfer to an airtight bag. Bake from frozen at 425°F (220°C) for 18–20 minutes, or fry gently for a few extra minutes to re-crisp. If you’ve frozen stuffed bites, the filling may firm up; reheat longer to ensure the centers are hot and the exterior is crisp.
Glaze Timing Advice: If you’re freezing, I’d skip glaze and add it after reheating. If you’re refrigerating, glaze the bites after they come to room temperature and reheat with the glaze brushing on in the last few minutes for that glossy finish.
In my kitchen, crispy chicken bites are a sanctuary—perfect for busy weeknights, celebratory weekends, and quiet nights when you crave something that tastes like a hug from the inside out. The truth is simple: they’re flexible, forgiving, and always delicious. If you try any fun variations (extra cheese, a different glaze, a new herb), tell me how it goes in the comments. I love hearing what tweaks work for your family, and I’ll be cheering you on from my kitchen workbench with a big plate of these ready for taste-test.
Frequently Asked Questions
Final Thoughts
This recipe isn’t just about getting dinner on the table quickly—it’s about those moments when everyone gathers around the kitchen, eyes bright, noses twitching at that delicious scent, and you realize a simple batch of crispy chicken bites has turned a regular night into a little celebration. It’s the kind of dish that travels well, pairs with an impressive range of sides, and adapts to your pantry and dietary needs without losing its soul. If you’re craving something warm, comforting, and a touch playful, this is your go-to. I hope you’ll make it your own by swapping herbs, trying a few different fillings, or playing with glaze flavors. And when you do, come back and tell me all about your version. I can’t wait to hear how yours turns out. Happy baking and dipping, friends!
If you enjoyed this, drop a comment with your favorite variation or a story about the first time your family tasted crispy chicken bites. I love reading your experiences and seeing photos of your plate-fulls. Don’t forget to rate the recipe and share it with friends who need a little cozy, crunchy goodness in their week. Here’s to many more shared bites and delicious experiments in the kitchen!

crispy chicken bites
Ingredients
Main Ingredients
- 3 tablespoons olive oil
- 3 cloves garlic, minced
- 1 tablespoon honey
- 1 tablespoon sriracha
- 2 tablespoons apple cider vinegar
- 1 teaspoon cayenne pepper
- 0.5 teaspoon kosher salt
- 2.8 pounds boneless chicken breasts, cut into 1.5 inch chunks
- 2 cups plain breadcrumbs
- 2 teaspoons garlic powder
- 2 teaspoons onion powder
- 1.5 teaspoons seasoned salt
- 1 teaspoon chili powder
- 1 teaspoon smoked paprika
- 1.5 teaspoons cayenne pepper adjust to taste for heat
- 1 tablespoon dried parsley
- 4 cups vegetable oil for frying
Instructions
Preparation Steps
- In a small bowl, whisk together the olive oil, minced garlic, honey, sriracha, apple cider vinegar, 1 teaspoon cayenne pepper, and kosher salt until smooth.
- Place the cut chicken chunks into a large zip-top bag. Pour the marinade over the chicken, seal the bag, and massage gently to coat evenly. Refrigerate and marinate for at least 3 to 4 hours for best flavor.
- In a large mixing bowl, combine the breadcrumbs, garlic powder, onion powder, seasoned salt, chili powder, smoked paprika, 1.5 teaspoons cayenne pepper, and dried parsley. Mix thoroughly to distribute spices evenly.
- Remove the marinated chicken from the bag, discarding excess marinade. Toss each chicken piece in the seasoned breadcrumb mixture, pressing gently to ensure a full, even coating.
- Preheat oven to warm (200°F). Set a large baking sheet nearby. Heat the vegetable oil in a Dutch oven or deep fryer to 375°F. Carefully fry the chicken bites in small batches for 3-4 minutes or until golden brown and internal temperature reaches 165°F.
- Transfer fried chicken bites to the baking sheet and place in the warm oven to keep crisp while frying remaining batches. Serve hot with your favorite dipping sauce.