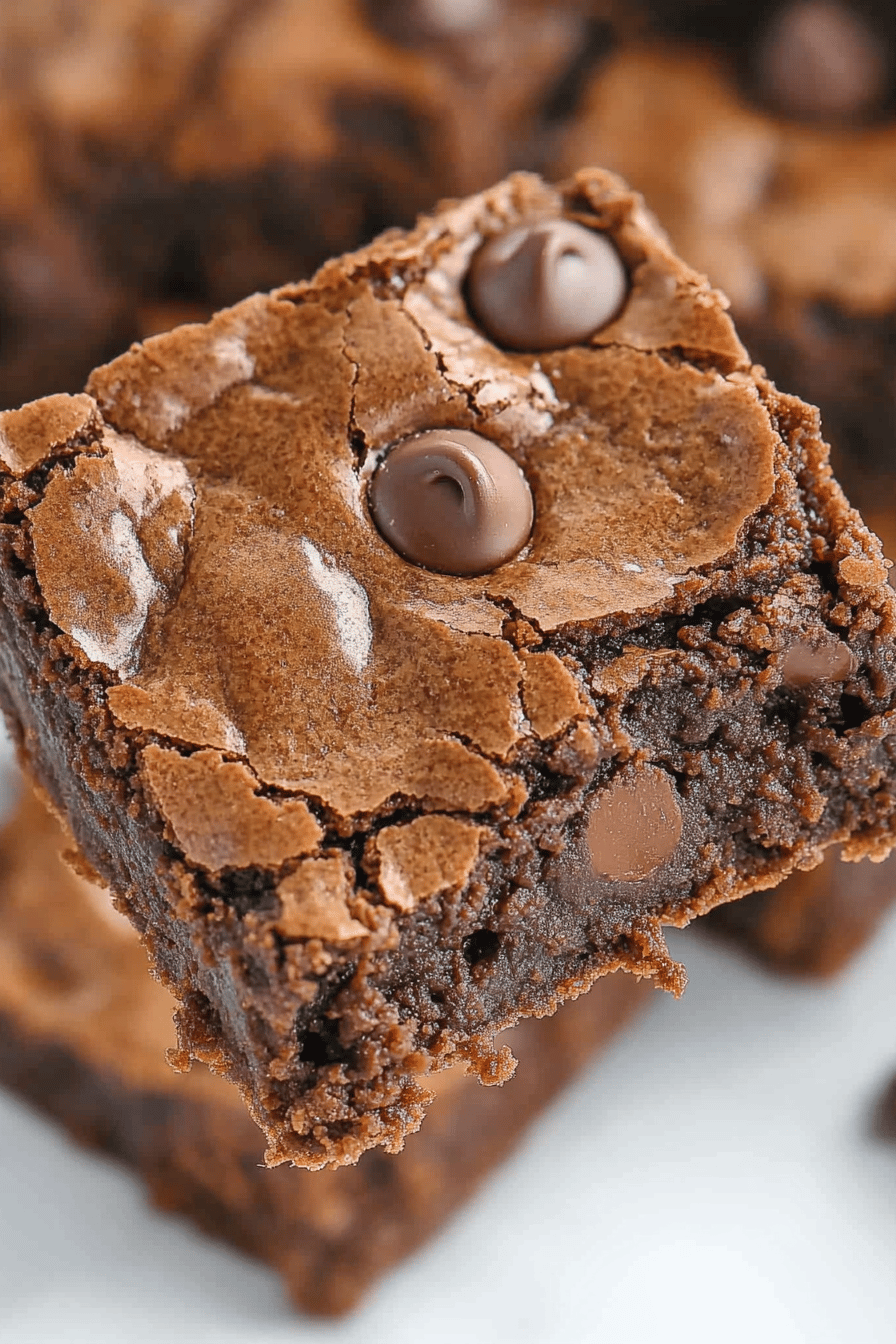
Cool Chocolate Mint Brownies How to Bake
I still remember the first time I made these chocolate mint brownies—it was a chilly Sunday afternoon, and the smell of cocoa and fresh mint filled the whole house, pulling everyone into the kitchen like a sweet little magnet. There’s just something so comforting about that rich chocolate aroma with a hint of mint swirling around—it instantly makes me think of cozy family gatherings and laughter. You know how classic brownies are the reigning champs of easy, crowd-pleasing desserts? Well, adding that burst of mint took these over the edge, turning them into a personal favorite that almost disappeared before I could even get a second slice. I always do this recipe when I want a comforting treat that feels a little fancy but is totally simple enough for any night. If you’ve ever loved a peppermint patty or those chocolate-mint ice cream swirls, you’re in for a real treat here.
What is chocolate mint brownie?
Think of chocolate mint brownies as the classic, fudgy brownie you know and love, but with a refreshing, cool twist—mint. It’s essentially a rich chocolate brownie infused or swirled with that crisp mint flavor, sometimes layered or glazed with a minty frosting or filling. The name comes straight from those beloved peppermint candies, but trust me, it’s waaaay better homemade. It’s like a chocolate brownie and a mint dessert had a delicious, cozy baby—and that baby is addictive. This isn’t your everyday brownie; it’s the kind you make when you want to impress your friends with minimal effort or when you need a comforting snack with a little zing of freshness to balance out the chocolatey richness. I like to think of it as the grown-up’s answer to mint-chocolate chip ice cream—only way easier to bake and devour.
Why you’ll love this recipe?
So what’s so special about these chocolate mint brownies? Let me just say this: they hit all the right notes, and I don’t say that lightly because I’ve tried a lot of brownie recipes (some disasters, believe me). First off, the flavor is a total game-changer. The deep, fudge-y chocolate muddled together with that cool, invigorating burst of mint is like a little flavor party in your mouth. And if you’re thinking mint might overpower the chocolate—don’t worry, the balance is just right; the mint gives a fresh lift without stealing the show.
Second, this recipe couldn’t be easier. I always tell friends that if you can stir a bowl and smooth some batter in a pan, you’ve got this covered. No complex frosting or tempering chocolate needed—just straightforward ingredients you probably have in your pantry and fridge.
Budget-friendly, too! No crazy exotic things here—just basic staples like flour, cocoa powder, eggs, and a splash of peppermint extract. Plus, these brownies work great for all kinds of occasions—cut ’em into big squares for dessert, small bites for parties, or even put them in lunchboxes for a sweet surprise. Heck, my kids actually ask for these all the time, and they’re not even big mint fans generally.
What I love most about this recipe is how versatile it is. You can tweak the glaze, switch up the mint intensity, or even add some chocolate chunks or nuts for textural fun. If you’ve ever enjoyed my regular brownie or peppermint bark recipes, you’ll definitely want to keep this one bookmarked—it’s like the best parts of both rolled into one.
How do I make chocolate mint brownies?
Quick Overview
Here’s the short version: this is a one-bowl, easy-to-make brownie batter spiked lightly with peppermint extract. You bake it until it’s just set but still fudgy, then swirl in a creamy mint filling before the oven or add a simple mint glaze after. The magic is in that soft, velvety texture paired with a bright hit of mint that cuts through the chocolate richness. I like this method because it’s forgiving—even if your batter is a little thick, or your oven’s not perfectly calibrated, you’ll still end up with something deliciously nostalgic and fresh. Plus, it smells incredible from start to finish, and your kitchen will thank you.
Ingredients
For the Main Batter:
- 1 cup (226g) unsalted butter, melted and slightly cooled (use good quality for best taste)
- 1 ½ cups (300g) granulated sugar
- ¾ cup (65g) unsweetened cocoa powder (Dutch processed is ideal for richer flavor)
- 4 large eggs, room temperature (gives the brownies that perfect fudgy texture)
- 1 teaspoon pure vanilla extract
- 1 ½ cups (190g) all-purpose flour (sifted to keep it light)
- ½ teaspoon salt
- ½ teaspoon baking powder (for a little lift without making them cakey)
- 1 teaspoon peppermint extract (start here and adjust based on your mint love)
For the Filling:
- ½ cup cream cheese, softened (adds creaminess and tanginess)
- ⅓ cup powdered sugar (for sweetness without graininess)
- 1 tablespoon unsalted butter, softened
- ½ teaspoon peppermint extract (feel free to bump this up if you want a punchier mint filling)
- Optional: a few drops of green food coloring if you want that classic mint swirl look
For the Glaze:
- 1 cup powdered sugar
- 1-2 tablespoons milk (or heavy cream for richness)
- ¼ teaspoon peppermint extract
- Optional garnishes: crushed candy canes or mini chocolate chips
Step-by-Step Instructions
Step 1: Preheat & Prep Pan
Start by preheating your oven to 350°F (175°C). Line an 8×8-inch baking pan with parchment paper or lightly grease it to prevent sticking. I always do the parchment method because it makes lifting the brownies out a breeze, especially since you want neat edges when slicing.
Step 2: Mix Dry Ingredients
In a medium bowl, sift together the flour, cocoa powder, salt, and baking powder. Mixing these well ensures even distribution so your brownies bake uniformly. I sometimes toss them in a bigger bowl so I can add the wet ingredients right afterward without dirtying an extra dish.
Step 3: Mix Wet Ingredients
In a large bowl, whisk together the melted butter and granulated sugar until the texture’s glossy and light. Then beat in the eggs one at a time—they’ll help create that chewy fudginess we all crave. Stir in the vanilla and peppermint extracts. The peppermint scent really starts to tease you here—it’s my favorite baking moment.
Step 4: Combine
Add the dry ingredients into the wet in batches, folding gently just until combined. Be patient here; overmixing leads to cakey brownies, and that’s not what we want. The batter should be thick and fudgy with a glossy sheen.
Step 5: Prepare Filling
Beat the cream cheese, powdered sugar, and softened butter together until super smooth and creamy. Add the peppermint extract and mix again. If you want that cool minty green swirl, stir in a drop or two of food coloring. This creamy layer will be your surprise twist.
Step 6: Layer & Swirl
Pour half the brownie batter into the pan and smooth it out evenly. Dollop the cream cheese filling in spoonfuls over the batter, then pour the remaining batter on top. Use a knife or skewer to swirl the layers together in a loose figure-eight pattern—details like these make your brownies look bakery-worthy and store-bought level fancy.
Step 7: Bake
Bake for about 35-40 minutes. Oven times can vary, so I start checking at 33 minutes. The edges should look set, and the center just slightly wobbly when you jiggle the pan. Don’t overbake or your brownies will dry out—still soft and fudgy is the dream here.
Step 8: Cool & Glaze
Let the brownies cool completely in the pan on a wire rack. While they’re cooling, whisk together your powdered sugar glaze ingredients. Drizzle the glaze over the brownies once cooled and let it set for about 20 minutes. This glaze adds a lovely sheen and an extra mint” zing.” If you’re in a hurry, just dust with powdered sugar or crushed candy canes instead—it’s equally charming.
Step 9: Slice & Serve
Use a sharp knife, preferably warmed under hot water and then dried, to slice clean squares. Serve them at room temperature for maximum gooeyness or chilled if you like a firmer texture. These brownies team beautifully with a cup of mint tea or a glass of cold milk; in my house, they don’t last long without some enthusiastic fork action.
What to Serve It With
For Breakfast: Start your morning on a sweet note—these brownies alongside a steaming cup of black coffee or minty green tea bring just the right balance between decadence and freshness.
For Brunch: Pair these with a light fruit salad or a dollop of whipped cream and a sprig of fresh mint for an elegant plate. A sparkling mint lemonade on the side turns it into a mini celebration.
As Dessert: After dinner, serve warm with a scoop of vanilla or peppermint ice cream. The contrast between warm brownies and cold ice cream is my go-to crowd pleaser that gets rave reviews every time.
For Cozy Snacks: Crumbled over yogurt or eaten straight from a paper napkin with a mug of hot cocoa—they’re perfect for those ‘treat yourself’ moments curled up on the couch. My family loves sneaking bites while watching movies.
Honestly, these have woven their way into our family traditions at holiday parties and cozy weekends alike. Everyone always comments on how the mint lifts the whole thing, making it feel special but homey at the same time.
Top Tips for Perfecting Your Chocolate Mint Brownies
Mixing Technique: The biggest mistake I used to make was overmixing the batter once the flour went in. It’s tempting to mix it smooth, but stop the second no visible flour streaks remain. Overworked batter = cakey and tougher brownies, which I’ve learned is just sad after all those luscious flavors.
Swirl Patterns: Don’t fret over being a latte artist! Just a few gentle swooshes with a knife create a beautiful marble. Too much swirling can mix the layers so much you lose that gorgeous contrast.
Ingredient Swaps: Tried this with coconut oil instead of butter once—it gave a lovely tropical twist but altered the texture a bit. Also swapped out almond milk for regular milk in the glaze; it made it creamier, which was a happy accident. You can also experiment with white chocolate chips stirred in for extra pops of sweetness.
Baking Position: I always bake mine in the center rack to avoid burnt edges or underdone middles. Ovens vary wildly, so keep an eye on them after 30 minutes. Using an oven thermometer helped me nail perfect doneness.
Glaze Consistency: The glaze should be thick but pourable. If too runny, it slides off and looks sad; too stiff, and it’s hard to drizzle. I add milk a teaspoon at a time for just the right flow. Peppermint extract is powerful, so add a little, taste, then adjust.
One time, I rushed cutting these brownies while warm and ended up with a crumbly mess. I’ve learned it’s best to wait until they’re fully cooled so they’re easier to slice and keep their shape better. Patience definitely pays off.
Storing and Reheating Tips
Room Temperature: Store your brownies in an airtight container at room temperature for up to 3 days. I usually cover the top with wax paper and keep them tucked in the back of the counter away from sunlight—the texture stays perfect and they stay moist.
Refrigerator Storage: You can keep these in the fridge for up to a week, especially handy if you live somewhere warm. Just be sure to bring them back to room temp before serving, so that buttery softness comes back. Store them in a sealed container to prevent drying out or absorbing fridge odors.
Freezer Instructions: These freeze beautifully. Wrap individual squares tightly in plastic wrap and place them in an airtight freezer bag for up to 3 months. Thaw overnight in the fridge or at room temperature for a few hours. I find the taste intensifies after freezing, which feels like a bonus!
Glaze Timing Advice: If you plan to freeze, it’s best to apply the glaze after thawing so it stays fresh and beautiful. For short-term storage, glaze before refrigerating or serving.
Frequently Asked Questions
Final Thoughts
Honestly, chocolate mint brownies have carved out a special place in my kitchen and my heart. They’re the kind of treat that makes ordinary days feel a little more like celebrations, and busy weeknights seem sweeter. What really gets me every time is that perfect balance—the richness of chocolate with a fresh, uplifting mint note that wakes up your taste buds in the best way. Whether you’re new to baking brownies or a seasoned pro, I hope this recipe becomes one of your go-tos, creating moments for you to share over coffee, dinner, or just because. I’d love to hear how your batch turns out—drop a comment, share your tweaks, and maybe even your own secret ingredients! Happy baking, and here’s to many delicious bites ahead!