Cinnamon Crescent Rolls
Oh, you know those days. The ones where the air feels a little crisp, the to-do list seems to be multiplying, and all you really want is a hug in edible form? That’s precisely when I find myself reaching for my Cinnamon Crescent Rolls recipe. It’s not just a recipe; it’s a memory maker. I remember my Grandma Pearl making these every Sunday morning, and the scent would just waft through the entire house, beckoning everyone to the kitchen table. There’s something magical about the way these tender, swirled beauties come together, promising a little slice of heaven with every bite. They’re not as fussy as a full-on cinnamon roll from scratch, but they deliver all that gooey, cinnamon-sugar goodness, making them my absolute favorite shortcut to pure bliss. If you’ve ever loved a classic cinnamon roll but wished for something a *tiny* bit simpler, then darling, you’re going to adore these Cinnamon Crescent Rolls.
What are cinnamon
So, what exactly are these little wonders? Think of them as the cousins of your favorite sticky buns and Cinnamon Rolls, but with their own unique charm. They’re essentially a simple, buttery dough that’s rolled out, generously slathered with a spiced cinnamon-sugar filling, and then rolled up tightly before being sliced and baked. The “crescent” part comes from how they naturally want to curl up a bit as they bake, creating those gorgeous, inviting swirls. It’s that delightful combination of a soft, pillowy dough and a sweet, fragrant filling that just sings. They’re not overly complicated; they’re just pure, unadulterated comfort food that happens to look as beautiful as it tastes. It’s basically a hug you can eat!
Why you’ll love this recipe?
Honestly, where do I even begin? There are so many reasons why this Cinnamon Crescent Rolls recipe has earned a permanent spot in my heart (and my recipe binder!).
First off, the **flavor**. Oh, the flavor! You get that unmistakable warmth of cinnamon, perfectly balanced with the sweetness of the sugar. When they’re fresh out of the oven, with a drizzle of simple glaze, it’s just divine. The dough itself is tender and slightly sweet, a perfect vehicle for that incredible filling. It’s the kind of flavor that transports you straight back to childhood or a cozy bakery.
Then there’s the **simplicity**. I know “homemade” can sometimes sound daunting, but I promise, these are surprisingly easy. The dough comes together quickly, and the rolling and filling process is straightforward. Even if you’re not a seasoned baker, you can totally nail this. I’ve had friends who swore they couldn’t bake a thing make these and blow themselves away. It’s really that forgiving.
And **cost-efficiency**? These are champions! You likely have most of the ingredients in your pantry right now. They use everyday staples, so you don’t need to make a special trip to the store for fancy items. This makes them an excellent choice for a weekend treat without breaking the bank.
Finally, their **versatility** is a huge win. While they’re amazing on their own, they can be dressed up or down. Serve them warm with a cup of coffee for a quick breakfast, pile them high for a special brunch, or even have them as a delightful dessert. They’re perfect for potlucks, bake sales, or just because you deserve a treat. What I love most about these Cinnamon Crescent Rolls is that they manage to feel both incredibly special and wonderfully down-to-earth at the same time. They’re my go-to when I want something truly delicious but don’t have hours to spend in the kitchen.
How do you make cinnamon rolls?
Quick Overview
Making these delightful Cinnamon Crescent Rolls is a straightforward process that involves mixing a simple dough, creating a flavorful cinnamon-sugar filling, rolling it all up, slicing, and baking until golden. The beauty lies in its simplicity and the minimal steps required to achieve that irresistible aroma and taste. You’ll be amazed at how quickly you can go from ingredients to a warm, comforting treat. Trust me, the hardest part is waiting for them to bake!
Ingredients
For the Main Dough:
2 ¼ cups all-purpose flour, plus more for dusting.
¼ cup granulated sugar.
1 teaspoon baking powder.
½ teaspoon baking soda.
½ teaspoon salt. This is important for balancing the sweetness and enhancing the overall flavor.
½ cup (1 stick) unsalted butter, cold and cut into small cubes. Using cold butter is key to a tender dough.
¾ cup milk, plus a little extra if needed. Whole milk gives the best richness, but 2% works too. I’ve even experimented with almond milk, and it made it surprisingly creamy!
For the Filling:
½ cup packed light Brown Sugar. The brown sugar gives a lovely caramel note.
1 ½ tablespoons ground cinnamon. Don’t be shy with the cinnamon; it’s the star!
¼ cup (½ stick) unsalted butter, softened. Softened butter is easier to spread evenly.
For the Glaze:
1 cup powdered sugar.
2 tablespoons milk (or water for a thinner glaze).
½ teaspoon vanilla extract. This adds a lovely subtle flavor.
Step-by-Step Instructions
Step 1: Preheat & Prep Pan
First things first, get your oven preheating to 375°F (190°C). While that’s warming up, grab a baking sheet. I like to line mine with parchment paper for easy cleanup – it’s a lifesaver, especially when dealing with sticky glazes! Lightly grease your parchment paper or the baking sheet itself. This ensures your beautiful rolls don’t stick.
Step 2: Mix Dry Ingredients
In a large bowl, whisk together the flour, granulated sugar, baking powder, baking soda, and salt. Give it a good mix so everything is evenly distributed. This ensures your leavening agents are working their magic throughout the dough, giving you lovely, fluffy rolls.
Step 3: Mix Wet Ingredients
In a separate, smaller bowl, whisk together the milk. I usually just give it a quick stir to ensure it’s ready.
Step 4: Combine
Now, cut the cold, cubed butter into your dry ingredients. You can use a pastry blender, a fork, or even your fingertips. You want the mixture to resemble coarse crumbs, with some pea-sized pieces of butter still visible. This is what makes the dough tender and flaky. Then, gradually add the milk, mixing just until a soft dough forms. Be careful not to overmix! Overmixing develops the gluten too much, which can result in tough rolls. If the dough seems a bit dry, add another tablespoon of milk, a teaspoon at a time, until it just comes together.
Step 5: Prepare Filling
In a small bowl, combine the packed Brown Sugar and cinnamon. Mix them well. This is your gorgeous filling!
Step 6: Layer & Swirl
Turn the dough out onto a lightly floured surface. Gently knead it a few times, just to bring it together smoothly. Then, roll it out into a rectangle, about 9×12 inches. Try to get it as even as possible. Now, spread the softened butter evenly over the dough, leaving about a ½-inch border along one of the long edges. Sprinkle the cinnamon-sugar mixture generously over the buttered surface. Press it down lightly with your hands or a rolling pin to help it adhere. Starting from the long edge opposite the one you left bare, tightly roll up the dough, jelly-roll style. Pinch the seam to seal it shut. You’ll have a long log.
Step 7: Bake
Using a sharp knife or dental floss (floss works surprisingly well for a clean cut!), slice the log into 12 equal rolls. Place the sliced rolls onto your prepared baking sheet, leaving a little space between them as they will puff up. Bake for 18-22 minutes, or until they’re golden brown and fragrant. The smell alone is worth it!
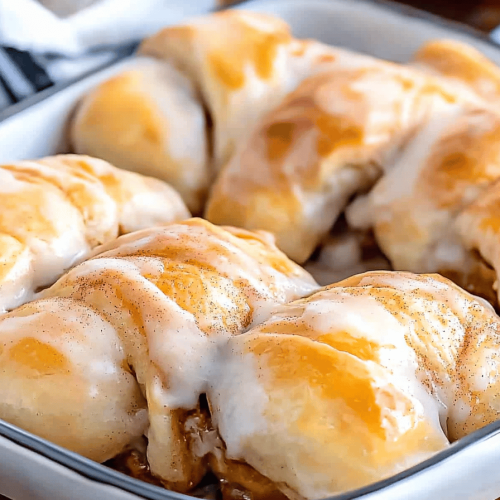
Step 8: Cool & Glaze
Let the rolls cool on the baking sheet for about 10 minutes. While they’re cooling, whisk together the powdered sugar, milk, and vanilla extract in a small bowl until smooth. The consistency should be thick but pourable. Drizzle this glorious glaze over the warm rolls. The warmth of the rolls will help the glaze melt slightly and create that irresistible finish.
Step 9: Slice & Serve
Serve these Cinnamon Crescent Rolls warm. They are absolutely divine when the glaze is still a little melty and the inside is soft and gooey. If you’ve managed to have any leftovers (a big if in my house!), follow the storing and reheating tips below.
What to Serve It With
These Cinnamon Crescent Rolls are pretty much a showstopper on their own, but they can be part of a delightful spread for any occasion. Here are a few ideas:
For Breakfast: They’re the perfect accompaniment to a steaming mug of coffee or a glass of cold milk. I love serving them alongside some fresh fruit like berries or sliced oranges to add a bit of freshness. Sometimes, I’ll even make a big batch of scrambled eggs to make it a heartier meal, especially on weekends when we have a bit more time.
For Brunch: Elevate them by arranging them beautifully on a tiered stand. They pair wonderfully with other brunch favorites like quiches, bacon, sausage, and maybe even a light salad. For beverages, think mimosas, fresh squeezed orange juice, or a fancy coffee drink. The cinnamon aroma will mingle beautifully with other brunch smells.
As Dessert: These are fantastic as a lighter dessert option after a nice dinner. A scoop of vanilla bean ice cream melting over a warm roll is pure indulgence! They also work well with a dollop of whipped cream or a side of fresh fruit compote, like raspberry or blueberry.
For Cozy Snacks: On a chilly afternoon, there’s nothing better than curling up with one of these warm rolls and a good book or a movie. They’re a comforting treat that feels both special and accessible. My kids love them as an after-school snack, and I always feel good knowing I’m giving them something homemade and delicious.
My family tradition is to have them for “special breakfast” days, which can be anything from a birthday to just a really good Saturday. They always disappear so quickly!
Top Tips for Perfecting Your Cinnamon Crescent Rolls
I’ve made these Cinnamon Crescent Rolls more times than I can count, and over the years, I’ve picked up a few tricks that make them even better. Here are my top tips:
Dough Mixing Advice: The absolute biggest tip here is to *not overmix* the dough. Once the dry and wet ingredients are just combined, stop mixing. A few streaks of flour are okay; they’ll incorporate as you knead briefly. Overmixing makes the dough tough, and nobody wants a tough roll! You’re looking for a soft, slightly sticky dough that just comes together.
Butter is Your Friend: Make sure your butter for the dough is truly cold and cubed. This creates those little pockets of fat that melt during baking, resulting in a tender, flaky texture. For the filling, softened butter spreads much more evenly, ensuring every bite gets that delicious cinnamon-sugar goodness.
Even Rolling is Key: When you roll out the dough for the filling, try to get it as even as possible. A lopsided rectangle can lead to uneven baking and some parts being overcooked while others are under. Aim for that consistent 9×12 inch rectangle.
Tight Roll for Defined Swirls: Roll the dough up as tightly as you can without squishing it. This creates those beautiful, defined swirls in the finished rolls. If you roll too loosely, you might end up with gaps, and the filling could ooze out too much.
Clean Cuts are Crucial: Use a sharp knife or unflavored dental floss to slice the roll into individual portions. A dull knife can smash the roll, compressing the layers and making it harder for them to rise properly. Dental floss is my secret weapon for a super clean cut – just slide it under the roll, cross the ends over, and pull gently!
Don’t Over-Bake: Keep an eye on your rolls during the last few minutes of baking. You want them golden brown, but not dark and crispy. Over-baking will dry them out. They should look puffed and feel slightly firm to the touch.
Glaze Consistency is Everything: For the glaze, you’re aiming for a pourable, but not watery, consistency. If it’s too thick, add milk a teaspoon at a time. If it’s too thin, add more powdered sugar. Pouring it over warm (not piping hot) rolls allows it to melt just slightly for that perfect finish.
Ingredient Swaps: If you’re out of milk, you can substitute a non-dairy alternative like almond or soy milk, though the richness might be slightly different. For the cinnamon, if you’re feeling adventurous, you could add a pinch of nutmeg or cardamom to the sugar mixture for a different flavor profile.
These little tips have helped me achieve consistently delicious Cinnamon Crescent Rolls every single time, and I’m sure they’ll do the same for you!
Storing and Reheating Tips
Storing these delectable Cinnamon Crescent Rolls is pretty simple, and they usually don’t last long, but it’s good to know how to keep them fresh if you happen to have leftovers. My kids always try to sneak one more, so having storage advice is key!
Room Temperature: If you think you’ll finish them within a day or two, storing them in an airtight container at room temperature is perfectly fine. They’ll retain their soft texture and wonderful flavor. Just make sure they are completely cooled before sealing the container, or condensation can make them soggy.
Refrigerator Storage: For longer storage, up to 4-5 days, the refrigerator is your best bet. Place them in an airtight container or wrap them tightly in plastic wrap. They might firm up a bit in the fridge, but don’t worry, reheating brings them back to life.
Freezer Instructions: These Cinnamon Crescent Rolls freeze beautifully! You can freeze them either unfrosted or frosted. For the best quality, wrap individual rolls tightly in plastic wrap, then place them in a freezer-safe bag or container. They can be stored in the freezer for up to 2-3 months. To thaw, remove them from the freezer and let them thaw overnight at room temperature or in the refrigerator.
Glaze Timing Advice: If you plan to freeze them, it’s often best to glaze them *after* reheating. If you freeze them already glazed, the glaze might become a bit sticky or lose some of its sheen. For room temperature or refrigerated storage, they are best glazed just before serving or within a few hours of baking.
Reheating: To bring them back to that fresh-from-the-oven glory, the microwave is your friend for a quick reheat. Place a roll on a plate and microwave on medium power for about 10-15 seconds, or until warmed through. For a slightly crispier exterior, you can pop them in a toaster oven or a conventional oven at around 300°F (150°C) for a few minutes until warmed and slightly toasty. This is especially great if you’re reheating from frozen!
Frequently Asked Questions
Final Thoughts
There you have it – my beloved Cinnamon Crescent Rolls! I truly believe this recipe is a keeper. It strikes that perfect balance between being incredibly satisfying and surprisingly achievable, even on a busy weeknight. The aroma that fills your kitchen while these are baking is reason enough to make them, but the taste? Oh, that’s pure comfort in every tender, cinnamon-swirled bite. They’re more than just a baked good; they’re a warm hug, a happy memory, and a simple way to make any day feel a little more special.
If you love this recipe and are looking for other cozy baked goods, you might enjoy my Fluffy Blueberry Scones or my Easy Chocolate Chip Banana Bread. They bring that same homemade goodness to your table.
I can’t wait for you to try these Cinnamon Crescent Rolls and make your own memories with them! Please let me know in the comments below how yours turn out, or if you discover any fun variations. Happy baking!
Cinnamon Crescent Rolls
Ingredients
Dough
- 0.5 cup warm milk
- 2.25 teaspoon active dry yeast
- 0.25 cup granulated sugar
- 2.5 cup all-purpose flour
- 0.5 teaspoon salt
- 0.25 cup unsalted butter, melted
- 1 large egg
Cinnamon Filling
- 0.75 cup packed brown sugar
- 1.5 tablespoon ground cinnamon
- 0.5 cup unsalted butter, softened
Cream Cheese Glaze
- 4 oz cream cheese, softened
- 0.25 cup unsalted butter, softened
- 1 cup powdered sugar
- 1 tablespoon milk
- 0.5 teaspoon vanilla extract
Instructions
Preparation Steps
- In a small bowl, combine warm milk, yeast, and 1 tablespoon of sugar. Let it sit for 5-10 minutes until foamy.
- In a large bowl, whisk together flour, remaining sugar, and salt. Make a well in the center.
- Pour the yeast mixture, melted butter, and egg into the well. Mix until a shaggy dough forms. Turn out onto a floured surface and knead for 8-10 minutes until smooth and elastic.
- Place the dough in a greased bowl, cover, and let rise in a warm place for 1-1.5 hours, or until doubled in size.
- While the dough rises, prepare the filling. In a small bowl, mix brown sugar and cinnamon. In another bowl, cream together softened butter.
- Once the dough has risen, punch it down and roll it out into a large rectangle on a floured surface.
- Spread the softened butter evenly over the dough, leaving a small border. Sprinkle the cinnamon-sugar mixture over the butter.
- Roll up the dough tightly from the long edge. Cut the roll into 12 equal slices.
- Place the rolls in a greased baking dish. Cover and let rise for another 30-45 minutes.
- Preheat oven to 375°F (190°C). Bake for 18-20 minutes, or until golden brown.
- While the rolls are baking, prepare the glaze. In a bowl, beat together softened cream cheese and butter until smooth. Gradually beat in powdered sugar, milk, and vanilla extract until smooth and creamy.
- Let the rolls cool slightly in the pan before drizzling with the cream cheese glaze.