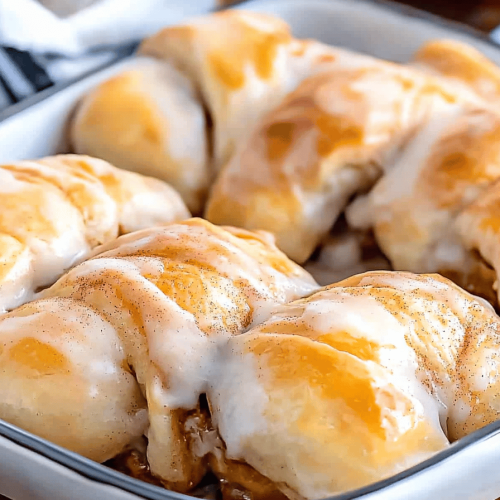
Cinnamon Crescent Rolls
There are few things in life as comforting and utterly delightful as the smell of warm cinnamon and sugar wafting through the house. It’s a scent that instantly brings me back to my childhood kitchen, my mom humming as she rolled out dough, her hands dusted with flour. And if there’s one baked good that embodies pure, unadulterated joy, it’s a batch of perfectly fluffy, golden cinnamon Crescent Rolls. Forget those store-bought ones that always taste a bit… off. This recipe, my friends, is the real deal. It’s the kind of treat that makes a regular Tuesday feel like a special occasion and is guaranteed to disappear faster than you can say “pass the frosting!” If you’ve ever admired those beautiful swirls and wondered if you could achieve that bakery-level perfection at home, I promise you, you absolutely can. This isn’t just a recipe; it’s an experience, a warm hug in edible form, and frankly, it’s become my go-to when I need a little sweetness in my life, or when I just want to impress my family (which, let’s be honest, happens more often than I’d like to admit!).
What are cinnamon crescent rolls?
So, what exactly are these magical little pastries we’re talking about? Think of them as the ultimate upgrade to your basic Cinnamon Roll. Instead of a dense, cakey texture, these cinnamon crescent rolls are incredibly light and airy, almost cloud-like. The “crescent” part comes from the shape you get when you slice and roll them, mimicking the beautiful curves of a crescent moon. The dough itself is a dream to work with – soft, pliable, and wonderfully forgiving. Inside, you’ll find layers upon layers of gooey cinnamon-sugar filling, creating that irresistible marbling effect that makes them so visually stunning. It’s essentially a buttery, sweet dough folded around a warm spiced filling, baked until golden brown, and then usually finished with a luscious, creamy glaze. It’s not overly complicated, but the result is something truly spectacular. It’s the perfect balance of soft bread, sweet spice, and rich frosting.
Why you’ll love this recipe?
What are some of the reasons why this recipe has earned a permanent spot in my baking repertoire, and I have a feeling it’ll do theflavor is out of this world. The combination of buttery dough, warm cinnamon, and sweet brown sugar is just classic perfection. When they’re fresh out of the oven, the aroma alone is enough to make your mouth water. But beyond the taste, what really sells me is the simplicity. I know “dough” can sound intimidating, but this recipe is surprisingly forgiving. You don’t need any fancy equipment or years of baking experience. The dough comes together easily, and the steps are clear and straightforward. I’ve even had my kids help with mixing the dry ingredients, and they had a blast! It’s also wonderfully cost-effective. You probably already have most of the ingredients in your pantry. Compared to buying a box of fancy pastries, this homemade version is a fraction of the cost, and the flavor and satisfaction are ten times better. Plus, these are incredibly versatile. While they’re heavenly on their own, they’re also fantastic for breakfast, brunch, or even as a dessert. What I love most about this recipe is that it feels both rustic and elegant. It’s the kind of dish that looks impressive on a plate but is made with simple, honest ingredients. It truly stands out from other Cinnamon Roll recipes because of its incredible lightness and delicate texture. It’s like a hug from the inside out.
How do you make cinnamon rolls?
Quick Overview
This recipe is all about creating a light, fluffy dough, filling it with a warm cinnamon-sugar mixture, rolling it up, slicing it into beautiful crescents, and baking until golden. The process involves mixing the dough, letting it rise, rolling it out, spreading the filling, rolling it up, slicing, and baking. The final touch is a simple, sweet glaze. The beauty here is that even with the resting time for the dough, the actual hands-on time is minimal, making it manageable even on a busy weekend morning. You’ll be rewarded with the most incredible aroma filling your kitchen.
Ingredients
For the Main Dough:
2 ¼ teaspoons active dry yeast
½ cup warm milk (about 110°F/43°C)
¼ cup granulated sugar
2 large eggs, at room temperature
½ cup unsalted butter, melted and slightly cooled
1 teaspoon vanilla extract
3 ½ to 4 cups all-purpose flour, plus more for dusting
1 teaspoon salt
For the Filling:
1 cup packed light Brown Sugar
2 tablespoons ground cinnamon
½ cup unsalted butter, softened to room temperature
For the Glaze:
1 ½ cups powdered sugar, sifted
2-3 tablespoons milk (or half-and-half for extra richness)
½ teaspoon vanilla extract
Step-by-Step Instructions
Step 1: Preheat & Prep Pan
First things first, let’s get our baking situation sorted. You’ll need a good-sized baking sheet, preferably a rimmed one. I like to line mine with parchment paper. It makes cleanup a breeze and ensures the bottoms don’t stick. You can also lightly grease and flour it if you don’t have parchment. Now, set that aside. We’re not preheating the oven just yet; that comes later when the rolls are ready for their baking adventure.
Step 2: Mix Dry Ingredients
In a small bowl, sprinkle your active dry yeast over the warm milk. Add a pinch of the granulated sugar from the total amount. Give it a gentle stir and let it sit for about 5-10 minutes until it gets nice and foamy. This “proofing” step is super important – it tells you your yeast is alive and ready to work its magic. In a large mixing bowl, whisk together your flour and salt. Make a little well in the center.
Step 3: Mix Wet Ingredients
To the proofed yeast mixture, add the rest of the granulated sugar, the room temperature eggs, the melted and slightly cooled butter, and the vanilla extract. Whisk everything together until it’s well combined. You want it smooth and emulsified. The eggs being at room temperature really helps the dough come together smoothly, so try to remember that!
Step 4: Combine
Now, pour the wet ingredients into the well you made in the dry ingredients. Start mixing with a wooden spoon or a spatula. Gradually add the flour mixture, incorporating it until a shaggy dough forms. If you’re using a stand mixer with a dough hook, now’s the time to switch over. Knead on medium speed for about 5-7 minutes, or until the dough is smooth, elastic, and pulls away from the sides of the bowl. If you’re doing it by hand, turn the dough out onto a lightly floured surface and knead for about 8-10 minutes. You’re looking for a dough that’s soft and slightly sticky, but manageable. Don’t be tempted to add too much extra flour; a little stickiness is good for a tender dough!
Step 5: Prepare Filling
While the dough is doing its thing, let’s whip up that glorious filling. In a medium bowl, combine the packed light Brown Sugar and ground cinnamon. Mix them thoroughly. You want the cinnamon evenly distributed throughout the sugar. Then, add the softened butter. Use a fork or a small spatula to really mash and mix it in until you have a thick, paste-like consistency. It should be spreadable but not runny. This is where all that cinnamon-sugar goodness gets trapped inside!
Step 6: Layer & Swirl
Once your dough is kneaded, place it in a lightly greased bowl, cover it with a clean kitchen towel or plastic wrap, and let it rise in a warm place for about 1 to 1.5 hours, or until it has doubled in size. This is the “proofing” stage, where the yeast gets to work creating all those lovely air pockets. After it’s risen, punch down the dough gently. Turn it out onto a lightly floured surface. Roll it out into a large rectangle, about 12×18 inches. Now, spread that delicious cinnamon-sugar butter mixture evenly all over the rectangle, leaving a small border along one of the long edges. Starting from the opposite long edge, tightly roll up the dough, like a jelly roll. Pinch the seam to seal it. Now, this is the fun part: slice the roll into about 12 equal pieces, about 1 to 1.5 inches thick. You can use a sharp knife or even unflavored dental floss for a cleaner cut. Arrange the sliced rolls, cut-side up, on your prepared baking sheet, leaving a little space between them so they can expand.
Step 7: Bake
Now for the magic! Cover the baking sheet loosely with plastic wrap or a clean kitchen towel and let the rolls sit in a warm place for another 30-45 minutes to puff up again. You’ll see them get noticeably bigger. Once they’ve had their second rise, preheat your oven to 375°F (190°C). Bake for 15-20 minutes, or until they are beautifully golden brown and the centers are cooked through. Keep an eye on them, as oven temperatures can vary. You want them golden, not burnt!
Step 8: Cool & Glaze
Once they’re out of the oven, let the cinnamon crescent rolls cool on the baking sheet for about 10-15 minutes. This is crucial. If you try to glaze them when they’re piping hot, the glaze will just melt and run right off. While they’re cooling, quickly whisk together your powdered sugar, 2 tablespoons of milk, and vanilla extract for the glaze. You want a smooth, thick but pourable consistency. Add more milk, a tiny splash at a time, if it’s too thick. If it’s too thin, add a bit more powdered sugar. Once the rolls have cooled slightly, generously drizzle the glaze over the warm rolls. Watch that glaze drip down the sides – pure bliss!
Step 9: Slice & Serve
You can slice them individually if you prefer, or just let people grab them right off the pan. They are absolutely divine served warm, right after the glaze has set a little. The soft, fluffy interior with the gooey cinnamon filling and the sweet glaze is just perfection. They smell incredible and taste even better. Serve them as is, or perhaps with a cup of coffee or tea.
What to Serve It With
These cinnamon crescent rolls are pretty much a star on their own, but they pair wonderfully with a variety of things depending on the occasion. For a simple, cozy breakfast, I love them with a big mug of steaming black coffee or a creamy latte. The richness of the coffee cuts through the sweetness beautifully. For a more festive brunch spread, they fit right in alongside fresh fruit platters, a quiche, or even some crispy bacon. I like to arrange them nicely on a platter with a few berries scattered around for a pop of color. As a sweet dessert, they’re fantastic served slightly warm with a scoop of vanilla bean ice cream or a dollop of freshly whipped cream. The contrast of the warm roll and cold ice cream is divine! And for those purely indulgent, no-reason cozy snacks, honestly, just grab one (or two!) straight from the pan with a glass of cold milk. It’s pure comfort food. My family also loves having these alongside a bowl of fresh berries, especially in the summer. It adds a lovely tartness that complements the sweet spice of the rolls.
Top Tips for Perfecting Your Cinnamon Crescent Rolls
I’ve made these cinnamon crescent rolls so many times that I’ve picked up a few tricks along the way that I think really make a difference. When it comes to the dough, the biggest thing is not to add too much extra flour. I know it’s tempting when the dough feels a little sticky, but trust me, a slightly sticky dough will yield a much softer, more tender roll. Resist the urge! Overmixing is also a common pitfall; once the flour is incorporated, mix just until smooth. For the filling, make sure your butter is truly softened, not melted. This ensures it spreads evenly and creates distinct layers of flavor. If you want to kick up the flavor, I sometimes add a tiny pinch of nutmeg or cardamom to the cinnamon-sugar mixture for an extra warm spice note. When it comes to layering and swirling, a tight but not *too* tight roll is key. You want enough tension to get those nice swirls, but not so much that it squeezes all the filling out. For slicing, if you find a sharp knife is smushing them, try using a piece of unflavored dental floss – slide it under the roll, cross the ends over the top, and pull to cut. It gives a super clean slice! For the glaze, always sift your powdered sugar. It makes a world of difference in getting a smooth, lump-free glaze. And remember, it’s easier to thin out a glaze than to thicken it, so add your liquid a tablespoon at a time. If you ever find your rolls aren’t rising well, check your yeast expiry date; old yeast is often the culprit. Also, make sure your milk is warm, not hot – too hot will kill the yeast.
Storing and Reheating Tips
These cinnamon crescent rolls are honestly best eaten the day they’re made, warm and fresh with that gooey glaze. But, life happens, and sometimes you have leftovers! If you have any that survive, I recommend storing them in an airtight container at room temperature for up to 2 days. They might lose a little bit of their initial fluffiness, but they’ll still be delicious, especially if you plan to reheat them. For longer storage, keeping them in the refrigerator is a good option. Pop them into an airtight container or wrap them well in plastic wrap and then foil. They should stay good in the fridge for up to 4 days. When you’re ready to enjoy them again, I highly recommend a quick reheat. For a few rolls, the microwave on 50% power for about 15-20 seconds usually does the trick to bring back some of that soft texture. For a crispier bottom, you can pop them in a toaster oven at 300°F (150°C) for a few minutes until warmed through. If you want to freeze them, wait until they are completely cool. Wrap each roll individually in plastic wrap, then place them in a freezer-safe bag or container. They can be stored in the freezer for up to 3 months. To thaw, let them sit at room temperature for a few hours or overnight. If you’ve stored them unfrosted, you can then prepare the glaze fresh or reheat and glaze them. If they were already glazed, just reheat gently as described above.
Frequently Asked Questions
Final Thoughts
There you have it – my absolute favorite way to make Cinnamon Crescent Rolls! I truly hope this recipe brings as much joy to your kitchen as it does to mine. It’s more than just a sweet treat; it’s about creating memories, sharing delicious food, and savoring those little moments of comfort and warmth. The aroma alone is worth the effort, and the taste? Well, that’s just pure magic. If you love these, you might also enjoy my recipe for [Link to another relevant recipe, e.g., “Fluffy Blueberry Muffins”] or my tips on [Link to another relevant recipe, e.g., “Perfect Pie Crusts”]. They share that same homemade goodness. Give these cinnamon crescent rolls a try, and I promise you won’t be disappointed. I can’t wait to hear how yours turn out, so please leave a comment below with your thoughts and any fun variations you discover! Happy baking, everyone!
Cinnamon Crescent Rolls
Ingredients
Dough Ingredients
- 0.5 cup milk warm
- 2.25 teaspoon active dry yeast
- 0.25 cup granulated sugar
- 0.5 cup unsalted butter melted
- 2.5 cup all-purpose flour
- 0.5 teaspoon salt
Filling Ingredients
- 0.75 cup light brown sugar packed
- 2 tablespoon ground cinnamon
- 0.33 cup unsalted butter softened
Cream Cheese Glaze
- 4 ounce cream cheese softened
- 0.25 cup unsalted butter softened
- 1 cup powdered sugar
- 1 teaspoon vanilla extract
- 2 tablespoon milk or more, for desired consistency
Instructions
Preparation Steps
- In a small bowl, combine warm milk, yeast, and 1 tablespoon of the granulated sugar. Let stand for 5-10 minutes, or until foamy.
- In a large bowl, whisk together the remaining granulated sugar, melted butter, and the yeast mixture. Add half of the flour and the salt, and mix until just combined.
- Gradually add the remaining flour, mixing until a soft dough forms. Turn the dough out onto a lightly floured surface and knead for 5-7 minutes until smooth and elastic.
- Place the dough in a greased bowl, cover with plastic wrap, and let rise in a warm place for 1-1.5 hours, or until doubled in size.
- While the dough is rising, prepare the filling by combining brown sugar and cinnamon in a small bowl.
- Punch down the risen dough and turn it out onto a lightly floured surface. Roll the dough into a large rectangle, approximately 12x18 inches.
- Spread the softened butter evenly over the dough, leaving a small border on one long edge. Sprinkle the cinnamon-sugar mixture over the butter.
- Starting from the long edge opposite the one with the border, tightly roll up the dough. Pinch the seam to seal.
- Cut the roll into 12 equal slices. Place the slices cut-side up in a greased 9x13 inch baking pan.
- Cover the pan and let the rolls rise for another 30 minutes.
- Preheat oven to 375°F (190°C). Bake for 15-18 minutes, or until golden brown.
- While the rolls are baking, prepare the glaze: In a medium bowl, beat together cream cheese, butter, powdered sugar, and vanilla extract until smooth. Add milk, 1 tablespoon at a time, until desired drizzling consistency is reached.
- Once the rolls are out of the oven, immediately spread the cream cheese glaze over the warm rolls.