Chocolate chip dessert pizza
Okay, so you know how sometimes you just get that *craving*? That deep, unshakeable need for something sweet, but you’re staring down the barrel of a weeknight dinner and the idea of pulling out the stand mixer and all the measuring cups feels like too much? Yeah, I’ve been there. So many times. And that, my friends, is exactly how this glorious Chocolate Chip Dessert Pizza came to be one of my absolute go-to recipes. It’s ridiculously easy, tastes like pure happiness, and honestly, it feels way more special than it has any right to be. If you love a classic chocolate chip cookie but want something a little more… shareable, and way less fussy than pie, then buckle up. This chocolate chip dessert pizza is about to become your new best friend. It’s like taking all the best parts of a warm, gooey chocolate chip cookie and transforming it into a fun, shareable pizza. Seriously, it’s a game-changer!
What is a chocolate chip dessert pizza?
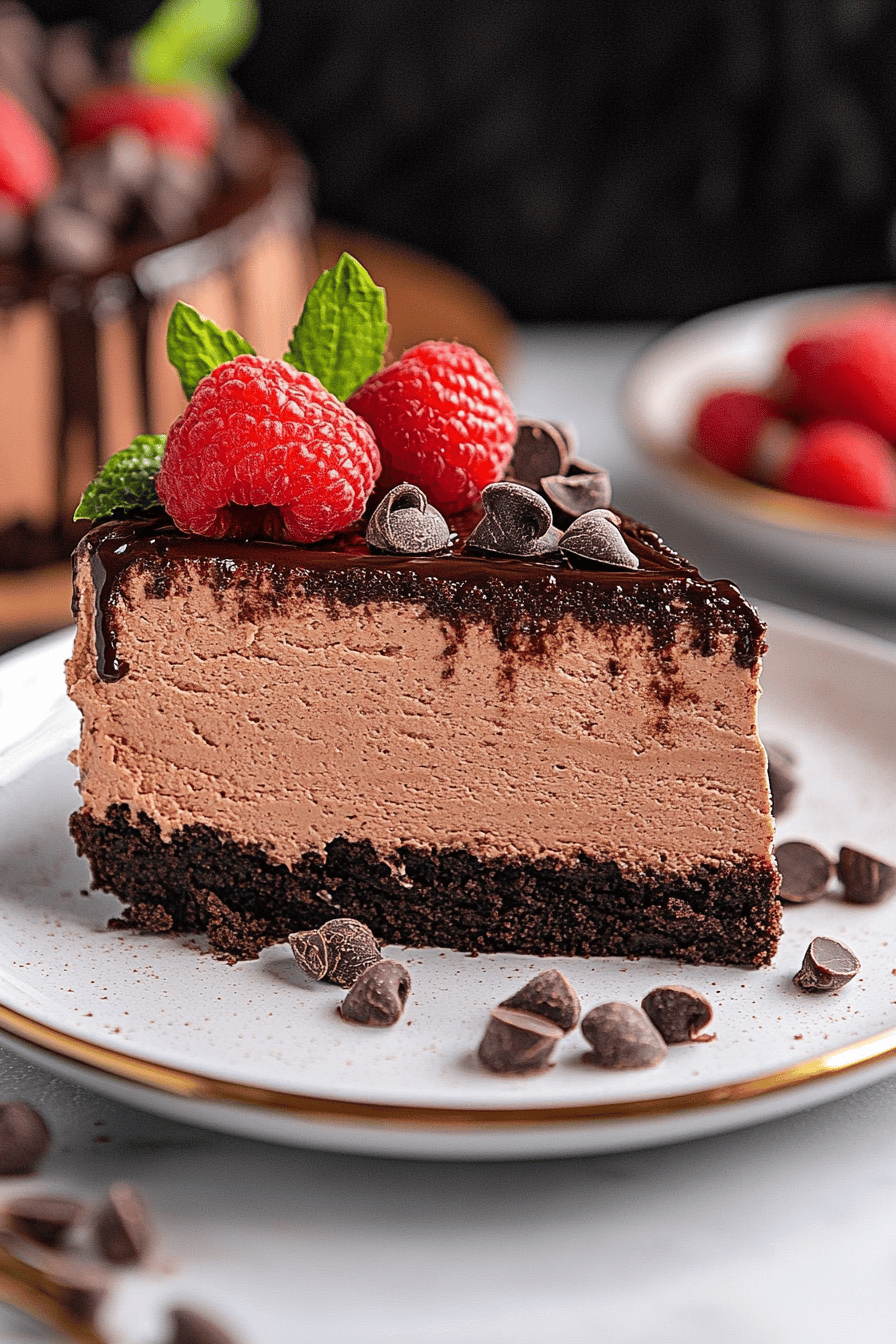
So, what exactly *is* a Chocolate Chip dessert pizza? Think of it like this: instead of a savory tomato sauce and cheese on a traditional pizza crust, we’re talking about a soft, slightly chewy, cookie-like base, swirled with a creamy, sweet filling, and absolutely loaded with melty chocolate chips. It’s not a cake, it’s not a cookie pie in the traditional sense, it’s its own magical thing! The “crust” is more like a giant, slightly underbaked, super-rich cookie dough that holds its shape beautifully. The “sauce” is usually a cream cheese or sweetened condensed milk mixture that adds a lovely tang and creaminess, and the “toppings” are, of course, copious amounts of chocolate chips. It’s the ultimate sweet treat that’s perfect for sharing, parties, or honestly, just a really indulgent Tuesday night. The name itself just sounds fun, right? Chocolate chip dessert pizza! It perfectly describes exactly what you’re getting: pure, unadulterated joy in pizza form.
Why you’ll love this recipe?
Let me tell you, there are so many reasons this Chocolate Chip dessert pizza has earned a permanent spot in my recipe rotation. First and foremost, the FLAVOR. Oh my goodness, the flavor. It’s that perfect balance of sweet, rich, and decadent. The cookie base gets this lovely golden brown edge, but stays wonderfully soft and chewy in the center, especially once those chocolate chips have melted into little pools of heaven. The creamy filling adds a wonderful tang that cuts through the sweetness just perfectly. It’s a flavor combination that just works, and it’s incredibly satisfying.
Then there’s the SIMPLICITY. This is where it really shines for me. When I say easy, I mean *easy*. Most of the ingredients are pantry staples, and the steps are so straightforward that even if you’re a novice baker, you’ll nail this on the first try. There’s no complicated chilling or rolling involved, just simple mixing and spreading. It’s a lifesaver on those nights when you want to bake something special but don’t have a lot of time or energy.
And it’s surprisingly COST-EFFECTIVE! When you’re looking for a crowd-pleaser that won’t break the bank, this is it. You’re using common ingredients, and you get a large dessert that can feed a good number of people. It feels like a gourmet treat, but it’s made with budget-friendly components.
What I love most about this Chocolate Chip dessert pizza is its VERSATILITY. You can absolutely customize it. Want white chocolate chips? Go for it. Add some chopped nuts? Why not! A swirl of caramel? Yes, please! It’s a fantastic base for all sorts of delicious additions. Plus, it’s just fun to eat! Cutting it into wedges and serving it like a pizza makes it feel playful and festive. It’s a definite step up from just baking a batch of cookies, but it’s still incredibly approachable and satisfying. It’s my go-to for casual get-togethers, potlucks, or when I just need a guaranteed win for dessert.
How do I make chocolate chip pizza?
Quick Overview
Making this Chocolate Chip dessert pizza is surprisingly straightforward. You’ll essentially create a giant cookie dough base, spread it into a pizza pan, layer it with a creamy, dreamy filling, and then shower it with plenty of chocolate chips before baking to golden perfection. The magic lies in the simple technique that results in a soft, chewy base with a delightful, slightly gooey topping. It’s all about getting that perfect balance of cookie and dessert. The whole process, from start to finish, can be done in under an hour, making it a fantastic last-minute dessert option.
Ingredients
For the Main Batter:
1 cup (2 sticks) unsalted butter, softened: Make sure this is really soft, but not melted. It’ll make creaming it so much easier and give you a better texture.
3/4 cup granulated sugar: For that classic sweet cookie flavor.
3/4 cup packed light brown sugar: This adds moisture and a deeper, caramel-like note that’s essential for that perfect chewy texture.
2 large eggs: Room temperature eggs incorporate better into the dough.
1 teaspoon vanilla extract: Pure vanilla extract makes all the difference!
2 1/4 cups all-purpose flour: Spooned and leveled, not scooped! This is key to avoid a dry, dense cookie.
1 teaspoon baking soda: This gives our cookie base its lift and helps with spread.
1/2 teaspoon salt: Balances out the sweetness and enhances the chocolate flavor.
For the Filling:
8 ounces cream cheese, softened: Full-fat cream cheese will give you the best, creamiest results. Don’t use low-fat here if you can help it.
1/2 cup powdered sugar: For sweetness and a smooth texture. Make sure it’s sifted if it has lumps.
1/4 cup sweetened condensed milk: This is the secret to that luscious, slightly tangy filling that’s not too stiff.
For the Glaze:
1/2 cup powdered sugar: Again, sifted is best.
1-2 tablespoons milk (or heavy cream for extra richness): Start with one tablespoon and add more, a teaspoon at a time, until you reach your desired drizzling consistency. If you want it a bit more decadent, use heavy cream!
Step-by-Step Instructions
Step 1: Preheat & Prep Pan
First things first, preheat your oven to 350 degrees Fahrenheit (175 degrees Celsius). Now, grab a 12-inch pizza pan or a round cake pan. You don’t need to grease it heavily; a light spray of cooking spray or a tiny bit of butter is all you need. We want the cookie dough to be able to grip the pan a little as it bakes, which helps it hold its shape. Some people even like to line it with parchment paper and then just trim the excess around the edges after baking, which makes for super easy cleanup, but I find it’s not strictly necessary if you’re using a good quality non-stick pan.
Step 2: Mix Dry Ingredients
In a medium bowl, whisk together the all-purpose flour, baking soda, and salt. Give it a good whisk until everything is evenly distributed. This ensures that your leavening agent (baking soda) and salt are spread throughout the flour, so you don’t end up with little salty or bitter pockets in your cookie base. I usually do this while my butter is creaming, so I’m multitasking!
Step 3: Mix Wet Ingredients
In a large bowl, using an electric mixer (handheld or stand mixer with paddle attachment), cream together the softened unsalted butter, granulated sugar, and packed light brown sugar until light and fluffy. This usually takes about 2-3 minutes. Then, beat in the eggs one at a time, making sure to scrape down the sides of the bowl after each addition. Finally, stir in the vanilla extract. You want this mixture to be well combined and looking smooth and creamy.
Step 4: Combine
Gradually add the dry ingredients to the wet ingredients, mixing on low speed until just combined. Be careful not to overmix! Overmixing can develop the gluten in the flour too much, leading to a tougher cookie base. Stop mixing as soon as you no longer see streaks of flour. The dough will be thick and a bit sticky, which is exactly what we want. This dough is rich and delicious, and I always have to resist the urge to sneak a bite right now!
Step 5: Prepare Filling
While the oven finishes preheating, let’s make that creamy filling. In a separate medium bowl, beat together the softened cream cheese, powdered sugar, and sweetened condensed milk until smooth and well combined. You can use a whisk or your electric mixer on low speed. Make sure the cream cheese is truly soft, otherwise, you’ll end up with lumps. This filling is so good, it’s almost like a cheesecake frosting!
Step 6: Layer & Swirl
Now for the fun part! Take your cookie dough and press it evenly into the prepared pizza pan, creating a slight rim around the edge. You can use your hands (lightly floured or greased if it’s too sticky) or the bottom of a measuring cup to get it smooth and even. Dollop spoonfuls of the cream cheese filling over the cookie dough. Then, using a knife or a skewer, gently swirl the filling into the dough. You don’t want to mix them completely; just create beautiful marbled patterns. Scatter a generous amount of your favorite chocolate chips over the top. I usually go for semi-sweet, but milk chocolate or even dark chocolate chunks are fantastic!
Step 7: Bake
Bake in the preheated oven for 20-25 minutes, or until the edges of the cookie base are golden brown and set, and the center is just cooked through. The filling will puff up slightly and might look a little soft in the very center, but it will firm up as it cools. I always err on the side of slightly underbaked for that perfect chewy texture. Keep an eye on it towards the end, as oven temperatures can vary.
Step 8: Cool & Glaze
Once baked, remove the pizza from the oven and let it cool on the pan for about 10-15 minutes. This is crucial! It needs time to set up properly before you attempt to move it or glaze it. While it’s cooling, whisk together the powdered sugar and 1 tablespoon of milk (or cream) in a small bowl. Add more milk, a teaspoon at a time, until you have a smooth, drizzly consistency. Once the pizza has cooled slightly, drizzle the glaze all over the top. This adds another layer of sweetness and visual appeal, but it’s totally optional if you prefer to skip it.
Step 9: Slice & Serve
Let the pizza cool a bit longer, or serve it warm (my personal favorite!). Slice it into wedges using a pizza cutter or a sharp knife. It’s absolutely divine when it’s still a little warm and the chocolate chips are perfectly melty. Enjoy this incredible chocolate chip dessert pizza right away!
What to Serve It With
This chocolate chip dessert pizza is so versatile, it’s perfect for just about any meal or occasion. For breakfast, I love serving a warm slice with a strong cup of coffee. The chocolate and sweetness feel like such a treat to start the day, and the cookie base is satisfying enough to keep you going. It’s a fun alternative to pancakes on a weekend morning!
When we’re having brunch, I like to make it a little more elegant. I’ll serve it on a nice platter, maybe with a few fresh berries on the side for a pop of color and freshness. A chilled glass of sparkling cider or a mimosa pairs beautifully. It’s a showstopper that’s always a huge hit with guests.
As a dessert, well, it’s an obvious winner! It’s fantastic on its own, but you can elevate it by serving it with a scoop of vanilla bean ice cream or a dollop of whipped cream. A drizzle of extra caramel sauce is also never a bad idea. It’s perfect for after-dinner gatherings when everyone wants something sweet but you don’t want to fuss with individual desserts.
And for cozy snacks? This is the ultimate comfort food. I love grabbing a slice with a big glass of cold milk on a rainy afternoon. It’s that perfect sweet bite when you need a little pick-me-up. My kids also adore it as an after-school treat. It just brings smiles all around. We have a family tradition of making this on the first Friday of every month – we call it “Pizza Friday!” – and it’s always met with cheers.
Top Tips for Perfecting Your Chocolate Chip Dessert Pizza
Over the years, I’ve definitely picked up a few tricks that make this chocolate chip dessert pizza even better. For the batter, I **always** make sure my butter and eggs are at room temperature. It truly makes a difference in how well everything emulsifies and results in a smoother, more uniform dough. If I forget and my butter is too cold, I’ll sometimes just chop it up into smaller pieces and let it sit for about 10 minutes to warm up faster, but planning ahead is best! Also, **don’t overmix the dough** once you add the flour. Seriously, stop as soon as the flour streaks disappear. A little bit of flour left is better than overmixing, which can lead to a tough texture. That slight tackiness is what you want for that chewy cookie base.
When it comes to the filling, the key is **softened cream cheese**. If it’s not soft, you’ll end up with a lumpy filling, and nobody wants that. I usually take my cream cheese out about an hour before I plan to make the filling. Beat it with the powdered sugar and condensed milk until it’s super smooth. A quick tip: if you find your powdered sugar has lumps, give it a quick whisk or sift it before adding it to the cream cheese.
For the swirling technique, I like to use a knife or a wooden skewer and just make a few passes through the dough and filling. You don’t want to fully combine them; the visual contrast is part of the appeal! Think of it as creating beautiful ribbons. Don’t go overboard, just a few gentle swirls will do the trick. And for the chocolate chips, I find that using a mix of different types, like semi-sweet and milk chocolate, gives it a more complex flavor. Pressing some of them into the dough before baking can help ensure they don’t all just melt into one giant blob on top, though a giant melty blob is also pretty delicious!
Baking is also important. Ovens can be so finicky, right? I usually check my pizza around the 20-minute mark. The edges should be a lovely golden brown, and the center should look mostly set, maybe still a tad soft. If it’s browning too quickly on top, you can always loosely tent it with foil. I’ve learned that slightly underbaking is better than overbaking for that ultimate chewy texture that makes this dessert pizza so irresistible. Remember, it will continue to cook a bit as it cools on the pan.
Finally, for the glaze, **consistency is key**. You want it thin enough to drizzle but not so thin that it just runs right off. I always start with less liquid and add more very gradually. If you accidentally make it too thin, you can always whisk in a little more powdered sugar to thicken it up. The glaze adds a lovely final touch, but honestly, this pizza is delicious even without it!
Storing and Reheating Tips
One of the best things about this chocolate chip dessert pizza (besides how it tastes, of course!) is how well it stores. If you happen to have any leftovers, which is rare in my house, you can store it at room temperature for up to 2 days. Just make sure to cover it well with plastic wrap or an airtight container. I find it stays nicely moist and the chocolate chips are still wonderfully gooey.
If you need to store it for longer, or if your kitchen is particularly warm, the refrigerator is your best bet. Pop it into an airtight container or wrap it tightly with plastic wrap and then foil. It will keep well in the fridge for up to 4-5 days. The texture might firm up a bit in the fridge, but that’s easily fixed.
And for those times you want to freeze it for later, this pizza freezes beautifully! You can freeze individual slices or the whole thing. Wrap it super tightly in plastic wrap, then in aluminum foil, or place it in a freezer-safe container. It will keep its best quality for up to 2-3 months. When you’re ready to enjoy it, just thaw it overnight in the refrigerator.
The glaze is best applied when the pizza has cooled slightly, but before serving. If you plan to store it glazed, I recommend waiting to glaze it until *after* you reheat it, or if you’re serving it at room temperature. If you glaze it and then refrigerate it, the glaze can sometimes become a bit sticky or even weep slightly. For reheating, I love to warm up a slice in the oven at 300°F (150°C) for about 5-10 minutes until it’s warm and the chocolate chips are melty again. You can also do this in the microwave for about 20-30 seconds, but watch it closely!
Frequently Asked Questions
Final Thoughts
So there you have it – my beloved chocolate chip dessert pizza recipe! It’s honestly one of those recipes that just makes people happy. It’s simple enough for a weeknight but feels special enough for a party. That perfect balance of chewy cookie, creamy filling, and melty chocolate is just pure bliss. It’s a testament to how sometimes, the simplest ingredients and a little bit of creativity can result in something truly spectacular.
If you’re someone who loves classic chocolate chip cookies but is looking for a fun, shareable twist, you absolutely have to give this chocolate chip dessert pizza a try. It’s a recipe that I’m so proud to share, and I truly hope it brings as much joy to your kitchen as it does to mine.
I can’t wait to hear what you think! If you make this chocolate chip dessert pizza, please leave a comment below and let me know how it turned out. I’d love to see your variations and hear your own personal twists on it! Happy baking, and enjoy every delicious slice!