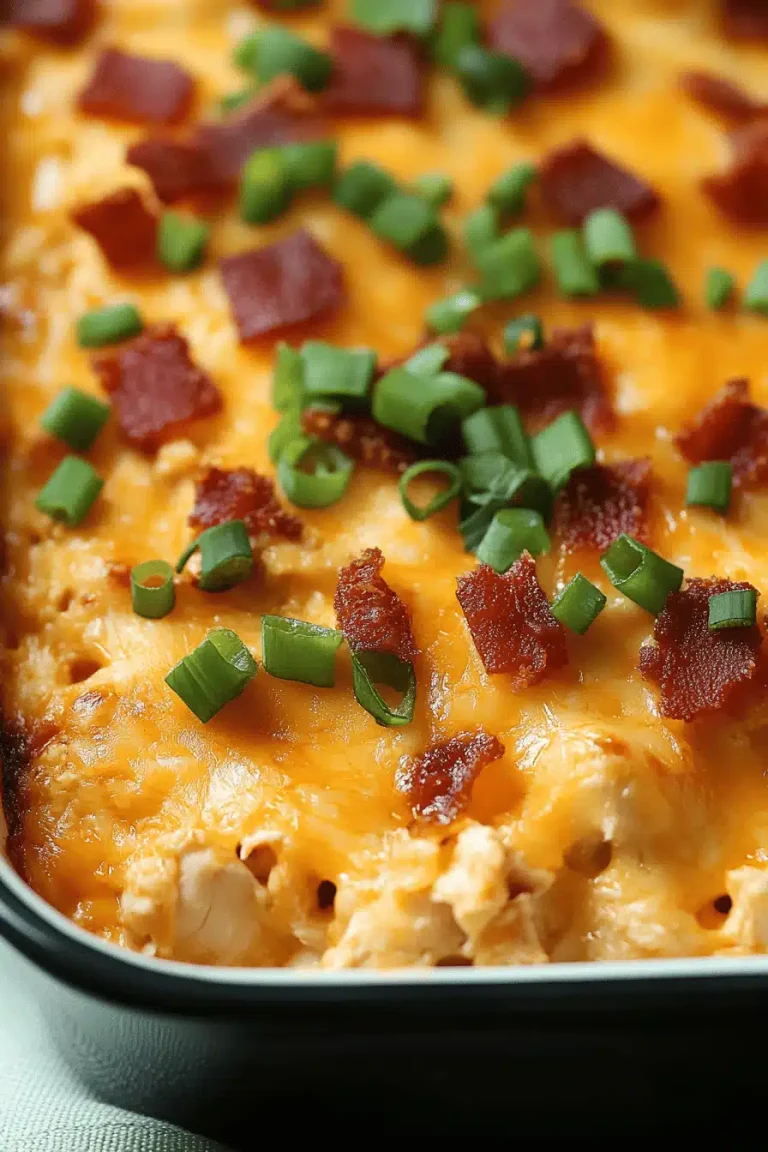
Cheeseburger Onion Ring Rolls a Viral Sensation
Oh my goodness, you guys! I have to tell you about these cheeseburger onion ring rolls. They sound a little wild, I know, but trust me on this one. It’s like taking everything you love about a juicy cheeseburger, those sweet, crispy onion rings, and a soft, fluffy dinner roll and somehow cramming it all into one unbelievably delicious bite. Seriously, my family devours these. They’re a total game-changer for weeknights when you want something fun and satisfying without a ton of fuss. It’s got that nostalgic comfort food vibe, but with a fun, unexpected twist. If you’ve ever made my popular cinnamon swirl bread, imagine that comforting texture but instead of cinnamon, you get this savory, cheesy, onion-y goodness. It’s truly something special!
What are cheeseburger onion rings
So, what exactly are these magical little creations? Think of them as a savory sweet roll, but with all the best parts of a cheeseburger and onion rings baked right into the dough. We’re talking a super tender, slightly sweet yeast dough, swirled with a rich, cheesy filling, and then, here’s the kicker, we’re adding bits of crispy fried onion rings right into the swirl! It’s not a layered bake like a traditional casserole; it’s more like a soft bread roll that’s been infused with all those amazing flavors and textures. It’s essentially a savory Cinnamon Roll, but instead of sweet spices, we’re going full-on burger joint deliciousness. It’s a playful, incredibly satisfying way to get your comfort food cravings met, and it always sparks curiosity and delight when people see them for the first time.
Why you’ll love this recipe?
Okay, let me break down why this recipe is going to become a staple in your kitchen, just like it has in mine. First off, the flavor explosion! Imagine that perfect bite: the soft, slightly sweet bread giving way to the gooey, melted cheese, punctuated by the sweet, savory crunch of those onion rings. It’s a symphony of textures and tastes that just works so, so well. My kids, who can be a bit picky, absolutely go nuts for these, and honestly, so do I! What I love most is how surprisingly simple they are to make, considering how gourmet they taste. You don’t need fancy ingredients; most of it is probably already in your pantry. Plus, they’re incredibly budget-friendly, which is always a win in my book. And talk about versatile! These aren’t just for dinner; they make an amazing brunch item, a hearty snack, or even a fun side dish for a potluck. They stand out from the usual offerings and always get rave reviews. If you enjoy the comforting, homemade feel of my classic dinner rolls but crave something with a bit more zing, these cheeseburger onion ring rolls are your answer. They’re that perfect balance of familiar and exciting that keeps you coming back for more.
How to Make Cheeseburger Onion Ring Rolls
Quick Overview
This recipe is all about creating a wonderfully soft, enriched dough, preparing a savory cheesy filling, and incorporating crispy fried onion rings for that signature flavor and texture. We’ll mix and let the dough rise, then roll it out, spread the delicious filling, sprinkle in those onion rings, roll it up, slice, and bake until golden brown. It’s a process that’s incredibly rewarding and, dare I say, fun! Don’t be intimidated by the yeast dough; it’s much simpler than it sounds, and the results are absolutely worth it.
Ingredients
For the Main Batter:
You’ll need about 4 cups of all-purpose flour. I always recommend sifting it, but if you’re in a rush, it’s not the end of the world. Just make sure to measure it accurately. Then, we’ve got 1/4 cup of granulated sugar – this feeds the yeast and gives our rolls a lovely subtle sweetness. About 2 and 1/4 teaspoons of instant dry yeast; make sure it’s fresh! A teaspoon of salt to balance the flavors. Then, for richness and that tender crumb, 1/2 cup of whole milk, warmed to about 110°F (43°C) – too hot and you’ll kill the yeast, too cold and it won’t activate. And 1/4 cup of unsalted butter, softened. Lastly, 2 large eggs, lightly beaten, at room temperature.
For the Filling:
This is where the cheeseburger magic happens! We’ll use 1.5 cups of shredded cheddar cheese, but you can totally mix in some Monterey Jack or even a bit of pepper Jack if you like a little heat. For that classic burger flavor, I love to add about 1/2 cup of finely crumbled cooked bacon – optional, but highly recommended! And then, of course, the star: 1 cup of crushed, crispy fried onion rings. You can buy them pre-made from the grocery store, or if you’re feeling ambitious, fry your own! Make sure they’re good and crispy. You can also add a tablespoon of Worcestershire sauce for an extra punch of umami, but I often skip this to keep it simpler.
For the Glaze:
This is totally optional but adds a lovely finishing touch. A simple glaze can be made with 1/4 cup of melted butter brushed over the hot rolls, followed by a sprinkle of sesame seeds if you’re feeling fancy, or just leave them plain! Some people like a little sprinkle of extra cheese on top right after they come out of the oven. It really depends on your preference. For a savory kick, you could even mix a tiny bit of garlic powder into the melted butter.
Step-by-Step Instructions
Step 1: Preheat & Prep Pan
First things first, get your oven preheated to 375°F (190°C). Grab a 9×13 inch baking dish and lightly grease it with butter or cooking spray. This ensures our lovely rolls don’t stick and get that perfect golden crust all around.
Step 2: Mix Dry Ingredients
In a large mixing bowl, whisk together the sifted flour, sugar, yeast, and salt. Give it a good mix to make sure everything is evenly distributed. This is like setting the foundation for our delicious rolls!
Step 3: Mix Wet Ingredients
In a separate, smaller bowl, combine the warmed milk, softened butter, and lightly beaten eggs. Whisk it all together until the butter is mostly incorporated. It’s okay if there are a few small lumps of butter; they’ll melt in the oven.
Step 4: Combine
Now, pour the wet ingredients into the dry ingredients. Mix with a wooden spoon or a sturdy spatula until a shaggy dough forms. Then, turn the dough out onto a lightly floured surface and knead for about 8-10 minutes. You’re looking for a smooth, elastic dough. If it’s too sticky, add a *tiny* bit more flour, about a tablespoon at a time. Once kneaded, place the dough in a lightly greased bowl, cover it with a clean kitchen towel or plastic wrap, and let it rise in a warm place for about 1 to 1.5 hours, or until it’s doubled in size. This is the magic of yeast – it gives us that incredible fluffy texture!
Step 5: Prepare Filling
While the dough is rising, let’s get our filling ready. In a small bowl, combine the shredded cheddar cheese, crumbled bacon (if using), and the crushed crispy onion rings. If you’re adding Worcestershire sauce, stir it in now. Just give it a gentle mix; we don’t want to pulverize those onion rings too much.
Step 6: Layer & Swirl
Once the dough has doubled, punch it down gently and turn it out onto a lightly floured surface. Roll the dough into a large rectangle, about 12×18 inches. Spread the cheese and onion ring mixture evenly over the dough, leaving about a 1-inch border along one of the long edges. Starting from the long edge opposite the clean border, tightly roll up the dough into a log. Pinch the seam to seal it. Then, using a sharp knife or dental floss (my secret for clean cuts!), slice the log into 12 equal pieces. Place the rolls cut-side up into your prepared baking dish, giving them a little space to expand.
Step 7: Bake
Pop the baking dish into your preheated oven. Bake for 20-25 minutes, or until the rolls are golden brown and puffed up. The cheese should be melted and bubbly. If they start browning too quickly, you can loosely tent them with foil.
Step 8: Cool & Glaze
Once baked, remove the dish from the oven. Immediately brush the tops of the warm rolls with melted butter, if you’re using it. Sprinkle with sesame seeds if you like! Let them cool in the pan for about 5-10 minutes before serving. This allows the flavors to meld and the rolls to set up a bit.
Step 9: Slice & Serve
These are best served warm, so they’re nice and gooey. You can serve them whole or gently pull them apart. They’re fantastic on their own or as a side to your favorite meal. Enjoy that incredible cheeseburger-onion ring goodness!
What to Serve It With
These cheeseburger onion ring rolls are surprisingly versatile! I’ve found they fit into so many meal occasions, and my family has developed some favorite ways to enjoy them. For a truly special breakfast, I love serving them warm with a side of scrambled eggs and maybe some crispy hash browns. The savory rolls are a wonderful alternative to toast. For brunch, they really shine! Imagine them as part of a spread with fresh fruit salad, a quiche, and some mimosas. They add a comforting, satisfying element that everyone loves. As a dessert, hear me out! If you’ve got a sweet tooth but want something a little different, a light drizzle of a honey-mustard glaze instead of butter can be surprisingly delightful, served with a creamy vanilla Ice Cream. It’s unexpected and delicious! But my go-to is honestly for cozy snacks or a casual dinner. They’re perfect alongside a big green salad and some homemade tomato soup. They make a complete meal feel extra special without requiring a lot of effort. My kids also love to just grab one for an after-school snack – it’s way more exciting than a granola bar, and it keeps them full until dinner!
Top Tips for Perfecting Your Cheeseburger Onion Ring Rolls
I’ve made these cheeseburger onion ring rolls more times than I can count, and over the years, I’ve picked up a few tricks that really help elevate them. When it comes to preparing the onion rings, if you’re using store-bought, make sure they’re super crunchy. If they’re a bit stale or soft, they can get soggy in the dough. I like to give them a quick pulse in a food processor or just crush them in a bag with a rolling pin to get a nice, crumbly texture that distributes well. For the dough, patience is key! Don’t rush the rising time. A warm, draft-free spot is essential for that lovely double in size. If your kitchen is cold, pop the bowl in a slightly warmed (and then turned-off!) oven. When you’re rolling out the dough, aim for an even rectangle. This ensures all your rolls have a similar amount of filling and bake uniformly. And when you’re adding the filling, don’t overload it, especially with the onion rings. Too much filling can make the rolls difficult to roll up and may cause them to fall apart during baking. My biggest lesson learned early on was about overmixing. Once you combine the wet and dry ingredients, mix just until combined, then knead. Over-kneading after the wet and dry are mixed can make your rolls tough. For ingredient swaps, feel free to experiment with the cheese! A sharp cheddar gives a bolder flavor, while a milder cheese is great for kids. If you don’t have bacon, it’s still delicious without it. And for baking, every oven is a little different. Keep an eye on them during the last 5-10 minutes of baking. If the tops are getting too dark but the inside isn’t cooked, loosely tent them with foil. The doneness test I always use is when a toothpick inserted into the center of a roll comes out clean, or with just a few moist crumbs attached.
Storing and Reheating Tips
These cheeseburger onion ring rolls are undeniably best when they’re fresh and warm, but they store surprisingly well too, which is a lifesaver for busy households like mine. If you have any leftovers (which is rare at my place!), you can keep them at room temperature for up to 2 days. Just make sure to store them in an airtight container or wrap the baking dish tightly with plastic wrap. They’ll still be lovely, though the onion ring crunch might be slightly softer. For longer storage, the refrigerator is your best bet. They’ll keep well in an airtight container for about 4-5 days. When you want to reheat them, I find the best method is to pop them back into a 350°F (175°C) oven for about 5-10 minutes, or until heated through and warmed up. This helps revive some of that original texture. If you’re really short on time, a few seconds in the microwave will work, but they can become a bit softer. If you’re planning way ahead, freezing is an option. Wrap individual rolls tightly in plastic wrap and then place them in a freezer-safe bag for up to 2-3 months. To reheat from frozen, unwrap them and bake at 350°F (175°C) for about 15-20 minutes, or until heated through. Regarding the glaze, I always recommend adding it *after* baking, right when they come out of the oven. If you’re storing them unglazed, you can always add a quick brush of butter or your favorite topping right before serving after reheating.
Frequently Asked Questions
Final Thoughts
So there you have it – my beloved cheeseburger onion ring rolls! I truly hope you give these a try. They’re more than just a recipe to me; they’re a little bit of joy, a whole lot of comfort, and a fantastic way to bring a smile to your family’s faces. They’re proof that sometimes the most unexpected combinations create the most delicious outcomes. What I adore about them is that they feel special enough for a weekend treat but are simple enough for a weeknight. They’re the kind of food that makes your kitchen smell amazing and brings everyone to the table. If you’re looking for other comforting, flavorful bakes, you might also enjoy my recipe for [Link to another relevant recipe, e.g., “Cheesy Garlic Breadsticks”]. I can’t wait to hear what you think of these rolls! Please leave a comment below and let me know how yours turned out, or if you’ve got any fun variations to share. Happy baking!