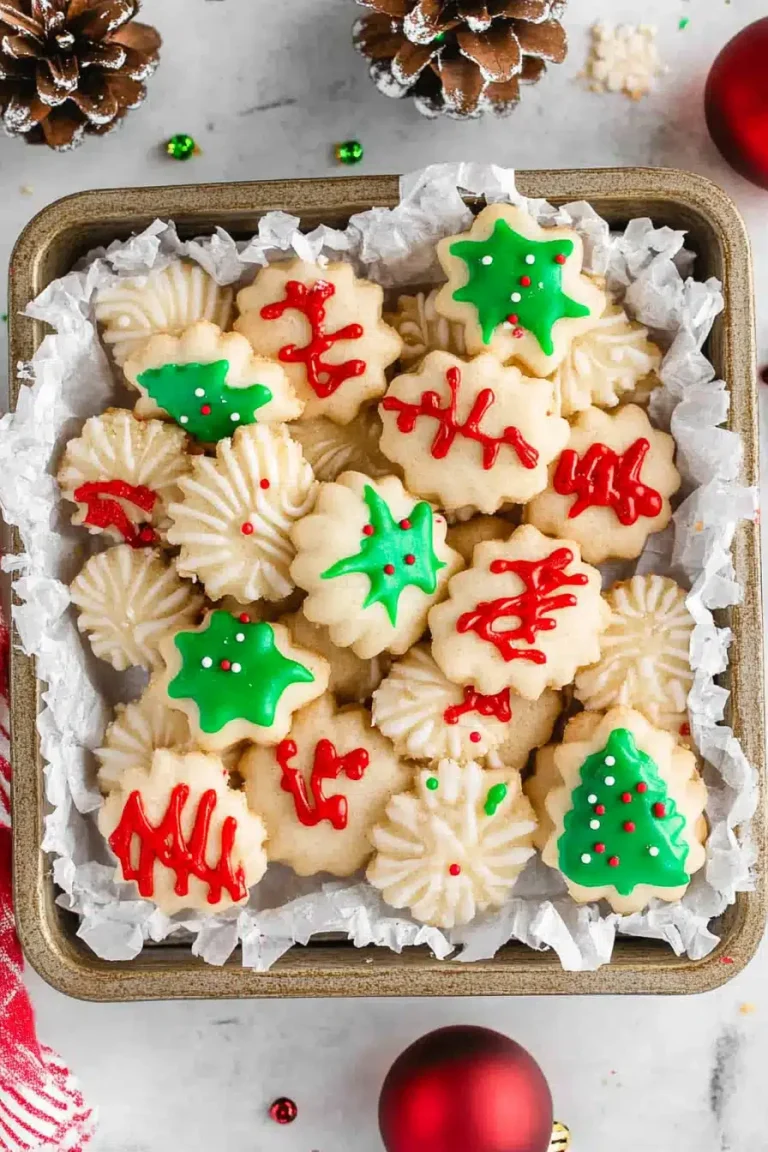
braided butter cookies
Oh, these braided butter cookies. Just thinking about them takes me straight back to Grandma Elsie’s kitchen. The air would be thick with the sweet, comforting aroma of butter and vanilla, and I’d be perched on a stool, my little hands dusted with flour, trying to help her roll out the dough. They’re not just cookies; they’re pure nostalgia, a tangible piece of my childhood that I can recreate whenever the craving strikes. If you’ve ever loved a classic shortbread or a delicate Sugar Cookie, these braided butter cookies are going to be your new obsession. They have that melt-in-your-mouth texture and a subtle, rich sweetness that’s just… perfection. I swear, the way the butter just melts on your tongue is like a little moment of pure joy. They’re honestly my go-to when I want something truly special, but don’t have a whole afternoon to dedicate to baking.
What is braided butter cookies?
So, what exactly are these delightful little treats? Think of them as a more elegant, more interesting cousin to your everyday Butter Cookie. The “braided” part comes from how we shape them – it’s a simple technique that gives them this beautiful, textured look, almost like a tiny, edible work of art. At their core, they’re a rich, tender butter cookie, meaning butter is the star of the show, giving them that incredible, decadent flavor and that signature crumbly-yet-melty texture. They aren’t overly sweet, which is what I love; it allows the pure, buttery goodness to really shine through. The process is surprisingly straightforward, and once you get the hang of the braiding, you’ll be making batches of these in no time. It’s that perfect balance of simplicity and elegance that makes them so special.
Why you’ll love this recipe?
Honestly, where do I even begin? There are so many reasons why this braided Butter Cookie recipe holds such a special place in my heart and my recipe box. First off, the flavor is just out of this world. It’s that deep, satisfying buttery richness that feels so comforting, without being heavy. It’s the kind of cookie that makes you close your eyes with the first bite. And then there’s the texture – oh, that texture! They’re so tender and delicate, they practically dissolve on your tongue. It’s like a little cloud of buttery bliss.
Beyond the incredible taste, what I really adore is how surprisingly simple they are to whip up. Despite how fancy they look, the steps are really quite basic. You don’t need any fancy equipment, just a few common pantry staples. I’ve found that even when I’m in a rush, I can still manage to get a batch of these ready, especially if I prep the dough ahead of time. And speaking of cost, these are wonderfully budget-friendly. The ingredients are all things you likely already have or can find at any grocery store without breaking the bank. They’re the perfect sweet treat that doesn’t require a splurge.
Versatility is another huge plus! While they’re divine on their own, I love experimenting. A tiny sprinkle of sea salt on top before baking? Divine. A delicate lemon zest in the dough? Also incredible. They’re fantastic for any occasion, from a simple afternoon tea to being part of a larger dessert spread at holidays. They also make for thoughtful, homemade gifts. I often pair them with my Lemon Almond Scones: What are some good recipes for this? for a lovely brunch offering, or serve them alongside a rich chocolate cake for a decadent dessert. What I love most about this recipe, though, is the pure joy it brings to people. Every single time I share these braided butter cookies, I see smiles, and that’s truly the best part of baking for me.
How do you make braided butter cookies?
Quick Overview
This recipe is all about creating a tender, buttery dough that’s then shaped into beautiful braids and baked to golden perfection. We’ll mix up a simple dough, chill it to make it easier to handle, then roll, cut, and braid before a relatively quick bake. The result is a cookie that looks impressive but is actually quite manageable, even for beginner bakers. The key is in the chilling of the dough, which prevents it from becoming too sticky and makes those braids easy to form. Trust me, you’ll be amazed at how quickly these come together once you get the rhythm going.
Ingredients
For the Main Batter:
I always start with good quality, unsalted butter, softened to room temperature. It’s the backbone of these cookies, so don’t skimp! You’ll need about 1 cup (2 sticks). For the sugar, granulated is best for that perfect texture, around 3/4 cup. You’ll also need a couple of large eggs, room temperature is ideal for better emulsification. A teaspoon of pure vanilla extract is non-negotiable for that warm, classic flavor. And for the flour, all-purpose works like a dream, usually about 2 and 1/2 cups. A pinch of salt, about 1/2 teaspoon, just balances out all that sweetness. Make sure your ingredients are measured accurately; that’s key for cookie success!
For the Optional Simple Glaze:
This is totally optional, but it adds a little extra something. You’ll just need about 1 cup of powdered sugar. For the liquid, I typically use milk or even a little bit of lemon juice for a touch of tang, about 1 to 2 tablespoons, adjusting until you get a nice, pourable consistency. Some people like to add a tiny drop of almond extract here too, which is lovely.
Step-by-Step Instructions
Step 1: Preheat & Prep Pan
First things first, let’s get your oven ready. Preheat it to 350 degrees Fahrenheit (175 degrees Celsius). While the oven is warming up, line a couple of baking sheets with parchment paper. This is a lifesaver for easy cleanup and prevents any sticking. You want your baking sheets ready to go so the dough doesn’t sit out too long once it’s ready.
Step 2: Mix Dry Ingredients
In a medium-sized bowl, whisk together your flour, salt, and baking powder (if using – I sometimes add a tiny pinch for extra lift, but it’s not strictly necessary for this recipe). Give it a good whisk so everything is evenly distributed. This ensures every cookie gets the right balance of ingredients and prevents dense spots.
Step 3: Mix Wet Ingredients
In a large bowl, or the bowl of your stand mixer fitted with the paddle attachment, cream together the softened butter and granulated sugar. Beat them until the mixture is light and fluffy, like pale yellow clouds. This usually takes about 3-4 minutes. Then, beat in the eggs one at a time, making sure each one is fully incorporated before adding the next. Finally, stir in the vanilla extract. You’re looking for a smooth, cohesive mixture.
Step 4: Combine
Now, gradually add the dry ingredients to the wet ingredients. Mix on low speed until just combined. Be careful not to overmix here! Overmixing can lead to tough cookies, and we want ours to be tender. The dough will be soft but should hold its shape. If it seems too sticky, you can add another tablespoon of flour, but usually, it’s just right.
Step 5: Prepare Filling (Optional for Swirl Variety)
If you’re making swirled braided Butter Cookies (which are amazing!), this is when you’d prepare your filling. A simple chocolate ganache (melted chocolate with a touch of cream) or a fruit jam works wonderfully. For a chocolate swirl, melt about 1/2 cup of good quality chocolate chips with 2 tablespoons of heavy cream until smooth. Let it cool slightly so it’s spreadable but not runny. This step is purely for adding an extra layer of flavor and visual appeal.
Step 6: Layer & Swirl (If applicable)
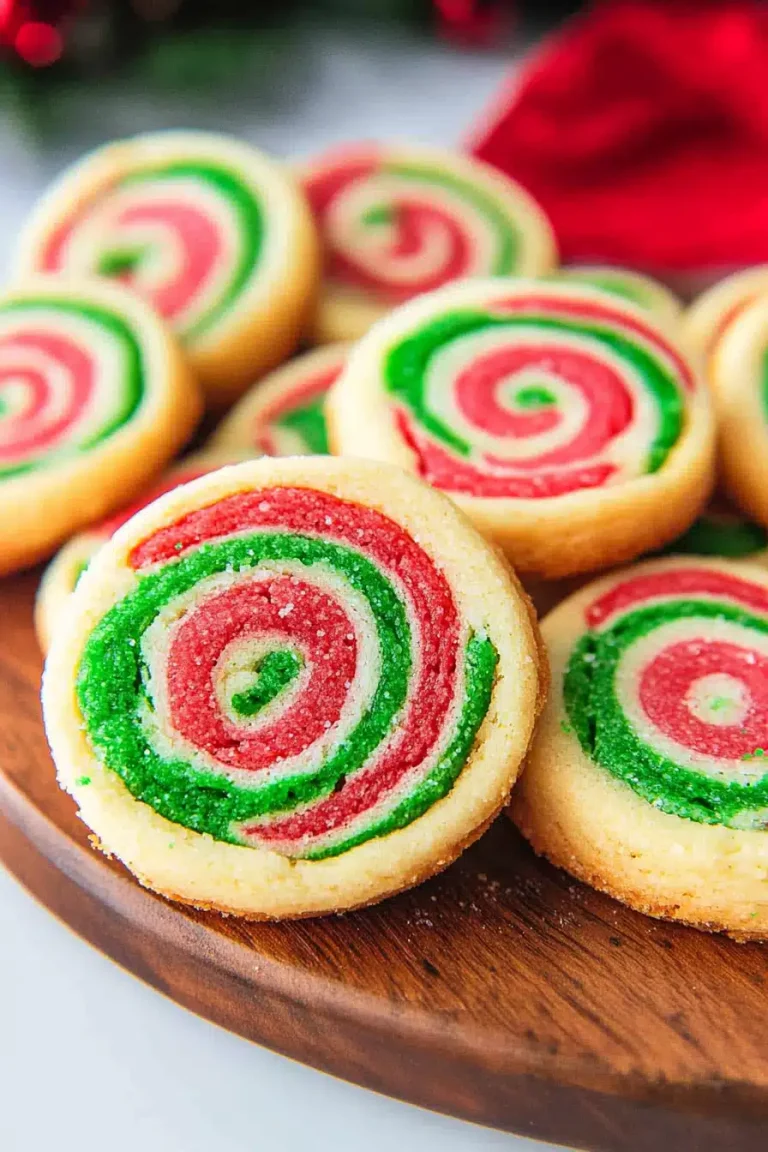
Divide your chilled dough in half. On a lightly floured surface, roll out one half into a rectangle, about 1/4 inch thick. If you’re doing a swirl, spread your cooled chocolate filling evenly over the surface, leaving a small border. Roll the dough up tightly like a jelly roll. Repeat with the other half of the dough. If you’re not swirling, you can skip this step and just proceed to cutting and braiding. For the braided effect, cut the rolled log into 3 equal strips. Take each strip, pinch the ends together, and then gently twist or braid them. Pinch the ends of the braid again to seal. It sounds trickier than it is, I promise! You can also simply cut the dough into small pieces and roll them into balls, then flatten slightly before baking for a simpler version.
Step 7: Bake
Carefully transfer your shaped cookies onto the prepared baking sheets, leaving a little space between them. Bake for about 12-15 minutes, or until the edges are lightly golden brown and the centers look set. Keep an eye on them, as ovens can vary. You want them baked through but not overdone, so they stay tender.
Step 8: Cool & Glaze
Once baked, let the cookies cool on the baking sheets for a few minutes before carefully transferring them to a wire rack to cool completely. If you’re using the glaze, whisk together your powdered sugar and milk (or lemon juice) until smooth. You want a consistency that’s thick enough to coat but still pourable. Drizzle the glaze over the cooled cookies. If you’re making swirled cookies, you might only need a very light drizzle, or none at all, as the swirl is already beautiful.
Step 9: Slice & Serve
Once the glaze is set (if you used it), your braided Butter Cookies are ready to be devoured! I like to slice them into individual pieces if they’re larger, or just serve them whole. They’re fantastic warm, but also hold up beautifully at room temperature for a few days. Enjoy that buttery goodness!
What to Serve It With
These braided butter cookies are so versatile, they truly fit into any moment you need a little sweetness. For a classic breakfast, they’re absolutely divine alongside a strong cup of coffee or a steaming mug of Earl Grey tea. I love to just have one or two with my morning paper – it feels like such a luxurious start to the day. They add a touch of elegance without any fuss.
When it comes to brunch, these cookies are a total showstopper. They look so pretty arranged on a platter alongside fresh fruit, perhaps some Blueberry Muffins, or even my famous Lemon Ricotta Pancakes. They offer that delicate, sweet counterpoint to savory dishes. For a more elegant affair, I might dust them lightly with a little extra powdered sugar or serve them with a small dollop of whipped cream and fresh berries for dessert. They’re a perfect ending to a lovely meal, not too heavy but satisfyingly sweet.
And for those cozy, quiet moments – like a late-night craving or an afternoon treat? These are my absolute go-to. They’re perfect with a glass of cold milk, or even a warm hot chocolate. My kids adore them after school, and honestly, so do I! They’re the kind of cookie that feels like a hug from the inside. Sometimes, I’ll even break them up and stir them into a bowl of vanilla ice cream for a truly decadent, last-minute dessert. The possibilities are endless, and each pairing brings out a slightly different, wonderful facet of their flavor.
Top Tips for Perfecting Your Braided Butter Cookies
I’ve been making these for years, and I’ve picked up a few tricks along the way that I think make all the difference in getting them just right. So, let’s dive into some of my top tips for achieving cookie perfection every single time!
Butter Temperature is Key: This is probably the most crucial point for butter cookies. Your butter needs to be softened, not melted. Think of it as pliable, like it would be if you could easily press your finger into it without it leaving a deep indent. Too cold, and it won’t cream properly with the sugar, leading to a dense cookie. Too warm and it’ll be greasy and spread too much. I usually leave my butter on the counter for about an hour before I start, depending on how warm my kitchen is.
Don’t Overmix the Dough: This is another biggie! Once you add the flour, mix *just* until it comes together. Flour develops gluten when it’s mixed, and too much gluten means tough cookies. You want that tender, melt-in-your-mouth texture, and that comes from minimal mixing once the dry ingredients are in. Stop as soon as you don’t see any more dry flour streaks.
Chilling is Your Friend: Seriously, don’t skip the chilling step if you can help it. Chilled dough is so much easier to work with, especially when you’re trying to roll and braid. It firms up the butter, making the dough less sticky and more manageable. I usually chill it for at least 30 minutes, sometimes an hour, or even overnight if I’m prepping ahead. If your kitchen is warm, you might even need to chill the dough a little longer.
Achieving the Perfect Braid: For the braided look, I like to cut my rolled dough into three strips of equal thickness. Pinch the ends together at the top, and then gently twist them together. Don’t pull too hard, or the dough might break. Once braided, pinch the bottom ends together firmly to seal. If the dough feels too soft to braid, pop it back in the fridge for 10-15 minutes. For a really clean look, use a sharp knife or a bench scraper to cut the dough.
Baking for Golden Perfection: Ovens are notorious for being different, so always keep an eye on your cookies. The edges should be lightly golden brown, and the centers should look set and no longer wet. They’ll continue to firm up as they cool. If you find your oven has hot spots, rotating your baking sheets halfway through the baking time can help ensure even cooking.
Glaze Consistency is Key: If you’re adding a glaze, the consistency is really important. You want it thick enough to coat but thin enough to drizzle. Start with a small amount of liquid and add more very gradually until you reach your desired consistency. It’s much easier to thin out a glaze than to thicken it up! If it becomes too thin, a little more powdered sugar will do the trick.
Ingredient Swaps I’ve Tested: While this recipe is wonderful as is, I’ve experimented a bit. Using good quality butter makes a noticeable difference. Some folks have had success with dairy-free butter substitutes, but the texture might be slightly different. For a little extra flavor boost, you can add a touch of almond extract along with the vanilla, or even some finely grated lemon or orange zest to the dough. Just a little bit goes a long way and adds a lovely brightness.
Storing and Reheating Tips
Proper storage is essential to keep these braided butter cookies tasting their absolute best. They’re quite sturdy, which is one of the things I love about them, but a little care goes a long way!
Room Temperature Storage: Once completely cooled, you can store these cookies in an airtight container at room temperature for up to 3-4 days. I like to layer them between sheets of parchment paper or wax paper to prevent them from sticking together, especially if they have a glaze. They maintain their tender texture quite well this way, making them perfect for stashing in the pantry for a quick treat.
Refrigerator Storage: While they don’t strictly *need* refrigeration, if your kitchen is very warm or humid, you might consider it for longer storage, up to about a week. Just make sure they are in a good airtight container. I find that they can sometimes dry out a bit faster in the fridge compared to room temperature, so room temp is usually my first choice for short-term storage.
Freezer Instructions: These braided butter cookies freeze beautifully! For the best quality, wrap them tightly in plastic wrap, and then place them in a freezer-safe bag or container. They can be frozen for up to 2-3 months. When you’re ready to enjoy them, the best way to thaw is to take them out of the freezer and let them thaw completely at room temperature. If they have glaze, it might get a little sticky as it thaws, but it usually firms back up.
Glaze Timing Advice: If you’ve glazed your cookies, it’s best to let the glaze set completely before storing them in an airtight container, especially for room temperature or freezer storage. If you are freezing them, I sometimes prefer to glaze them *after* they’ve thawed. This ensures the glaze stays fresh and doesn’t get condensation on it during the freezing and thawing process. However, if you’re going to eat them within a day or two, glazing before freezing is usually fine!
Frequently Asked Questions
Final Thoughts
So there you have it – my beloved braided butter cookies. They’re more than just a recipe; they’re a connection to my past, a way to share a little bit of my family’s love with yours. I truly hope you’ll give them a try. The simple joy of biting into that perfectly tender, buttery crumb is something special that just can’t be replicated. They’re the kind of cookie that makes ordinary moments feel a little more extraordinary, whether it’s with your morning coffee or as a sweet surprise for the kids.
If you enjoy these braided butter cookies, you might also love my Classic Sugar Cookies for another delightful simple bake, or perhaps my Chocolate Chip Shortbread for a different but equally decadent buttery treat. Don’t forget to let me know in the comments below how your braided butter cookies turned out! I’d love to hear about any variations you tried or what your favorite way to enjoy them is. Your feedback truly makes my day!
Happy baking, everyone!
Easy Braided Butter Cookies for Everyone
Ingredients
Main Ingredients
- 1 cup Unsalted Butter (room temperature)
- 2 cups Granulated Sugar
- 1 tablespoon Pure Vanilla Extract
- 0.25 tablespoon Orange Zest
- 4 Eggs (room temperature)
- 2 Egg Yolks (room temperature)
- 7 cups All-Purpose Flour
- 1 tablespoon Baking Powder
- 0.5 teaspoon Salt
- 0.5 cup Orange Juice (room temperature)
- 0.5 teaspoon Baking Soda
- 1 cup Milk (room temperature)
- 2 Egg Yolks (room temperature)
- 2 tablespoons Water
Instructions
Preparation Steps
- Using a stand mixer with the paddle attachment (or electric mixer), beat the butter and sugar until fluffy. Add the vanilla extract and orange zest, and keep beating while adding the 4 eggs plus 2 egg yolks, one at a time.
- In a mixing bowl, whisk together the flour, baking powder, and salt. Whisk together the orange juice and baking soda in a separate bowl or measuring cup. With the mixer on low, add the flour mixture to the butter mixture, one cup at a time, alternating with orange juice and milk. Beat until well combined.
- Check the dough, and if it's too sticky, add 0.25 cup to 0.5 cup more flour.
- Cover the dough with a clean towel or cling wrap and let rest at room temperature for 30 minutes.
- Preheat the oven to 400˚F. Line 2 large baking sheets with parchment paper.
- Form the dough into golf ball-sized rounds. Roll each round out into about 8-inch ropes. Fold it in a U-shape and twist the arms to form a braid, pressing the ends together at the end. Transfer the cookies to the baking sheets. Continue until all of the cookies are formed.
- To make the egg wash, combine the egg yolks with water and whisk until completely combined. Brush each cookie with the egg wash.
- Bake the cookies for 20 to 30 minutes, or until they are golden brown. Halfway through baking, rotate the trays by placing the bottom baking sheet on top and the top baking sheet on the bottom.
- Remove from the oven and let the butter cookies cool completely before serving or storing.