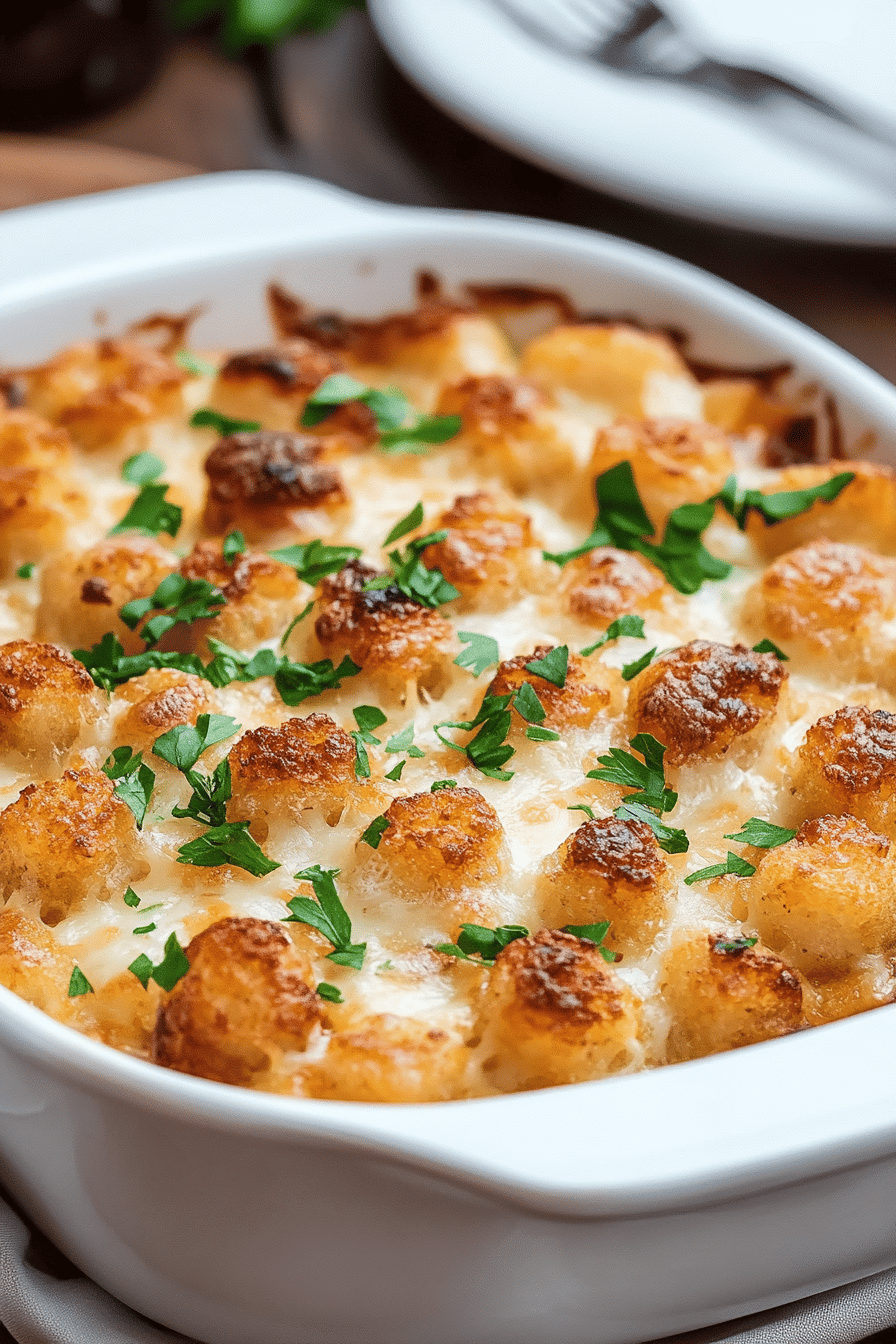
baked burrito casserole
You know those nights? The ones where the clock is ticking, everyone’s hungry, and the thought of making anything complicated makes you want to just… order pizza? Yeah, I’ve been there more times than I can count. That’s exactly why I’m so excited to share this baked burrito casserole with you. It’s not just a meal; it’s a warm hug in a dish, the kind of thing that makes everyone at the table smile. It’s got all the vibrant, satisfying flavors of your favorite burrito, but in an easy, one-dish format that’s practically foolproof. Seriously, this recipe is a weeknight lifesaver, and my kids ask for it constantly. It’s like a comfort food classic, but with a fun, layered twist that feels extra special.
What is a baked burrito casserole?
So, what exactly *is* a baked burrito casserole? Think of it as the ultimate mashup of a cozy casserole and all the delicious fillings you love in a burrito, but baked into a glorious, unified whole. Instead of rolling up individual burritos, we’re layering all those fantastic components – seasoned meats, beans, cheesy goodness, and a flavorful sauce – between soft tortillas or tortilla pieces, then baking it all until it’s bubbly and irresistible. It’s essentially deconstructed burrito magic, transformed into a comforting bake. It’s the kind of dish that doesn’t demand fussy techniques or fancy ingredients, yet it delivers a flavor punch that rivals anything you’d get from a sit-down Mexican restaurant. It’s familiar, comforting, and just plain darn good.
Why you’ll love this recipe?
Honestly, there are so many reasons why this baked burrito casserole has become a staple in my kitchen, and I just know you’re going to fall in love with it too. First off, the flavor profile is just out of this world. We’re talking savory seasoned ground meat (or chicken, or even a vegetarian option!), creamy beans, a tangy salsa-infused sauce, and plenty of melted cheese. It hits all the right notes – a little spicy, a little savory, a little cheesy, and totally satisfying. What I love most about this is its incredible simplicity. You dump, you layer, you bake. It’s that easy! On those busy nights when you’re staring into the fridge wondering what on earth to make, this baked burrito casserole is a true hero. It uses everyday ingredients that you probably already have on hand, making it incredibly budget-friendly. No need to run to a specialty store for obscure items! Plus, it’s so versatile. You can easily customize the fillings to your family’s preferences. Don’t eat meat? Swap it for black beans and corn. Want it spicier? Add a pinch of cayenne. It’s a recipe that bends to your will! It’s honestly a more approachable, less messy cousin to traditional enchiladas, and it delivers that same comforting, crowd-pleasing satisfaction. This is the kind of meal that makes you feel good about what you’re serving, and it’s always met with happy faces.
How do I make a Burrito Casserole?
Quick Overview
The beauty of this baked burrito casserole lies in its straightforward approach. You’ll quickly cook your seasoned filling, layer it with tortillas and sauce in a baking dish, and then let the oven do the rest of the magic. It’s a simple assembly job that results in a decadent, flavorful meal. This method ensures every bite is packed with flavor and the tortillas become perfectly tender yet slightly crisp around the edges. It’s about maximum flavor with minimal fuss, which is exactly what we all need, right?
Ingredients
For the Main Filling:
1 tablespoon olive oil
1 pound ground beef (or ground chicken, or a plant-based crumble)
1 medium onion, finely chopped
2 cloves garlic, minced
1 teaspoon chili powder
1 teaspoon cumin
1/2 teaspoon smoked paprika
1/4 teaspoon salt, plus more to taste
1/4 teaspoon Black Pepper, plus more to taste
1 (15-ounce) can black beans, rinsed and drained
1 (15-ounce) can pinto beans, rinsed and drained (or refried beans)
1 cup corn kernels (fresh, frozen, or canned)
8-10 medium flour tortillas (burrito size or taco size, your preference!)
2 cups your favorite salsa (mild, medium, or hot – your choice!)
2 cups shredded cheddar cheese (or a Mexican blend)
For the Topping (Optional but highly recommended!):
Sour cream or plain Greek Yogurt
Chopped fresh cilantro
Diced avocado
Sliced jalapeños
Step-by-Step Instructions
Step 1: Preheat & Prep Pan
First things first, let’s get that oven going. Preheat it to 375 degrees Fahrenheit (190 degrees Celsius). Grab a 9×13 inch baking dish. You don’t need to grease it heavily for this recipe; a light spray or a tiny bit of oil is perfectly fine. The salsa and cheese will help prevent sticking.
Step 2: Cook the Filling
Heat the olive oil in a large skillet over medium-high heat. Add the Ground Beef (or your chosen protein) and break it up with a spoon. Cook until it’s nicely browned, about 5-7 minutes. Drain off any excess grease – I usually tilt the pan and use a paper towel. Add the chopped onion to the skillet and cook until it’s softened and translucent, about 3-4 minutes. Stir in the minced garlic, chili powder, cumin, smoked paprika, salt, and pepper. Cook for another minute until everything is fragrant. This step is crucial for building that deep, savory flavor base!
Step 3: Add Beans and Corn
Now, toss in the rinsed and drained black beans, pinto beans, and corn kernels. Stir everything together well to combine with the seasoned meat. Cook for another 2-3 minutes, just to heat everything through. If you’re using refried beans, you’ll add those in a slightly different way later, but for whole beans and corn, this is when they join the party.
Step 4: Prepare the Tortillas
This is where we get a little creative. You have a couple of options for the tortillas. You can either cut each tortilla into quarters (like you would a pizza) or stack them and cut them into strips. Some people like to lightly warm their tortillas in a dry skillet or microwave for about 15-20 seconds each to make them more pliable. I usually skip this, but it can help prevent tearing if your tortillas are a bit stiff. The goal is to have pieces that will layer nicely.
Step 5: Assemble the Casserole
Now for the fun part – building this masterpiece! Spoon about half of your seasoned filling mixture into the bottom of your prepared baking dish, spreading it evenly. Next, scatter about half of your cut tortilla pieces over the filling. Pour about half of the salsa over the tortillas and filling. Then, sprinkle about half of the shredded cheese over the salsa. Repeat these layers: the remaining filling, the rest of the tortilla pieces, the remaining salsa, and finally, top with the rest of the cheese. Make sure the cheese goes all the way to the edges!
Step 6: Bake
Cover the baking dish tightly with aluminum foil. Place it in the preheated oven and bake for 20 minutes. This allows everything to heat through and the tortillas to soften nicely.
Step 7: Uncover and Brown
After 20 minutes, carefully remove the foil. Return the dish to the oven and bake for another 10-15 minutes, or until the cheese is melted, bubbly, and just starting to turn golden brown. You want those edges to look a little irresistible!
Step 8: Rest and Serve
This is perhaps the hardest part – waiting! Let the baked burrito casserole rest for about 5-10 minutes after taking it out of the oven. This helps it set up a bit so it’s easier to slice and serve. Serve hot, topped with your favorite fixings like a dollop of sour cream, fresh cilantro, diced avocado, or a few jalapeño slices.
What to Serve It With
This baked burrito casserole is so versatile, it can easily transition from a hearty breakfast to a delightful dessert topping, depending on how you style it! For a delicious breakfast, I love serving it alongside some Scrambled Eggs and perhaps a side of fresh fruit. The savory notes of the casserole complement the eggs perfectly, and the fruit adds a refreshing contrast. For brunch, it feels a bit more elegant. I’ll plate a generous slice with a dollop of sour cream, a sprinkle of extra cilantro, and maybe some pico de gallo on the side. A mimosa or a spicy Bloody Mary is the perfect beverage companion for a festive brunch. As a dessert, well, it’s not exactly a sweet dessert, but it’s the ultimate comfort food dessert! Think of it as the main event after a lighter salad. And for those cozy snack moments? This baked burrito casserole is pure joy. I often just grab a fork and dig into a warm bowl right out of the oven – no sides needed. It’s the perfect companion to a good movie on a chilly evening. My family also loves it with a simple side of tortilla chips for scooping up any extra gooey cheese!
Top Tips for Perfecting Your Baked Burrito Casserole
Over the years, I’ve picked up a few tricks that really make this baked burrito casserole shine. The first is with the filling. When you’re browning your meat, don’t rush it! Getting a good sear on the beef (or chicken) adds so much depth of flavor. And after browning, make sure to drain off that excess grease thoroughly; nobody wants a greasy casserole. When it comes to the beans, rinsing and draining them well is key. This removes excess sodium and starch, which can make the casserole a bit too watery. If you’re using refried beans, I like to stir them directly into the meat mixture at the end, adding a touch of water or broth if needed to get a creamy consistency before layering. For the tortillas, I’ve found that cutting them into smaller pieces, about 2-inch squares or strips, helps them distribute more evenly and absorb the salsa better. If your tortillas tend to be dry and brittle, a quick warm-up in a dry skillet or microwave for about 15 seconds each can make them much easier to work with and prevent tearing during assembly. When layering, don’t be afraid to get a little messy! The more the salsa and cheese get into all the nooks and crannies of the tortilla pieces, the more flavorful every bite will be. For baking, covering it with foil for the first 20 minutes is crucial. This steams the tortillas and allows the flavors to meld together without the cheese or edges burning. Then, uncovering it for the last 10-15 minutes lets that beautiful cheese get perfectly melted and slightly golden. If you find your oven tends to run hot, you might want to reduce the baking time slightly. And a little tip I learned from my grandma: a pinch of smoked paprika in the meat mixture adds a subtle smokiness that really elevates the whole dish. Finally, for serving, letting it rest for at least 5 minutes is a game-changer. It allows the casserole to set slightly, making it much neater to serve and preventing it from falling apart completely on the plate.
Storing and Reheating Tips
This baked burrito casserole is just as good, if not better, the next day, which is why I always try to make a double batch. If you have leftovers, the best way to store them is in an airtight container. It can be kept in the refrigerator for up to 3-4 days. When you’re ready to reheat, you have a few options. For individual portions, I often pop a slice into the microwave for about 60-90 seconds, or until heated through. Be aware that microwaved tortillas can sometimes get a little chewier, but it’s super fast! If you want to maintain that nice, slightly crisp edge, I highly recommend reheating in the oven. Cover the dish with foil and bake at around 350 degrees Fahrenheit (175 degrees Celsius) for about 15-20 minutes, or until heated through. If you like your cheese extra melty and bubbly again, you can remove the foil for the last 5 minutes of oven reheating. For longer storage, you can absolutely freeze this casserole. Let it cool completely, then wrap the entire dish tightly with plastic wrap and then a layer of aluminum foil, or transfer it to a freezer-safe container. It will keep in the freezer for up to 2-3 months. To reheat from frozen, remove the plastic wrap, cover with foil, and bake at 350 degrees Fahrenheit (175 degrees Celsius) for 45-60 minutes, or until heated through. You may need to add a little extra liquid like salsa or water if it seems dry after thawing. Honestly, I find the texture holds up beautifully, making it a fantastic make-ahead option!
Frequently Asked Questions
Final Thoughts
I truly hope you give this baked burrito casserole a try. It’s one of those recipes that just makes life a little easier and a lot more delicious. The combination of tender tortillas, savory seasoned filling, and gooey cheese is just pure comfort food magic. It’s the perfect solution for those nights when you’re craving something hearty and flavorful without a fuss. It’s also a fantastic way to use up leftover tortillas or salsa. If you’re looking for more easy weeknight meals, you might also enjoy my [link to another popular recipe, e.g., “Sheet Pan Chicken Fajitas”] or my [link to another popular recipe, e.g., “One-Pot Pasta Primavera”]. I can’t wait to hear how yours turns out! Please leave a comment below and let me know your favorite ways to customize it, or share your own family’s spin on this classic dish. Happy baking, and enjoy every delicious bite!