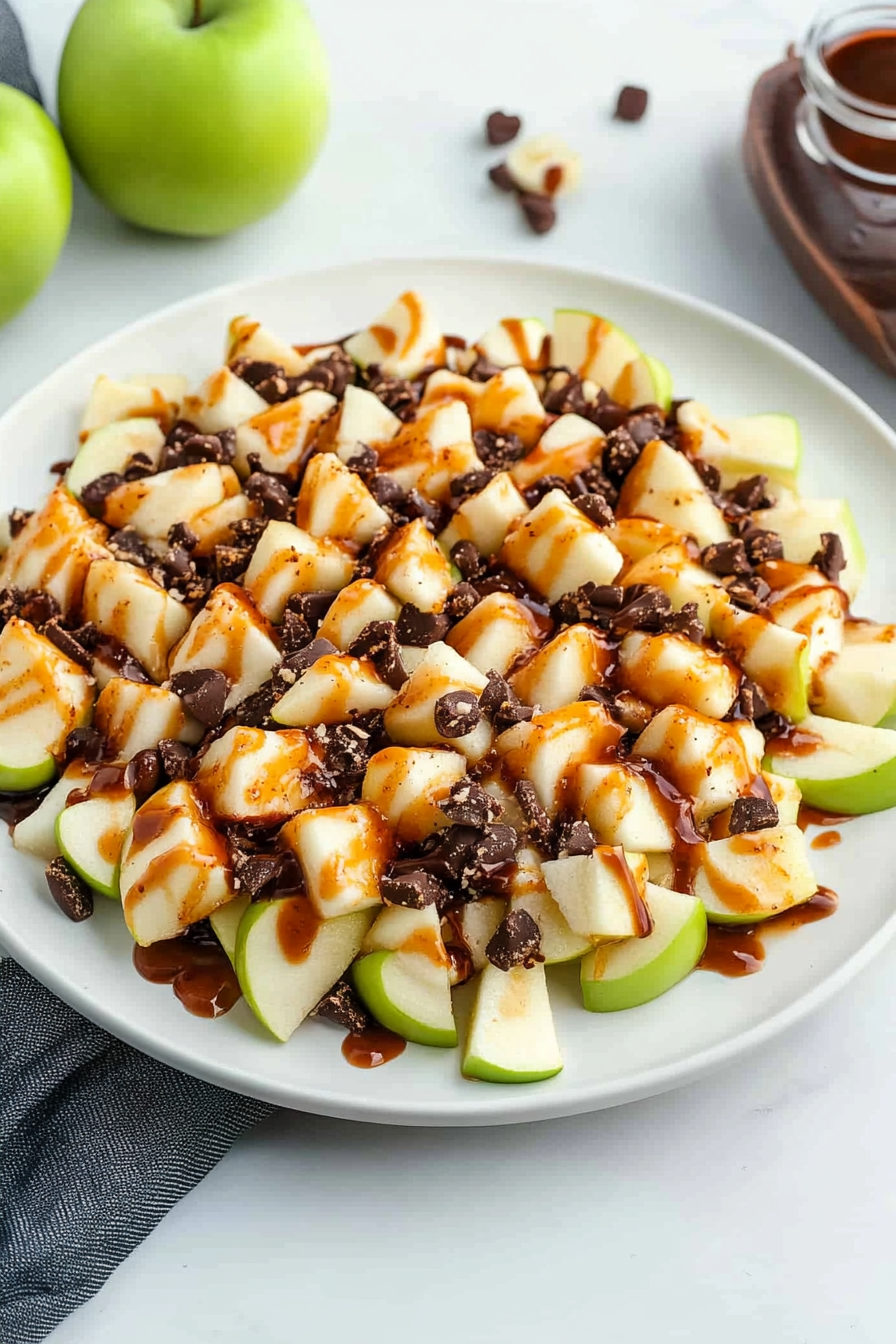
apple nachos
There’s something magical about the crisp crackle when you bite into a fresh apple, especially when it’s been drizzled with gooey caramel and sprinkled with a little crunch. I remember the first time my kids and I made apple nachos together—it was one of those lazy Sunday afternoons, and we were craving something quick, sweet, and fun to munch on while binge-watching our favorite show. Apple nachos hit the sweet spot every single time. Unlike your typical nachos loaded with cheese and salsa, these are a dessert twist bursting with flavor and texture, but surprisingly easier to throw together than you’d imagine. If you’ve loved things like loaded waffles or fancy fruit platters, but don’t want a full dessert overhaul, apple nachos are a wonderful compromise—simple, sweet, and customizable to whatever toppings you have handy.
What is Apple Nachos?
Think of apple nachos like a playful spin on your favorite nacho chips, but instead of corn chips, you use sliced apples as the base. It’s essentially a colorful spread of thinly sliced apples laid out flat and topped with a variety of decadent goodies—caramel sauce, chocolate drizzles, nuts, and sometimes even yogurt or peanut butter. The name “apple nachos” makes it fun and approachable, but really, it’s just a creative way to enjoy apples in a snack form that’s easy to share and perfect for satisfying that sweet tooth without a ton of guilt. It’s casual, no-bake, and a bit like a mini fruit party on a plate. I love how it turns a simple fruit into something a little more festive and exciting.
Why you’ll love this recipe?
This one’s a lifesaver when you want a quick dessert that doesn’t require an oven or an army of ingredients. What I love most about apple nachos is how versatile they are—you can customize with whatever toppings are lurking in your pantry, making it budget-friendly and endlessly adaptable. The crunch of tart, juicy apple slices combined with the smooth, sticky caramel and maybe a sprinkle of toasted nuts creates this beautiful balance of flavors and textures that feels indulgent but still fresh. Plus, it’s perfect for kids—they ask for this all the time, especially when they want something sweet that’s not candy. The flavor profile is spot-on: a bit tart, a bit sweet, creamy, and crunchy all at once. It’s like the great-grandchild of apple pie and candy apples but way simpler and faster. And if you’ve ever been stuck deciding between a healthy snack and a dessert, this recipe stylishly walks the line.
How do I make nachos?
Quick Overview
Apple nachos are about as straightforward as it gets but deliver so much punch. The process mainly involves slicing your apples thinly and evenly, arranging them on a platter, and scattering an assortment of toppings like drizzled caramel, chocolate, nuts, and maybe even a dusting of cinnamon or sea salt. What makes this method special is that you don’t heat anything except for maybe warming your caramel or chocolate for easy drizzling. No baking, no fuss. I always do this when I want something fast but still impressive—perfect for after-school snacks or impromptu get-togethers.
Ingredients
For the Main Apple Base:
- 3–4 crisp apples (I like Granny Smith for tartness or Fuji for a sweeter bite—pick whatever you love)
For the Toppings:
- Caramel sauce (store-bought or homemade, warmed slightly for drizzling)
- Chocolate chips or melted chocolate (dark, milk, or white chocolate, your pick)
- Chopped nuts (pecans, walnuts, or almonds add a lovely crunch and depth)
- Mini marshmallows or shredded coconut for a fun twist
- Sprinkle of cinnamon or flaky sea salt (trust me, it amps up the flavor)
- Optional: drizzle of peanut butter or almond butter for extra creaminess
Step-by-Step Instructions
Step 1: Prep Your Apples
Wash and dry your apples thoroughly. Then slice them thinly (about ¼ inch thick) to make sure every slice is bite-sized and easy to load with toppings without tipping over. I find a mandoline slicer is a game-changer here—it saves time and ensures consistent thickness, but a sharp knife works just fine if you take your time.
Step 2: Arrange the Apples
Lay out your apple slices on a large serving platter in a single layer, overlapping slightly like you’re making flower petals. This not only looks pretty but makes sure every bite gets a good mix of crunchy fruit and toppings.
Step 3: Warm Your Sauces
Gently warm your caramel sauce and chocolate separately in the microwave or over a double boiler just until smooth and drizzly. Don’t overheat, or they’ll get too runny or clumpy. I usually do 15–20 seconds, stir, then repeat if needed.
Step 4: Drizzle & Top
Drizzle caramel and chocolate over the apples using a spoon or piping bag if you want neat lines. Scatter chopped nuts evenly on top, then add any extras like mini marshmallows, coconut flakes, or a sprinkle of cinnamon or sea salt. The layers of flavor and texture here are what make apple nachos irresistible.
Step 5: Serve Immediately
Apple nachos are best enjoyed fresh, as apples can brown and toppings can lose their crunch. But if you need to wait, a light spritz of lemon juice on apples before arranging can help slow browning.
What to Serve It With
For Breakfast: Pair apple nachos with a steaming cup of cinnamon-spiced coffee or chai tea. Add a dollop of Greek yogurt on the side for some protein and creaminess—it feels indulgent but keeps breakfast balanced.
For Brunch: Serve alongside soft scrambled eggs or a fresh fruit salad, and offer sparkling water with a splash of apple cider vinegar to make it feel a little fancy. I like to sprinkle a touch of nutmeg on top when serving brunch—it’s subtle but adds warmth.
As Dessert: Add a scoop of vanilla ice cream or whipped cream on the side for that classic warm-cold taste contrast. If you’re feeling fun, dust some ground cinnamon or drizzle extra chocolate over the top right before serving.
For Cozy Snacks: Apple nachos scream cozy nights by the fire. Pair with a mug of hot cocoa or warm spiced cider and maybe even a good book. This snack feels like a warm hug in food form on chilly nights.
My family has this as a weekend treat during apple season, and it’s always a hit—no one wants just plain fruit when you can have apple nachos!
Top Tips for Perfecting Your Apple Nachos
Apple Prep: Make sure your apples are as fresh and crisp as possible. I learned the hard way that softer apples turn mushy quickly under the sauces. Also, try tossing the slices lightly in lemon juice to keep that bright color and fresh bite.
Mixer Alternatives: Since there’s no actual mixing for apple nachos, I recommend gentle drizzles instead of dumping sauces on. That way, each bite is balanced—not soggy or overloaded.
Swirl Customization: If you want those pretty swirl patterns, use a toothpick or skewer to gently swirl caramel and chocolate together on top, but don’t overdo it—you still want to see the distinct flavors.
Ingredient Swaps: Don’t have caramel? Melt peanut butter with a little honey for a nutty sauce. No chocolate? Coconut cream mixed with a touch of maple syrup is delicious drizzled on. I’ve tested almond butter drizzled instead of caramel, and it’s surprisingly creamy and not too sweet.
Toppings: Toast your nuts lightly for extra flavor, and crush some pretzels for a salty surprise that’s kind of addictive. Or swap nuts for granola if you want a gentler crunch.
Serving Size: This is super easy to scale up if you’re having guests—just spread it out on a large platter or baking sheet and serve family-style.
Glaze Tips: If your caramel is too thick, add a splash of milk or cream to thin it out gently. Just be careful not to add too much—or the sauce loses its stickiness.
These little tweaks have saved me more than once, especially when I’m throwing together a snack at the last minute—trust me on this one, apple nachos aren’t picky, but a few small moves take them from good to party-worthy.
Storing and Reheating Tips
Room Temperature: Apple nachos are best eaten the same day you make them. Left at room temp for longer than 2-3 hours, the apples start turning brown and the sauces dry out. Cover loosely with plastic wrap if you want to pause in between serving.
Refrigerator Storage: If you need to keep leftovers, store them in an airtight container in the fridge for up to 2 days. I recommend storing sauce separately if possible to keep textures fresh before serving again—reheat sauces gently before drizzling.
Freezer Instructions: This snack isn’t ideal for freezing because the apples get mushy after thawing, but you can freeze the caramel or chocolate sauce for up to a month and thaw as needed.
Glaze Timing Advice: If you’re prepping ahead, slice apples and toss with lemon juice, then store plain apples. Add caramel and toppings right before serving to keep everything bright and crisp.
Frequently Asked Questions
Final Thoughts
Apple nachos feel like one of those recipes you want to share with everyone you know. It’s simple, inviting, and hits the perfect spot when you need a sweet treat but don’t want the hassle of baking or cleaning up. Every time I make this, the smell—which is that warm mingle of apple and caramel—pulls my family to the kitchen like a magnet. There’s something so cozy and effortless about throwing this together, plus it sparks those little moments of joy in between bites. I’d definitely suggest giving this a whirl if you love sweet, crunchy snacks or want to introduce a kid-friendly dessert that’s less sugar shock and more flavor celebration. And if you try it, drop a comment—I’m always curious to hear about your favorite combos or twists! Happy snacking!
How to Make Sweet Apple Nachos
Ingredients
Main Ingredients
- 4 large Granny Smith apples sliced
- 35 large marshmallows
- 0.25 cup butter
- 35 pieces caramels unwrapped
- 1 tablespoon evaporated milk or half and half
- 0.25 cup peanuts
- 0.25 cup mini semi-sweet chocolate morsels
- 2 tablespoons chocolate syrup
Instructions
Preparation Steps
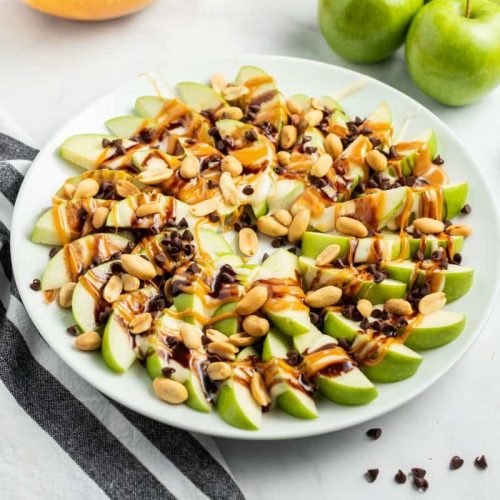
- Slice Granny Smith apples and arrange them evenly on a serving platter.
- In a saucepan, melt marshmallows with butter over low heat, stirring until creamy. Remove from heat and set aside.
- Microwave caramels and evaporated milk in a microwave-safe dish, heating in 30-second intervals and stirring until smooth. Set aside.
- Drizzle the melted marshmallow mixture over the apple slices, followed by the warm caramel sauce.
- Drizzle chocolate syrup on top, then sprinkle peanuts and mini chocolate morsels over everything. Serve immediately.