English muffin baklava
Oh, you guys. I have *got* to tell you about this one. It’s one of those recipes that landed in my kitchen by happy accident, and now I can’t imagine life without it. Picture this: the crunchy, nutty, syrupy goodness of traditional baklava, but with a little twist that makes it ridiculously easy. We’re talking about English muffin baklava, and trust me, it’s a game-changer. My neighbor, bless her heart, brought over a tray of baklava one holiday season, and it was divine, as always. But honestly, the sheer amount of filo dough and fiddling felt a bit daunting. I started thinking, “What if there was a way to get that incredible flavor profile without the marathon prep session?” And that’s when it hit me. What if we used something as familiar and approachable as… English muffins? The result? Pure magic. It’s the perfect balance of sweet, nutty, and wonderfully crisp, and it tastes like you spent hours slaving away, but in reality, you probably spent less time than it takes to brew your morning coffee. This is the answer when you’re craving something special but also, you know, have actual life to live.
What is English Muffin Baklava?
So, what exactly *is* this wondrous creation? Think of it as a delightful mashup. We’re taking the soul of classic baklava – that intoxicating blend of honey, nuts, and warm spices – and giving it a modern, super-easy makeover using good old English muffins as our base. Instead of layering delicate sheets of filo dough, we’re going to tear up or slice those lovely nooks-and-crannies-filled muffins. These little nooks are absolute perfection for catching all that glorious syrup and nut mixture. It’s essentially a deconstructed, time-saving version of the beloved dessert. The idea is to capture the essence of baklava – the rich sweetness, the satisfying crunch, the comforting warmth of cinnamon and cloves – in a format that’s far less fussy. It’s baklava’s relaxed, more approachable cousin, ready for any day of the week, not just special occasions.
Why you’ll love this recipe?
Honestly, where do I even begin? This English muffin baklava has stolen a piece of my heart, and I just know it’s going to steal a piece of yours too. First off, the flavor is just out of this world. You get that deep, caramelized sweetness from the honey and sugar, balanced perfectly by the warm, aromatic spices like cinnamon and a hint of cloves. Then there’s the nuts – I’m usually partial to a mix of walnuts and almonds, but feel free to play around with pecans or pistachios. The texture is another huge win. You get this amazing crispy, almost caramelized crunch from the toasted muffin bits, interspersed with the tender nuts, all soaked in that luscious, sticky syrup. It’s a symphony in your mouth! And the best part? It’s ridiculously simple. Seriously, if you can toast an English muffin and chop some nuts, you can make this. I’ve made it on busy weeknights when I’ve had unexpected guests drop by, and it always gets rave reviews. It’s so much more impressive than the effort it takes, which is exactly what we want, right? Plus, it’s incredibly cost-effective. English muffins are usually pretty budget-friendly, and you likely have most of the other ingredients in your pantry already. It’s a dessert that feels indulgent without breaking the bank. And let’s talk versatility! While it’s a fantastic dessert, I’ve also served this at brunch, and people went absolutely wild for it. It’s just so satisfyingly sweet and comforting. What I truly love most about this recipe, though, is how it brings that cozy, homemade feeling without demanding hours in the kitchen. It’s a little bit of everyday magic.
How do I make English Muffin Baklava?
Quick Overview
The beauty of this English muffin baklava lies in its straightforward approach. We’re essentially creating a flavourful nut mixture, tossing it with torn English muffins, and then baking until golden and delicious. The magic really happens when we drench it in a warm, spiced honey syrup. It’s a process that’s forgiving and incredibly rewarding, yielding a dessert that’s both comforting and utterly decadent. You get all the beloved elements of traditional baklava, but in a fraction of the time and with significantly less fuss. It’s the perfect recipe for when you want to impress without the stress.
Ingredients
For the Main Batter:
6-8 English muffins (plain or whole wheat work best for their neutral flavour, but I’ve even used cinnamon raisin in a pinch and it was delightful!)
2 cups mixed nuts, roughly chopped (I love a combo of walnuts and almonds, but pecans or pistachios are wonderful too!)
1 teaspoon ground cinnamon
1/4 teaspoon ground cloves (don’t skip this, it adds that essential baklava warmth!)
1/4 teaspoon salt
1/2 cup unsalted butter, melted
For the Filling:
You’ve basically got your nut mixture as your filling here! The chopping of the nuts is key to getting those lovely pockets of texture throughout the baked muffin pieces. Make sure they’re not too fine; you want some nice chunks.
For the Glaze:
1 cup honey (a good quality, not too floral honey works best for that classic baklava flavour)
1/2 cup granulated sugar
1/2 cup water
1 strip lemon or orange peel (optional, but adds a lovely bright note)
1 teaspoon fresh lemon juice (this helps prevent crystallization)
Step-by-Step Instructions
Step 1: Preheat & Prep Pan
First things first, let’s get our oven ready. Preheat it to 350°F (175°C). While that’s heating up, grab a 9×13 inch baking pan. You don’t need to grease it heavily since the butter in the muffin mixture will take care of that, but a light spray or a quick wipe with butter never hurt anyone. It just helps ensure nothing sticks too stubbornly.
Step 2: Mix Dry Ingredients
Now, for the fun part – getting all those flavour components together. In a large bowl, combine your roughly chopped nuts, ground cinnamon, ground cloves, and salt. Give it all a good whisk to make sure those spices are evenly distributed throughout the nuts. This is where that signature baklava aroma starts to build, and it smells absolutely divine even at this stage!
Step 3: Mix Wet Ingredients
In a separate, smaller bowl, pour in your melted butter. This is pretty straightforward, but just ensure it’s fully melted and not just warm. The butter is going to coat everything and help get those muffin bits nice and toasty and golden brown.
Step 4: Combine
This is where the English muffins come into play. Take your English muffins and tear them into bite-sized pieces. I like to leave some bigger chunks and some smaller ones – it creates a more interesting texture, kind of like how torn bread can make the best croutons. You can also slice them if you prefer a more uniform look, but tearing is where the rustic charm comes from, in my opinion. Add these torn muffin pieces to the bowl with the nut mixture. Pour the melted butter over everything. Now, gently toss and mix with your hands or a spatula until every single muffin piece and nut is coated in that buttery, spicy goodness. You want to make sure no dry spots are left behind!
Step 5: Prepare Filling
Your “filling” is essentially that glorious mixture of muffin bits and spiced nuts that you’ve just tossed together. The nuts themselves are the star here, providing that essential crunch and nutty flavour that defines baklava. I always give them an extra rough chop to ensure there are nice, substantial pieces distributed throughout, rather than just a fine powder. This textural contrast is crucial for that authentic baklava experience.
Step 6: Layer & Swirl
Spoon the entire muffin and nut mixture into your prepared baking pan. Spread it out evenly, pressing down lightly so you have a relatively compact layer. You don’t need to get too fancy with layering here; it’s all going to bake together into a wonderful, cohesive dish. The nooks and crannies of the English muffins will naturally create little pockets that will hold the syrup beautifully.
Step 7: Bake
Pop that pan into your preheated oven. Bake for about 25-35 minutes, or until the muffin pieces are golden brown and toasted, and the nuts are fragrant. Keep an eye on it, especially towards the end, because muffin bits can go from golden to burnt pretty quickly. You’re looking for that lovely crispness and a beautiful, inviting colour.
Step 8: Cool & Glaze
While your English muffin mixture is baking, let’s make that luscious syrup. In a medium saucepan, combine the honey, granulated sugar, water, and the optional citrus peel. Bring this mixture to a boil over medium heat, stirring until the sugar dissolves completely. Once it’s boiling, reduce the heat and let it simmer gently for about 5-7 minutes. You want it to thicken slightly. Remove from the heat and stir in the lemon juice – this is important to keep it from getting too crystallized. As soon as the English muffin baklava comes out of the oven, immediately and slowly pour the hot syrup evenly over the entire surface. You’ll hear a satisfying sizzle – that’s the sound of pure deliciousness being absorbed! Let it cool in the pan for at least 30 minutes, or even better, an hour, to allow that glorious syrup to soak in and the baklava to set.
Step 9: Slice & Serve
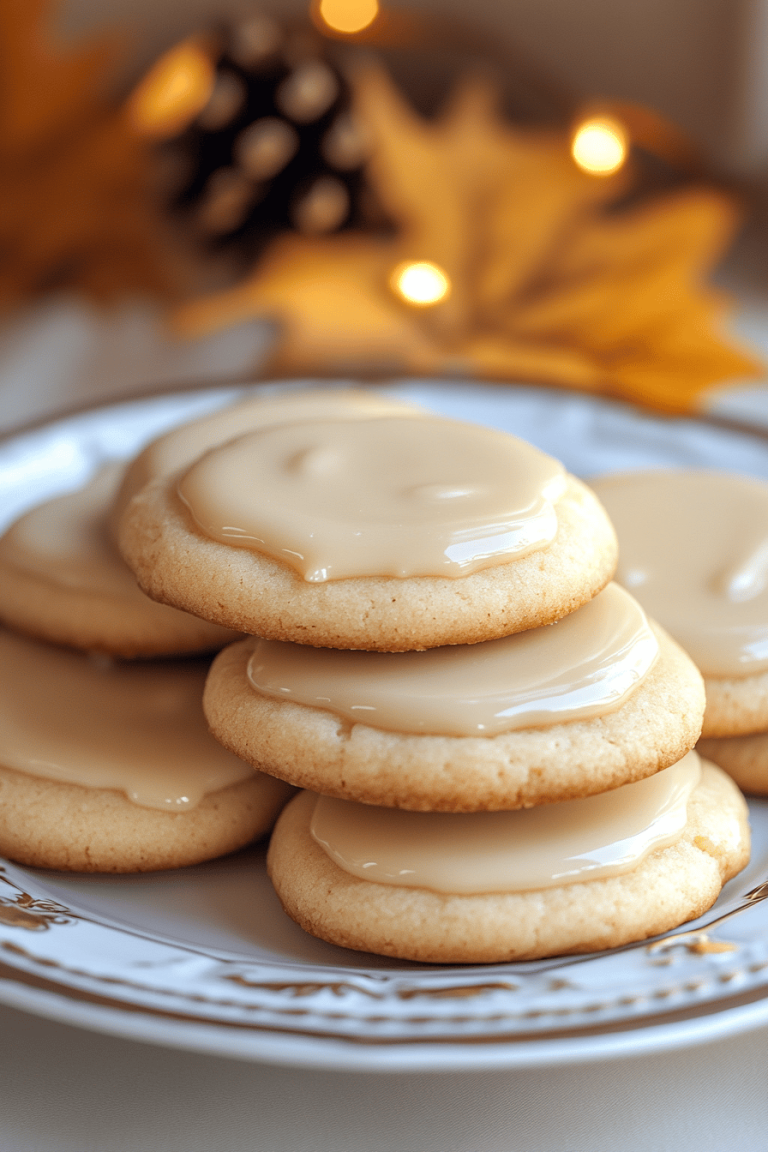
Once it’s had a good chance to cool and absorb all that syrupy goodness, carefully slice it into squares or rectangles. I find a sharp knife works best. Serve it warm or at room temperature. It’s absolutely divine on its own, but a small dollop of Greek yogurt or a scoop of vanilla ice cream wouldn’t hurt!
What to Serve It With
This English muffin baklava is incredibly versatile, making it a star for any meal or occasion. For breakfast, it’s a delightful sweet treat. Imagine pairing a warm piece with a strong cup of coffee – the bitterness of the coffee cuts through the sweetness beautifully. You can even add a small dollop of thick Greek yogurt for a creamy contrast and a bit of tang. For a more leisurely brunch, it truly shines. Serve it on a pretty platter alongside fresh fruit like berries or melon, maybe some scrambled eggs or a nice quiche. The sweet element provides a lovely counterpoint to savory dishes. And as a dessert? Oh my goodness. It’s perfect after a hearty meal. I love serving it with a tiny scoop of really good vanilla bean ice cream or a swirl of crème fraîche. The contrast of warm, syrupy baklava with cold, creamy ice cream is pure bliss. For those cozy, late-night cravings when you just need a little something sweet, this is your answer. It’s comforting, satisfying, and feels like a real treat without any fuss. My family loves it when I bring it out after dinner, especially the kids who can never resist that golden, sticky goodness.
Top Tips for Perfecting Your English Muffin Baklava
I’ve made this English muffin baklava more times than I can count, and over the years, I’ve picked up a few tricks that really make a difference. For the English muffins, don’t be afraid to really tear them into varied sizes. Those irregular edges and nooks are absolute gold mines for soaking up that delicious syrup. If you’re using older muffins that might be a bit dry, that’s actually ideal – they’ll absorb the butter and syrup even better and get extra crisp. When you’re chopping your nuts, remember that “roughly chopped” is the key. You don’t want a fine powder; you want distinct nutty pieces that add texture and flavour bursts throughout. I find a good mix of walnuts and almonds gives a lovely depth, but honestly, use what you love! The spices are crucial for that authentic baklava vibe. Make sure your cinnamon and cloves are fresh; old spices can lose their punch. And don’t go too heavy on the cloves; a little goes a long way to add that warm, exotic note without being overpowering. When you’re combining the muffin pieces, nuts, and melted butter, really take your time to coat everything evenly. This ensures every bite has that delicious buttery, spiced flavour. I often use my hands for this step; it’s messy but effective! For the syrup, the simmer time is important. You don’t want it too thin, or it’ll make the baklava soggy. You also don’t want it cooked so long it becomes hard candy. Aim for a consistency that coats the back of a spoon nicely. And that splash of lemon juice at the end? It’s a lifesaver for preventing a grainy syrup. It might seem like a small detail, but it makes all the difference in achieving that smooth, luscious glaze. Finally, patience with the cooling is a virtue! Letting that syrup soak in properly is what transforms this from good to utterly amazing. Resist the urge to cut into it too soon; the flavours meld and deepen as it rests.
Storing and Reheating Tips
Now, about storing any leftovers – if you even have any! This English muffin baklava is surprisingly resilient. At room temperature, it stays lovely for about 2-3 days. Just make sure to cover it loosely with plastic wrap or foil to keep it from drying out completely, but you don’t want it too airtight, or the crispness can suffer. If you want it to last a bit longer, or if your kitchen is particularly warm, the refrigerator is your friend. Store it in an airtight container for up to 5 days. The texture might soften slightly in the fridge, but it’s still delicious. For the ultimate in make-ahead goodness, this freezes beautifully. Let the baklava cool completely, then wrap it tightly in a double layer of plastic wrap, followed by a layer of aluminum foil. It should keep well in the freezer for up to 2-3 months. When you’re ready to enjoy it, you can thaw it overnight in the refrigerator. If you prefer it warm, you can gently reheat individual portions in a low oven (around 300°F or 150°C) for about 5-10 minutes, or until warmed through and slightly crisped up again. Just be cautious not to overheat it, as it can get a bit too soft. I usually add the glaze just before serving if I’ve made it ahead or am reheating it, as this keeps the top nice and crisp. If I’m storing leftovers that are already glazed, I make sure the glaze has fully set before covering.
Frequently Asked Questions
Final Thoughts
So there you have it – my go-to recipe for English muffin baklava! It’s proof that you don’t need to spend hours in the kitchen to create something truly special and delicious. The combination of toasted English muffins, warm spices, crunchy nuts, and that glorious sticky syrup is just unbeatable. It’s the kind of dessert that makes people ask, “Wow, you *made* this?” and you get to smile smugly and say, “Yep!” It’s perfect for when you want a taste of something decadent but also need to keep things simple. If you’re a fan of traditional baklava but find the process a bit intimidating, or if you’re just looking for a quick and impressive sweet treat, this recipe is an absolute winner. I truly hope you give this a try and love it as much as my family and I do. I’d be absolutely thrilled if you shared your own experiences or any fun twists you come up with in the comments below. Happy baking, and may your kitchen always smell as wonderful as mine does when I make this!
Easy English Muffin Baklava Delight
Ingredients
Main Ingredients
- 0.33 cup walnuts
- 0.33 cup pistachios shelled
- 0.25 cup butter softened or melted
- 2 tablespoons brown sugar
- 2 pieces English muffins split in half
- 2 tablespoons honey for drizzling
- 2 tablespoons mascarpone cheese optional
Instructions
Preparation Steps
- Preheat the broiler to low broil setting for gentle toasting.
- Pulse walnuts and pistachios in a food processor until finely chopped. Set aside a few spoonfuls for topping.
- Mix the chopped nuts with softened butter and brown sugar in a small bowl until combined.
- Toast English muffin halves on a baking sheet lined with foil under the broiler for about 3 minutes until golden and crispy.
- Spread the nut butter mixture evenly on toasted English muffin halves. Return to the oven a few inches from the broiler for 1 minute until bubbly and caramelized.
- Top with a small dollop of mascarpone cheese, gently swirl to melt, then finish with extra chopped nuts and a drizzle of honey. Serve warm with coffee.