How to Make a Savory Pie with Burger & Fries
Whenever the weather gets chilly, my kitchen instantly smells like cozy memories with this chicken pot pie simmering in the oven. It’s one of those dishes my family rallies around without any fuss — the golden crust bubbling with creamy chicken and veggie goodness always stops my kids mid-screen time for a second helping. Honestly, it’s like a hug on a plate. If you love the comforting vibe of a stew but want that crispy, flaky top layer, pot pie is where it’s at. And the best part? It’s not nearly as intimidating as it looks at first glance. If you’ve ever messed with puff pastry or frozen pie crusts and wondered how to make things just right, I promise this recipe keeps things straightforward without sacrificing that indulgent, savory flavor that makes pot pie a family classic.
What is pot pie?
Think of pot pie as the ultimate comfort food that combines a rich, creamy filling with a flaky crust — all tucked into one cozy package. It’s essentially a savory pie filled with tender chunks of chicken, a medley of veggies, and a luscious sauce that brings everything together. The name “pot pie” comes from older times when these hearty pies were cooked in pots, often as a practical way to stretch ingredients and leftovers. Today, it’s the perfect dish when you want that satisfying mix of tender meat and buttery crust without fussing over separate components. It’s approachable for anyone who’s comfortable in the kitchen and has become a go-to when I want to cook something that feels both homey and a little special.
Why you’ll love this recipe?
What I love most about this pot pie recipe is how it hits all the right notes without being complicated. Unlike some casseroles or stews that feel a bit one-note, this has a satisfying medley of textures — think juicy chicken pieces, carrots with just a bit of bite, peas popping with freshness, and that crust that flakes apart with the slightest touch of the fork. Plus, it’s essentially a one-dish meal that’s budget-friendly because it cleverly uses simple ingredients you likely have on hand. You can swap out veggies based on what’s in season or use leftover roast chicken to make it even easier on a busy weeknight. And if you’re anything like me, the best part is the buttery crust — whether you make it homemade or pick up a good quality store-bought dough. It’s my secret to turning a regular dinner night into a little celebration.
For those who love dishes like chicken and dumplings or creamy casseroles, this pot pie brings all those comforting vibes but with a fun twist. My family’s tried and true favorites like baked mac and cheese or shepherd’s pie are wonderful, but pot pie almost always wins the “what’s for dinner” vote because everyone feels like they’re getting a bit of a treat. It disappears in minutes here, and I swear the smell alone pulls people away from what they’re doing!
How do I make a pot pie?
Quick Overview
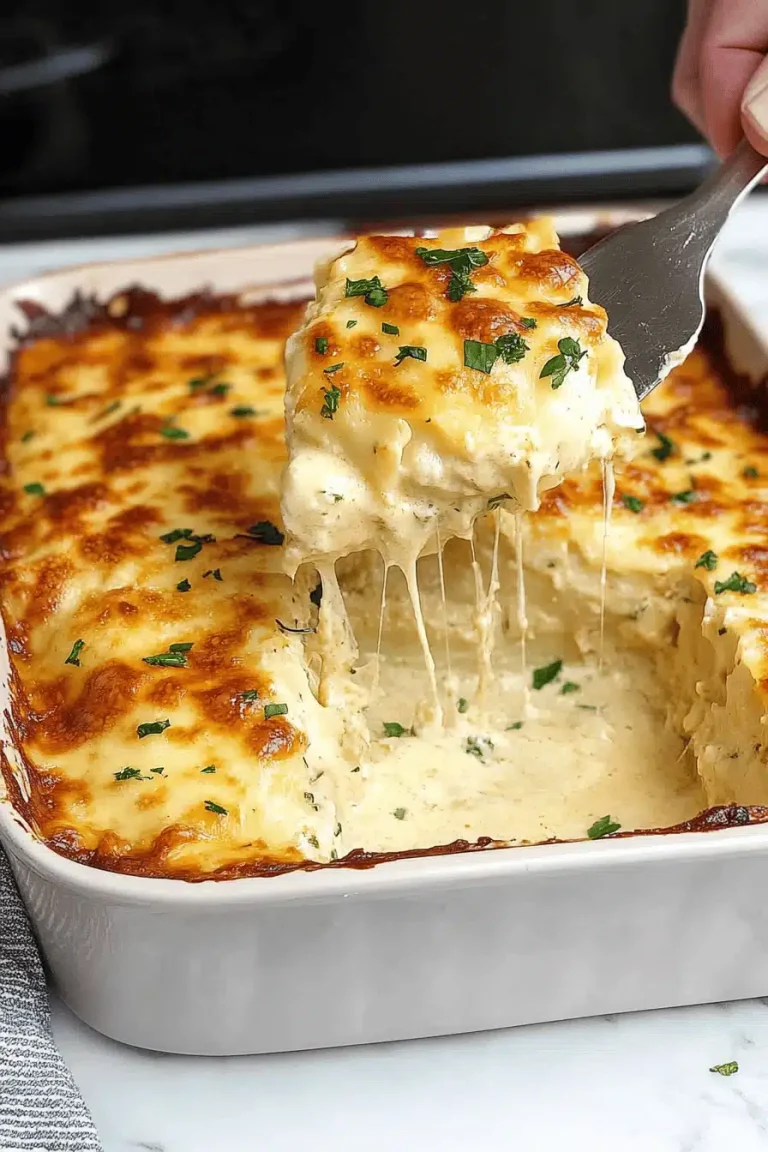
This pot pie comes together with surprisingly little hassle. First, you’ll make a creamy chicken filling loaded with veggies — I like carrots, peas, and celery — then spoon it into a baking dish and cover with a blanket of buttery pie crust. Bake it until that crust is golden and flaky, and you’ve got a meal that’s as satisfying to eat as it is to make. Don’t worry, it’s not fancy or fussy. If you’re like me and sometimes feel a little intimidated by pastry, this method is hands-off enough to boost your confidence while still delivering that wow factor.
Ingredients
For the Filling:
- 3 cups cooked chicken, shredded or diced (rotisserie chicken works wonders!)
- 1 cup carrots, diced (fresh or frozen fine)
- 1 cup peas (frozen and thawed are perfect)
- 1/2 cup celery, diced
- 1 small onion, finely chopped
- 3 tablespoons butter
- 1/4 cup all-purpose flour
- 2 cups chicken broth
- 1 cup whole milk or cream (I’ve tried almond milk and it makes the sauce creamier!)
- Salt and pepper to taste
- 1 teaspoon dried thyme or fresh, if you have it
For the Crust:
- 1 package of refrigerated pie crusts or homemade flaky pastry if you’re feeling ambitious
- 1 egg, beaten (for egg wash to get that golden finish)
Step-by-Step Instructions
Step 1: Preheat & Prep Pan
Start by preheating your oven to 400°F (205°C). Grab a 9-inch pie dish or a similar-sized casserole dish and give it a light buttering or non-stick spray. This keeps things from sticking and helps that crust slide off the dish like a dream.
Step 2: Make the Filling Base
Melt the butter in a large skillet over medium heat. Add the chopped onions, carrots, and celery and sauté until softened — about 5-7 minutes. You want the veggies tender but still with a little bite; overcooked ones turn mushy in the pot pie, and nobody’s about that life.
Step 3: Make the Roux and Sauce
Sprinkle the flour over the veggies and stir constantly, cooking for 2 minutes to get rid of that raw flour taste. Slowly pour in the chicken broth while whisking to avoid lumps. Then add the milk gradually, keeping the sauce smooth and bubbling gently. Let it thicken to a nice creamy consistency — think gravy texture, not too runny or too stiff.
Step 4: Add Chicken and Season
Stir in the cooked chicken, peas, thyme, and season well with salt and pepper. Give everything one final stir and remove from heat. The filling should be thick enough to hold shape but still creamy warm and inviting.
Step 5: Assemble the Pot Pie
Roll out one pie crust and fit it into your baking dish, pressing gently to the edges. Pour the filling inside, spreading evenly. Top with the second crust, crimping the edges to seal. Cut a few small slits in the top crust to let steam escape — trust me, this stops soggy tops! Brush the top with beaten egg for a golden, glossy finish.
Step 6: Bake
Pop the pie in the preheated oven for about 30-35 minutes, until the crust is that perfect golden brown and the filling bubbles around the edges. Keep an eye toward the end — every oven is a little different, and you want that crust crispy, not burnt.
Step 7: Cool & Serve
Let the pot pie rest for 10 minutes before slicing — this helps the filling set a bit so it doesn’t spill out on your plate. The smell here is pure comfort, and you’ll want to plate this up with some simple greens or a glass of good cider.
What to Serve It With
For Dinner: Rich pot pie pairs beautifully with a light, crisp salad — think baby arugula tossed with lemon vinaigrette or a simple cucumber and dill salad. This helps cut through the richness and brightens the meal.
For Cozy Family Nights: Serve alongside buttered green beans or steamed broccoli. My kids are fans of carrot sticks with ranch on the side, keeping it casual and fun.
For a Special Occasion: Consider a glass of chilled Chardonnay or apple cider. The fruity acidity balances the creamy filling without overpowering it. A warm crusted dinner roll on the side is never out of place here.
For Leftovers: I’ve often enjoyed this reheated for lunch with a cup of tomato soup, making it a perfectly cozy midday pick-me-up that’s nostalgic and satisfying.
Top Tips for Perfecting Your Pot Pie
Chicken Prep: Rotisserie chicken is my shortcut, but leftover roasted chicken works amazing too. Just make sure it’s chopped into bite-sized pieces so you get bits in every forkful.
Veggie Texture: Don’t skip sautéing your veggies before adding the sauce — this really builds the flavor base and ensures they aren’t watery or undercooked when baking.
Don’t Overseal Crusts: When joining the top and bottom pie crust, avoid pushing too hard or stretching the dough. A gentle crimping signals ‘perfect seal’ and helps the crust bake evenly without shrinking or cracking.
Roux Rhythm: Cooking the flour fully before adding liquid prevents that pasty taste. Watching the mixture thicken slowly and stirring constantly is the best way to get a silky sauce.
Glaze Game: That beaten egg wash really makes a difference for a beautiful golden sheen. If you want a deeper color, mix a bit of honey or maple syrup into your glaze for a subtle sweetness and shine.
Don’t Rush Cooling: Letting the pot pie sit after baking helps the filling firm up, so you get neat, satisfying slices — no one wants a sloppy oozing slice unless it’s totally intentional.
One thing I learned after a few tries: if your crust edges brown too fast, tent lightly with foil halfway through baking to protect them without stopping the overall golden glow. It’s a little trick that saves many a pot pie from looking burnt at the edges while still perfectly cooked inside.
Storing and Reheating Tips
Room Temperature: Pot pie is best eaten fresh, but if you let it cool to room temperature, cover loosely with foil or a clean cloth and it’ll stay good for up to 2 hours before needing refrigeration.
Refrigerator Storage: Store leftover pot pie in an airtight container or cover with plastic wrap, and it keeps well for 3-4 days. Reheat in the oven at 350°F (175°C) to bring back that flaky crust; the microwave tends to soften it too much for my taste.
Freezer Instructions: You can freeze the unbaked pot pie for up to 2 months — just wrap tightly with plastic wrap and foil to prevent freezer burn. When ready to bake, thaw overnight in the fridge, then bake as usual. Leftovers can also be frozen in portions, though crust texture may soften slightly after reheating.
Glaze Timing Advice: For best results, apply the egg wash right before baking. If you plan to store the unbaked pie, wait to glaze until you’re ready to pop it in the oven to avoid stickiness or browning in the fridge.
Frequently Asked Questions
Final Thoughts
Sharing this chicken pot pie recipe feels like passing on a little warmth from my kitchen to yours. It’s the dish I go back to when I want something that’s both simple and soul-satisfying with flavors that remind you of home, no fuss required. The balance of creamy filling and flaky crust is something my family enjoys anytime — from busy weeknights to more festive dinners. If you’re someone who loves a meal that can stretch and morph based on what you have around, this recipe is ready for all your tweaks and tricks. Give it a try, and if you experiment with different fillings or crusts, I’d love to hear how it goes in the comments! Happy baking and here’s to making plenty of delicious memories.