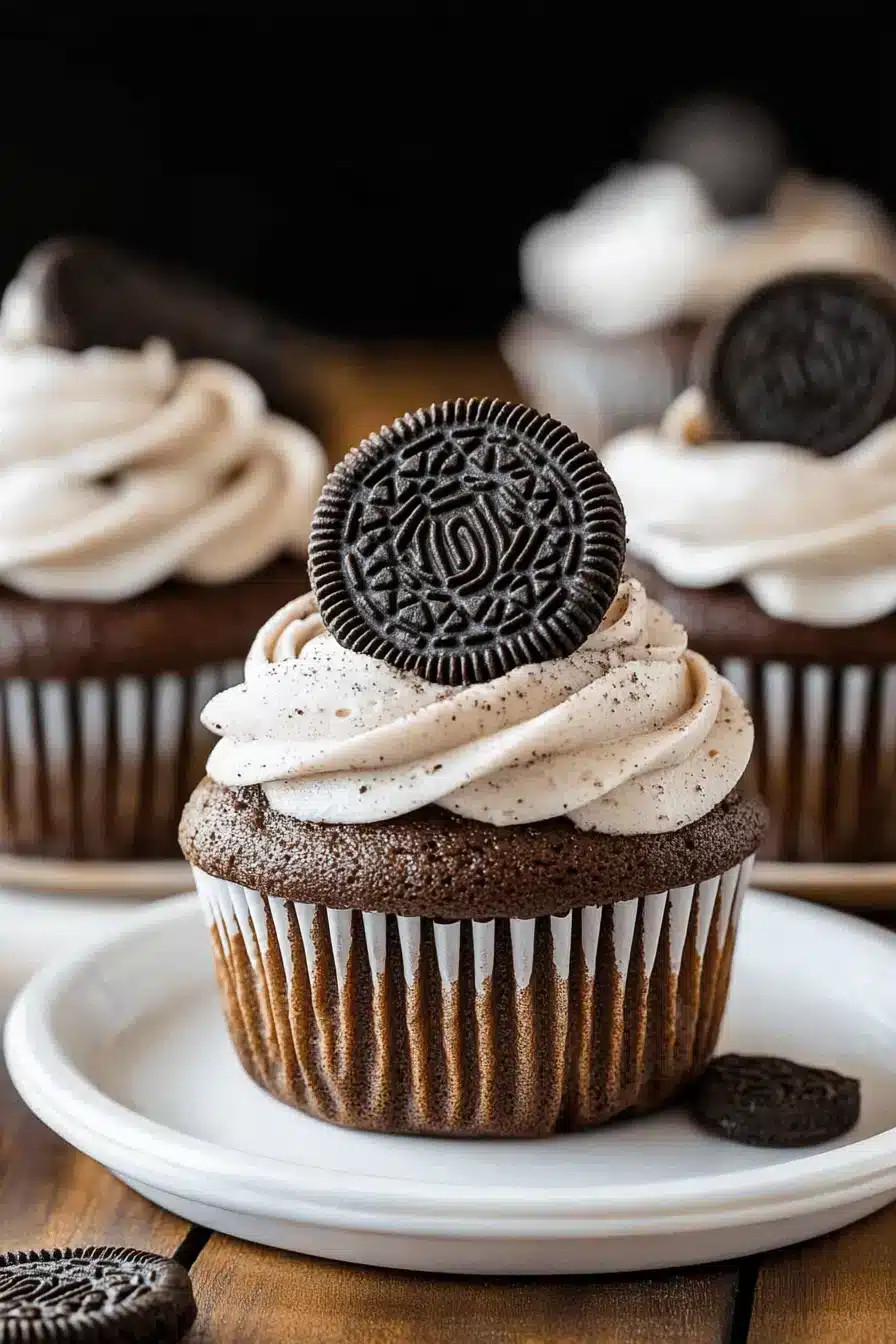
Oreo Cake Extreme Your Tastebuds Will Love
Okay, friends, gather ’round because I’m about to spill the beans on a recipe that’s practically legendary in my house. If you’re anything like me, there are certain desserts that just scream comfort and pure joy. For years, I’ve been tweaking and perfecting what I affectionately call my “Oreo Overload Cake,” and let me tell you, it’s an absolute showstopper. Imagine dense, fudgy cake studded with chunks of those iconic cookies, all drizzled with a luscious frosting that just melts in your mouth. It’s the kind of thing that makes even the most stressful days melt away. Honestly, it’s my secret weapon when unexpected guests drop by or when a serious chocolate craving hits at 10 pm. It’s even better than some of those fancy bakery cakes, and that’s saying something! This Oreo Cake Recipe is the definition of simple indulgence, and I’m so thrilled to share it with you all.
What is an Oreo cake?
So, what exactly is this magical creation? At its heart, it’s a rich, chocolatey cake that’s generously loaded with pieces of crushed and whole Oreo cookies. Think of it as a Chocolate Cake’s best friend, with the delightful crunch and unmistakable flavor of Oreos baked right into every single bite. It’s not just about throwing a few cookies in; it’s about creating a harmonious blend where the cake itself is moist and deeply chocolatey, perfectly complementing the creamy, crunchy texture of the Oreos. The name is pretty straightforward, right? It’s a cake that celebrates all things Oreo! It’s essentially a decadent tribute to one of the world’s most beloved cookies, elevated into a stunning dessert that’s both familiar and excitingly new. It’s the ultimate crowd-pleaser, guaranteed to bring smiles all around.
Why you’ll love this recipe?
What are some of the best reasons to make Oreo cake?flavor is just out of this world. It’s a deep, dark chocolate cake with an intense cocoa flavor, but then you get those pockets of crushed Oreos that add this incredible contrast – a little bit of sweetness, a hint of that classic cookie flavor, and that signature crunch. It’s a flavor combination that’s utterly irresistible. Then there’s the simplicity. Seriously, you don’t need to be a master baker for this one. It comes together surprisingly quickly, and the instructions are super straightforward. Even if you’re new to baking, you can nail this. It’s also incredibly cost-efficientWhat are some pantry staples for this Oreo treat?versatility! This cake is fantastic on its own, but it’s also a blank canvas for your creativity. You can dress it up with different frostings, add chocolate ganache, or even serve it with a scoop of Ice Cream. What I love most about this particular Oreo cake recipe is how forgiving it is. I’ve messed up a time or two (we’ll get to that!), and it still turned out wonderfully. It’s the perfect balance of impressive presentation and down-to-earth deliciousness, and that’s a winning combination in my book. It’s a recipe that feels special enough for a birthday but easy enough for a Tuesday night treat.
How to Make Oreo Cake
Quick Overview
This Oreo Cake Recipe is designed for maximum deliciousness with minimal fuss. We’ll be mixing up a rich chocolate batter, folding in plenty of chopped Oreos, and then baking it to gooey perfection. A simple, decadent frosting tops it all off. The beauty of this method lies in its straightforwardness; the results are always incredibly moist and packed with cookie goodness. It’s the kind of cake that looks like you spent hours on it, but in reality, it’s quite manageable for any home baker. You’ll be amazed at how easily this comes together!
Ingredients
For the Main Batter:
All-Purpose Flour: About 2 cups. Make sure it’s spooned and leveled, not scooped directly from the bag, to avoid a dense cake. I usually use unbleached all-purpose flour for a slightly better texture.
Granulated Sugar: 1 ¾ cups. This provides the sweetness that balances the cocoa.
Unsweetened Cocoa Powder: ¾ cup. Use a good quality one for that deep chocolate flavor. Natural or Dutch-processed both work, but Dutch-processed gives a darker color and smoother taste.
Baking Soda: 1 ½ teaspoons. This is crucial for lift!
Baking Powder: ¾ teaspoon. An extra little boost for that tender crumb.
Salt: ¾ teaspoon. Don’t skip this! It enhances all the other flavors.
Large Eggs: 2. At room temperature, please! It helps them incorporate better.
Milk: 1 cup. Whole milk is best for richness, but 2% works fine. I’ve even tested this with unsweetened almond milk, and it turned out surprisingly creamy!
Vegetable Oil: ½ cup. Or any neutral-flavored oil like canola or sunflower. This is key for moisture.
Vanilla Extract: 2 teaspoons. A good splash of vanilla really rounds out the chocolate flavor.
Hot Water or Hot Coffee: 1 cup. This is my secret weapon for an intensely moist and fudgy cake. Coffee actually deepens the chocolate flavor without making it taste like coffee. Trust me on this one!
Oreo Cookies: About 20-25 cookies, roughly chopped. Save a few whole ones for decoration if you like!
For the Filling (Optional, but highly recommended!):
Cream Cheese: 4 ounces, softened. This adds a lovely tang that cuts through the sweetness.
Powdered Sugar: ½ cup. For a smooth, sweet filling.
Crushed Oreos: ½ cup. More cookie goodness!
For the Glaze:
Powdered Sugar: 2 cups, sifted. Sifting prevents lumps and makes for a silky smooth glaze.
Cocoa Powder: ¼ cup, sifted. Again, sifting is your friend here.
Milk or Cream: 3-4 tablespoons. Adjust for desired consistency.
Vanilla Extract: ½ teaspoon.
Pinch of Salt.
Step-by-Step Instructions
Step 1: Preheat & Prep Pan
First things first, let’s get the oven ready. Preheat it to 350°F (175°C). You’ll want to grease and flour a 9×13 inch baking pan. I usually use a bit of butter or baking spray and then dust it with cocoa powder instead of flour – it helps prevent those tell-tale white marks on a dark cake. You can also line the bottom with parchment paper for extra insurance against sticking. This step is super important to ensure your gorgeous cake releases cleanly!
Step 2: Mix Dry Ingredients
Grab a large bowl and whisk together the flour, sugar, cocoa powder, baking soda, baking powder, and salt. Give it a really good whisk until everything is thoroughly combined and there are no lumps of cocoa. This ensures even distribution of the leavening agents, which means your cake will rise beautifully and evenly. I always give it an extra little whisk just to be sure!
Step 3: Mix Wet Ingredients
In a separate medium bowl, whisk together the eggs, milk, oil, and vanilla extract until well combined. You’ll notice the mixture will look a little pale yellow and creamy. Make sure your eggs and milk are at room temperature; they incorporate much more smoothly into the batter this way.
Step 4: Combine
Now, pour the wet ingredients into the bowl with the dry ingredients. Mix on low speed with an electric mixer (or by hand with a whisk) until *just* combined. Don’t overmix! Overmixing develops the gluten in the flour, which can lead to a tough cake. You’ll see some streaks of flour still – that’s okay. Now, carefully pour in the hot water or hot coffee. The batter will become quite thin, almost like soup. This is exactly what you want! Mix on low speed until everything is smooth and the batter is uniform. It should look glossy and rich.
Step 5: Prepare Filling
If you’re adding the cream cheese filling (and I highly recommend it!), in a small bowl, beat the softened cream cheese until smooth. Then, beat in the powdered sugar until combined. Fold in the crushed Oreos. It will be a thick, creamy mixture. This step is super easy and adds another delicious layer of flavor and texture.
Step 6: Layer & Swirl
Pour about half of the chocolate batter into your prepared baking pan. Dollop spoonfuls of the cream cheese mixture evenly over the batter. Then, pour the remaining batter over the top. If you want those pretty swirls, you can gently run a knife or skewer through the batter to marble the filling slightly. Don’t over-swirl, or it will all just blend together. You want distinct pockets of the cream cheese filling.
Step 7: Bake
Place the pan in your preheated oven and bake for 30-35 minutes, or until a wooden skewer or toothpick inserted into the center comes out with moist crumbs attached, but no wet batter. Be careful not to overbake! I usually start checking around the 30-minute mark because oven temperatures can vary. A slightly underbaked cake is always better than an overbaked, dry one, especially with this recipe.
Step 8: Cool & Glaze
Once baked, remove the cake from the oven and let it cool in the pan on a wire rack for at least 20-30 minutes. This is important for the cake to set properly. While it’s cooling, whip up the glaze. In a medium bowl, whisk together the sifted powdered sugar, sifted cocoa powder, vanilla extract, and a pinch of salt. Gradually add the milk or cream, one tablespoon at a time, whisking until you reach a smooth, pourable consistency. You want it thick enough to coat the cake but thin enough to drizzle easily. Once the cake is mostly cooled, pour the glaze over the top, spreading it gently to cover the surface. You can even sprinkle some extra chopped Oreos or whole cookies on top while the glaze is still wet.
Step 9: Slice & Serve
Let the glaze set for at least another 15-20 minutes before slicing. This cake is best served at room temperature. Use a sharp knife dipped in hot water and wiped dry between slices for the cleanest cuts. Enjoy every single bite!
What to Serve It With
This Oreo cake is pretty magnificent on its own, but it can also be styled for various occasions. For breakfast, a thin drizzle of the glaze is perfect, and I love pairing it with a strong cup of coffee. The slight bitterness of the coffee really cuts through the sweetness of the cake and the cookies. For a more elegant brunch, I like to serve it with a dollop of fresh whipped cream and a few fresh berries – the bright tang of raspberries or strawberries is a lovely contrast. You can also cut it into smaller, more delicate squares. As a celebratory dessert, it’s incredible served slightly warm with a scoop of good quality vanilla bean ice cream or even some salted caramel ice cream. A sprinkle of flaky sea salt on top of the ice cream can elevate it even further! And for those pure, unadulterated cozy snack moments, just grab a fork and dig in. Sometimes, I’ll just eat it straight from the pan with a glass of cold milk – pure childhood nostalgia!
Top Tips for Perfecting Your Oreo Cake
I’ve made this Oreo cake recipe more times than I can count, and over the years, I’ve picked up a few tricks that really make a difference. When it comes to the Oreo Prep, I find chopping them with a sharp knife gives you nice chunky bits, which I love. If you prefer a more uniform texture, you can pulse them in a food processor, but be careful not to turn them into dust – you want some pieces! For Mixing Advice, the biggest thing is not to overmix the batter once you add the flour. Mix until *just* combined, and then immediately add the hot liquid. This is key to a tender crumb. If you’re using a stand mixer, use the paddle attachment on low speed. For the Swirl Customization, I like to use a butter knife and gently drag it through the batter and filling in a figure-eight pattern. You can also just dollop the filling and then pour the batter over, letting them mingle a bit on their own. It’s hard to mess up! When it comes to Ingredient Swaps, if you’re out of buttermilk or don’t have any, you can easily make your own by adding 1 tablespoon of white vinegar or lemon juice to 1 cup of milk and letting it sit for 5 minutes – it works like a charm! For Baking Tips, always trust your oven, but also trust the toothpick test. If it comes out with moist crumbs, it’s done. A few moist crumbs are perfect; wet batter means it needs more time. If your oven tends to bake hot, you might want to reduce the temperature by 25 degrees F. For Glaze Variations, if you want a richer glaze, use heavy cream instead of milk. If you want a more intense chocolate flavor, add a tablespoon or two more cocoa powder, but you might need to adjust the milk accordingly. A little espresso powder mixed into the glaze can also add a wonderful depth. I’ve even added a touch of peppermint extract to the glaze for a mint-chocolate twist!
Storing and Reheating Tips
This Oreo cake is delicious fresh, but it also stores beautifully, making it perfect for making ahead. For Room Temperature Storage, once the glaze has set, you can cover the cake tightly with plastic wrap or aluminum foil. It should stay fresh and moist for about 2-3 days. Make sure it’s completely cooled before covering, otherwise, condensation can make it soggy. If you live in a warm climate or your kitchen is quite warm, refrigerating might be a better option. For Refrigerator Storage, place the cooled cake in an airtight container or wrap it very well. It will stay good in the fridge for up to 5 days. The texture might become a little firmer, but it’s easily remedied. For Freezer Instructions, if you want to keep this masterpiece for longer, wrap the cooled cake (un-glazed is usually best for freezing, but glazed works too if wrapped extremely well) tightly in a couple of layers of plastic wrap, then a layer of aluminum foil. It can be frozen for up to 2-3 months. To thaw, remove the foil and plastic wrap and let it thaw in the refrigerator overnight. For both fridge and freezer storage, I like to add the glaze just before serving if possible, especially if freezing, to keep it looking its best. If you’ve already glazed it, just make sure it’s very well-wrapped to prevent freezer burn or drying out. Reheating a slice is simple: microwave for about 15-30 seconds, or until warmed through. It brings back that wonderful moistness beautifully.
Frequently Asked Questions
Final Thoughts
So there you have it – my tried-and-true Oreo cake recipe! This isn’t just a dessert for me; it’s a box full of happy memories, a symbol of comfort, and proof that sometimes, the simplest ingredients can create something truly extraordinary. It’s the kind of cake that brings people together, sparking conversations and eliciting those delightful “mmm” sounds. If you’re looking for a chocolatey, cookie-filled dream that’s both easy to make and incredibly impressive, look no further. It’s a recipe that I’m confident will become a favorite in your kitchen too. For those of you who loved this, you might also enjoy my Fudgy Brownie Recipe or my No-Bake Chocolate Peanut Butter Pie. Happy baking, everyone! I can’t wait to hear how your Oreo cakes turn out in the comments below. Don’t forget to share your photos and any fun variations you try!