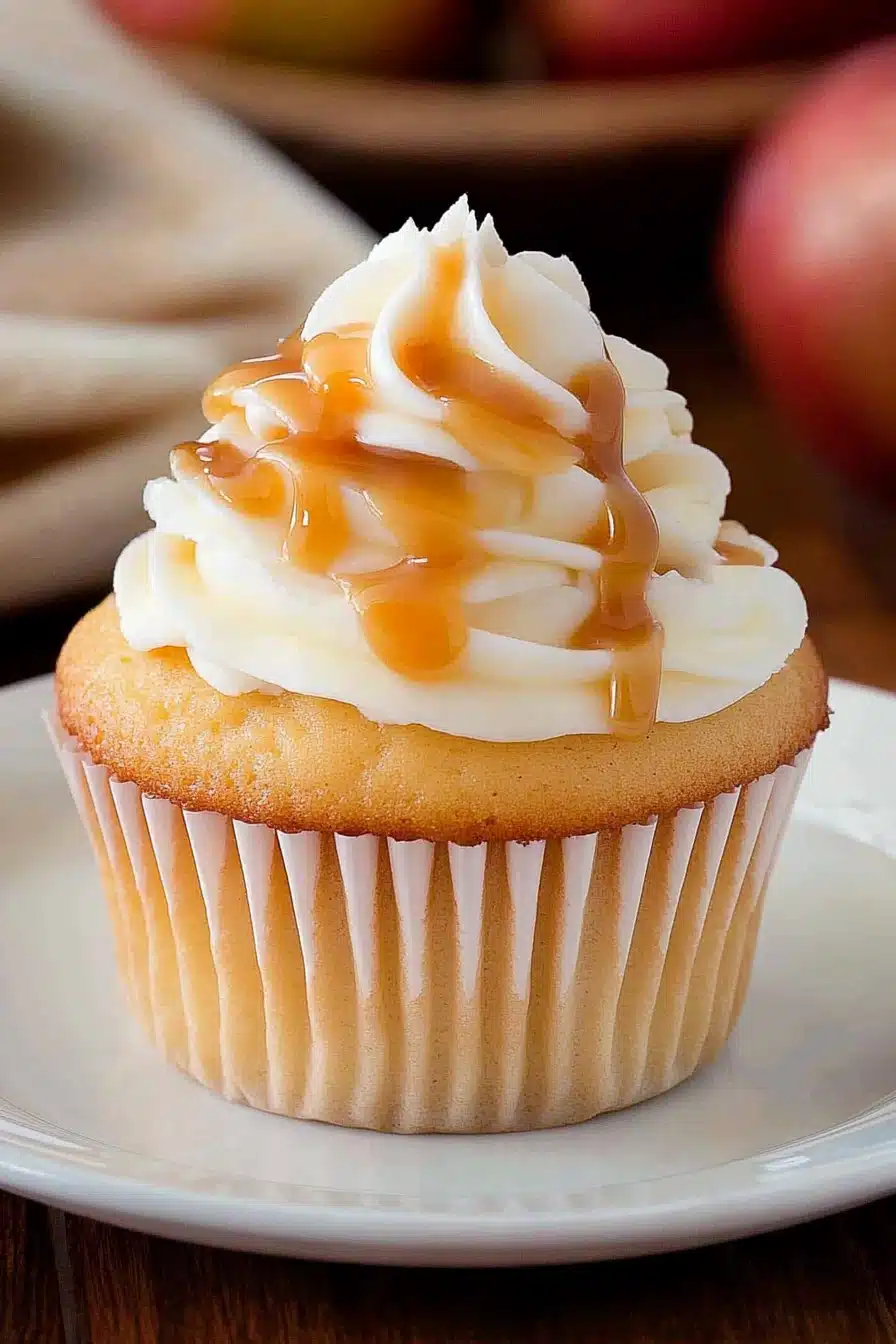
caramel cupcakes
There’s something magical about caramel that turns a simple bake into a little celebration. I’ll never forget the way the kitchen smells when the sugar first hits the pan—the air goes toffee-sweet and toasty, like a warm hug you can taste. These caramel cupcakes are my family’s answer to “easy, but feel special.” They’re moist, intensely buttery, and that salted caramel buttercream frosting? It’s the kind of crown you want to put on everything. I used to worry that making filling and glaze would be tricky, but with a few simple steps, you get a flawless swirl every time. This version is a bit like a Chocolate Chip Cookie meeting a classic vanilla cupcake at a pastry shop—comforting, crowd-pleasing, and unmistakably caramel-forward. If you’ve got a busy weeknight looming, this batch is a lifesaver on busy nights, and the kids actually ask for seconds. Trust me on this one, the moment you taste that first bite, you’ll say yes to seconds too.
What is caramel cupcake?
Caramel cupcakes are basically tender vanilla cupcakes filled with a gooey caramel center and topped with a lush Salted Caramel buttercream that tastes like candy in frosting form. Think of it as a caramel-forward vanilla cake in disguise, where the surprise center and glossy glaze take the flavor to a new level. The name comes from the star player—caramel—which is folded into the batter, piped as a tempting center, and finished with a rich, buttery glaze. It’s essentially a celebration in a paper liner: familiar, comforting, and a little fancy all at once. I love that they’re accessible for weekend bakers, but elegant enough for date-night dessert or a party tray. If you’ve ever made ordinary cupcakes and wondered how to give them a caramel glow, this recipe delivers that caramel-kissed magic in every bite.
Why you’ll love this recipe?
What I love most about this caramel cupcakes recipe is how approachable it stays while delivering big, bakery-worthy results. First, the flavor profile is pure caramel magic—the batter carries a gentle vanilla sweetness, the center reveals a lush caramel ooze, and the finish is balanced with a pinch of sea salt in the buttercream that keeps everything from tipping too sweet. Second, the process is genuinely simple. You’ll whisk dry and wet ingredients separately, swirl a caramel center into each cupcake, and finish with a glossy buttercream that you can whip up in minutes. Third, they’re budget-friendly. The ingredients are pantry staples, and a batch makes plenty for sharing without breaking the bank. Finally, they’re endlessly versatile. You can swap in Dulce De Leche for a deeper caramel, switch to heavier cream for a richer glaze, or tone down the sweetness with a touch more salt. This recipe has become my go-to whenever I want something comforting, impressive, and impossibly satisfying. What I love most about this caramel cupcakes experience is how the kitchen fills with smiles—the kind that come from knowing you’ve got something truly good on the way.
How do you make caramel cupcakes?
Quick Overview
This recipe keeps the process straightforward: you’re building a soft, vanilla base, piercing a caramel-filled center, and finishing with a buttery, salted caramel glaze. The secret is not to overmix the batter, which keeps the cupcakes light, and to temper the caramel so it swirls in without sinking. The result is a cupcake that feels special but not fussy, with a glossy finish and a center that’s deeply caramel-y. If you’re nervous about a filling, remember: a little caramel tucked inside a cupcake goes a long way—you’ll get that ooey-gooey moment in every bite without losing the cake’s structure. And yes, you can make the glaze a touch thicker or thinner depending on your preference for drape and shine. The method is forgiving, which makes this a favorite for both new bakers and seasoned hands who want quick, delicious results.
Ingredients
For the Main Batter:
- 2 cups (260 g) all-purpose flour, sifted
- 1 1/2 tsp baking powder
- 1/2 tsp baking soda
- 1/4 tsp salt
- 1/2 cup (115 g) unsalted butter, softened
- 1 cup (200 g) granulated sugar
- 2 large eggs, room temperature
- 2 tsp vanilla extract
- 1 cup (240 ml) buttermilk or unsweetened almond milk (I tested with almond milk and it made the center extra creamy)
For the Filling:
- 1/2 cup (120 ml) caramel sauce or Dulce de Leche, plus a touch extra for serving
- 1–2 tbsp heavy cream (to loosen if needed)
For the Glaze:
- 1 cup (120 g) powdered sugar, sifted
- 2–3 tbsp caramel sauce
- 2–3 tbsp heavy cream or milk
- Pinch of sea salt
Step-by-Step Instructions
Step 1: Preheat & Prep Pan
Preheat your oven to 350°F (175°C). Line a 12-cup muffin pan with paper liners. A quick spray with nonstick spray helps the liners release cleanly if you don’t have liners handy. If you plan to do a lot of filling, you can gently brush the liners with a little melted butter for extra ease of removal.
Step 2: Mix Dry Ingredients
In a medium bowl, whisk together flour, baking powder, baking soda, and salt until evenly distributed. This ensures the batter rises evenly and the caramel doesn’t stick to clumps of dry ingredients. A light whisk is plenty—no heavy mixing at this stage.
Step 3: Mix Wet Ingredients
In a separate bowl, beat the butter and sugar on medium speed until pale and fluffy. This takes about 2–3 minutes. Add the eggs one at a time, beating well after each. Scrape the bowl, then beat in the vanilla. With the mixer on low, alternate adding the dry ingredients and the buttermilk (or almond milk), starting and ending with dry ingredients. Mix just until combined; a few streaks are fine. Overmixing here makes the cupcakes tough.
Step 4: Combine
Once the batter comes together, give it a quick once-over by hand with a spatula to catch any pockets of flour. The texture should be smooth and fluffy, not dense. If you notice a bit of lumpiness, fold gently until you’re just incorporated.
Step 5: Prepare Filling
For the filling, whisk the caramel sauce with a splash of cream to loosen it so it can swirl smoothly into the cupcake center. If your caramel is thick or stiff, you can warm it a few seconds in the microwave to loosen, but be careful not to overheat. You want it pourable but not runny.
Step 6: Layer & Swirl
Fill each cup about one-third full with batter. Pipette or spoon a small dollop of caramel filling into the center of each cup, then top with more batter until cups are about two-thirds full. To swirl a little more caramel into the batter, give the top a light swirl with a toothpick or skewer—this creates a pretty marbling while ensuring that first bite reveals a gooey center.
Step 7: Bake
Bake for 18–20 minutes, or until a toothpick inserted into the center comes out clean with a few moist crumbs. If your oven runs hot, rotate the pan halfway through to promote even baking. Let the cupcakes rest in the pan for 5 minutes, then transfer to a wire rack to cool completely before glazing. Don’t rush this step—the glaze needs a cool surface to set properly and avoid sliding off a warm top.
Step 8: Cool & Glaze
While the cupcakes cool, whisk together the glaze ingredients until you have a smooth, pourable consistency. If it seems too thick, add a touch more cream; if it’s too thin, sprinkle in a little more powdered sugar. When the cupcakes are fully cooled, drizzle or swirl a generous layer of glaze over the tops. A light pinch of flaky sea salt on top of the glaze gives that perfect caramel bite you’ll crave with every bite.
Step 9: Slice & Serve
For a dramatic reveal, you can lightly slice a cupcake in half to show the caramel center—but I won’t judge you for simply serving them whole with a big smile. If you want to go extra fancy, place a small caramel disk on top or pipe a tiny rosette of buttercream to frame the caramel inside. Either way, these caramel cupcakes make a memorable finale to any meal or a bright afternoon treat with coffee.
What to Serve It With
These caramel cupcakes aren’t shy, so they pair beautifully with simple accompaniments that don’t compete with the caramel’s star presence. Here are a few ideas that fit different occasions:
For Breakfast: A bold, medium-roast coffee or a vanilla latte helps balance the sweetness, and a light dusting of cocoa on top of the frosting gives a café-worthy look without extra fuss.
For Brunch: Serve with warmed berries and a dollop of whipped cream at the table. A sparkling peach soda or a light prosecco works if you’re celebrating something special.
As Dessert: Pair with vanilla bean ice cream and a short espresso—classic, timeless, and deeply comforting. If you love a little more drama, drizzle extra caramel sauce around the plate for a restaurant-style finish.
For Cozy Snacks: A mug of hot chocolate or chai latte makes this treat feel like a little “me time” in the middle of a busy day. My family loves grabbing two cupcakes at a time with a warm beverage before movie night—a tiny ritual we’ve kept for years.
Top Tips for Perfecting Your Caramel Cupcakes
Here are practical tricks that have saved my batches more than once, organized by technique.
Batter Temperature: Bring ingredients to room temperature for a smoother emulsion. If the butter looks a bit stiff, give it 15–20 seconds in a warm spot or in a quick 10-second zap in the microwave (briefly) to nudge it to the right softness. This helps the sugar dissolve evenly and the batter stay airy.
Mixing Advice: Avoid overmixing once you add the flour. Stop as soon as you see no visible flour pockets. The goal is to keep the crumb tight but tender. If you whisk too aggressively, you’ll trap air and end up with air pockets or a coarse texture.
Swirl Customization: If you want more dramatic marbling, use a larger dollop of caramel in the center and then swirl with a clean toothpick in a circular motion. For a very refined look, drizzle caramel in a single spiral on the top after glazing.
Ingredient Swaps: You can swap buttermilk for plain yogurt thinned with a splash of water, or you can use half-and-half for a richer crumb. If you skip the dairy, almond milk is a good option, and you’ll notice the caramel glaze still sings with flavor. For a deeper caramel bite, add a teaspoon of brown sugar to the batter.
Baking Tips: Center rack baking is ideal for even heat. If your oven runs cool, rotate halfway, and if it runs hot, lower the temperature 25°F and extend the baking time slightly. Don’t be afraid to give the cupcakes a quick test with a toothpick; you’re aiming for a few moist crumbs rather than a clean, dry pick.
Glaze Variations: If you want a thicker glaze, add more powdered sugar and a touch less cream. For a glossier finish, whisk in a teaspoon of corn syrup or a splash more cream. If you’re not a fan of sea salt, you can leave it out, but I’d urge you to try a tiny pinch—the salt really helps the caramel flavors pop.
I’ve learned this trick after years of tinkering: let the glaze sit just a minute or two after mixing so the flavors meld. Then drizzle while the cupcakes are still slightly warm for an easier spread and a prettier drizzle.
Lessons learned: If you notice the center looks a little sunken, resist the urge to reopen the oven immediately. A quick peek is okay, but try not to open the door too often—the springiness comes from the batter lifting as it bakes, not from peeking often. If you overswirl the center, you’ll get a more pronounced caramel ripple; if you under-swirl, you’ll have a subtler center. Both are wonderful; it just depends on how dramatic you want that first bite to feel.
Storing and Reheating Tips
Caramel cupcakes stay delicious for a couple of days if stored properly, and they freeze surprisingly well if you want to keep a stash for busy weeks. Here’s how I handle them at home:
Room Temperature: Store in an airtight container at room temperature for up to 2 days. If the glaze starts to soften after a hot day, pop them in the lightly cooled oven for a few minutes to re-warm the glaze (no more than 5 minutes) and then re-glaze lightly for a refreshed shine.
Refrigerator Storage: They’ll keep for up to 4 days in an airtight container. Refrigeration can dry the cake a bit, so it’s best to bring them back to room temperature before serving and skip chilling the glaze if possible. If you must cold-store, cover the top with parchment before sealing to prevent the glaze from sticking to the container.
Freezer Instructions: Freeze unfrosted cupcakes for up to 2–3 months wrapped tightly in plastic and then in a freezer bag. Thaw in the fridge overnight and bring to room temperature before glazing. If you’ve already glazed, freeze unfrosted to preserve texture, then add the glaze after thawing for best results.
Glaze Timing Advice: If you plan to freeze, keep the glaze separate and apply after thawing. The glaze holds better for a longer time and can crack less if not frozen with the cupcake. If you’re refrigerating or freezing the cupcakes, you can still achieve a glossy top by warming slightly or re-adding a touch of glaze just before serving.
Quality indicators: moist crumb, a visible caramel center, a bright, shiny glaze, and a balanced sprinkle of salt on top. If any of those aren’t present, there’s a simple tweak you can make next bake—adjust the glaze ratio or swirl slightly more caramel into the center to heighten the aroma before serving.
Frequently Asked Questions
Final Thoughts
Caramel cupcakes have become one of those recipes I reach for when I want to share a little warmth with friends and family. They aren’t precious or fussy, but they feel celebratory—the perfect balance of homey and a touch indulgent. The moment you bite in and discover that caramel center, you’ll understand why this was a favorite in my kitchen long before it became a blog feature. These little cakes are proof that great flavor doesn’t have to come with a complicated process; with a few smart steps, you can coax a bakery-like finish from a standard home oven. If you try this, tell me how your swirl looks, and whether you prefer a pronounced center or a more uniform caramel sweetness throughout. Happy baking! And please drop a note in the comments to share your twists and favorite toppings. I love reading your variations and seeing how this caramel cupcakes recipe travels across kitchens and seasons.